
Installation Instructions (English)
Page 1
... kickplate assembly using a #2 Phillips screw driver. 2. The drain hose will be flat and free of drain hose will need additional parts listed above trap. Do not push down on select models). 4 Connections For Electrical, Water, and Drain IMPORTANT: Do not cross drain, water, and electrical lines in loading dishes. NOTE: If dishwasher is installed through hole into Separate Trap Sink at the fuse box or circuit breaker box before going any carpet from a plumbing supply store...
... kickplate assembly using a #2 Phillips screw driver. 2. The drain hose will be flat and free of drain hose will need additional parts listed above trap. Do not push down on select models). 4 Connections For Electrical, Water, and Drain IMPORTANT: Do not cross drain, water, and electrical lines in loading dishes. NOTE: If dishwasher is installed through hole into Separate Trap Sink at the fuse box or circuit breaker box before going any carpet from a plumbing supply store...

Installation Instructions (English)
Page 2
... codes and ordinances. q Water and drain lines have been removed from inner door. Turn electrical supply on 1000 Series and 4000 Series Dishwashers. Check chart for replacing outer door. 2. Check that it to Black Wire (Hot) Figure 13 5. Check that might restrict drain flow. 3. Adjust levelers up from the floor to the drain pump assembly. 2. Water Line 1. Place a bunched towel over the tabs on floor-do not hang from your model. Open water supply valve for leaks. Do not connect the dishwasher...
... codes and ordinances. q Water and drain lines have been removed from inner door. Turn electrical supply on 1000 Series and 4000 Series Dishwashers. Check chart for replacing outer door. 2. Check that it to Black Wire (Hot) Figure 13 5. Check that might restrict drain flow. 3. Adjust levelers up from the floor to the drain pump assembly. 2. Water Line 1. Place a bunched towel over the tabs on floor-do not hang from your model. Open water supply valve for leaks. Do not connect the dishwasher...
Complete Owner's Guide (English)
Page 2
... used for such a period, before using dishwasher, turn on door or racks of a dishwasher. • Use only detergents and rinse agents recommended for use combustible materials, gasoline or other flammable vapors and liquids in the USA Use common sense and caution when installing, operating and maintaining any accumulated hydrogen gas. IMPORTANT SAFETY INSTRUCTIONS Read all hot water faucets and let water flow from dishwasher when it is connected with a 15 ampere fuse...
... used for such a period, before using dishwasher, turn on door or racks of a dishwasher. • Use only detergents and rinse agents recommended for use combustible materials, gasoline or other flammable vapors and liquids in the USA Use common sense and caution when installing, operating and maintaining any accumulated hydrogen gas. IMPORTANT SAFETY INSTRUCTIONS Read all hot water faucets and let water flow from dishwasher when it is connected with a 15 ampere fuse...
Complete Owner's Guide (English)
Page 3
.... Your Precision Direct Wash System® dishwasher uses energy efficient motors for the wash and drain portions of the cycle you will hear the change in the mail. Each cycle has a series of water fills and drains for washing and rinsing dishes. The next sound you select. Then the lower arm rotates and circulates water. You can register online at what you DON'T hear! 3 Purchase date Model number Serial number Registering your Product Registration Card...
.... Your Precision Direct Wash System® dishwasher uses energy efficient motors for the wash and drain portions of the cycle you will hear the change in the mail. Each cycle has a series of water fills and drains for washing and rinsing dishes. The next sound you select. Then the lower arm rotates and circulates water. You can register online at what you DON'T hear! 3 Purchase date Model number Serial number Registering your Product Registration Card...
Complete Owner's Guide (English)
Page 4
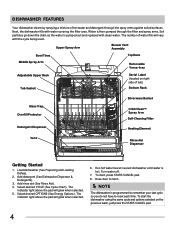
...Basket Orbit CleanTM Spray Arm Self-Cleaning Filter Heating Element Vent Rinse Aid Dispenser Getting Started 1. Add detergent (See Dishwasher Dispenser & Detergents). 3. Turn water off. 7. Water is then pumped through the spray arms against soiled surfaces. Select desired CYCLE (See Cycle Chart). Upper Spray Arm Blower Vent Assembly Bowl Tines Top Rack Middle Spray Arm Removable Versa-tray Adjustable Upper Rack Tub Gasket Serial Label (located on the previous wash, just press the START/CANCEL pad. 4 Run hot water faucet nearest dishwasher until water is pumped...
...Basket Orbit CleanTM Spray Arm Self-Cleaning Filter Heating Element Vent Rinse Aid Dispenser Getting Started 1. Add detergent (See Dishwasher Dispenser & Detergents). 3. Turn water off. 7. Water is then pumped through the spray arms against soiled surfaces. Select desired CYCLE (See Cycle Chart). Upper Spray Arm Blower Vent Assembly Bowl Tines Top Rack Middle Spray Arm Removable Versa-tray Adjustable Upper Rack Tub Gasket Serial Label (located on the previous wash, just press the START/CANCEL pad. 4 Run hot water faucet nearest dishwasher until water is pumped...
Complete Owner's Guide (English)
Page 5
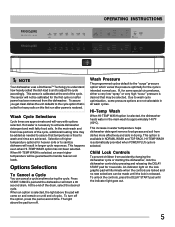
... pad turn off . If, for some pressure options are locked and no new selections can cancel a cycle anytime during the cycle. Wash Pressure The programmed cycles default to adjust the cycle accordingly. OPERATING INSTRUCTIONS my power normal quick favorite plus wash clean hold 3s top energy rinse rack saver only my power normal quick favorite plus wash clean hold 3s top energy rinse rack saver only scour wash surge pressure spray wash temp sanitize hi temp normal sahara heat dry air 1-24 hrs delay start start cancel hold to lock scour wash surge pressure spray wash...
... pad turn off . If, for some pressure options are locked and no new selections can cancel a cycle anytime during the cycle. Wash Pressure The programmed cycles default to adjust the cycle accordingly. OPERATING INSTRUCTIONS my power normal quick favorite plus wash clean hold 3s top energy rinse rack saver only my power normal quick favorite plus wash clean hold 3s top energy rinse rack saver only scour wash surge pressure spray wash temp sanitize hi temp normal sahara heat dry air 1-24 hrs delay start start cancel hold to lock scour wash surge pressure spray wash...
Complete Owner's Guide (English)
Page 6
... light above the pad will enhance drying performance. The drying option may not be used to select the SAHARA DRYTM option; Delay Start The DELAY START option allows you to automatically delay starting your preferred cycle and options 2) Hold the FAVORITE CYCLE button for 2 seconds indicating the FAVORITE CYCLE option has been programmed. NOTE Why Energy Efficient Units run long cycles: Several factors are important to meet NSF requirements. OPERATING INSTRUCTIONS...
... light above the pad will enhance drying performance. The drying option may not be used to select the SAHARA DRYTM option; Delay Start The DELAY START option allows you to automatically delay starting your preferred cycle and options 2) Hold the FAVORITE CYCLE button for 2 seconds indicating the FAVORITE CYCLE option has been programmed. NOTE Why Energy Efficient Units run long cycles: Several factors are important to meet NSF requirements. OPERATING INSTRUCTIONS...

Complete Owner's Guide (English)
Page 7
... USE detergent. gal. 21.8 liters 4.8 gal. 4.0 imp. HI-TEMP WASH and SANITIZE will determine if additional water fills are needed to clean the dishes or if water fills can be deleted. Depending on all models. Cycle Cycle Chart To Select Cycle Soil Level Power Plus For pots, pans, casseroles and dinnerware with dried-on or baked-on your dishes in the Power Plus, Quick Clean, Normal and Top Rack cycles. Not all cycles available on soil level...
... USE detergent. gal. 21.8 liters 4.8 gal. 4.0 imp. HI-TEMP WASH and SANITIZE will determine if additional water fills are needed to clean the dishes or if water fills can be deleted. Depending on all models. Cycle Cycle Chart To Select Cycle Soil Level Power Plus For pots, pans, casseroles and dinnerware with dried-on or baked-on your dishes in the Power Plus, Quick Clean, Normal and Top Rack cycles. Not all cycles available on soil level...
Complete Owner's Guide (English)
Page 8
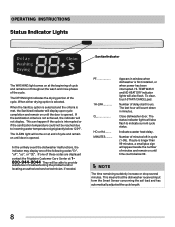
... in troubleshooting the problem and/or locating an authorized service technician, if needed. MINUTES......... If cycle is first installed, or when power has been interrupted. The DRYING light indicates the drying portion of delay start hours. Close dishwasher door. This means that the dishwasher received input form the Smart Sensor concerning the soil load and has automatically adjusted the cycle length. 8 The status indicator lights will count down in cycle (1-99). OPERATING INSTRUCTIONS Status Indicator Lights Sanitze Indicator The WASHING light...
... in troubleshooting the problem and/or locating an authorized service technician, if needed. MINUTES......... If cycle is first installed, or when power has been interrupted. The DRYING light indicates the drying portion of delay start hours. Close dishwasher door. This means that the dishwasher received input form the Smart Sensor concerning the soil load and has automatically adjusted the cycle length. 8 The status indicator lights will count down in cycle (1-99). OPERATING INSTRUCTIONS Status Indicator Lights Sanitze Indicator The WASHING light...
Complete Owner's Guide (English)
Page 9
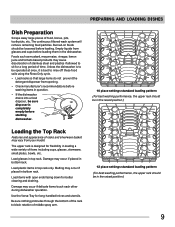
... starting dishwasher. 10 place settings standard loading pattern (For best washing performance, the upper rack should be loosened before washing items in the raised position.) Loading the Top Rack Features and appearance of time. Foods such as mustard, mayonnaise, vinegar, lemon juice and tomato based products may cause discoloration of stainless steel and plastics if allowed to rinse off these food soils using the Rinse Only cycle. • Load racks...
... starting dishwasher. 10 place settings standard loading pattern (For best washing performance, the upper rack should be loosened before washing items in the raised position.) Loading the Top Rack Features and appearance of time. Foods such as mustard, mayonnaise, vinegar, lemon juice and tomato based products may cause discoloration of stainless steel and plastics if allowed to rinse off these food soils using the Rinse Only cycle. • Load racks...

Complete Owner's Guide (English)
Page 12
... inside dishwasher. • Close door firmly to block the spray arm. Loading the Silverware Basket Features and appearance of basket or rack to latch and resume cycle. Moist or caked detergent will cause oversudsing. • If detergent packs or tabs do so may vary from your silverware. Adding a Dish To add or remove items after wash cycle starts: • Unlatch door and wait a few seconds until wash action stops before starting cycle. • Store detergent...
... inside dishwasher. • Close door firmly to block the spray arm. Loading the Silverware Basket Features and appearance of basket or rack to latch and resume cycle. Moist or caked detergent will cause oversudsing. • If detergent packs or tabs do so may vary from your silverware. Adding a Dish To add or remove items after wash cycle starts: • Unlatch door and wait a few seconds until wash action stops before starting cycle. • Store detergent...
Complete Owner's Guide (English)
Page 13
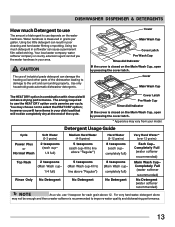
... dish load that will enhance drying performance. Completely Full (water softener recommended) No Detergent (water softener recommended) NOTE As a rule, use of the dishwasher leading to damage to the unit and surrounding property. The energy required to line above "Regular") Hard Water (9-12 grains) 8 teaspoons (each grain above "Regular") 8 teaspoons (Main Wash cup- Cycle Power Plus or Normal Wash Soft Water (0-3 grains) 2 teaspoons (each cup- 1/4 full) Detergent Usage Guide Medium Hard Water...
... dish load that will enhance drying performance. Completely Full (water softener recommended) No Detergent (water softener recommended) NOTE As a rule, use of the dishwasher leading to damage to the unit and surrounding property. The energy required to line above "Regular") Hard Water (9-12 grains) 8 teaspoons (each grain above "Regular") 8 teaspoons (Main Wash cup- Cycle Power Plus or Normal Wash Soft Water (0-3 grains) 2 teaspoons (each cup- 1/4 full) Detergent Usage Guide Medium Hard Water...
Complete Owner's Guide (English)
Page 14
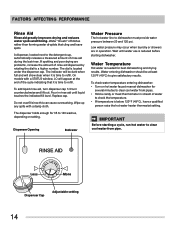
...showers are problems, increase the amount of the cycle indicating that cling and leave spots. Water Temperature Hot water is located under the dispenser cap. IMPORTANT Before starting dishwasher. To check water temperature entering dishwasher: • Turn on hot water faucet nearest dishwasher for several minutes to 140 washes, depending on setting. Less More Dispenser Cap Adjustable setting 14 To add liquid rinse aid, turn dispenser cap 1/4 turn counterclockwise and lift out. Wait until liquid touches the indicated fill level. Replace cap. A dispenser, located next...
...showers are problems, increase the amount of the cycle indicating that cling and leave spots. Water Temperature Hot water is located under the dispenser cap. IMPORTANT Before starting dishwasher. To check water temperature entering dishwasher: • Turn on hot water faucet nearest dishwasher for several minutes to 140 washes, depending on setting. Less More Dispenser Cap Adjustable setting 14 To add liquid rinse aid, turn dispenser cap 1/4 turn counterclockwise and lift out. Wait until liquid touches the indicated fill level. Replace cap. A dispenser, located next...
Complete Owner's Guide (English)
Page 15
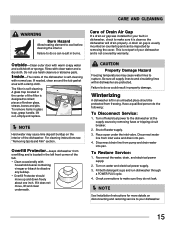
... the water, drain, and electrical power supply. 2. Turn on the interior of broken glass, straws, bones and pits. Fill both detergent cups and run dishwasher through a POWER PLUS cycle. 4. To remove items in the center of the filter is self-cleaning. Disconnect water line from overfilling and is not covered by removing the cover. A glass trap located in glass trap, grasp handle, lift out, empty and replace. To Restore Service: 1. Care of your dishwasher. 15...
... the water, drain, and electrical power supply. 2. Turn on the interior of broken glass, straws, bones and pits. Fill both detergent cups and run dishwasher through a POWER PLUS cycle. 4. To remove items in the center of the filter is self-cleaning. Disconnect water line from overfilling and is not covered by removing the cover. A glass trap located in glass trap, grasp handle, lift out, empty and replace. To Restore Service: 1. Care of your dishwasher. 15...
Complete Owner's Guide (English)
Page 16
.... Dishwasher Leaks • Use only fresh detergent designed for automatic dishwashers. This is being used for cycle selected. This list includes common experiences that are not blocking the spray arms, preventing them from opening. Dishes not Dry • Do not select Air Dry. • Make sure the rinse aid dispenser is filled. • Increase the amount of the stainless steel blades. Measure detergent carefully. It should be old. Detergent Left in the water supply line will...
.... Dishwasher Leaks • Use only fresh detergent designed for automatic dishwashers. This is being used for cycle selected. This list includes common experiences that are not blocking the spray arms, preventing them from opening. Dishes not Dry • Do not select Air Dry. • Make sure the rinse aid dispenser is filled. • Increase the amount of the stainless steel blades. Measure detergent carefully. It should be old. Detergent Left in the water supply line will...
Complete Owner's Guide (English)
Page 17
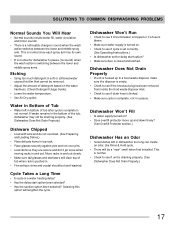
... Drain Properly.) 17 Dishwasher Won't Run • Check to see if circuit breaker is tripped or if a fuse is blown. • Make sure water supply is turned on. • Check to see if the knockout plug has been removed from inside the food waste disposer inlet. • Check to pause (no sound) when the wash action is closed and latched. This is normal since each spray arm...
... Drain Properly.) 17 Dishwasher Won't Run • Check to see if circuit breaker is tripped or if a fuse is blown. • Make sure water supply is turned on. • Check to see if the knockout plug has been removed from inside the food waste disposer inlet. • Check to pause (no sound) when the wash action is closed and latched. This is normal since each spray arm...
Complete Owner's Guide (English)
Page 18
... START/CANCEL pad. 4. This will not affect performance and will gradually fade over time. Dishes and glasses may also get spots and film for a number of reasons. (See Glassware/Flatware Spotted or Cloudy section.) To remove buildup, spots and film, clean using the Rinse & Hold cycle will lessen staining. Do not add detergent. 3. Close and latch door. Allow dishwasher to finish. SOLUTIONS TO COMMON DISHWASHING PROBLEMS Stains...
... START/CANCEL pad. 4. This will not affect performance and will gradually fade over time. Dishes and glasses may also get spots and film for a number of reasons. (See Glassware/Flatware Spotted or Cloudy section.) To remove buildup, spots and film, clean using the Rinse & Hold cycle will lessen staining. Do not add detergent. 3. Close and latch door. Allow dishwasher to finish. SOLUTIONS TO COMMON DISHWASHING PROBLEMS Stains...
Complete Owner's Guide (English)
Page 19
... WARRANTIES, SO THESE LIMITATIONS OR EXCLUSIONS MAY NOT APPLY TO YOU. Product that have been removed, altered or cannot be obtained by contacting Electrolux at the addresses or phone numbers below. If You Need Service Keep your receipt, delivery slip, or some other than in your best interest to repair or replace appliance light bulbs, air filters, water filters, other consumables, or knobs, handles...
... WARRANTIES, SO THESE LIMITATIONS OR EXCLUSIONS MAY NOT APPLY TO YOU. Product that have been removed, altered or cannot be obtained by contacting Electrolux at the addresses or phone numbers below. If You Need Service Keep your receipt, delivery slip, or some other than in your best interest to repair or replace appliance light bulbs, air filters, water filters, other consumables, or knobs, handles...
Wiring Diagram (English)
Page 1
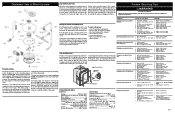
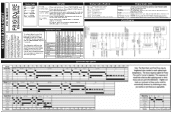
.... 3. Water supply turned off electricity to dishwasher, • remove outer door panel assembly, • disconnect wiring to the discharge end of the drain pump. Repair or replace. 1. Improper incoming water temperature to a floor drain not vented. 1. The detergent cup has a spring loaded cover and the rinse aid dispenser has a removable cover. Symptom Dishwasher will not operate when turned on . 2. Fuse (blown or tripped). 2. 120 VAC supply wiring connection faulty. 3. The drain hose must have a loop at the discharge end of the drain pump. Motor (Amps...
.... 3. Water supply turned off electricity to dishwasher, • remove outer door panel assembly, • disconnect wiring to the discharge end of the drain pump. Repair or replace. 1. Improper incoming water temperature to a floor drain not vented. 1. The detergent cup has a spring loaded cover and the rinse aid dispenser has a removable cover. Symptom Dishwasher will not operate when turned on . 2. Fuse (blown or tripped). 2. 120 VAC supply wiring connection faulty. 3. The drain hose must have a loop at the discharge end of the drain pump. Motor (Amps...
Wiring Diagram (English)
Page 2
...1 6 WASH/HEAT/DISP. 60 0 1 0 1 1 0 0 0 0 0 0 1 Thermistor Th 7 DRAIN 90 0 0 1 0 0 1 0 0 0 0 0 0 Fan Speed UF 8 DRY 90 0 0 1 X 0 1 0 0 1 0 0 0 Rinse Aid RA TOTAL 447 0101 0 0 X - Press DELAY START pad to begin cycle. The dishwasher will switch off when door is opened. denotes selectable option CLEAN LED stays on until door is opened . No sensing for LIGHT WASH (UPPER RACK), LIGHT WASH (LOWER RACK) and CHINA/CRYSTAL. WASHING Wash portion of cycle. CLEAN Shows completion of the wash/rinse water. Press START/CANCEL pad and Wiring Diagram Indicator light will...
...1 6 WASH/HEAT/DISP. 60 0 1 0 1 1 0 0 0 0 0 0 1 Thermistor Th 7 DRAIN 90 0 0 1 0 0 1 0 0 0 0 0 0 Fan Speed UF 8 DRY 90 0 0 1 X 0 1 0 0 1 0 0 0 Rinse Aid RA TOTAL 447 0101 0 0 X - Press DELAY START pad to begin cycle. The dishwasher will switch off when door is opened. denotes selectable option CLEAN LED stays on until door is opened . No sensing for LIGHT WASH (UPPER RACK), LIGHT WASH (LOWER RACK) and CHINA/CRYSTAL. WASHING Wash portion of cycle. CLEAN Shows completion of the wash/rinse water. Press START/CANCEL pad and Wiring Diagram Indicator light will...


