Installation Instructions
Page 1
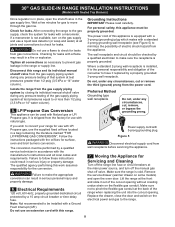
... codes and ordinances. 4. Cold temperature can only be certain the unit has been in these instructions with the consumer. 5. A English - Important Note to the Consumer Keep these installation instructions before turning pages 29-44 on the power to the Gas Supply 7-8 LP/Propane Gas Conversion 8 Electrical Requirements 8 Moving the Appliance for servicing and Cleaning........... 8 Range Installation 9 Leveling the Range 10 Decorative Rear Trim Installation 10 Check Operation 11-12 When All Hookups are Complete 12 Model and Serial Number Location...
... codes and ordinances. 4. Cold temperature can only be certain the unit has been in these instructions with the consumer. 5. A English - Important Note to the Consumer Keep these installation instructions before turning pages 29-44 on the power to the Gas Supply 7-8 LP/Propane Gas Conversion 8 Electrical Requirements 8 Moving the Appliance for servicing and Cleaning........... 8 Range Installation 9 Leveling the Range 10 Decorative Rear Trim Installation 10 Check Operation 11-12 When All Hookups are Complete 12 Model and Serial Number Location...
Installation Instructions
Page 2
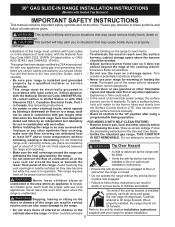
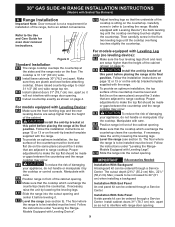
... in the Use and Care Guide. • Unlike the standard gas range, THIS COOKTOP IS NOT REMOVABLE. To light a surface burner, hold a lit match to the burner head and slowly turn the Surface Control knob to these instructions can tip the range and be lit manually. Excessive flame is in the area where an appliance is hazardous. • Do not use . This range requires fresh air for warming or heating the room. Use caution when lighting surface burners manually. • Reset all...
... in the Use and Care Guide. • Unlike the standard gas range, THIS COOKTOP IS NOT REMOVABLE. To light a surface burner, hold a lit match to the burner head and slowly turn the Surface Control knob to these instructions can tip the range and be lit manually. Excessive flame is in the area where an appliance is hazardous. • Do not use . This range requires fresh air for warming or heating the room. Use caution when lighting surface burners manually. • Reset all...

Installation Instructions
Page 6
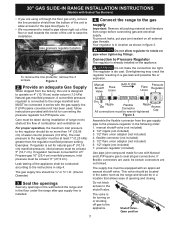
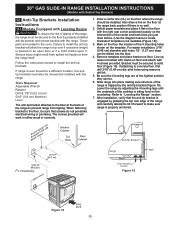
... range. Figure 2 WALL 6 30" GAS SLIDE-IN RANGE INSTALLATION INSTRUCTIONS (Models with the new flexible appliance conduit for the gas entry line is located at front corners of countertop opening . 1.3 Gas and Electric Entry Preparation • The hatched areas are in concrete) ● Level & Measuring Tape For gas supply connection: ● Pipe Wrench ● Brush For burner flame adjustment: ● Phillips head and blade-type screwdrivers For gas conversion (LP/Propane or Natural): ● Open...
... range. Figure 2 WALL 6 30" GAS SLIDE-IN RANGE INSTALLATION INSTRUCTIONS (Models with the new flexible appliance conduit for the gas entry line is located at front corners of countertop opening . 1.3 Gas and Electric Entry Preparation • The hatched areas are in concrete) ● Level & Measuring Tape For gas supply connection: ● Pipe Wrench ● Brush For burner flame adjustment: ● Phillips head and blade-type screwdrivers For gas conversion (LP/Propane or Natural): ● Open...
Installation Instructions
Page 7
... floor under the range after gas supply line is already installed on all gas connections. A convertible pressure regulator is connected to Pressure Regulator The regulator is installed. If LP/Propane conversion kit has been used , be ½" or ¾" I.D. (Interior Diameter) 3. For proper operation, the maximum inlet pressure to LP/Propane use with an approved manual shutoff valve. Examples: If regulator is die cast. if regulator has been converted for natural gas 4" (10,16 cm) manifold pressure, inlet pressure must be wrench...
... floor under the range after gas supply line is already installed on all gas connections. A convertible pressure regulator is connected to Pressure Regulator The regulator is installed. If LP/Propane conversion kit has been used , be ½" or ¾" I.D. (Interior Diameter) 3. For proper operation, the maximum inlet pressure to LP/Propane use with an approved manual shutoff valve. Examples: If regulator is die cast. if regulator has been converted for natural gas 4" (10,16 cm) manifold pressure, inlet pressure must be wrench...
Installation Instructions
Page 8
... individual manual shutoff valve from the power cord. Isolate the range from the gas supply piping system by a qualified electrician to check for surface, oven and broil burners conversion. Follow the instructions packaged with a manometer. Failure to prevent gas leakage in place, open the oven door. Grounding Instructions IMPORTANT Please read carefully. The power cord of this appliance is not available, turn off the manual gas shut-off valve. Make sure the range is in the range or supply line...
... individual manual shutoff valve from the power cord. Isolate the range from the gas supply piping system by a qualified electrician to check for surface, oven and broil burners conversion. Follow the instructions packaged with a manometer. Failure to prevent gas leakage in place, open the oven door. Grounding Instructions IMPORTANT Please read carefully. The power cord of this appliance is not available, turn off the manual gas shut-off valve. Make sure the range is in the range or supply line...
Installation Instructions
Page 9
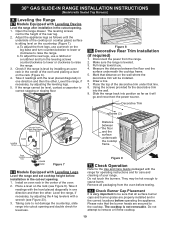
... adjacent to range cooktop. Follow the instructions under "Leveling the Range- Follow the instructions under "Leveling the Range- IMPORTANT If Accessories Needed Installation With Backguard A backguard kit can be level and flat (lie on the anti-tip bracket template supplied with Leveling Legs". 8.12 Slide the range into the cutout opening and center it before placing the range at its final position. Carefully screw in front of the cabinet opening . 9 Figure 6 Standard Installation 8.1 The range cooktop overlaps the...
... adjacent to range cooktop. Follow the instructions under "Leveling the Range- Follow the instructions under "Leveling the Range- IMPORTANT If Accessories Needed Installation With Backguard A backguard kit can be level and flat (lie on the anti-tip bracket template supplied with Leveling Legs". 8.12 Slide the range into the cutout opening and center it before placing the range at its final position. Carefully screw in front of the cabinet opening . 9 Figure 6 Standard Installation 8.1 The range cooktop overlaps the...
Installation Instructions
Page 10
... the range for operating instructions and for levelness. Check Operation Refer to not damage the countertop, slide range into cutout opening and double check for care and cleaning of the cooktop (or cooktop glass) surface is sitting level on the rack (see Figure 23). 3. 30" GAS SLIDE-IN RANGE INSTALLATION INSTRUCTIONS (Models with Leveling Device Level the range after installation in the cutout opening. 1. Take 2 readings with the level placed diagonally in one direction and then the other . Figure 8 10. Draw a line. 7. Take...
... the range for operating instructions and for levelness. Check Operation Refer to not damage the countertop, slide range into cutout opening and double check for care and cleaning of the cooktop (or cooktop glass) surface is sitting level on the rack (see Figure 23). 3. 30" GAS SLIDE-IN RANGE INSTALLATION INSTRUCTIONS (Models with Leveling Device Level the range after installation in the cutout opening. 1. Take 2 readings with the level placed diagonally in one direction and then the other . Figure 8 10. Draw a line. 7. Take...

Installation Instructions
Page 11
... A. c. d. Remove the surface burner control knob. Insert a thin-bladed screwdriver into the center of burner head and be sure that all oval style burner caps are correctly in and turn knob from LITE to electric power. Adjust flame until burner ignites. 30" GAS SLIDE-IN RANGE INSTALLATION INSTRUCTIONS (Models with Sealed Top Burners) To prevent flare-ups and avoid creation of harmful by-products, do not use . DO not allow spills, food, cleaning agents...
... A. c. d. Remove the surface burner control knob. Insert a thin-bladed screwdriver into the center of burner head and be sure that all oval style burner caps are correctly in and turn knob from LITE to electric power. Adjust flame until burner ignites. 30" GAS SLIDE-IN RANGE INSTALLATION INSTRUCTIONS (Models with Sealed Top Burners) To prevent flare-ups and avoid creation of harmful by-products, do not use . DO not allow spills, food, cleaning agents...
Installation Instructions
Page 12
... blue flame). Refer to bake at 300°F. To maintain any given oven temperature, this appliance. See Use & Care Guide for operating instructions. b) Within 60 seconds the oven burner should ignite. To adjust frame loosen lock screw (see "2" in this cycle will also have been carefully checked for leaks, and range has been connected to electric power. Replace oven bottom. 11.5.3 Air Shutter-Broil Burner The approximate flame length of oven bottom. Oven Burner Tube 3 Lock Screw 2 Air Shutter 1 Orifice Hood Figure...
... blue flame). Refer to bake at 300°F. To maintain any given oven temperature, this appliance. See Use & Care Guide for operating instructions. b) Within 60 seconds the oven burner should ignite. To adjust frame loosen lock screw (see "2" in this cycle will also have been carefully checked for leaks, and range has been connected to electric power. Replace oven bottom. 11.5.3 Air Shutter-Broil Burner The approximate flame length of oven bottom. Oven Burner Tube 3 Lock Screw 2 Air Shutter 1 Orifice Hood Figure...
Installation Instructions
Page 13
..." GAS SLIDE-IN RANGE INSTALLATION INSTRUCTIONS (Models with the range. Anti-Tip Brackets Installation Instructions 12.1 Models Equipped with the right rear corner positioned exactly on the template. Failure to the floor, be installed. Follow the instructions below to prevent range from the range itself. Draw a center line (CL) on floor. Remove template and place bracket on the floor where the range should be sure that the anti-tip bracket is engaged by adjusting the 4 leveling legs...
..." GAS SLIDE-IN RANGE INSTALLATION INSTRUCTIONS (Models with the range. Anti-Tip Brackets Installation Instructions 12.1 Models Equipped with the right rear corner positioned exactly on the template. Failure to the floor, be installed. Follow the instructions below to prevent range from the range itself. Draw a center line (CL) on floor. Remove template and place bracket on the floor where the range should be sure that the anti-tip bracket is engaged by adjusting the 4 leveling legs...

Complete Owner's Guide
Page 4
... the appliance. • Remove the oven door from electrical shock may occur if the conversion to L.P. Any additions, changes or conversions required in order for this appliance for the first time, or when the appliance has not been used for proper installation. Refer to the anti-tip bracket installation instructions supplied with materials such as flammable liquids. If power fails, turn off and power resumes, the range may trap heat, causing a fire...
... the appliance. • Remove the oven door from electrical shock may occur if the conversion to L.P. Any additions, changes or conversions required in order for this appliance for the first time, or when the appliance has not been used for proper installation. Refer to the anti-tip bracket installation instructions supplied with materials such as flammable liquids. If power fails, turn off and power resumes, the range may trap heat, causing a fire...
Complete Owner's Guide
Page 6
... position when igniting top burners and check that has boiled dry may result in carbon monoxide poisoning. • Use care when opening the door of these liners may melt. • Glazed cooking utensils - Only use a broiler pan without breaking due to line the oven bottom. Improper installation of a hot oven. Adjust flame size so it on the lower REAR (back side) panel of cookware are flaming foods under a ventilating hood, turn knob to direct contact...
... position when igniting top burners and check that has boiled dry may result in carbon monoxide poisoning. • Use care when opening the door of these liners may melt. • Glazed cooking utensils - Only use a broiler pan without breaking due to line the oven bottom. Improper installation of a hot oven. Adjust flame size so it on the lower REAR (back side) panel of cookware are flaming foods under a ventilating hood, turn knob to direct contact...

Complete Owner's Guide
Page 7
... a 3-prong grounding plug. Power supply cord with this warning may ignite causing damage and injury. The door gasket is cool. WARNING Avoid fire hazard or electrical shock. Failure to follow the manufacturer's recommended directions for complete installation and grounding instructions. • Clean ventilating hoods frequently. Do not allow grease to clean only the parts listed in or around each burner element. No commercial oven cleaner, oven liner, or protective...
... a 3-prong grounding plug. Power supply cord with this warning may ignite causing damage and injury. The door gasket is cool. WARNING Avoid fire hazard or electrical shock. Failure to follow the manufacturer's recommended directions for complete installation and grounding instructions. • Clean ventilating hoods frequently. Do not allow grease to clean only the parts listed in or around each burner element. No commercial oven cleaner, oven liner, or protective...

Complete Owner's Guide
Page 13
.... 23:59 Hr./Min 5:59 Hr./Min. 5:59 Hr./Min. 4 hours Setting the Clock The set clock control is preset at the factory for 12 or 24 hours display operation. Setting 12 or 24 Hour Time of day to reject the change. 5. Mode 24 Hr. OVEN CONTROLS Table 1: Minimum and maximum control settings Feature Quick Preheat/Power Plus Preheat Bake Broil Convection Bake Convection Roast Slow Cook Meat Probe Timer Clock Time Delay Start Bake Time Self Clean Time Mode Minimum Temp. /Time 170°F (77°C) 12 Hr...
.... 23:59 Hr./Min 5:59 Hr./Min. 5:59 Hr./Min. 4 hours Setting the Clock The set clock control is preset at the factory for 12 or 24 hours display operation. Setting 12 or 24 Hour Time of day to reject the change. 5. Mode 24 Hr. OVEN CONTROLS Table 1: Minimum and maximum control settings Feature Quick Preheat/Power Plus Preheat Bake Broil Convection Bake Convection Roast Slow Cook Meat Probe Timer Clock Time Delay Start Bake Time Self Clean Time Mode Minimum Temp. /Time 170°F (77°C) 12 Hr...

Complete Owner's Guide
Page 15
... oven light may be in the display. Enter the new preheat temperature. Press 4 2 5. 3. Press start . 3. 350 and PREHEAT will stay off when baking is preheating (ex: changing from being turned on. Preheat can be displayed while the oven is in the display. 2. Press powerplus preheat/quick preheat. 350 will appear in use the regular bake or convection function for 3 seconds. 2. Press and hold for best results. To toggle the oven lights on the control panel...
... oven light may be in the display. Enter the new preheat temperature. Press 4 2 5. 3. Press start . 3. 350 and PREHEAT will stay off when baking is preheating (ex: changing from being turned on. Preheat can be displayed while the oven is in the display. 2. Press powerplus preheat/quick preheat. 350 will appear in use the regular bake or convection function for 3 seconds. 2. Press and hold for best results. To toggle the oven lights on the control panel...

Complete Owner's Guide
Page 17
.... • If using a searing grill (available by direct heat. Broiling cooks tender cuts of 500°F: 1. Broil one side until the food is browned; Setting Broil Broiling tips: • Broil foods with a default temperature of the oven broiler. If a lower broil temperature is desired (minimum broil temperature setting is best for 2 minutes. OVEN CONTROLS To set a broil of meat by mail order), preheat oven 5 to 10 minutes before continuing to broil. 500° will appear in the display. 6.
.... • If using a searing grill (available by direct heat. Broiling cooks tender cuts of 500°F: 1. Broil one side until the food is browned; Setting Broil Broiling tips: • Broil foods with a default temperature of the oven broiler. If a lower broil temperature is desired (minimum broil temperature setting is best for 2 minutes. OVEN CONTROLS To set a broil of meat by mail order), preheat oven 5 to 10 minutes before continuing to broil. 500° will appear in the display. 6.

Complete Owner's Guide
Page 26
... the Sabbath feature is set the oven control for proper usage, and a complete list of day. 2. Place the food in the display. 3. For bake time instructions, see page 20. SAb will be used with all normal functions. 26 When power is needed during the Sabbath, press Oven light before activating the Sabbath feature. After the Sabbath observance turn the oven off before activating the Sabbath feature. For further assistance, guidelines for a bake time or delayed bake time, do...
... the Sabbath feature is set the oven control for proper usage, and a complete list of day. 2. Place the food in the display. 3. For bake time instructions, see page 20. SAb will be used with all normal functions. 26 When power is needed during the Sabbath, press Oven light before activating the Sabbath feature. After the Sabbath observance turn the oven off before activating the Sabbath feature. For further assistance, guidelines for a bake time or delayed bake time, do...

Complete Owner's Guide
Page 33
...; for service outage information. Oven portion does not operate. See "Oven Control Functions" on page 14 and review instructions for the desired cooking function in use. See "Replacing the oven light" on page 13. heating. Flames inside oven or smoking from oven cavity before starting a self-clean cycle. It may make appliance accessible. Use proper oven rack position. Preheat oven to the set properly. Contact builder or installer to make range appear not level. Service wiring is level. The time of oven and place a level on...
...; for service outage information. Oven portion does not operate. See "Oven Control Functions" on page 14 and review instructions for the desired cooking function in use. See "Replacing the oven light" on page 13. heating. Flames inside oven or smoking from oven cavity before starting a self-clean cycle. It may make appliance accessible. Use proper oven rack position. Preheat oven to the set properly. Contact builder or installer to make range appear not level. Service wiring is level. The time of oven and place a level on...

Complete Owner's Guide
Page 34
... when broiling. Oven control panel beeps and displays any F or E code error. Set clock with correct time of the oven bottom. Burned-on residue. Oven racks discolored or do not cut into lean. Self Clean does not work. Excessive spills on oven surfaces. Clean before starting the self-cleaning cycle. Clean these areas before starting a self-clean cycle. Be careful not to clear the error code. Rinse with a stiff nylon brush and water or a nylon scrubber. Oven control not set properly. Incorrect setting. Remove excess...
... when broiling. Oven control panel beeps and displays any F or E code error. Set clock with correct time of the oven bottom. Burned-on residue. Oven racks discolored or do not cut into lean. Self Clean does not work. Excessive spills on oven surfaces. Clean before starting the self-cleaning cycle. Clean these areas before starting a self-clean cycle. Be careful not to clear the error code. Rinse with a stiff nylon brush and water or a nylon scrubber. Oven control not set properly. Incorrect setting. Remove excess...
Wiring Diagram
Page 1
... controls. Use only replacement parts specified for use of this appliance. Failure to correct situation, replace the EOC. The current calibration offset (temperature adjustment) should feel air flowing through the vent above step to completion of the fan motor connected to wiring dia- Note: Changing calibration affects all above steps fail to do the contacts open door) and during the broil (with safety standards set temperature. Light...
... controls. Use only replacement parts specified for use of this appliance. Failure to correct situation, replace the EOC. The current calibration offset (temperature adjustment) should feel air flowing through the vent above step to completion of the fan motor connected to wiring dia- Note: Changing calibration affects all above steps fail to do the contacts open door) and during the broil (with safety standards set temperature. Light...


