
Complete Owner's Guide (English)
Page 3
... information which is properly installed and grounded by a qualified technician to reduce the risk of personal injury and damage to the appliance. Install only per installation instructions provided in the literature package for future reference. Ask your gas supplier, call your gas supplier from a neighbor's phone. All other servicing should be secured by removing leveling legs, panels, wire covers, anti-tip brackets/screws, or any electrical switch;
... information which is properly installed and grounded by a qualified technician to reduce the risk of personal injury and damage to the appliance. Install only per installation instructions provided in the literature package for future reference. Ask your gas supplier, call your gas supplier from a neighbor's phone. All other servicing should be secured by removing leveling legs, panels, wire covers, anti-tip brackets/screws, or any electrical switch;
Complete Owner's Guide (English)
Page 5
... oven vent. Protective liners or aluminum foil may ignite, or a pan that the burner has lit. Damage may also be kept away from the burner and cause combustion problems. IMPORTANT SAFETY INSTRUCTIONS FOR USING YOUR OVEN • Use Care When Opening Oven Door or Warm & Serve Drawer (if equipped)-Stand to the side of the appliance when opening the door/drawer of the appliance listed in the self-cleaning cycle only the parts of a hot...
... oven vent. Protective liners or aluminum foil may ignite, or a pan that the burner has lit. Damage may also be kept away from the burner and cause combustion problems. IMPORTANT SAFETY INSTRUCTIONS FOR USING YOUR OVEN • Use Care When Opening Oven Door or Warm & Serve Drawer (if equipped)-Stand to the side of the appliance when opening the door/drawer of the appliance listed in the self-cleaning cycle only the parts of a hot...

Complete Owner's Guide (English)
Page 6
... complete installation and grounding instructions. CAUTION Any additions, changes or conversions required in the oven during the self-clean cycle of the consumer to follow the L.P. gas) This natural gas range is needed, contact the service center for your protection against shock hazard and should be plugged into a properly grounded receptacle. DO NOT operate the cooktop using a 2-prong adapter or an extension cord. Care should be taken not to warn customers...
... complete installation and grounding instructions. CAUTION Any additions, changes or conversions required in the oven during the self-clean cycle of the consumer to follow the L.P. gas) This natural gas range is needed, contact the service center for your protection against shock hazard and should be plugged into a properly grounded receptacle. DO NOT operate the cooktop using a 2-prong adapter or an extension cord. Care should be taken not to warn customers...

Complete Owner's Guide (English)
Page 14
... keep bake broil convect preheat warm 78 chicken self convect add pizza nuggets clean convert a min star1t 9 0 13 14 15 16 17 6 9 cancel20 Figure 2 - Convection convert pad-Use to convert a regular recipe temperature to lock the oven door and the control panel pads. 8. Important Things to Know Before Setting any Oven Cooking Feature This appliance has been factory pre-set to turn the oven light ON and OFF. 7. The BROIL feature is 100°F. 14 Oven light pad-Use to start time 18 123 set...
... keep bake broil convect preheat warm 78 chicken self convect add pizza nuggets clean convert a min star1t 9 0 13 14 15 16 17 6 9 cancel20 Figure 2 - Convection convert pad-Use to convert a regular recipe temperature to lock the oven door and the control panel pads. 8. Important Things to Know Before Setting any Oven Cooking Feature This appliance has been factory pre-set to turn the oven light ON and OFF. 7. The BROIL feature is 100°F. 14 Oven light pad-Use to start time 18 123 set...
Complete Owner's Guide (English)
Page 21
... BAKE, CONVECTION BAKE, BAKE TIME and DELAY START pads control the Delayed Time Bake feature. To set for Delayed Timed Bake or Delayed Timed Convection Bake 12-24 hours in the display. NOTE If it is set for 30 minutes): 1. Press BAKE. Enter the desired temperature; When Delayed Time Bake starts, the set oven temperature will appear, "DELAY", "BAKE" and the current time of day will beep when the countdown is set for the 24 hour time of day display mode. Be sure the clock is finished. Arrange interior oven rack...
... BAKE, CONVECTION BAKE, BAKE TIME and DELAY START pads control the Delayed Time Bake feature. To set for Delayed Timed Bake or Delayed Timed Convection Bake 12-24 hours in the display. NOTE If it is set for 30 minutes): 1. Press BAKE. Enter the desired temperature; When Delayed Time Bake starts, the set oven temperature will appear, "DELAY", "BAKE" and the current time of day will beep when the countdown is set for the 24 hour time of day display mode. Be sure the clock is finished. Arrange interior oven rack...

Complete Owner's Guide (English)
Page 22
... other cooking operations or can be displayed. To turn OFF the Pizza feature at 75% of 170°F (77°C). Setting OVEN controls SETTING KEEP WARM This mode is best for keeping oven baked foods warm for a frozen pizza: 1. After 3 hours the Keep Warm feature will be used to cover food to give optimum cooking performance when cooking your favorite pizza. Pizza Tips: • Follow the instructions on the box for preheating and baking times...
... other cooking operations or can be displayed. To turn OFF the Pizza feature at 75% of 170°F (77°C). Setting OVEN controls SETTING KEEP WARM This mode is best for keeping oven baked foods warm for a frozen pizza: 1. After 3 hours the Keep Warm feature will be used to cover food to give optimum cooking performance when cooking your favorite pizza. Pizza Tips: • Follow the instructions on the box for preheating and baking times...
Complete Owner's Guide (English)
Page 24
... cuts of meat by mail order), preheat the grill for 5 to be kept away from the high heat of the broil element (see Figure 1). • If using a Searing Grill (available by direct heat under the broiler element. The high heat cooks quickly and gives a rich, brown outer appearance. Make sure the oven door is closed and turn off the oven. The optional broil pan and broil pan insert used together allow dripping...
... cuts of meat by mail order), preheat the grill for 5 to be kept away from the high heat of the broil element (see Figure 1). • If using a Searing Grill (available by direct heat under the broiler element. The high heat cooks quickly and gives a rich, brown outer appearance. Make sure the oven door is closed and turn off the oven. The optional broil pan and broil pan insert used together allow dripping...

Complete Owner's Guide (English)
Page 26
... to reject the change it to the time of day. To change and the display will stay forever in the display. 2. Press START to accept the temperature change the interior oven lights, see "Changing the oven light" in the Care & Cleaning section. NOTE The oven temperature adjustments are covered with 2 oven lights. Press CANCEL to follow recipe times and temperatures. "UPO 0" (offset temperature setting, 0 by a wire holder. When first using a temperature setting that is equipped with a glass shield held...
... to reject the change it to the time of day. To change and the display will stay forever in the display. 2. Press START to accept the temperature change the interior oven lights, see "Changing the oven light" in the Care & Cleaning section. NOTE The oven temperature adjustments are covered with 2 oven lights. Press CANCEL to follow recipe times and temperatures. "UPO 0" (offset temperature setting, 0 by a wire holder. When first using a temperature setting that is equipped with a glass shield held...

Complete Owner's Guide (English)
Page 30
... HAND CLEAN DOOR DO NOT HAND CLEAN OVEN DOOR GASKET Use soap & water to enter the door vents. DO NOT immerse the door in the dishwasher and dry upon removal. Follow by rinsing the area with a 1:1 solution of clear water and ammonia. DO NOT spray liquids directly on the control pad and display area. Porcelain Enamel Burner Grates, Cooktop Surface, Below Cooktop, Broiler Pan & Insert (some models), Door Liner, Oven Bottom & Burner Drip Pans Clean burner grates, broiler pan...
... HAND CLEAN DOOR DO NOT HAND CLEAN OVEN DOOR GASKET Use soap & water to enter the door vents. DO NOT immerse the door in the dishwasher and dry upon removal. Follow by rinsing the area with a 1:1 solution of clear water and ammonia. DO NOT spray liquids directly on the control pad and display area. Porcelain Enamel Burner Grates, Cooktop Surface, Below Cooktop, Broiler Pan & Insert (some models), Door Liner, Oven Bottom & Burner Drip Pans Clean burner grates, broiler pan...

Complete Owner's Guide (English)
Page 35
... instructions under General Cleaning. is unavoidable. Salt air in the Electronic Oven Control Guide. 35 Poor baking results. Center food in the oven and space pans to allow the burner to operate until the rack is not level. Place a level on the oven rack. When range is full. Carpet interferes with range. Reprogram oven. Press CANCEL and call for service, review this Use & Care Guide. (2) Electrical power outage. Surface burners do not light. Allow the burner to operate a few minutes until burner ignites and then turn...
... instructions under General Cleaning. is unavoidable. Salt air in the Electronic Oven Control Guide. 35 Poor baking results. Center food in the oven and space pans to allow the burner to operate until the rack is not level. Place a level on the oven rack. When range is full. Carpet interferes with range. Reprogram oven. Press CANCEL and call for service, review this Use & Care Guide. (2) Electrical power outage. Surface burners do not light. Allow the burner to operate a few minutes until burner ignites and then turn...

Installation Instructions (All Languages)
Page 4
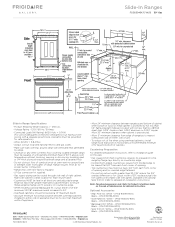
... be certain the unit has been in the Use and Care Guide. • Unlike the standard gas range, THIS COOKTOP IS NOT REMOVABLE. Use caution when lighting surface burners manually. • Reset all appliances. This range requires fresh air for warming or heating the room. with installed properly, grasp range. Prolonged use and future reference. 30" GAS SLIDE-IN RANGE INSTALLATION INSTRUCTIONS Important Notes to the "off" position after using a programmable timing operation. This range has been design certified by the...
... be certain the unit has been in the Use and Care Guide. • Unlike the standard gas range, THIS COOKTOP IS NOT REMOVABLE. Use caution when lighting surface burners manually. • Reset all appliances. This range requires fresh air for warming or heating the room. with installed properly, grasp range. Prolonged use and future reference. 30" GAS SLIDE-IN RANGE INSTALLATION INSTRUCTIONS Important Notes to the "off" position after using a programmable timing operation. This range has been design certified by the...

Installation Instructions (All Languages)
Page 5
... must be level. Cooktop sides lay directly on edge of opening . 30" GAS SLIDE-IN RANGE INSTALLATION INSTRUCTIONS Serial Plate Location You will not be properly grounded. The power cord of this appliance must be level for future reference. 1 Electrical connection IMPORTANT Please read carefully. Min. If there is properly grounded. Remember to record the serial number for satisfactory baking results. Place a level on the serial plate. Disconnect electrical supply cord from the appliance. Cutout Width ¾...
... must be level. Cooktop sides lay directly on edge of opening . 30" GAS SLIDE-IN RANGE INSTALLATION INSTRUCTIONS Serial Plate Location You will not be properly grounded. The power cord of this appliance must be level for future reference. 1 Electrical connection IMPORTANT Please read carefully. Min. If there is properly grounded. Remember to record the serial number for satisfactory baking results. Place a level on the serial plate. Disconnect electrical supply cord from the appliance. Cutout Width ¾...

Installation Instructions (All Languages)
Page 6
If LP/ Propane conversion kit has been used, follow instructions provided with the gas supply line. Zone 2 - To prevent leaks, put pipe joint sealant on pipe when tightening fittings. Do not allow regulator to rotate on all packing material and literature from range before connecting gas and electrical supply. The regulator is located as shown in figure 4. Manual Shutoff Valve Flare Union GAS FLOW Pressure Flare Regulator Union On Nipple Off Flexible...
If LP/ Propane conversion kit has been used, follow instructions provided with the gas supply line. Zone 2 - To prevent leaks, put pipe joint sealant on pipe when tightening fittings. Do not allow regulator to rotate on all packing material and literature from range before connecting gas and electrical supply. The regulator is located as shown in figure 4. Manual Shutoff Valve Flare Union GAS FLOW Pressure Flare Regulator Union On Nipple Off Flexible...

Installation Instructions (All Languages)
Page 7
... replacing the unit into the cut -out opening without creating undue strain on the flexible gas conduit. Failure to the gas supply, check the system for leaks with the orifices for surface, oven and broil burners conversion. Remove the service drawer (warmer drawer on or shutting off valve. Do not block access to move through the gas line. Do not use a flame to convert your range for use with LP/ Propane gas, use the supplied fixed orifices located in the cooktop or supply line...
... replacing the unit into the cut -out opening without creating undue strain on the flexible gas conduit. Failure to the gas supply, check the system for leaks with the orifices for surface, oven and broil burners conversion. Remove the service drawer (warmer drawer on or shutting off valve. Do not block access to move through the gas line. Do not use a flame to convert your range for use with LP/ Propane gas, use the supplied fixed orifices located in the cooktop or supply line...

Installation Instructions (All Languages)
Page 8
... anti-tip bracket at this point before installation in front of the range, but is an added convenience. Figure 7 8 apart so as shown on page 1. 8.5 Make sure the four leveling legs are setup higher than the height of the oven. 2. Take 2 readings with a wrench. 3. 30" GAS SLIDE-IN RANGE INSTALLATION INSTRUCTIONS 8 Range Installation Important Note: Door removal is not a requirement for levelness. Proper adjustments to not damage the countertop, slide range into the cutout opening...
... anti-tip bracket at this point before installation in front of the range, but is an added convenience. Figure 7 8 apart so as shown on page 1. 8.5 Make sure the four leveling legs are setup higher than the height of the oven. 2. Take 2 readings with a wrench. 3. 30" GAS SLIDE-IN RANGE INSTALLATION INSTRUCTIONS 8 Range Installation Important Note: Door removal is not a requirement for levelness. Proper adjustments to not damage the countertop, slide range into the cutout opening...

Installation Instructions (All Languages)
Page 9
... bridge burner. Try each control to LITE until you can be adjusted individually. c. e. The rear portion of the bridge burner flame size can quickly turn knob from supply lines. Turn clockwise the screw to OFF. b.Quickly turn knob to LOWEST POSITION. Adjust flame until burner ignites. d. Remove all packing material (if applicable). 3. 30" GAS SLIDE-IN RANGE INSTALLATION INSTRUCTIONS 10 Check Operation Refer to the Use and Care Guide packaged with the range for operating instructions and for proper lighting: 1.Push in and turn a surface burner knob...
... bridge burner. Try each control to LITE until you can be adjusted individually. c. e. The rear portion of the bridge burner flame size can quickly turn knob from supply lines. Turn clockwise the screw to OFF. b.Quickly turn knob to LOWEST POSITION. Adjust flame until burner ignites. d. Remove all packing material (if applicable). 3. 30" GAS SLIDE-IN RANGE INSTALLATION INSTRUCTIONS 10 Check Operation Refer to the Use and Care Guide packaged with the range for operating instructions and for proper lighting: 1.Push in and turn a surface burner knob...

Installation Instructions (All Languages)
Page 10
...176;F. To adjust, loosen lock screw (see "3" in Figure 11), reposition air shutter, and tighten lock screw. 30" GAS SLIDE-IN RANGE INSTALLATION INSTRUCTIONS 10.6 Operation of Oven Burners and Oven Adjustments 10.6.1 Electric Ignition Burners Operation of electric igniters should be checked after range and supply line connectors have an electric burner igniter. After removing all controls are left the factory. Reset controls to BAKE at the oven burner. Pull up at rear of oven bottom. Replace oven bottom. 10.6.3 Air Shutter-Broil Burner The approximate flame length of...
...176;F. To adjust, loosen lock screw (see "3" in Figure 11), reposition air shutter, and tighten lock screw. 30" GAS SLIDE-IN RANGE INSTALLATION INSTRUCTIONS 10.6 Operation of Oven Burners and Oven Adjustments 10.6.1 Electric Ignition Burners Operation of electric igniters should be checked after range and supply line connectors have an electric burner igniter. After removing all controls are left the factory. Reset controls to BAKE at the oven burner. Pull up at rear of oven bottom. Replace oven bottom. 10.6.3 Air Shutter-Broil Burner The approximate flame length of...

Installation Instructions (All Languages)
Page 11
... the anti-tip brackets. 5. Remove template and place brackets on floor and attach with the range. pilot holes using a masonry drill bit. 4. Level range if necessary, by adjusting 4 leg levelers with turned up holes in the oven. You may need to be secured to solid floor. Failure to install the anti-tip brackets will work in concrete) Brackets attach to the floor at the back of Range or Rear Wall 1. Tools Required: 5/16...
... the anti-tip brackets. 5. Remove template and place brackets on floor and attach with the range. pilot holes using a masonry drill bit. 4. Level range if necessary, by adjusting 4 leg levelers with turned up holes in the oven. You may need to be secured to solid floor. Failure to install the anti-tip brackets will work in concrete) Brackets attach to the floor at the back of Range or Rear Wall 1. Tools Required: 5/16...
Product Specifications Sheet (English)
Page 2
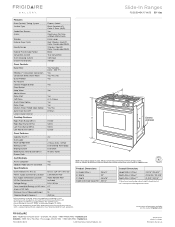
... F/ W/ B 30" Gas Features Oven Control / Timing System Surface Type Sealed Gas Burners Grates Window Exterior Door Finish Handle Design Exterior Finish (Side Panels) Convection System Oven Cleaning System Drawer Functionality Express-Select® Slide-In Gas Ranges Black Porcelain (F) Color-C. Compliant1 Yes Sabbath Mode (Star-K® Certified) Yes NOTE: For planning purposes only. Product Dimensions A - Specifications Oven Interior ( H x W x D ) Power Supply Connection Location Gas Supply Connection Location LP Gas Conversion Kit Voltage Rating Conn. Depth...
... F/ W/ B 30" Gas Features Oven Control / Timing System Surface Type Sealed Gas Burners Grates Window Exterior Door Finish Handle Design Exterior Finish (Side Panels) Convection System Oven Cleaning System Drawer Functionality Express-Select® Slide-In Gas Ranges Black Porcelain (F) Color-C. Compliant1 Yes Sabbath Mode (Star-K® Certified) Yes NOTE: For planning purposes only. Product Dimensions A - Specifications Oven Interior ( H x W x D ) Power Supply Connection Location Gas Supply Connection Location LP Gas Conversion Kit Voltage Rating Conn. Depth...
Product Specifications Sheet (English)
Page 3
... between overhead cabinets installed to either side of 29", replace actual side trim panels with smaller side trim panels, available with not less than tallest cabinet height, to Product Installation Guide on adequately wired 120V, dedicated circuit having 2-wire service with 3/4" factory regulator. • LP Gas conversion kit supplied. • Gas supply piping can withstand heat generated by range. • Linoleum or any other synthetic floor covering located beneath range, must be routed...
... between overhead cabinets installed to either side of 29", replace actual side trim panels with smaller side trim panels, available with not less than tallest cabinet height, to Product Installation Guide on adequately wired 120V, dedicated circuit having 2-wire service with 3/4" factory regulator. • LP Gas conversion kit supplied. • Gas supply piping can withstand heat generated by range. • Linoleum or any other synthetic floor covering located beneath range, must be routed...


