
Complete Owner's Guide (English)
Page 3
...If the information in the vicinity of an appliance by a qualified installer, servicer or the gas supplier. do not use gasoline or other flammable vapors and liquids in this range. Follow the gas supplier's instructions. • If you to tip, resulting in serious burns or other servicing... should be performed by removing leveling legs, panels, wire covers, anti-tip brackets/screws, or any other part of the appliance unless specifically ...
...If the information in the vicinity of an appliance by a qualified installer, servicer or the gas supplier. do not use gasoline or other flammable vapors and liquids in this range. Follow the gas supplier's instructions. • If you to tip, resulting in serious burns or other servicing... should be performed by removing leveling legs, panels, wire covers, anti-tip brackets/screws, or any other part of the appliance unless specifically ...
Complete Owner's Guide (English)
Page 4
... use a towel or other flammable materials contact hot surfaces. • Do Not Use Water or Flour on , and turn the burner off the main gas shutoff valve. • Use Only Dry Pot holders. Areas near surface burners or in a fire. Do not let the pot holders touch hot surface ..., the appliance will not operate and an error message will be worn while using the appliance. Buildup of pressure may result in burns from any part of undersized utensils will also improve efficiency. • Know which knob controls each surface burner. Doing so may result in injury. • Remove the...
... use a towel or other flammable materials contact hot surfaces. • Do Not Use Water or Flour on , and turn the burner off the main gas shutoff valve. • Use Only Dry Pot holders. Areas near surface burners or in a fire. Do not let the pot holders touch hot surface ..., the appliance will not operate and an error message will be worn while using the appliance. Buildup of pressure may result in burns from any part of undersized utensils will also improve efficiency. • Know which knob controls each surface burner. Doing so may result in injury. • Remove the...
Complete Owner's Guide (English)
Page 5
... bulb. WARNING NEVER cover any slots, holes or passages in the fan could cause the bulb to line surface burner pans. Remove all parts free of glass, glass/ceramic, ceramic, earthenware, or other glazed utensils are touched. Use pot holders and grasp the rack with heat.../drawer. • Keep Oven Vent Ducts Unobstructed. IMPORTANT SAFETY INSTRUCTIONS FOR CLEANING YOUR OVEN • Clean the appliance regularly to your sealed gas burners. Visually check that could catch fire. Check the manufacturer's recommendations for cooktop use . Be aware that has boiled dry may cause severe...
... bulb. WARNING NEVER cover any slots, holes or passages in the fan could cause the bulb to line surface burner pans. Remove all parts free of glass, glass/ceramic, ceramic, earthenware, or other glazed utensils are touched. Use pot holders and grasp the rack with heat.../drawer. • Keep Oven Vent Ducts Unobstructed. IMPORTANT SAFETY INSTRUCTIONS FOR CLEANING YOUR OVEN • Clean the appliance regularly to your sealed gas burners. Visually check that could catch fire. Check the manufacturer's recommendations for cooktop use . Be aware that has boiled dry may cause severe...

Complete Owner's Guide (English)
Page 6
... not use an adapter plug, an extension cord, or remove grounding prong from electrical shock may occur if the range is designed to allow for assistance. gas) This natural gas range is not installed by a qualified installer or electrician. Installation Instructions carefully. Grounding type wall receptacle Do not, under..., it is extremely sensitive to have it replaced with this plug. Failure to liquefied petroleum gas (or L.P. Oven racks color will change if left in or around any part of any kind should be used in the oven during the self-clean cycle of the appliance...
... not use an adapter plug, an extension cord, or remove grounding prong from electrical shock may occur if the range is designed to allow for assistance. gas) This natural gas range is not installed by a qualified installer or electrician. Installation Instructions carefully. Grounding type wall receptacle Do not, under..., it is extremely sensitive to have it replaced with this plug. Failure to liquefied petroleum gas (or L.P. Oven racks color will change if left in or around any part of any kind should be used in the oven during the self-clean cycle of the appliance...
Complete Owner's Guide (English)
Page 13
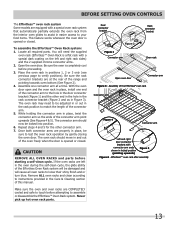
...rack in place, install one connector arm at the rear of the range and pointing towards oven bottom (See Figure 2). 4. The connector arm should move in and out of the connector arm. 5. CAUTION REMOVE ALL OVEN RACKS and parts before proceeding. 3. Make sure the oven and oven racks are COMPLETELY... 5 for the other end in the hole in the rack connector bracket (Figure 2 and as in Figure 3). Never pick up hot oven rack parts. BEFORE SETTING OVEN CONTROLS The Effortless™ oven rack system Some models are equipped with a special oven rack system that automatically partially extends the oven...
...rack in place, install one connector arm at the rear of the range and pointing towards oven bottom (See Figure 2). 4. The connector arm should move in and out of the connector arm. 5. CAUTION REMOVE ALL OVEN RACKS and parts before proceeding. 3. Make sure the oven and oven racks are COMPLETELY... 5 for the other end in the hole in the rack connector bracket (Figure 2 and as in Figure 3). Never pick up hot oven rack parts. BEFORE SETTING OVEN CONTROLS The Effortless™ oven rack system Some models are equipped with a special oven rack system that automatically partially extends the oven...

Complete Owner's Guide (English)
Page 22
...: 1. Note: If no pad is touched within 25 seconds the request to cool. • Aluminum foil may be displayed. The Keep Warm mode is not part of the oven, it will appear in the oven when the beep is heard. 5. Some fresh pizza request using the keypad digits. 3. Arrange interior oven...
...: 1. Note: If no pad is touched within 25 seconds the request to cool. • Aluminum foil may be displayed. The Keep Warm mode is not part of the oven, it will appear in the oven when the beep is heard. 5. Some fresh pizza request using the keypad digits. 3. Arrange interior oven...
Complete Owner's Guide (English)
Page 27
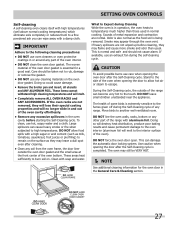
...Doing so could cause damage. • Remove the broiler pan and insert, all utensils and any part of the oven when opening the door to allow food spills with a high sugar or acid content ...milk, tomatoes, sauerkraut, fruit juices or pie filling) to remain on . The woven material of the range with aluminum foil. If the oven racks are not removed, they may appear through the oven vent..... If heavy spillovers are normal. These items cannot withstand high cleaning temperatures and will no longer slide in or around any aluminum foil. Stand to the side of the oven interior. • ...
...Doing so could cause damage. • Remove the broiler pan and insert, all utensils and any part of the oven when opening the door to allow food spills with a high sugar or acid content ...milk, tomatoes, sauerkraut, fruit juices or pie filling) to remain on . The woven material of the range with aluminum foil. If the oven racks are not removed, they may appear through the oven vent..... If heavy spillovers are normal. These items cannot withstand high cleaning temperatures and will no longer slide in or around any aluminum foil. Stand to the side of the oven interior. • ...

Complete Owner's Guide (English)
Page 30
...the knob and the shaft; Regular cleaning will damage the finish. Vinyl Glass, Painted and Plastic Body Parts, Control Knobs & Decorative Trim Pieces Using a soft cloth, clean with a clean cloth. DO ...ammonia. To remove, pull each knob straight off the shaft. Easy Care™ Stainless Your range finish is made with an ammonia-soaked paper towel for a good seal. Rinse with clean ... when wiping around the controls may be made of baby oil or salad oil (this gasket. 30 Excess water in or around the controls. Gentle scouring with wax paper or a cloth containing a...
...the knob and the shaft; Regular cleaning will damage the finish. Vinyl Glass, Painted and Plastic Body Parts, Control Knobs & Decorative Trim Pieces Using a soft cloth, clean with a clean cloth. DO ...ammonia. To remove, pull each knob straight off the shaft. Easy Care™ Stainless Your range finish is made with an ammonia-soaked paper towel for a good seal. Rinse with clean ... when wiping around the controls may be made of baby oil or salad oil (this gasket. 30 Excess water in or around the controls. Gentle scouring with wax paper or a cloth containing a...

Complete Owner's Guide (English)
Page 31
... removable. Keeping the Burner Head Ports clean will prevent improper ignition and an uneven flame. Do not remove any mild cleaners used for 30 minutes. The ports (or slots) around the Burner Heads must be routinely checked. ALWAYS keep the surface Burner Caps in hot soapy ... cup ammonia and soak for stubborn stains. To Clean the Cooktop and contoured areas of stainless parts. Special care and cleaning are required for this Use & Care Guide. 31 Because the gas Burners are sealed, cleanups are easy when spillovers are positioned securely over the burners. CAUTION Pay ...
... removable. Keeping the Burner Head Ports clean will prevent improper ignition and an uneven flame. Do not remove any mild cleaners used for 30 minutes. The ports (or slots) around the Burner Heads must be routinely checked. ALWAYS keep the surface Burner Caps in hot soapy ... cup ammonia and soak for stubborn stains. To Clean the Cooktop and contoured areas of stainless parts. Special care and cleaning are required for this Use & Care Guide. 31 Because the gas Burners are sealed, cleanups are easy when spillovers are positioned securely over the burners. CAUTION Pay ...

Complete Owner's Guide (English)
Page 32
... Figure 4). Push the door hinge locks up towards the oven door (See Figure 2). Close the oven door. Do not close the oven door until all parts are fully in place. 2. ject. 3. The oven light bulb is opened. Turn the power off oven door Around CAUTION The door is unplugged and all...
... Figure 4). Push the door hinge locks up towards the oven door (See Figure 2). Close the oven door. Do not close the oven door until all parts are fully in place. 2. ject. 3. The oven light bulb is opened. Turn the power off oven door Around CAUTION The door is unplugged and all...

Complete Owner's Guide (English)
Page 36
... Insert or insert is normal, and the fan may automatically turn on the oven bottom. Broiler Pan or Broiler Pan Insert needs to cool internal parts. Follow steps under "Oven Cleaning" in the Electronic Oven Control Guide. Wipe up excessive spillovers before starting the Self-Clean cycle. If flames or excessive...
... Insert or insert is normal, and the fan may automatically turn on the oven bottom. Broiler Pan or Broiler Pan Insert needs to cool internal parts. Follow steps under "Oven Cleaning" in the Electronic Oven Control Guide. Wipe up excessive spillovers before starting the Self-Clean cycle. If flames or excessive...
Complete Owner's Guide (English)
Page 40
...authorized service companies; Product that prove to obtain and keep all costs for servicing, such as described or illustrated are not a part of this warranty. Expenses for making the appliance accessible for repairing or replacing any implied warranty. use your original date of ...implied warranties, so these limitations or exclusions may also have other cosmetic parts. 11. Box 212378 Augusta, GA 30907 40 Canada 1.800.265.8352 Electrolux Canada Corp. 5855 Terry Fox Way Mississauga, Ontario, Canada L5V 3E4 Service ...
...authorized service companies; Product that prove to obtain and keep all costs for servicing, such as described or illustrated are not a part of this warranty. Expenses for making the appliance accessible for repairing or replacing any implied warranty. use your original date of ...implied warranties, so these limitations or exclusions may also have other cosmetic parts. 11. Box 212378 Augusta, GA 30907 40 Canada 1.800.265.8352 Electrolux Canada Corp. 5855 Terry Fox Way Mississauga, Ontario, Canada L5V 3E4 Service ...

Installation Instructions (All Languages)
Page 4
... before installing range. 2. Important Note to range must be lit manually. Installation of this range must conform with local codes or, in the absence of local codes, with CSA Standard C22.1, Canadian Electrical Code, Part 1 in United States or with the National Fuel Gas Code ANSI Z223... cooking utensil. As children grow, teach them in an area covered with the National Electrical Code ANSI/NFPA No. 70- 30" GAS SLIDE-IN RANGE INSTALLATION INSTRUCTIONS Important Notes to LITE. Avoid touching the vent openings or nearby surfaces as a storage space. Never leave the...
... before installing range. 2. Important Note to range must be lit manually. Installation of this range must conform with local codes or, in the absence of local codes, with CSA Standard C22.1, Canadian Electrical Code, Part 1 in United States or with the National Fuel Gas Code ANSI Z223... cooking utensil. As children grow, teach them in an area covered with the National Electrical Code ANSI/NFPA No. 70- 30" GAS SLIDE-IN RANGE INSTALLATION INSTRUCTIONS Important Notes to LITE. Avoid touching the vent openings or nearby surfaces as a storage space. Never leave the...

Installation Instructions (All Languages)
Page 10
...Figure 10 10.6.2 Air Shutter-Oven Burner The approximate oven burner flame length is yellow, increase air shutter opening size. 30" GAS SLIDE-IN RANGE INSTALLATION INSTRUCTIONS 10.6 Operation of Oven Burners and Oven Adjustments 10.6.1 Electric Ignition Burners Operation of electric igniters should be checked after... to include the model and serial numbers and a lot number or letter from the oven: a) Set the oven to operate. When ordering parts for operating instructions. c) If your Use and Care Guide. d) Within 60 seconds the broil burner should ignite. See Use & Care Guide...
...Figure 10 10.6.2 Air Shutter-Oven Burner The approximate oven burner flame length is yellow, increase air shutter opening size. 30" GAS SLIDE-IN RANGE INSTALLATION INSTRUCTIONS 10.6 Operation of Oven Burners and Oven Adjustments 10.6.1 Electric Ignition Burners Operation of electric igniters should be checked after... to include the model and serial numbers and a lot number or letter from the oven: a) Set the oven to operate. When ordering parts for operating instructions. c) If your Use and Care Guide. d) Within 60 seconds the broil burner should ignite. See Use & Care Guide...

Installation Instructions (All Languages)
Page 11
...wiring or plumbing. You may need to align with the range. 30" GAS SLIDE-IN RANGE INSTALLATION INSTRUCTIONS 11 Anti-Tip Brackets Installation Instructions To reduce the risk of tipping of the range, the range must be moved and installed with the range. If range is ever moved to a different location, the antitip ... 4 leg levelers with 4 screws provided. Mark on the floor the location of brackets. pilot holes using a masonry drill bit. 4. Those parts are trapped by ends of the 4 mounting holes shown on floor and attach with wrench. (See Figure 13 below to allow room for proper...
...wiring or plumbing. You may need to align with the range. 30" GAS SLIDE-IN RANGE INSTALLATION INSTRUCTIONS 11 Anti-Tip Brackets Installation Instructions To reduce the risk of tipping of the range, the range must be moved and installed with the range. If range is ever moved to a different location, the antitip ... 4 leg levelers with 4 screws provided. Mark on the floor the location of brackets. pilot holes using a masonry drill bit. 4. Those parts are trapped by ends of the 4 mounting holes shown on floor and attach with wrench. (See Figure 13 below to allow room for proper...


