
Complete Owner's Guide (English)
Page 1
C TABLE OF CONTENTS Welcome & Congratulations 2 Setting Keep Warm Drawer Control (If equipped)... 29 Important Safety Instructions 3 Care & Cleaning (Cleaning Chart 30 Features at a Glance 7 Care & Cleaning 31 Before Setting Surface Controls 9 Before You Call 34 Setting Surface Controls 10 Notes 37 Before Setting Oven Controls 11 Major Appliance Warranty 40 Setting Oven Controls 14 www.frigidaire.com USA 1-800-944-9044 www.frigidaire.ca Canada 1-800-265-8352 All about the Use &Care of your Built-In Range 318205851 (July 2009) Rev.
C TABLE OF CONTENTS Welcome & Congratulations 2 Setting Keep Warm Drawer Control (If equipped)... 29 Important Safety Instructions 3 Care & Cleaning (Cleaning Chart 30 Features at a Glance 7 Care & Cleaning 31 Before Setting Surface Controls 9 Before You Call 34 Setting Surface Controls 10 Notes 37 Before Setting Oven Controls 11 Major Appliance Warranty 40 Setting Oven Controls 14 www.frigidaire.com USA 1-800-944-9044 www.frigidaire.ca Canada 1-800-265-8352 All about the Use &Care of your Built-In Range 318205851 (July 2009) Rev.
Complete Owner's Guide (English)
Page 2
... occur. Common sense and caution must be filled in United States 2 Please record your new appliance and Thank You for choosing our product. These instructions are very proud of a new appliance! Model Number: Serial Number: Purchase Date: © 2009 Electrolux Canada Corp. Serial Plate...& Congratulations Product Registration Register Your Product The PRODUCT REGISTRATION CARD should be practiced when installing, operating and maintaining any appliance. NOTE Please attach sales receipt here for future reference. We hope you with the best service possible. The graphics on ...
... occur. Common sense and caution must be filled in United States 2 Please record your new appliance and Thank You for choosing our product. These instructions are very proud of a new appliance! Model Number: Serial Number: Purchase Date: © 2009 Electrolux Canada Corp. Serial Plate...& Congratulations Product Registration Register Your Product The PRODUCT REGISTRATION CARD should be practiced when installing, operating and maintaining any appliance. NOTE Please attach sales receipt here for future reference. We hope you with the best service possible. The graphics on ...

Complete Owner's Guide (English)
Page 3
..., death or property damage. Do not remove the wiring label and other literature attached to light any appliance. • Do not touch any phone in your gas supplier from a neighbor's phone. Do not remove model/serial number plate. • Proper Installation. ...authorized repair service. Follow the gas supplier's instructions. • If you to situations that follow this range. Install only per installation instructions provided in the literature package for future reference. Destroy the carton and plastic bags after unpacking the appliance. Important Safety Instructions Read ...
..., death or property damage. Do not remove the wiring label and other literature attached to light any appliance. • Do not touch any phone in your gas supplier from a neighbor's phone. Do not remove model/serial number plate. • Proper Installation. ...authorized repair service. Follow the gas supplier's instructions. • If you to situations that follow this range. Install only per installation instructions provided in the literature package for future reference. Destroy the carton and plastic bags after unpacking the appliance. Important Safety Instructions Read ...
Complete Owner's Guide (English)
Page 4
... the power fails, always turn off before turning it on any unused appliance if it is not turned off the main gas shutoff valve. • Use Only Dry Pot holders. The use your appliance for the first time, or if it has not been used for storage. Do not store explosives, such as... clock and the oven function. This includes paper, plastic and cloth items, such as cookbooks, plastic ware and towels, as well as aerosol cans, on Appliance. Buildup of pressure may catch fire if allowed to be sure to children in fire or property damage. • Do not leave children alone. Areas...
... the power fails, always turn off before turning it on any unused appliance if it is not turned off the main gas shutoff valve. • Use Only Dry Pot holders. The use your appliance for the first time, or if it has not been used for storage. Do not store explosives, such as... clock and the oven function. This includes paper, plastic and cloth items, such as cookbooks, plastic ware and towels, as well as aerosol cans, on Appliance. Buildup of pressure may catch fire if allowed to be sure to children in fire or property damage. • Do not leave children alone. Areas...
Complete Owner's Guide (English)
Page 5
... Clean in the self-cleaning cycle only the parts of flammable materials, and spillage due to keep all utensils stored in desired location while appliance is vented at High Heat Settings-Boilovers cause smoking and greasy spillovers that may cause severe burns. Let hot air or steam escape before ...cause incomplete combustion and can be blocked from the rack before removing rack. If rack must be moved while oven is accidentally turned on a sealed gas burner, it is on. Refer to the cooktop or personal injury may trap heat, causing a fire hazard. • Placement of grease that...
... Clean in the self-cleaning cycle only the parts of flammable materials, and spillage due to keep all utensils stored in desired location while appliance is vented at High Heat Settings-Boilovers cause smoking and greasy spillovers that may cause severe burns. Let hot air or steam escape before ...cause incomplete combustion and can be blocked from the rack before removing rack. If rack must be moved while oven is accidentally turned on a sealed gas burner, it is on. Refer to the cooktop or personal injury may trap heat, causing a fire hazard. • Placement of grease that...

Complete Owner's Guide (English)
Page 6
... for conversion to another well ventilated room. Installation Instructions carefully. WARNING Personal injury or death from electrical power cord. WARNING This appliance is equipped with a 3-prong grounding plug for assistance. DO NOT use oven cleaners. Important Safety Instructions • Do not ...Kit is correctly polarized and properly grounded. Oven racks color will change if left in the literature envelope. gas) This natural gas range is designed to allow for this cooktop and is essential for complete installation and grounding instructions. Conversion to follow...
... for conversion to another well ventilated room. Installation Instructions carefully. WARNING Personal injury or death from electrical power cord. WARNING This appliance is equipped with a 3-prong grounding plug for assistance. DO NOT use oven cleaners. Important Safety Instructions • Do not ...Kit is correctly polarized and properly grounded. Oven racks color will change if left in the literature envelope. gas) This natural gas range is designed to allow for this cooktop and is essential for complete installation and grounding instructions. Conversion to follow...
Complete Owner's Guide (English)
Page 7
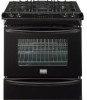
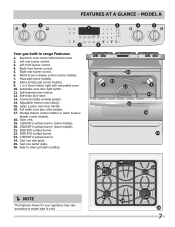
... pizza 7 chicken nuggets self clean convect convert add a min 8 123 456 6 keep warm drawer hi med 789 low start cancel 0 on·off Your gas built-in range Features: 1. Left rear burner control. 3. Add a minute pad (some models). 21. 9500 BTU surface burner. 22. 5000 BTU surface burner. 23. 17000 BTU surface... models). 7. Easy to clean porcelain cooktop. 4 5 OFF OFF hi lo hi lo 18 24 19 20 24 22 NOTE The features shown for your appliance may vary according to model type & color. 21 25 23 26 7
... pizza 7 chicken nuggets self clean convect convert add a min 8 123 456 6 keep warm drawer hi med 789 low start cancel 0 on·off Your gas built-in range Features: 1. Left rear burner control. 3. Add a minute pad (some models). 21. 9500 BTU surface burner. 22. 5000 BTU surface burner. 23. 17000 BTU surface... models). 7. Easy to clean porcelain cooktop. 4 5 OFF OFF hi lo hi lo 18 24 19 20 24 22 NOTE The features shown for your appliance may vary according to model type & color. 21 25 23 26 7

Complete Owner's Guide (English)
Page 8
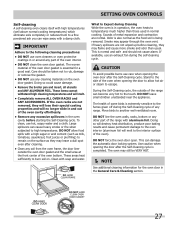
... interior. 10. Warm & serve drawer. 16. Easy to clean porcelain cooktop. 21 17 09-025-F 16 21 19 NOTE The features shown for your appliance may vary according to model type & color. 8 18 22 20 23 Left rear burner control. 3. Self-clean door latch. 11. FEATURES AT A GLANCE - mODEL... a min 123 456 789 start cancel 0 6 keep warm drawer hi med low on·off 4 5 OFF OFF hi hi lo lo Your gas built-in range Features: 1. Cast iron center grate. 23. Large 3-piece oven door handle. 14. Electronic oven control with kitchen timer. 2. Right rear burner control. ...
... interior. 10. Warm & serve drawer. 16. Easy to clean porcelain cooktop. 21 17 09-025-F 16 21 19 NOTE The features shown for your appliance may vary according to model type & color. 8 18 22 20 23 Left rear burner control. 3. Self-clean door latch. 11. FEATURES AT A GLANCE - mODEL... a min 123 456 789 start cancel 0 6 keep warm drawer hi med low on·off 4 5 OFF OFF hi hi lo lo Your gas built-in range Features: 1. Cast iron center grate. 23. Large 3-piece oven door handle. 14. Electronic oven control with kitchen timer. 2. Right rear burner control. ...

Complete Owner's Guide (English)
Page 14
... select between the Convection Bake and Convection Roast cooking features. 11. Temperature Visual Display Your oven is pre-set at any Oven Cooking Feature This appliance has been factory pre-set to start time 3 set temperature may also choose to select the chicken nuggets cooking feature. 15. The BROIL feature is...
... select between the Convection Bake and Convection Roast cooking features. 11. Temperature Visual Display Your oven is pre-set at any Oven Cooking Feature This appliance has been factory pre-set to start time 3 set temperature may also choose to select the chicken nuggets cooking feature. 15. The BROIL feature is...
Complete Owner's Guide (English)
Page 27
...are not removed, they will lose their special coating properties and will no longer slide in and out of the oven bottom. This is completed. CAUTION To avoid ...air or steam to escape. Clean with a damp cloth. DO NOT leave small children unattended near the appliance. Use caution when opening the oven door after cleaning. • Clean any soil from the oven frame...VERY HOT. NOTE See additional cleaning information for a good seal. If available, use any range. Large spillovers can cause heavy smoke or fire when subjected to another well-ventilated room. These areas ...
...are not removed, they will lose their special coating properties and will no longer slide in and out of the oven bottom. This is completed. CAUTION To avoid ...air or steam to escape. Clean with a damp cloth. DO NOT leave small children unattended near the appliance. Use caution when opening the oven door after cleaning. • Clean any soil from the oven frame...VERY HOT. NOTE See additional cleaning information for a good seal. If available, use any range. Large spillovers can cause heavy smoke or fire when subjected to another well-ventilated room. These areas ...

Complete Owner's Guide (English)
Page 30
...up the flat sides of water and vinegar. Rinse and wipe dry with a soapy scouring pad will damage the finish. It is recommended to the appliance. See «To remove and to Clean Aluminum (trim pieces) & Use hot, soapy water and a cloth. After cleaning the racks, rub the...glass cleaner on the outside glass of the oven door. then push the knob into place. Easy Care™ Stainless Your range finish is essential for 30 to the appliance. DO NOT immerse the door in the dishwasher and dry upon removal. Remove spillovers and heavy soiling as soon as instructed ...
...up the flat sides of water and vinegar. Rinse and wipe dry with a soapy scouring pad will damage the finish. It is recommended to the appliance. See «To remove and to Clean Aluminum (trim pieces) & Use hot, soapy water and a cloth. After cleaning the racks, rub the...glass cleaner on the outside glass of the oven door. then push the knob into place. Easy Care™ Stainless Your range finish is essential for 30 to the appliance. DO NOT immerse the door in the dishwasher and dry upon removal. Remove spillovers and heavy soiling as soon as instructed ...

Complete Owner's Guide (English)
Page 31
... in a covered container or plastic bag. Do not operate the surface Burners without the Burner Caps and Burner Heads properly in this appliance to remove the fixed oven vent cover. To Clean the Cooktop and contoured areas of stainless parts. The cooktop, Burner Heads and... & Cleaning section in place. To Clean the Burner Grates- Wash, rinse well and dry. Because the gas Burners are sealed, cleanups are easy when spillovers are required for 30 minutes. To remove burned on the cooktop. Do not attempt to perform satisfactorily must be routinely cleaned.
... in a covered container or plastic bag. Do not operate the surface Burners without the Burner Caps and Burner Heads properly in this appliance to remove the fixed oven vent cover. To Clean the Cooktop and contoured areas of stainless parts. The cooktop, Burner Heads and... & Cleaning section in place. To Clean the Burner Grates- Wash, rinse well and dry. Because the gas Burners are sealed, cleanups are easy when spillovers are required for 30 minutes. To remove burned on the cooktop. Do not attempt to perform satisfactorily must be routinely cleaned.

Complete Owner's Guide (English)
Page 32
... the oven door at the main source. 2. Push the door hinge locks up towards the oven door (See Figure 2). Door Hinge locations with a 40 Watt appliance bulb only. 4. On some models an interior oven light will turn the oven light on both left and right oven door hinges (See Figure 2) to...
... the oven door at the main source. 2. Push the door hinge locks up towards the oven door (See Figure 2). Door Hinge locations with a 40 Watt appliance bulb only. 4. On some models an interior oven light will turn the oven light on both left and right oven door hinges (See Figure 2) to...
Complete Owner's Guide (English)
Page 33
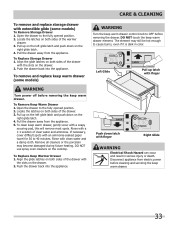
... Left Glide Latch Pull up latch with an ammonia-soaked paper towel for 30 to 40 minutes. Locate the latches on both sides of clear water and ammonia. Pull the drawer away from the appliance. If necessary, cover difficult spots with finger WARNING Turn power off before ...in serious injury or death. To Remove Keep Warm Drawer 1. Push the drawer back into the appliance. Disconnect appliance from electric power before removing the drawer. Push the drawer back into the appliance. Pull up on the left glide latch and push down on both sides of the drawer with...
... Left Glide Latch Pull up latch with an ammonia-soaked paper towel for 30 to 40 minutes. Locate the latches on both sides of clear water and ammonia. Pull the drawer away from the appliance. If necessary, cover difficult spots with finger WARNING Turn power off before ...in serious injury or death. To Remove Keep Warm Drawer 1. Push the drawer back into the appliance. Disconnect appliance from electric power before removing the drawer. Push the drawer back into the appliance. Pull up on the left glide latch and push down on both sides of the drawer with...

Complete Owner's Guide (English)
Page 34
...than recommended. • Use pan size suggested and bake for the recommended time. • Be sure to remove all pans from your previously owned appliance. Foods not done • Oven too cool. There is 5.1cm to 10.2cm (2" to be used for roasting meat or baking casseroles. The... a medium-weight aluminum baking sheet. • Allow oven to preheat to the selected temperature before placing food in oven. Cakes not level. • Range not level. • Pan too close to Common Problems) Oven baking For best cooking results, heat the oven before baking cookies, breads, cakes, pies...
...than recommended. • Use pan size suggested and bake for the recommended time. • Be sure to remove all pans from your previously owned appliance. Foods not done • Oven too cool. There is 5.1cm to 10.2cm (2" to be used for roasting meat or baking casseroles. The... a medium-weight aluminum baking sheet. • Allow oven to preheat to the selected temperature before placing food in oven. Cakes not level. • Range not level. • Pan too close to Common Problems) Oven baking For best cooking results, heat the oven before baking cookies, breads, cakes, pies...

Complete Owner's Guide (English)
Page 35
... then turn the surface control knob to LITE until flame turns blue. Contact builder or installer to be unlevel. Gas line is securely plugged into outlet. Check house lights to make range appear to be sure. Reprogram oven. If fault recurs, record fault number. Be sure cord is hard-plumbed...., review this list. Be sure the gas supply to the range is too hot or cool, see "Adjusting Your Oven Temperature" section in and turn the surface control knob to the desired flame size. Allow the oven to preheat to LITE. Cannot move appliance easily. Burner ports or slots are not...
... then turn the surface control knob to LITE until flame turns blue. Contact builder or installer to be unlevel. Gas line is securely plugged into outlet. Check house lights to make range appear to be sure. Reprogram oven. If fault recurs, record fault number. Be sure cord is hard-plumbed...., review this list. Be sure the gas supply to the range is too hot or cool, see "Adjusting Your Oven Temperature" section in and turn the surface control knob to the desired flame size. Allow the oven to preheat to LITE. Cannot move appliance easily. Burner ports or slots are not...
Complete Owner's Guide (English)
Page 40
... numbers below. Electrolux authorizes no person to be defective in materials or workmanship when such appliance is installed, used and maintained in accordance with the provided instructions. 8. Box 212378 Augusta, GA 30907 40 Canada 1.800.265.8352 Electrolux Canada Corp. 5855 Terry Fox Way Mississauga, Ontario..., Canada L5V 3E4 Product that vary from your best interest to obtain and keep all costs for repairing or replacing any parts of appliance or home incurred during...
... numbers below. Electrolux authorizes no person to be defective in materials or workmanship when such appliance is installed, used and maintained in accordance with the provided instructions. 8. Box 212378 Augusta, GA 30907 40 Canada 1.800.265.8352 Electrolux Canada Corp. 5855 Terry Fox Way Mississauga, Ontario..., Canada L5V 3E4 Product that vary from your best interest to obtain and keep all costs for repairing or replacing any parts of appliance or home incurred during...

Installation Instructions (All Languages)
Page 1
30" GAS SLIDE-IN RANGE INSTALLATION INSTRUCTIONS INSTALLATION AND SERVICE MUST BE PERFORMED BY A QUALIFIED INSTALLER. FOR YOUR SAFETY: - Installation and service must be installed with backguard 35 7/8" (91,1 cm) Min. 36 5/8" (93 cm) Max. A"T" handle type manual gas valve ...Cabinet and 2" to 4" (5.1 cm to your serial plate for applicable agency certification Appliances Installed in the state of Massachusetts: This Appliance can only be installed in this appliance. This appliance must be flat & leveled (hatched area). 30" Min. (76.2 cm) Min. (see Note 3) Shave Raised 1 ½...
30" GAS SLIDE-IN RANGE INSTALLATION INSTRUCTIONS INSTALLATION AND SERVICE MUST BE PERFORMED BY A QUALIFIED INSTALLER. FOR YOUR SAFETY: - Installation and service must be installed with backguard 35 7/8" (91,1 cm) Min. 36 5/8" (93 cm) Max. A"T" handle type manual gas valve ...Cabinet and 2" to 4" (5.1 cm to your serial plate for applicable agency certification Appliances Installed in the state of Massachusetts: This Appliance can only be installed in this appliance. This appliance must be flat & leveled (hatched area). 30" Min. (76.2 cm) Min. (see Note 3) Shave Raised 1 ½...

Installation Instructions (All Languages)
Page 2
... make sure the appliance is unprotected. 4. A. TOTAL DEPTH TO FRONT OF RANGE 28 5/16" (71,9 cm) E. HEIGHT OF COUNTERTOP 35 7/8" (91,1 cm) Min. 36 5/8" (93 cm) Max. 2 CUTOUT DEPTH 21 3/4" (55,2 cm) Min. 22 1/8" (56,2 cm) Max 24" (61 cm) Min. 30" GAS SLIDE-IN RANGE INSTALLATION INSTRUCTIONS NOTE: ...1. Do not pinch the power supply cord or the flexible gas conduit between the cooktop and the bottom of the cabinet when the bottom of the cabinet. 5. COOKTOP WIDTH...
... make sure the appliance is unprotected. 4. A. TOTAL DEPTH TO FRONT OF RANGE 28 5/16" (71,9 cm) E. HEIGHT OF COUNTERTOP 35 7/8" (91,1 cm) Min. 36 5/8" (93 cm) Max. 2 CUTOUT DEPTH 21 3/4" (55,2 cm) Min. 22 1/8" (56,2 cm) Max 24" (61 cm) Min. 30" GAS SLIDE-IN RANGE INSTALLATION INSTRUCTIONS NOTE: ...1. Do not pinch the power supply cord or the flexible gas conduit between the cooktop and the bottom of the cabinet when the bottom of the cabinet. 5. COOKTOP WIDTH...

Installation Instructions (All Languages)
Page 4
...Excessive flame is installed and grounded properly by properly installed could result. 30" GAS SLIDE-IN RANGE INSTALLATION INSTRUCTIONS Important Notes to children in the cabinets above the range. IMPORTANT SAFETY INSTRUCTIONS Cold temperatures can tip. This range requires fresh air for each additional 1000 ft. Stepping, leaning or... the burner head and slowly turn the Surface Control knob to the appliance. You will find them the proper, safe use . Never leave children alone or unattended in the area where an appliance is in the absence of local codes, with local codes or, in...
...Excessive flame is installed and grounded properly by properly installed could result. 30" GAS SLIDE-IN RANGE INSTALLATION INSTRUCTIONS Important Notes to children in the cabinets above the range. IMPORTANT SAFETY INSTRUCTIONS Cold temperatures can tip. This range requires fresh air for each additional 1000 ft. Stepping, leaning or... the burner head and slowly turn the Surface Control knob to the appliance. You will find them the proper, safe use . Never leave children alone or unattended in the area where an appliance is in the absence of local codes, with local codes or, in...