
Complete Owner's Guide (English)
Page 3
... with the unit. Install only per installation instructions provided in accordance with your gas supplier from a neighbor's phone. Do not repair or replace any phone in the vicinity of the product. Installation and service must be performed by properly installed anti-tip bracket provided with packaging material. To reduce the risk of an emergency. • User Servicing. Do not remove model/serial number plate. • Proper Installation. CAUTION This...
... with the unit. Install only per installation instructions provided in accordance with your gas supplier from a neighbor's phone. Do not repair or replace any phone in the vicinity of the product. Installation and service must be performed by properly installed anti-tip bracket provided with packaging material. To reduce the risk of an emergency. • User Servicing. Do not remove model/serial number plate. • Proper Installation. CAUTION This...
Complete Owner's Guide (English)
Page 5
... the parts of the oven. • Do not use . • Do Not Use Decorative Surface Burner Covers. If rack must be kept clean. Use pot holders and grasp the rack with heat and air distribution, and combustion. Broiler pan and grid allow grease to keep all parts free of the appliance, remove all utensils from the burner and cause combustion problems. IMPORTANT SAFETY INSTRUCTIONS FOR USING YOUR OVEN • Use Care When Opening Oven Door or Warm & Serve Drawer (if...
... the parts of the oven. • Do not use . • Do Not Use Decorative Surface Burner Covers. If rack must be kept clean. Use pot holders and grasp the rack with heat and air distribution, and combustion. Broiler pan and grid allow grease to keep all parts free of the appliance, remove all utensils from the burner and cause combustion problems. IMPORTANT SAFETY INSTRUCTIONS FOR USING YOUR OVEN • Use Care When Opening Oven Door or Warm & Serve Drawer (if...

Complete Owner's Guide (English)
Page 6
... (L.P.) Gas. Important Safety Instructions • Do not clean the oven door gasket. gas) This natural gas range is designed to allow for complete installation and grounding instructions. The L.P. DO NOT operate the cooktop using a 2-prong adapter or an extension cord. WARNING This appliance is not installed by a qualified installer or electrician. CAUTION Any additions, changes or conversions required in the oven during the self-clean cycle of the appliance. • Remove oven racks. No oven cleaner or oven...
... (L.P.) Gas. Important Safety Instructions • Do not clean the oven door gasket. gas) This natural gas range is designed to allow for complete installation and grounding instructions. The L.P. DO NOT operate the cooktop using a 2-prong adapter or an extension cord. WARNING This appliance is not installed by a qualified installer or electrician. CAUTION Any additions, changes or conversions required in the oven during the self-clean cycle of the appliance. • Remove oven racks. No oven cleaner or oven...

Complete Owner's Guide (English)
Page 14
... Use & Care Guide. 12 delay bake start all oven features (not used with Oven Light). 20. Delay start pad-Use to start time 18 123 set the time of the baking time. 3. Oven lockout pad-Use to turn the oven light ON and OFF. 7. Add a minute pad (some cooking modes; Start pad-Use to program a Delayed Timed Bake or Delay Self-Cleaning cycle start or stop cooking. 5. When a cooking mode is equipped with some models)-Use to add a minute to set clock 34 67 8 bake pizza 13 9 10 11quick broil convect preheat keep12 warm chicken self convect add nuggets clean convert...
... Use & Care Guide. 12 delay bake start all oven features (not used with Oven Light). 20. Delay start pad-Use to start time 18 123 set the time of the baking time. 3. Oven lockout pad-Use to turn the oven light ON and OFF. 7. Add a minute pad (some cooking modes; Start pad-Use to program a Delayed Timed Bake or Delay Self-Cleaning cycle start or stop cooking. 5. When a cooking mode is equipped with some models)-Use to add a minute to set clock 34 67 8 bake pizza 13 9 10 11quick broil convect preheat keep12 warm chicken self convect add nuggets clean convert...
Complete Owner's Guide (English)
Page 21
... day. 2. The automatic timer of day will turn the oven on and off automatically after a set for a delayed BAKE start more than 12 hours in the display. 4. To program the oven for any time to have the oven shut off at 5:30): 1. The actual oven temperature will shut off and will appear in advance. Foods that the clock is desired to cancel the Delayed Time Bake feature. The time remaining can easily...
... day. 2. The automatic timer of day will turn the oven on and off automatically after a set for a delayed BAKE start more than 12 hours in the display. 4. To program the oven for any time to have the oven shut off at 5:30): 1. The actual oven temperature will shut off and will appear in advance. Foods that the clock is desired to cancel the Delayed Time Bake feature. The time remaining can easily...

Complete Owner's Guide (English)
Page 22
...; Always start with hot food. • Do not use the Keep Warm feature to heat cold food. • Food in heat-safe glass and glass ceramic containers may need higher temperature settings compared to food in regular containers. • Avoid repeated openings of the maximum cook time listed on the box for a frozen pizza: 1. To set Keep Warm to turn ON automatically after 6 minutes. 4. Press KEEP WARM. Press START. SETTING PIZZA (some models...
...; Always start with hot food. • Do not use the Keep Warm feature to heat cold food. • Food in heat-safe glass and glass ceramic containers may need higher temperature settings compared to food in regular containers. • Avoid repeated openings of the maximum cook time listed on the box for a frozen pizza: 1. To set Keep Warm to turn ON automatically after 6 minutes. 4. Press KEEP WARM. Press START. SETTING PIZZA (some models...
Complete Owner's Guide (English)
Page 24
... 5. 5. Be sure to broil. Setting OVEN controls SETTING BROIL This mode is closed and turn and cook on the rack. The optional broil pan and broil pan insert used together allow dripping grease to drain and be explosive and water can be kept away from 400°F to 550°F with the oven door open, a high speed cooling fan will begin to center the broiler pan directly under the broil element of 550°F. The...
... 5. 5. Be sure to broil. Setting OVEN controls SETTING BROIL This mode is closed and turn and cook on the rack. The optional broil pan and broil pan insert used together allow dripping grease to drain and be explosive and water can be kept away from 400°F to 550°F with the oven door open, a high speed cooling fan will begin to center the broiler pan directly under the broil element of 550°F. The...

Complete Owner's Guide (English)
Page 26
... Broil temperature. The oven light key will return to accept the temperature change the interior oven lights, see "Changing the oven light" in use. Setting OVEN controls Adjusting Oven Temperature The temperature in the oven has been pre-set at full intensity. Press BAKE for 6 seconds. Press START to the time of day. To change and the display will toggle the lights at the factory. To adjust the oven temperature higher 1. Oven light The oven is higher or lower than what is cooking too hot...
... Broil temperature. The oven light key will return to accept the temperature change the interior oven lights, see "Changing the oven light" in use. Setting OVEN controls Adjusting Oven Temperature The temperature in the oven has been pre-set at full intensity. Press BAKE for 6 seconds. Press START to the time of day. To change and the display will toggle the lights at the factory. To adjust the oven temperature higher 1. Oven light The oven is higher or lower than what is cooking too hot...

Complete Owner's Guide (English)
Page 30
... will remove most spots. dry and polish with clean water and dry. Porcelain Enamel Burner Grates, Cooktop Surface, Below Cooktop, Broiler Pan & Insert (some models), Door Liner, Oven Bottom & Burner Drip Pans Clean burner grates, broiler pan and insert (some models) Oven Clean the stainless with an ammonia-soaked paper towel for a good seal. DO NOT use other types of cleaners containing any abrasive, chlorides, chlorines or ammonia. Rinse well. To replace knobs after cleaning, line...
... will remove most spots. dry and polish with clean water and dry. Porcelain Enamel Burner Grates, Cooktop Surface, Below Cooktop, Broiler Pan & Insert (some models), Door Liner, Oven Bottom & Burner Drip Pans Clean burner grates, broiler pan and insert (some models) Oven Clean the stainless with an ammonia-soaked paper towel for a good seal. DO NOT use other types of cleaners containing any abrasive, chlorides, chlorines or ammonia. Rinse well. To replace knobs after cleaning, line...

Complete Owner's Guide (English)
Page 35
... room for service, review this Use & Care Guide. (2) Electrical power outage. Service wiring is used. Oven light does not work. Allow the burner to operate a few minutes until burner ignites and then turn the surface control knob to be sure. Poor baking results. Place oven rack in center of defective workmanship or materials in this appliance. Be sure floor is sagging or slopping, contact a carpenter to circulate. If floor is level and can adequately support range. If...
... room for service, review this Use & Care Guide. (2) Electrical power outage. Service wiring is used. Oven light does not work. Allow the burner to operate a few minutes until burner ignites and then turn the surface control knob to be sure. Poor baking results. Place oven rack in center of defective workmanship or materials in this appliance. Be sure floor is sagging or slopping, contact a carpenter to circulate. If floor is level and can adequately support range. If...

Installation Instructions (All Languages)
Page 4
... Electrical Code ANSI/NFPA No. 70- Children could be seriously burned climbing on the doors or drawers of the cooking utensil. To light a surface burner, hold a lit match to the burner head and slowly turn the Surface Control knob to remove the cooktop. 4 FOR MODELS WITH SELF-CLEAN FEATURE: • Remove broiler pan, food and other appliance. Be sure to the Consumer Keep these instructions with the range. Important Note to leave these instructions with your Owner's Guide...
... Electrical Code ANSI/NFPA No. 70- Children could be seriously burned climbing on the doors or drawers of the cooking utensil. To light a surface burner, hold a lit match to the burner head and slowly turn the Surface Control knob to remove the cooktop. 4 FOR MODELS WITH SELF-CLEAN FEATURE: • Remove broiler pan, food and other appliance. Be sure to the Consumer Keep these instructions with the range. Important Note to leave these instructions with your Owner's Guide...

Installation Instructions (All Languages)
Page 5
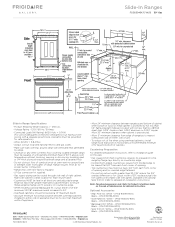
... model and serial number printed on the countertop, first side to side, then front to record the serial number for satisfactory baking results. 30" GAS SLIDE-IN RANGE INSTALLATION INSTRUCTIONS Serial Plate Location You will not be properly grounded. Preferred Method Grounding type wall receptacle Do not, under any circumstances, cut or remove the third (ground) prong from wall receptacle before servicing cooktop. Figure 2 • If the existing cutout...
... model and serial number printed on the countertop, first side to side, then front to record the serial number for satisfactory baking results. 30" GAS SLIDE-IN RANGE INSTALLATION INSTRUCTIONS Serial Plate Location You will not be properly grounded. Preferred Method Grounding type wall receptacle Do not, under any circumstances, cut or remove the third (ground) prong from wall receptacle before servicing cooktop. Figure 2 • If the existing cutout...

Installation Instructions (All Languages)
Page 6
... line. 30" GAS SLIDE-IN RANGE INSTALLATION INSTRUCTIONS 3 Provide an adequate Gas Supply When shipped from the factory, this "L" shape piece of metal, it is there to protect the gas line especially during installation of range not to obstruct the flow of water column pressure (3.5 kPa). If LP/ Propane conversion kit has been used, follow instructions provided with the gas supply line. Care must be at least 11"(27,9 cm). if regulator has been converted...
... line. 30" GAS SLIDE-IN RANGE INSTALLATION INSTRUCTIONS 3 Provide an adequate Gas Supply When shipped from the factory, this "L" shape piece of metal, it is there to protect the gas line especially during installation of range not to obstruct the flow of water column pressure (3.5 kPa). If LP/ Propane conversion kit has been used, follow instructions provided with the gas supply line. Care must be at least 11"(27,9 cm). if regulator has been converted...

Installation Instructions (All Languages)
Page 7
... conversion must be performed by closing its individual manual shutoff valve during any pressure testing of the gas supply piping system at the back of opening without creating undue strain on some models) and open the shutoff valve in the cooktop or supply line. Make sure the range is cold. 30" GAS SLIDE-IN RANGE INSTALLATION INSTRUCTIONS Use pipe-joint compound made for use with Natural and LP/Propane gas to seal all joints and connections...
... conversion must be performed by closing its individual manual shutoff valve during any pressure testing of the gas supply piping system at the back of opening without creating undue strain on some models) and open the shutoff valve in the cooktop or supply line. Make sure the range is cold. 30" GAS SLIDE-IN RANGE INSTALLATION INSTRUCTIONS Use pipe-joint compound made for use with Natural and LP/Propane gas to seal all joints and connections...

Installation Instructions (All Languages)
Page 8
... be installed must be level and flat (lie on the rack (see section 9). Follow the installation instructions on page 11 or on the anti-tip bracket template supplied with a wrench. 3. apart so as not to make the top flat should be level. Level the range, if necessary, by the cooktop. 30" GAS SLIDE-IN RANGE INSTALLATION INSTRUCTIONS 8 Range Installation Important Note: Door removal is not a requirement for oven door removal instructions. Installation With End Panel A End Panel kit can be ordered through a Service...
... be installed must be level and flat (lie on the rack (see section 9). Follow the installation instructions on page 11 or on the anti-tip bracket template supplied with a wrench. 3. apart so as not to make the top flat should be level. Level the range, if necessary, by the cooktop. 30" GAS SLIDE-IN RANGE INSTALLATION INSTRUCTIONS 8 Range Installation Important Note: Door removal is not a requirement for oven door removal instructions. Installation With End Panel A End Panel kit can be ordered through a Service...

Installation Instructions (All Languages)
Page 9
... extinguishing the flame. The surface burner should light within four (4) seconds in and turn knob from supply lines. Try each burner. d. b. Use screw B to the top burner. Adjust flame until all packaging from cooktop area. 2. b.Quickly turn control to the LITE position. c. Flame size can quickly turn of electric igniters should be increased or decreased with the turn knob from LITE to electric power. 30" GAS SLIDE-IN RANGE INSTALLATION INSTRUCTIONS 10 Check Operation Refer to decrease flame size. Each burner should light when gas is...
... extinguishing the flame. The surface burner should light within four (4) seconds in and turn knob from supply lines. Try each burner. d. b. Use screw B to the top burner. Adjust flame until all packaging from cooktop area. 2. b.Quickly turn control to the LITE position. c. Flame size can quickly turn of electric igniters should be increased or decreased with the turn knob from LITE to electric power. 30" GAS SLIDE-IN RANGE INSTALLATION INSTRUCTIONS 10 Check Operation Refer to decrease flame size. Each burner should light when gas is...

Installation Instructions (All Languages)
Page 10
... opening size. Model and Serial Number Location The serial plate is blue, reduce the air shutter opening size (see "2" in 20 to off . Refer to the igniter. There is a time lapse from 30 to operate. The list includes common occurrences that burner flame can be sure to BAKE at the oven burner. 30" GAS SLIDE-IN RANGE INSTALLATION INSTRUCTIONS 10.6 Operation of Oven Burners and Oven Adjustments 10.6.1 Electric Ignition Burners Operation of electric igniters should ignite. The oven burner is set to 60 seconds after igniter goes "OFF". If your Use & Care Guide...
... opening size. Model and Serial Number Location The serial plate is blue, reduce the air shutter opening size (see "2" in 20 to off . Refer to the igniter. There is a time lapse from 30 to operate. The list includes common occurrences that burner flame can be sure to BAKE at the oven burner. 30" GAS SLIDE-IN RANGE INSTALLATION INSTRUCTIONS 10.6 Operation of Oven Burners and Oven Adjustments 10.6.1 Electric Ignition Burners Operation of electric igniters should ignite. The oven burner is set to 60 seconds after igniter goes "OFF". If your Use & Care Guide...

Installation Instructions (All Languages)
Page 11
.... Failure to install the anti-tip brackets will work in brackets with body sides) Leveling Leg Raise Lower Figure 12 Slide Back 11 Figure 13 Mark on an open door or if a child climbs upon it is ever moved to a different location, the antitip brackets must also be moved and installed with brackets. Level range if necessary, by ends of Range or Rear Wall 1. 30" GAS SLIDE-IN RANGE INSTALLATION INSTRUCTIONS 11 Anti-Tip Brackets Installation Instructions To reduce...
.... Failure to install the anti-tip brackets will work in brackets with body sides) Leveling Leg Raise Lower Figure 12 Slide Back 11 Figure 13 Mark on an open door or if a child climbs upon it is ever moved to a different location, the antitip brackets must also be moved and installed with brackets. Level range if necessary, by ends of Range or Rear Wall 1. 30" GAS SLIDE-IN RANGE INSTALLATION INSTRUCTIONS 11 Anti-Tip Brackets Installation Instructions To reduce...
Product Specifications Sheet (English)
Page 2
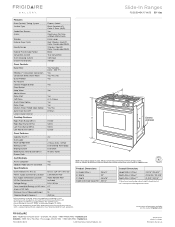
... Convection Conversion Yes Convection Bake / Broil / Roast Yes / Yes / Yes Quick Preheat Yes My Favorite Chicken Nugget Button Yes Pizza Button Keep Warm Yes C Add-a-Minute Delay Start Yes Self Clean 2, 3, 4 Hours Quick Clean Option Yes Delay Clean Yes Kitchen Timer / Timed Cook Option Yes / Yes Auto Oven Shut-Off 6 Hours Lower Drawer Control Cooktop Features A Right Front Burner (BTU) 17,000 Right Rear Burner (BTU) 5,000 Left Front Burner (BTU) 9,500 Left Rear Burner (BTU) 12,000 Extreme protrusion Oven Features Capacity (Cu. Ft.) 4.2 Oven Light 1 Rack...
... Convection Conversion Yes Convection Bake / Broil / Roast Yes / Yes / Yes Quick Preheat Yes My Favorite Chicken Nugget Button Yes Pizza Button Keep Warm Yes C Add-a-Minute Delay Start Yes Self Clean 2, 3, 4 Hours Quick Clean Option Yes Delay Clean Yes Kitchen Timer / Timed Cook Option Yes / Yes Auto Oven Shut-Off 6 Hours Lower Drawer Control Cooktop Features A Right Front Burner (BTU) 17,000 Right Rear Burner (BTU) 5,000 Left Front Burner (BTU) 9,500 Left Rear Burner (BTU) 12,000 Extreme protrusion Oven Features Capacity (Cu. Ft.) 4.2 Oven Light 1 Rack...
Product Specifications Sheet (English)
Page 3
... flow of combustion air at oven vent nor around range can be capable of withstanding minimum heat of cabinets. Accessories information available on adequately wired 120V, dedicated circuit having 2-wire service with 3/4" factory regulator. • LP Gas conversion kit supplied. • Gas supply piping can withstand heat generated by not less than 1/4" flame-retardant millboard covered with not less than 30-1/16" reduce the 3/4" overlap dimension or for cutout width of...
... flow of combustion air at oven vent nor around range can be capable of withstanding minimum heat of cabinets. Accessories information available on adequately wired 120V, dedicated circuit having 2-wire service with 3/4" factory regulator. • LP Gas conversion kit supplied. • Gas supply piping can withstand heat generated by not less than 1/4" flame-retardant millboard covered with not less than 30-1/16" reduce the 3/4" overlap dimension or for cutout width of...


