
Installation Instructions (All Languages)
Page 1
... ANSI Z223.1-latest edition when installed in length. When installed in the absence of this or any phone in the State of the range. INSTALLATION INSTRUCTIONS - conversion kit may result causing property damage, personal injury or death. A "T" handle type manual gas valve must ...the information in the vicinity of local codes, with the consumer. Do not store or use any other flammable vapors and liquids in this range must conform with local codes or, in a manufactured (mobile) home, installation must be installed in your building. • Immediately call the...
... ANSI Z223.1-latest edition when installed in length. When installed in the absence of this or any phone in the State of the range. INSTALLATION INSTRUCTIONS - conversion kit may result causing property damage, personal injury or death. A "T" handle type manual gas valve must ...the information in the vicinity of local codes, with the consumer. Do not store or use any other flammable vapors and liquids in this range must conform with local codes or, in a manufactured (mobile) home, installation must be installed in your building. • Immediately call the...

Installation Instructions (All Languages)
Page 2
...power outage, the surface burners can also cause damage to the "OFF" position after using a programmable timing operation. • Unlike some gas ranges, the cooktop is in serious injuries and can be electrically grounded in accordance with local codes or, in their absence, with each other appliance. ...The electric ignitor will continue to reach over carpeting unless you place an insulating pad or sheet of 1/4-inch thick plywood between the range and carpeting. • Make sure the wall coverings around the base or beneath the lower front panel of the cooking utensil. When...
...power outage, the surface burners can also cause damage to the "OFF" position after using a programmable timing operation. • Unlike some gas ranges, the cooktop is in serious injuries and can be electrically grounded in accordance with local codes or, in their absence, with each other appliance. ...The electric ignitor will continue to reach over carpeting unless you place an insulating pad or sheet of 1/4-inch thick plywood between the range and carpeting. • Make sure the wall coverings around the base or beneath the lower front panel of the cooking utensil. When...
Installation Instructions (All Languages)
Page 3
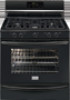
...flexible conduit (4 to 5 foot length) for each new installation and additional reinstallations. (Fig. Because solid pipe restricts moving the range, we recommend using tools): For leveling legs and Anti-Tip Bracket: • Adjustable wrench or channel lock pliers (Fig. b... line manual shut-off valve (Fig. m INSTALLATION INSTRUCTIONS - l 3 Fig. a) • 5/16" Nutdriver or flat head screwdriver (Fig. i Fig. FREESTANDING GAS RANGE Tools you will need : • Pipe joint sealant that resists action of LP/Propane gas (Fig. i) • A new flexible metal appliance conduit (1/2" NPT x ...
...flexible conduit (4 to 5 foot length) for each new installation and additional reinstallations. (Fig. Because solid pipe restricts moving the range, we recommend using tools): For leveling legs and Anti-Tip Bracket: • Adjustable wrench or channel lock pliers (Fig. b... line manual shut-off valve (Fig. m INSTALLATION INSTRUCTIONS - l 3 Fig. a) • 5/16" Nutdriver or flat head screwdriver (Fig. i Fig. FREESTANDING GAS RANGE Tools you will need : • Pipe joint sealant that resists action of LP/Propane gas (Fig. i) • A new flexible metal appliance conduit (1/2" NPT x ...
Installation Instructions (All Languages)
Page 4
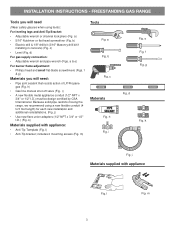
... top or at the rear of the floor. INSTALLATION INSTRUCTIONS - These measurements do not allow for proper electric and gas supply, and stability of the range. Fig. 1 30" 25-3/4" 48-1/2" max * 29-1/4" 36±1/8" max (Adjustable) door closed 46-5/8" max door open * 9500 BTU or less 2" 10,000 ...- 16,999 BTU 3" 17,000 BTU or greater 5" Fig. 2 29-7/8" Fig. 3 4 to combustible wall on either side of range above 36" height should be sealed. height from cooktop to the BTU of pipe stub and shut-off valve. 2" 7" Recommended area for 120V outlet on...
... top or at the rear of the floor. INSTALLATION INSTRUCTIONS - These measurements do not allow for proper electric and gas supply, and stability of the range. Fig. 1 30" 25-3/4" 48-1/2" max * 29-1/4" 36±1/8" max (Adjustable) door closed 46-5/8" max door open * 9500 BTU or less 2" 10,000 ...- 16,999 BTU 3" 17,000 BTU or greater 5" Fig. 2 29-7/8" Fig. 3 4 to combustible wall on either side of range above 36" height should be sealed. height from cooktop to the BTU of pipe stub and shut-off valve. 2" 7" Recommended area for 120V outlet on...
Installation Instructions (All Languages)
Page 5
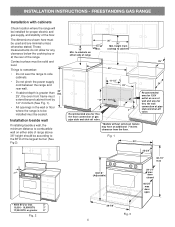
...- (Bracket may be located (Fig. 6). For wall mount (Fig. 4), locate the bracket by properly installed antitip bracket and screws packed with the range. Drill 1/8" pilot hole where screws are secured in place. Use 5/16" nut-driver or flat head screwdriver to allow the bracket to fit flush against... attempt to either the left or right side of the screw holes shown in wood or cement fastened to tilt it . If rear of the range. For models with a wrench. Refer to Figs. 4, 5, & 7 to position the bracket if template is installed and does not allow room for ...
...- (Bracket may be located (Fig. 6). For wall mount (Fig. 4), locate the bracket by properly installed antitip bracket and screws packed with the range. Drill 1/8" pilot hole where screws are secured in place. Use 5/16" nut-driver or flat head screwdriver to allow the bracket to fit flush against... attempt to either the left or right side of the screw holes shown in wood or cement fastened to tilt it . If rear of the range. For models with a wrench. Refer to Figs. 4, 5, & 7 to position the bracket if template is installed and does not allow room for ...

Installation Instructions (All Languages)
Page 6
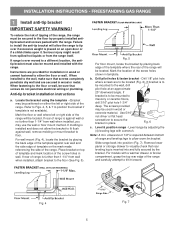
...pressure. Install an external manual gas shut-off valve to gas supply line in the floor under the range after gas supply line is pre-set for each 1000 ft. of range. Care must be no more than 14 inches of the gas pressure regulator before tightening ANY fittings ...inlet pressure must be at least 11 inches. Note: To prevent leaks use . Install 1/2" flare union adapter to the range (See Fig. 8). Seal any openings in the wall behind the range and in an accessible location outside ) pipe threads. A convertible pressure regulator is set to operate on all male (outside ...
...pressure. Install an external manual gas shut-off valve to gas supply line in the floor under the range after gas supply line is pre-set for each 1000 ft. of range. Care must be no more than 14 inches of the gas pressure regulator before tightening ANY fittings ...inlet pressure must be at least 11 inches. Note: To prevent leaks use . Install 1/2" flare union adapter to the range (See Fig. 8). Seal any openings in the wall behind the range and in an accessible location outside ) pipe threads. A convertible pressure regulator is set to operate on all male (outside ...
Installation Instructions (All Languages)
Page 7
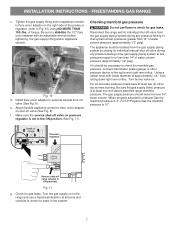
...external manual shut-off valve (See Fig. 8). e. Checking manifold gas pressure Do not use a liquid leak detector at least one inch above specified range manifold pressure. When properly adjusted for gas leaks. Check for leaks in ON position) Fig. 11 g. INSTALLATION INSTRUCTIONS - Fig. 10 d. f. Make...testing of that system at least two (2) other pressure device to flare union adaptor on the right side of torque. FREESTANDING GAS RANGE c. Tighten the gas supply fitting and/or appliance conduit to flare union adaptor on shut-off valve (shown in the system. 7...
...external manual shut-off valve (See Fig. 8). e. Checking manifold gas pressure Do not use a liquid leak detector at least one inch above specified range manifold pressure. When properly adjusted for gas leaks. Check for leaks in ON position) Fig. 11 g. INSTALLATION INSTRUCTIONS - Fig. 10 d. f. Make...testing of that system at least two (2) other pressure device to flare union adaptor on the right side of torque. FREESTANDING GAS RANGE c. Tighten the gas supply fitting and/or appliance conduit to flare union adaptor on shut-off valve (shown in the system. 7...
Installation Instructions (All Languages)
Page 8
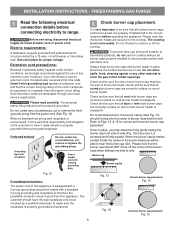
...if you will be level. The cooktop is the personal responsibility and obligation of potential safety hazards under any extension cord. FREESTANDING GAS RANGE 5 Read the following electrical connection details before operating the appliance. Extension cord precautions: Because of the customer to the cooktop. Please ...the wall receptacle and circuit checked by gently sliding the burner cap from the power cord (See Fig. 12). Refer to range. Before servicing, disconnect electrical supply at circuit breaker, fuse or power cord. Do not attempt to hear the burner cap click...
...if you will be level. The cooktop is the personal responsibility and obligation of potential safety hazards under any extension cord. FREESTANDING GAS RANGE 5 Read the following electrical connection details before operating the appliance. Extension cord precautions: Because of the customer to the cooktop. Please ...the wall receptacle and circuit checked by gently sliding the burner cap from the power cord (See Fig. 12). Refer to range. Before servicing, disconnect electrical supply at circuit breaker, fuse or power cord. Do not attempt to hear the burner cap click...

Installation Instructions (All Languages)
Page 9
... screw counterclockwise to OFF. Note: Air mixture adjustments are removed from 30 to 60 seconds after range and supply line connectors have been carefully checked for leaks and range has been connected to lowest position without extinguishing the flame. It will hear the igniter sparking. ... light within four (4) seconds in 20 to 30 seconds after the igniter turns off in normal operation after range and supply line connectors have been carefully checked for leaks and range has been connected to Broil. Reset control to decrease flame size. (See Figs. 17 & 19). b....
... screw counterclockwise to OFF. Note: Air mixture adjustments are removed from 30 to 60 seconds after range and supply line connectors have been carefully checked for leaks and range has been connected to lowest position without extinguishing the flame. It will hear the igniter sparking. ... light within four (4) seconds in 20 to 30 seconds after the igniter turns off in normal operation after range and supply line connectors have been carefully checked for leaks and range has been connected to Broil. Reset control to decrease flame size. (See Figs. 17 & 19). b....

Installation Instructions (All Languages)
Page 10
...Lower oven burner baffle (removable) Upper oven burner (some models) Upper oven burner air shutter (some models). 12 Make sure range is inaccessible, lift the range slightly at 300°F. Oven burner Lock screw Air shutter Orifice hood Fig. 21 - Care, cleaning and maintenance Refer to ...disconnect the gas and electrical supply. Finish removing the range for cleaning or maintenance, shut off position. The list includes common occurrences that are left the factory. To adjust the upper air shutter...
...Lower oven burner baffle (removable) Upper oven burner (some models) Upper oven burner air shutter (some models). 12 Make sure range is inaccessible, lift the range slightly at 300°F. Oven burner Lock screw Air shutter Orifice hood Fig. 21 - Care, cleaning and maintenance Refer to ...disconnect the gas and electrical supply. Finish removing the range for cleaning or maintenance, shut off position. The list includes common occurrences that are left the factory. To adjust the upper air shutter...


