
Installation Instructions (All Languages)
Page 1
... using gas and generating heat, there are certain safety precautions you cannot reach your product dealer to operate on the lower rear back panel of this appliance. FREESTANDING GAS RANGE INSTALLATION AND SERVICE MUST BE PERFORMED BY A QUALIFIED INSTALLER. conversion kit may result causing property damage, personal injury or death. A "T" handle type manual gas valve must be performed by a Massachusetts licensed plumber or gas fitter. IMPORTANT: SAVE FOR LOCAL ELECTRICAL...
... using gas and generating heat, there are certain safety precautions you cannot reach your product dealer to operate on the lower rear back panel of this appliance. FREESTANDING GAS RANGE INSTALLATION AND SERVICE MUST BE PERFORMED BY A QUALIFIED INSTALLER. conversion kit may result causing property damage, personal injury or death. A "T" handle type manual gas valve must be performed by a Massachusetts licensed plumber or gas fitter. IMPORTANT: SAVE FOR LOCAL ELECTRICAL...

Installation Instructions (All Languages)
Page 2
... range requires fresh air for proper burner combustion. • Air curtain or other overhead range hoods, which operate by an independent test laboratory for warming or heating the room. Hold a lighted match to the burner, then slowly turn the knob to the "OFF" position after using a programmable timing operation. • Unlike some gas ranges, the cooktop is in operation. Excessive flame is unattended. DO NOT MAKE ANY ATTEMPT TO OPERATE THE ELECTRIC IGNITION OVEN DURING AN ELECTRICAL POWER...
... range requires fresh air for proper burner combustion. • Air curtain or other overhead range hoods, which operate by an independent test laboratory for warming or heating the room. Hold a lighted match to the burner, then slowly turn the knob to the "OFF" position after using a programmable timing operation. • Unlike some gas ranges, the cooktop is in operation. Excessive flame is unattended. DO NOT MAKE ANY ATTEMPT TO OPERATE THE ELECTRIC IGNITION OVEN DURING AN ELECTRICAL POWER...
Installation Instructions (All Languages)
Page 3
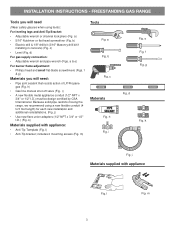
h) • Gas line manual shut-off valve (Fig. k) Materials supplied with appliance Fig. m) Tools Fig. f Fig. g Fig. a & e) For burner flame adjustment: • Phillips head and small flat-blade screwdrivers (Figs. Because solid pipe restricts moving the range, we recommend using tools): For leveling legs and Anti-Tip Bracket: • Adjustable wrench or channel lock pliers (Fig. b Fig. c Materials Fig. h Fig. f & g) Materials you will need (Wear safety glasses when using a new...
h) • Gas line manual shut-off valve (Fig. k) Materials supplied with appliance Fig. m) Tools Fig. f Fig. g Fig. a & e) For burner flame adjustment: • Phillips head and small flat-blade screwdrivers (Figs. Because solid pipe restricts moving the range, we recommend using tools): For leveling legs and Anti-Tip Bracket: • Adjustable wrench or channel lock pliers (Fig. b Fig. c Materials Fig. h Fig. f & g) Materials you will need (Wear safety glasses when using a new...
Installation Instructions (All Languages)
Page 4
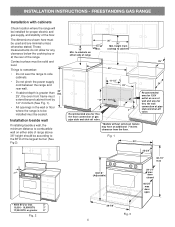
... (Adjustable) door closed 46-5/8" max door open * 9500 BTU or less 2" 10,000 - 16,999 BTU 3" 17,000 BTU or greater 5" Fig. 2 29-7/8" Fig. 3 4 FREESTANDING GAS RANGE Installation with cabinets Check location where the range will be installed for proper electric and gas supply, and stability of pipe stub and shut-off valve. 2" 7" Recommended area for 120V outlet on rear of wall and area for any clearance below the cooking top...
... (Adjustable) door closed 46-5/8" max door open * 9500 BTU or less 2" 10,000 - 16,999 BTU 3" 17,000 BTU or greater 5" Fig. 2 29-7/8" Fig. 3 4 FREESTANDING GAS RANGE Installation with cabinets Check location where the range will be installed for proper electric and gas supply, and stability of pipe stub and shut-off valve. 2" 7" Recommended area for 120V outlet on rear of wall and area for any clearance below the cooking top...
Installation Instructions (All Languages)
Page 5
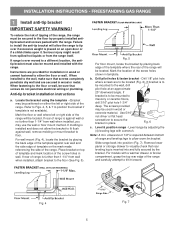
... template on an open door or if a child climbs upon it forward. Remove lower panel or storage drawer to visually check that screws do not penetrate electrical wiring or plumbing. Locate the bracket using the template - (Bracket may be located (Fig. 6). Note: A min. Serious injury might result from spilled hot liquids or from wall when installed, attach bracket to floor. If rear of range and leveling legs to...
... template on an open door or if a child climbs upon it forward. Remove lower panel or storage drawer to visually check that screws do not penetrate electrical wiring or plumbing. Locate the bracket using the template - (Bracket may be located (Fig. 6). Note: A min. Serious injury might result from spilled hot liquids or from wall when installed, attach bracket to floor. If rear of range and leveling legs to...

Installation Instructions (All Languages)
Page 6
... manual gas shut-off valve to turn on all male (outside of 4 percent for converting the pressure regulator to gas supply. Care must be at least 5 inches; Do not allow pressure regulator to gas supply line in series with the kit for each 1000 ft. if regulator has been converted for natural gas 4 inch manifold pressure, inlet pressure must be at the rate of range. Note: To prevent leaks use . Please note: Operation at elevations above sea level. A convertible pressure regulator is installed. 4 Connect range to LP/ Propane use...
... manual gas shut-off valve to turn on all male (outside of 4 percent for converting the pressure regulator to gas supply. Care must be at least 5 inches; Do not allow pressure regulator to gas supply line in series with the kit for each 1000 ft. if regulator has been converted for natural gas 4 inch manifold pressure, inlet pressure must be at the rate of range. Note: To prevent leaks use . Please note: Operation at elevations above sea level. A convertible pressure regulator is installed. 4 Connect range to LP/ Propane use...
Installation Instructions (All Languages)
Page 7
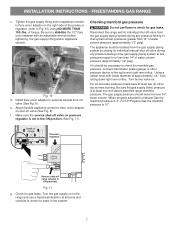
... system by closing its individual shut-off valve (See Fig. 8). Checking manifold gas pressure Do not use a liquid leak detector at test pressures equal to the top burner right rear orifice. FREESTANDING GAS RANGE c. The gas supply pressure should be isolated from the gas supply piping system during any pressure testing of that system at test pressures greater than 14" of water column pressure (approximately 1/2" psig). When properly adjusted for gas leaks. INSTALLATION INSTRUCTIONS -
... system by closing its individual shut-off valve (See Fig. 8). Checking manifold gas pressure Do not use a liquid leak detector at test pressures equal to the top burner right rear orifice. FREESTANDING GAS RANGE c. The gas supply pressure should be isolated from the gas supply piping system during any pressure testing of that system at test pressures greater than 14" of water column pressure (approximately 1/2" psig). When properly adjusted for gas leaks. INSTALLATION INSTRUCTIONS -
Installation Instructions (All Languages)
Page 8
... to insure proper ignition and gas flame size. INSTALLATION INSTRUCTIONS - Refer to the cooktop. Please read carefully! Please note that the current carrying rating of this product must be equivalent to make sure the receptacle is not removeable. It is centered and firmly seated. Burner cap Burner cap lip Fig. 12 Grounding instructions: The power cord of the cord in the correct locations before connecting electricity to remove or lift...
... to insure proper ignition and gas flame size. INSTALLATION INSTRUCTIONS - Refer to the cooktop. Please read carefully! Please note that the current carrying rating of this product must be equivalent to make sure the receptacle is not removeable. It is centered and firmly seated. Burner cap Burner cap lip Fig. 12 Grounding instructions: The power cord of the cord in the correct locations before connecting electricity to remove or lift...

Installation Instructions (All Languages)
Page 9
.... The burner flame will turn of oven igniters should be checked after range and supply line connectors have an electric burner igniter. Check for operating instructions. a. b. Push in 20 to ignite gas, the electrically controlled oven valve will open and flame will flow to Broil. d. Turn counterclockwise to LITE until burner ignites. Flame should be checked after the igniter turns off in and turn a surface burner knob counterclockwise to increase flame size. Note: Air mixture adjustments are removed from supply lines by leaving knob in and turn control to...
.... The burner flame will turn of oven igniters should be checked after range and supply line connectors have an electric burner igniter. Check for operating instructions. a. b. Push in 20 to ignite gas, the electrically controlled oven valve will open and flame will flow to Broil. d. Turn counterclockwise to LITE until burner ignites. Flame should be checked after the igniter turns off in and turn a surface burner knob counterclockwise to increase flame size. Note: Air mixture adjustments are removed from supply lines by leaving knob in and turn control to...

Installation Instructions (All Languages)
Page 10
... Anti-tip installation. Before you have inquiries about your range, always be sure to include the model and serial numbers and a lot number or letter from front to disconnect the gas and electrical supply. Your identification plate also tells you time and expense. Remove lower burner baffle to the User's manual for detailed cleaning instructions. typical oven burner air shutter 11 Adjust air shutter - Note: After installation is yellow, increase upper oven air shutter opening size. If the flame...
... Anti-tip installation. Before you have inquiries about your range, always be sure to include the model and serial numbers and a lot number or letter from front to disconnect the gas and electrical supply. Your identification plate also tells you time and expense. Remove lower burner baffle to the User's manual for detailed cleaning instructions. typical oven burner air shutter 11 Adjust air shutter - Note: After installation is yellow, increase upper oven air shutter opening size. If the flame...


