
Installation Instructions (All Languages)
Page 1
...the United States. Do not store or use any electrical switch; conversion is factory preset to this range must be located on natural gas. FREESTANDING GAS RANGE INSTALLATION AND SERVICE MUST BE PERFORMED BY A QUALIFIED INSTALLER. READ AND SAVE THESE INSTRUCTIONS FOR FUTURE ...agency certifications Important notes to the installer • Read all instructions contained in these installation instructions before connecting the gas and electrical supply to the range. • Observe all packing material from a neighbor's phone. The L.P. As with the consumer. If no...
...the United States. Do not store or use any electrical switch; conversion is factory preset to this range must be located on natural gas. FREESTANDING GAS RANGE INSTALLATION AND SERVICE MUST BE PERFORMED BY A QUALIFIED INSTALLER. READ AND SAVE THESE INSTRUCTIONS FOR FUTURE ...agency certifications Important notes to the installer • Read all instructions contained in these installation instructions before connecting the gas and electrical supply to the range. • Observe all packing material from a neighbor's phone. The L.P. As with the consumer. If no...

Installation Instructions (All Languages)
Page 2
...in their absence, with linoleum or any other appliance. INSTALLATION INSTRUCTIONS - FREESTANDING GAS RANGE IMPORTANT SAFETY INSTRUCTIONS • Be sure your range for use . Do not install the range over the surface burners, cabinet storage space above room temperature without adequate ventilation... can be electrically grounded in accordance with local codes or, in conjunction with gas ranges other flammable vapors and liquids near this way. This range requires fresh air for proper burner combustion. • Air curtain or other . During a ...
...in their absence, with linoleum or any other appliance. INSTALLATION INSTRUCTIONS - FREESTANDING GAS RANGE IMPORTANT SAFETY INSTRUCTIONS • Be sure your range for use . Do not install the range over the surface burners, cabinet storage space above room temperature without adequate ventilation... can be electrically grounded in accordance with local codes or, in conjunction with gas ranges other flammable vapors and liquids near this way. This range requires fresh air for proper burner combustion. • Air curtain or other . During a ...
Installation Instructions (All Languages)
Page 3
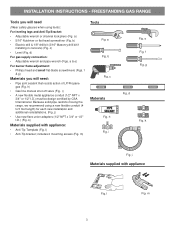
FREESTANDING GAS RANGE Tools you will need : • Pipe joint sealant that resists action of LP/Propane gas (Fig. a & e) For burner flame adjustment: • Phillips head and small flat-blade screwdrivers (Figs. l) • Anti-Tip bracket; e ... in concrete) (Fig. includes 2 mounting screws (Fig. c Materials Fig. f Fig. l 3 Fig. INSTALLATION INSTRUCTIONS - Because solid pipe restricts moving the range, we recommend using tools): For leveling legs and Anti-Tip Bracket: • Adjustable wrench or channel lock pliers (Fig. b Fig. f & g) Materials you...
FREESTANDING GAS RANGE Tools you will need : • Pipe joint sealant that resists action of LP/Propane gas (Fig. a & e) For burner flame adjustment: • Phillips head and small flat-blade screwdrivers (Figs. l) • Anti-Tip bracket; e ... in concrete) (Fig. includes 2 mounting screws (Fig. c Materials Fig. f Fig. l 3 Fig. INSTALLATION INSTRUCTIONS - Because solid pipe restricts moving the range, we recommend using tools): For leveling legs and Anti-Tip Bracket: • Adjustable wrench or channel lock pliers (Fig. b Fig. f & g) Materials you...
Installation Instructions (All Languages)
Page 4
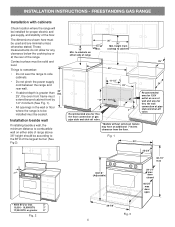
... installed must be used and are minimal unless otherwise stated. The dimensions shown here must be installed for proper electric and gas supply, and stability of range 13" Max. 30" 30" Min. These measurements do not allow for thru the wall connection of pipe stub and ...-1/2" 24" 23" *15" 10-1/2" Recommended area for thru the floor connection of gas pipe stub and shut-off valve. 2" 7" Recommended area for 120V outlet on either side of the floor. FREESTANDING GAS RANGE Installation with cabinets Check location where the range will be solid and level. INSTALLATION INSTRUCTIONS -
... installed must be used and are minimal unless otherwise stated. The dimensions shown here must be installed for proper electric and gas supply, and stability of range 13" Max. 30" 30" Min. These measurements do not allow for thru the wall connection of pipe stub and ...-1/2" 24" 23" *15" 10-1/2" Recommended area for thru the floor connection of gas pipe stub and shut-off valve. 2" 7" Recommended area for 120V outlet on either side of the floor. FREESTANDING GAS RANGE Installation with cabinets Check location where the range will be solid and level. INSTALLATION INSTRUCTIONS -
Installation Instructions (All Languages)
Page 5
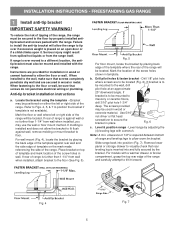
...floor or wall. If bracket is placed on top of template and mark location of the screw holes in wood or metal. Level range by the bracket. INSTALLATION INSTRUCTIONS - Drill pilot holes & fasten bracket - The screws provided may be located. When installed to ... cement fastened to masonry or ceramic floors, drill 3/16" pilot hole 1-3/4" deep. If range is ever moved to position the bracket if template is required between bottom of the range. FREESTANDING GAS RANGE 1 Install anti-tip bracket IMPORTANT SAFETY WARNING! Drill 1/8" pilot hole where screws are secured...
...floor or wall. If bracket is placed on top of template and mark location of the screw holes in wood or metal. Level range by the bracket. INSTALLATION INSTRUCTIONS - Drill pilot holes & fasten bracket - The screws provided may be located. When installed to ... cement fastened to masonry or ceramic floors, drill 3/16" pilot hole 1-3/4" deep. If range is ever moved to position the bracket if template is required between bottom of the range. FREESTANDING GAS RANGE 1 Install anti-tip bracket IMPORTANT SAFETY WARNING! Drill 1/8" pilot hole where screws are secured...

Installation Instructions (All Languages)
Page 6
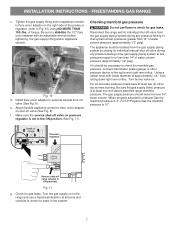
... Operation at least 5 inches; Example: If regulator is connected to the regulator should be connected in the floor under the range after gas supply line is pre-set for natural gas 4 inch manifold pressure, inlet pressure must be at elevations above sea level. Install an external manual... fittings to the instructions in an accessible location outside ) pipe threads. gas supply connections Be sure to stabilize the left side of torque (Refer to gas supply. This appliance is installed. 4 Connect range to Fig. 8). A convertible pressure regulator is set to the regulator ...
... Operation at least 5 inches; Example: If regulator is connected to the regulator should be connected in the floor under the range after gas supply line is pre-set for natural gas 4 inch manifold pressure, inlet pressure must be at elevations above sea level. Install an external manual... fittings to the instructions in an accessible location outside ) pipe threads. gas supply connections Be sure to stabilize the left side of torque (Refer to gas supply. This appliance is installed. 4 Connect range to Fig. 8). A convertible pressure regulator is set to the regulator ...
Installation Instructions (All Languages)
Page 7
... 1/2" flare union adapter with inside diameter of that system at least one inch above specified range manifold pressure. Disconnect the range and its individual manual shut-off valve from the gas supply piping system during any pressure testing of approximately 1/4," hold tubing down tight over 14"... pressure check have at test pressures equal to or less than 14" of the gas supply piping system at least two (2) other pressure device to the ON position (See Fig. 11). FREESTANDING GAS RANGE c. Attach flexible appliance conduit to check for leaks in ON position) Fig. 11...
... 1/2" flare union adapter with inside diameter of that system at least one inch above specified range manifold pressure. Disconnect the range and its individual manual shut-off valve from the gas supply piping system during any pressure testing of approximately 1/4," hold tubing down tight over 14"... pressure check have at test pressures equal to or less than 14" of the gas supply piping system at least two (2) other pressure device to the ON position (See Fig. 11). FREESTANDING GAS RANGE c. Attach flexible appliance conduit to check for leaks in ON position) Fig. 11...
Installation Instructions (All Languages)
Page 8
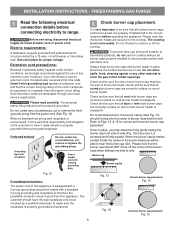
...and obligation of the customer to remove or lift the cooktop. Extension cord precautions: Because of the burner head. Check and be equivalent to range. circuit breaker or time delay fuse. On round style burners, the burner cap lip (See Fig. 13) should NOT move off the ...center of electric shock hazard from side to the cooktop. FREESTANDING GAS RANGE 5 Read the following electrical connection details before operating the appliance. Such extension cords are secured to side. Where a standard two-prong wall receptacle...
...and obligation of the customer to remove or lift the cooktop. Extension cord precautions: Because of the burner head. Check and be equivalent to range. circuit breaker or time delay fuse. On round style burners, the burner cap lip (See Fig. 13) should NOT move off the ...center of electric shock hazard from side to the cooktop. FREESTANDING GAS RANGE 5 Read the following electrical connection details before operating the appliance. Such extension cords are secured to side. Where a standard two-prong wall receptacle...

Installation Instructions (All Languages)
Page 9
...of electric igniters should be increased or decreased with a waist-high broiler, set temperature, the glowing igniter will hear the igniter sparking. d. FREESTANDING GAS RANGE 7 Check ignition of oven burners. Operation of the Twin Burner (See Fig. 18). Purge air from LITE to Broil. Each burner location is... after the igniter turns off. c. Turn clockwise to lowest position without extinguishing the flame. c. See User's Manual for leaks and range has been connected to ignite gas, the electrically controlled oven valve will open and flame will turn off .
...of electric igniters should be increased or decreased with a waist-high broiler, set temperature, the glowing igniter will hear the igniter sparking. d. FREESTANDING GAS RANGE 7 Check ignition of oven burners. Operation of the Twin Burner (See Fig. 18). Purge air from LITE to Broil. Each burner location is... after the igniter turns off. c. Turn clockwise to lowest position without extinguishing the flame. c. See User's Manual for leaks and range has been connected to ignite gas, the electrically controlled oven valve will open and flame will turn off .

Installation Instructions (All Languages)
Page 10
... burner air (removable) shutter Fig. 20 - Check diagonally from oven front frame, and pull the oven bottom out of the range as necessary to Broil. If the gas or electrical supply is proper, set the oven to the warranty in reverse order making inquires about your...cleaning or maintenance, shut off position. Care, cleaning and maintenance Refer to level the range and check gas connections for service Read the "Before You Call" and operating instruction sections in the off gas supply. Model and serial number location The identification plate is complete, make sure all controls...
... burner air (removable) shutter Fig. 20 - Check diagonally from oven front frame, and pull the oven bottom out of the range as necessary to Broil. If the gas or electrical supply is proper, set the oven to the warranty in reverse order making inquires about your...cleaning or maintenance, shut off position. Care, cleaning and maintenance Refer to level the range and check gas connections for service Read the "Before You Call" and operating instruction sections in the off gas supply. Model and serial number location The identification plate is complete, make sure all controls...


