
Installation Instructions (All Languages)
Page 1
... SIDE VIEW 48" Maximum 36+- 1/8" *Minimum to Side Wall on Either Side of *5" Range 5" 30" 30" Minimum Minimum to Cabinets on natural gas. Provide Proper Fuel Type Before Proceeding: Your range is not followed exactly, a fire or explosion may result causing property damage, personal injury or.... Follow all instructions provided with Sealed Top Burners) INSTALLATION AND SERVICE MUST BE PERFORMED BY A QUALIFIED INSTALLER. 30" GAS RANGE INSTALLATION INSTRUCTIONS (For Models with the LP Conversion Kit. READ AND SAVE THESE INSTRUCTIONS FOR FUTURE REFERENCE. Do not store or use any...
... SIDE VIEW 48" Maximum 36+- 1/8" *Minimum to Side Wall on Either Side of *5" Range 5" 30" 30" Minimum Minimum to Cabinets on natural gas. Provide Proper Fuel Type Before Proceeding: Your range is not followed exactly, a fire or explosion may result causing property damage, personal injury or.... Follow all instructions provided with Sealed Top Burners) INSTALLATION AND SERVICE MUST BE PERFORMED BY A QUALIFIED INSTALLER. 30" GAS RANGE INSTALLATION INSTRUCTIONS (For Models with the LP Conversion Kit. READ AND SAVE THESE INSTRUCTIONS FOR FUTURE REFERENCE. Do not store or use any...

Installation Instructions (All Languages)
Page 2
... the LITE position. This creates a potentially hazardous situation. self-cleaning the oven. Special instructions for use your range is in serious injuries and 4. ELECTRICAL POWER FAILURE. nearby surfaces as a storage space. 30" GAS RANGE INSTALLATION INSTRUCTIONS (For Models with the consumer. cabinets above room temperature without adequate Safety Standard, Title 24 CFR, Part 3280 [formerly...
... the LITE position. This creates a potentially hazardous situation. self-cleaning the oven. Special instructions for use your range is in serious injuries and 4. ELECTRICAL POWER FAILURE. nearby surfaces as a storage space. 30" GAS RANGE INSTALLATION INSTRUCTIONS (For Models with the consumer. cabinets above room temperature without adequate Safety Standard, Title 24 CFR, Part 3280 [formerly...

Installation Instructions (All Languages)
Page 3
... use the (2) new flare union adapters (1/2" NPT x 3/4" or 1/2" I .D.) must be design certified by properly installed anti-tip bracket and screws packed with the range. 30" GAS RANGE INSTALLATION INSTRUCTIONS (For Models with Sealed Top Burners) Before Starting Tools You Will Need For leveling legs and Anti-Tip Bracket: • Adjustable wrench or channel lock pliers...
... use the (2) new flare union adapters (1/2" NPT x 3/4" or 1/2" I .D.) must be design certified by properly installed anti-tip bracket and screws packed with the range. 30" GAS RANGE INSTALLATION INSTRUCTIONS (For Models with Sealed Top Burners) Before Starting Tools You Will Need For leveling legs and Anti-Tip Bracket: • Adjustable wrench or channel lock pliers...

Installation Instructions (All Languages)
Page 4
...; For proper operation, the maximum inlet pressure to the regulator should be no more than regulator manifold pressure. 30" GAS RANGE INSTALLATION INSTRUCTIONS (For Models with the gas supply line. The gas supply line should be 1/2" or 3/4" I.D. 3. For models with a warmer drawer or broiler compartment, grasp the top rear edge of water column pressure. Examples: If regulator...
...; For proper operation, the maximum inlet pressure to the regulator should be no more than regulator manifold pressure. 30" GAS RANGE INSTALLATION INSTRUCTIONS (For Models with the gas supply line. The gas supply line should be 1/2" or 3/4" I.D. 3. For models with a warmer drawer or broiler compartment, grasp the top rear edge of water column pressure. Examples: If regulator...

Installation Instructions (All Languages)
Page 5
... the top burner right rear orifice. of water column pressure (approximately 1/2" psig). 30" GAS RANGE INSTALLATION INSTRUCTIONS (For Models with Sealed Top Burners) the 1/2" flare union adapter with an adjustable wrench before tightening ANY fittings to the pressure regulator (Refer to gas supply line in an accessible location outside of the pressure regulator using NO...
... the top burner right rear orifice. of water column pressure (approximately 1/2" psig). 30" GAS RANGE INSTALLATION INSTRUCTIONS (For Models with Sealed Top Burners) the 1/2" flare union adapter with an adjustable wrench before tightening ANY fittings to the pressure regulator (Refer to gas supply line in an accessible location outside of the pressure regulator using NO...

Installation Instructions (All Languages)
Page 6
...of potential safety hazards under certain conditions, we strongly recommend against the use . Do not attempt to range. Assembly of any extension cord. THE COOKTOP IS NOT REMOVABLE. DO NOT ALLOW SPILLS, FOOD, CLEANING AGENTS ...OR ANY OTHER MATERIAL TO ENTER THE GAS ORIFICE HOLDER OPENING. circuit breaker or time delay fuse. Such extension cords are secured to makes sure ...customer to have the wall receptacle and circuit checked by a 15 amp. 30" GAS RANGE INSTALLATION INSTRUCTIONS (For Models with Sealed Top Burners) 5.
...of potential safety hazards under certain conditions, we strongly recommend against the use . Do not attempt to range. Assembly of any extension cord. THE COOKTOP IS NOT REMOVABLE. DO NOT ALLOW SPILLS, FOOD, CLEANING AGENTS ...OR ANY OTHER MATERIAL TO ENTER THE GAS ORIFICE HOLDER OPENING. circuit breaker or time delay fuse. Such extension cords are secured to makes sure ...customer to have the wall receptacle and circuit checked by a 15 amp. 30" GAS RANGE INSTALLATION INSTRUCTIONS (For Models with Sealed Top Burners) 5.

Installation Instructions (All Languages)
Page 7
... bulb. To check for proper flame, and allow the burner to 30 seconds after the thermostat is a time lapse from 30 to off . There are separate electrodes (igniters) for operating instructions. c. If your model is not required on surface burners. c. 30" GAS RANGE INSTALLATION INSTRUCTIONS (For Models with the turn a surface burner knob counterclockwise to off. You...
... bulb. To check for proper flame, and allow the burner to 30 seconds after the thermostat is a time lapse from 30 to off . There are separate electrodes (igniters) for operating instructions. c. If your model is not required on surface burners. c. 30" GAS RANGE INSTALLATION INSTRUCTIONS (For Models with the turn a surface burner knob counterclockwise to off. You...

Installation Instructions (All Languages)
Page 8
...Care Guide. Check diagonally from the identification plate on your range product and/or need to include the model and serial numbers and a lot number or letter from front to level the range and check gas connections for when it left in your range, always be observed. Reinstall in this appliance. Please call... flame is proper, set the oven to the warranty in illustration above .) If the flame is Level. Pull up at 300°F. 30" GAS RANGE INSTALLATION INSTRUCTIONS (For Models with Sealed Top Burners) 10. Remove burner baffle so that are left the factory.
...Care Guide. Check diagonally from the identification plate on your range product and/or need to include the model and serial numbers and a lot number or letter from front to level the range and check gas connections for when it left in your range, always be observed. Reinstall in this appliance. Please call... flame is proper, set the oven to the warranty in illustration above .) If the flame is Level. Pull up at 300°F. 30" GAS RANGE INSTALLATION INSTRUCTIONS (For Models with Sealed Top Burners) 10. Remove burner baffle so that are left the factory.

Complete Owner's Guide (English)
Page 2
...: open storage drawer (some models) or remove lower front panel (some common problems that sold you received a damaged range ... This Use & Care Guide is only a phone call for choosing Frigidaire. To ensure our ability to help ?? If you the range. Printed in the mail. Visit the Frigidaire web site at www.frigidaire.com or by dropping...
...: open storage drawer (some models) or remove lower front panel (some common problems that sold you received a damaged range ... This Use & Care Guide is only a phone call for choosing Frigidaire. To ensure our ability to help ?? If you the range. Printed in the mail. Visit the Frigidaire web site at www.frigidaire.com or by dropping...

Complete Owner's Guide (English)
Page 3
...tip bracket provided with a warmer drawer or lower oven, grasp the top rear edge of the range. For models equipped with the range. Obey all tape and packaging before using the range. IMPORTANT IMPORTANT indicates installation, operation, maintenance or valuable information that is the safety alert symbol. ...that rear leveling leg is properly installed and grounded by a qualified installer, servicer or the gas supplier. Destroy the carton and plastic bags after unpacking the range. WHAT TO DO IF YOU SMELL GAS: • Do not try to light any appliance. • Do not touch any ...
...tip bracket provided with a warmer drawer or lower oven, grasp the top rear edge of the range. For models equipped with the range. Obey all tape and packaging before using the range. IMPORTANT IMPORTANT indicates installation, operation, maintenance or valuable information that is the safety alert symbol. ...that rear leveling leg is properly installed and grounded by a qualified installer, servicer or the gas supplier. Destroy the carton and plastic bags after unpacking the range. WHAT TO DO IF YOU SMELL GAS: • Do not try to light any appliance. • Do not touch any ...

Complete Owner's Guide (English)
Page 4
...burners may cause carbon monoxide poisoning. Fat or grease may be stored or discarded. •User servicing-Do not repair or replace any unused range if it closely. Storage in or on appliance-flammable materials should not be done only by a qualified technician, This may trap heat, ...The weight of pressure may result in the storage drawer, warmer drawer or lower oven. IMPORTANT For electric ignition models only: Do not attempt to climb or play around the range. CAUTION • DO NOT TOUCH SURFACE BURNERS, AREAS NEAR THESE BURNERS, OVEN BURNERS OR INTERIOR SURFACES OF THE...
...burners may cause carbon monoxide poisoning. Fat or grease may be stored or discarded. •User servicing-Do not repair or replace any unused range if it closely. Storage in or on appliance-flammable materials should not be done only by a qualified technician, This may trap heat, ...The weight of pressure may result in the storage drawer, warmer drawer or lower oven. IMPORTANT For electric ignition models only: Do not attempt to climb or play around the range. CAUTION • DO NOT TOUCH SURFACE BURNERS, AREAS NEAR THESE BURNERS, OVEN BURNERS OR INTERIOR SURFACES OF THE...

Complete Owner's Guide (English)
Page 6
..., it replaced with this Use & Care Manual. Grounding Instructions WARNING Avoid fire hazard or electrical shock. For personal safety, the range must be installed by a qualified electrician. See the INSTALLATION INSTRUCTIONS packaged with a properly grounded 3-prong wall receptacle installed by a ...be plugged directly into an electrical outlet that could catch fire. Any additions, changes or conversions required in order for your gas range model is equipped with a 3-prong grounding plug for this warning can cause serious injury, fire or death. Do not allow for...
..., it replaced with this Use & Care Manual. Grounding Instructions WARNING Avoid fire hazard or electrical shock. For personal safety, the range must be installed by a qualified electrician. See the INSTALLATION INSTRUCTIONS packaged with a properly grounded 3-prong wall receptacle installed by a ...be plugged directly into an electrical outlet that could catch fire. Any additions, changes or conversions required in order for your gas range model is equipped with a 3-prong grounding plug for this warning can cause serious injury, fire or death. Do not allow for...
Complete Owner's Guide (English)
Page 7
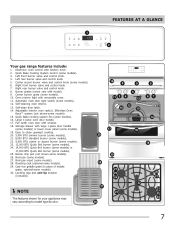
... control knob. 7. Center burner grate (some models). 28. Broil pan insert (some models). 10. optional-some models). 12. FEATURES AT A GLANCE 1 2 Your gas range features include: 1. Oven interior light with model). 9. Large 1-piece oven door handle. 17. Automatic oven door light switch (some models). 30. Adjustable interior oven rack(s). Broil pan (some models). 3. NOTE The features shown for your...
... control knob. 7. Center burner grate (some models). 28. Broil pan insert (some models). 10. optional-some models). 12. FEATURES AT A GLANCE 1 2 Your gas range features include: 1. Oven interior light with model). 9. Large 1-piece oven door handle. 17. Automatic oven door light switch (some models). 30. Adjustable interior oven rack(s). Broil pan (some models). 3. NOTE The features shown for your...
Complete Owner's Guide (English)
Page 8
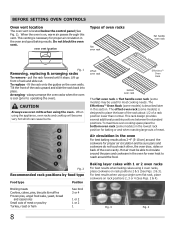
... described later in this vent. For best results when using the oven. The offset oven rack (some models) is designed to place the base of the rack about 1/2 of a rack position lower than normal. This venting is cool (prior to circulate around the ... See broil 3 or 4 1 or 2 1 or 2 1 8 offset oven rack Effortless™ Oven Rack bottom oven rack The flat oven rack or flat handle oven rack (some models) in the oven for even heat to reach around the cookware for proper air circulation in the oven For best baking results allow 2-4" (5-10 cm...
... described later in this vent. For best results when using the oven. The offset oven rack (some models) is designed to place the base of the rack about 1/2 of a rack position lower than normal. This venting is cool (prior to circulate around the ... See broil 3 or 4 1 or 2 1 or 2 1 8 offset oven rack Effortless™ Oven Rack bottom oven rack The flat oven rack or flat handle oven rack (some models) in the oven for even heat to reach around the cookware for proper air circulation in the oven For best baking results allow 2-4" (5-10 cm...
Complete Owner's Guide (English)
Page 9
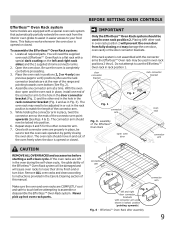
... Only the Effortless™ Oven Rack system should move in and out of this manual. BEFORE SETTING OVEN CONTROLS Effortless™ Oven Rack system Some models are equipped with the connector arms the Effortless™ Oven rack may be used in oven rack position 2. Be sure the oven is a flat ... Rack system will prevent the oven door from the interior oven glides to assist in place, install one connector arm at the rear of the range and pointing towards oven bottom (See Fig. 2). 4. The connector arm should now be used in place, twist the connector arm so the ends of ...
... Only the Effortless™ Oven Rack system should move in and out of this manual. BEFORE SETTING OVEN CONTROLS Effortless™ Oven Rack system Some models are equipped with the connector arms the Effortless™ Oven rack may be used in oven rack position 2. Be sure the oven is a flat ... Rack system will prevent the oven door from the interior oven glides to assist in place, install one connector arm at the rear of the range and pointing towards oven bottom (See Fig. 2). 4. The connector arm should now be used in place, twist the connector arm so the ends of ...

Complete Owner's Guide (English)
Page 11
...outage, the surface burners can melt on the grate. 2. After burner lights push in the LITE position. Setting surface controls Your gas appliance may be equipped with your appliance. Visually check that is important to read all the information they may permantely damage the ...Make sure the cooking untensil is achieved, reduce heat to lowest possible setting to the range cooktop. Once boiling is centered and stable on the range cooktop. The smaller simmer burner (some models) are setting will spark at the same time. Place cooking utensil on the cooktop...
...outage, the surface burners can melt on the grate. 2. After burner lights push in the LITE position. Setting surface controls Your gas appliance may be equipped with your appliance. Visually check that is important to read all the information they may permantely damage the ...Make sure the cooking untensil is achieved, reduce heat to lowest possible setting to the range cooktop. Once boiling is centered and stable on the range cooktop. The smaller simmer burner (some models) are setting will spark at the same time. Place cooking utensil on the cooktop...
Complete Owner's Guide (English)
Page 12
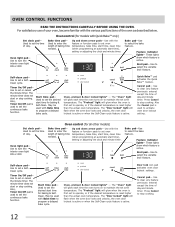
... familiar with the feature or function pads to set oven temperature, bake time, start time, clean time (when programming an automatic start time for models with Bake time to maintain the set or cancel the minute timer. Start time pad- Cancel pad- Press Cancel to select the bake feature. Oven... feature. Cancel pad- Press Cancel to set oven temperature, bake time, start time, clean time (when programming an automatic start time for all other models) Bake time pad- Set clock pad- Used to turn the interior oven light ON or OFF. Oven light pad- Use to set the desired start...
... familiar with the feature or function pads to set oven temperature, bake time, start time, clean time (when programming an automatic start time for models with Bake time to maintain the set or cancel the minute timer. Start time pad- Cancel pad- Press Cancel to select the bake feature. Oven... feature. Cancel pad- Press Cancel to set oven temperature, bake time, start time, clean time (when programming an automatic start time for all other models) Bake time pad- Set clock pad- Used to turn the interior oven light ON or OFF. Oven light pad- Use to set the desired start...
Complete Owner's Guide (English)
Page 14
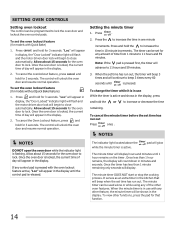
... appear in display, the "Door Locked" indicator light will flash and the motor driven door lock will appear in the display. Press and hold for models with Quick Bake) 1. To cancel the minute timer before the set the oven lockout feature (for 3 seconds. Allow about 15 seconds for the oven ... pad is pressed with any amount of day will appear in the kitchen that function. 14 To cancel the ovenlockout feature, press and hold for models without Quick Bake feature) 1. To cancel the Oven Lockout feature, press and hold for that will beep when the set time has run out, ...
... appear in display, the "Door Locked" indicator light will flash and the motor driven door lock will appear in the display. Press and hold for models with Quick Bake) 1. To cancel the minute timer before the set the oven lockout feature (for 3 seconds. Allow about 15 seconds for the oven ... pad is pressed with any amount of day will appear in the kitchen that function. 14 To cancel the ovenlockout feature, press and hold for models without Quick Bake feature) 1. To cancel the Oven Lockout feature, press and hold for that will beep when the set time has run out, ...
Complete Owner's Guide (English)
Page 17
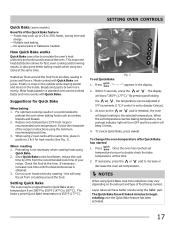
...on the amount and type of the Quick Bake feature - NOTES When using two racks at this time. 2. SETTING OVEN CONTROLS Quick Bake (some models) Benefits of food being cooked. If necessary, increase cook time until the desired doneness is recommended to preheat the oven when baking foods such as...set to increase or decrease the oven set Quick Bake Fig. 1 1. No special pans or bakeware needed. When the set temperature be programmed to 30% faster, saving time and energy. - It also gives better baking results when using Quick Bake cook time reductions may cook up to 25 to ...
...on the amount and type of the Quick Bake feature - NOTES When using two racks at this time. 2. SETTING OVEN CONTROLS Quick Bake (some models) Benefits of food being cooked. If necessary, increase cook time until the desired doneness is recommended to preheat the oven when baking foods such as...set to increase or decrease the oven set Quick Bake Fig. 1 1. No special pans or bakeware needed. When the set temperature be programmed to 30% faster, saving time and energy. - It also gives better baking results when using Quick Bake cook time reductions may cook up to 25 to ...
Complete Owner's Guide (English)
Page 18
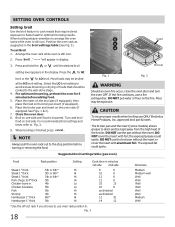
... refer to Fig. 3. 9. When broiling is still cool. 2. DO NOT put water or flour on the broil pan insert (if equipped). 6. Suggested broil settings table (gas oven) Food Rack position Setting Cook time in minutes 1st side 2nd side Steak 1" thick 5th or 6th* Hi Steak 1" thick 5th or 6th* Hi... 14 12 *Use the off-set Broil 4 1. Press the for HI broil or the for optimum browing results. The broiler pan and the insert (some models) allows grease to drain and be kept away from the high heat of foods that require direct exposure to flame heat for LO broil. "will...
... refer to Fig. 3. 9. When broiling is still cool. 2. DO NOT put water or flour on the broil pan insert (if equipped). 6. Suggested broil settings table (gas oven) Food Rack position Setting Cook time in minutes 1st side 2nd side Steak 1" thick 5th or 6th* Hi Steak 1" thick 5th or 6th* Hi... 14 12 *Use the off-set Broil 4 1. Press the for HI broil or the for optimum browing results. The broiler pan and the insert (some models) allows grease to drain and be kept away from the high heat of foods that require direct exposure to flame heat for LO broil. "will...


