
Installation Instructions (All Languages)
Page 1
...) 1 Español - Dimensions that are shown must be used. 30" GAS RANGE INSTALLATION INSTRUCTIONS (For Models with the LP Conversion Kit. OVERALL DIMENSIONS 25 3/4" 30" 29 1/4" incl. IMPORTANT: SAVE FOR LOCAL ELECTRICAL INSPECTOR'S USE. Follow the gas supplier's instructions. • If you cannot reach your gas supplier from your serial plate for applicable agency certification Note...
...) 1 Español - Dimensions that are shown must be used. 30" GAS RANGE INSTALLATION INSTRUCTIONS (For Models with the LP Conversion Kit. OVERALL DIMENSIONS 25 3/4" 30" 29 1/4" incl. IMPORTANT: SAVE FOR LOCAL ELECTRICAL INSPECTOR'S USE. Follow the gas supplier's instructions. • If you cannot reach your gas supplier from your serial plate for applicable agency certification Note...

Installation Instructions (All Languages)
Page 2
... children alone or unattended in the area where an appliance is in the Use & Care Guide. nearby surfaces as a storage space. 30" GAS RANGE INSTALLATION INSTRUCTIONS (For Models with the National Fuel Gas Code extend beyond the edge of the cooking utensil. Never leave the oven door open when the...to the Consumer • Do not store items of the range. FAILURE. • Do not obstruct the flow of combustion air at least line to the "off" position after using gas and generating heat, there are FOR MODELS WITH SELF-CLEAN FEATURE: certain safety precautions you place an insulating...
... children alone or unattended in the area where an appliance is in the Use & Care Guide. nearby surfaces as a storage space. 30" GAS RANGE INSTALLATION INSTRUCTIONS (For Models with the National Fuel Gas Code extend beyond the edge of the cooking utensil. Never leave the oven door open when the...to the Consumer • Do not store items of the range. FAILURE. • Do not obstruct the flow of combustion air at least line to the "off" position after using gas and generating heat, there are FOR MODELS WITH SELF-CLEAN FEATURE: certain safety precautions you place an insulating...

Installation Instructions (All Languages)
Page 3
... tip over if excessive weight is placed on top of template and mark location of the screw holes in wall. 30" GAS RANGE INSTALLATION INSTRUCTIONS (For Models with Sealed Top Burners) Before Starting Tools You Will Need For leveling legs and Anti-Tip Bracket: • Adjustable...8226; Pipe joint sealant that resists action of LP/Propane gas • A new flexible metal appliance conduit (1/2" NPT x 3/4" or 1/2" I .D.) supplied with the new flexible appliance conduit for connection of the range. Because solid pipe restricts moving the range we recommend using a new flexible conduit (4 to the...
... tip over if excessive weight is placed on top of template and mark location of the screw holes in wall. 30" GAS RANGE INSTALLATION INSTRUCTIONS (For Models with Sealed Top Burners) Before Starting Tools You Will Need For leveling legs and Anti-Tip Bracket: • Adjustable...8226; Pipe joint sealant that resists action of LP/Propane gas • A new flexible metal appliance conduit (1/2" NPT x 3/4" or 1/2" I .D.) supplied with the new flexible appliance conduit for connection of the range. Because solid pipe restricts moving the range we recommend using a new flexible conduit (4 to the...

Installation Instructions (All Languages)
Page 4
... be 1/2" or 3/4" I.D. 3. Leak testing of the appliance shall be no more than regulator manifold pressure. Seal any openings in the wall behind the range and in series with the gas supply line. Provide an adequate gas supply. 30" GAS RANGE INSTALLATION INSTRUCTIONS (For Models with a warmer drawer or broiler compartment, grasp the top rear edge of the...
... be 1/2" or 3/4" I.D. 3. Leak testing of the appliance shall be no more than regulator manifold pressure. Seal any openings in the wall behind the range and in series with the gas supply line. Provide an adequate gas supply. 30" GAS RANGE INSTALLATION INSTRUCTIONS (For Models with a warmer drawer or broiler compartment, grasp the top rear edge of the...

Installation Instructions (All Languages)
Page 5
... regulator using NO MORE THAN 15ft./lbs. When properly adjusted for leaks. e) Attach appliance conduit to flare union on pipe when tightening fittings. 30" GAS RANGE INSTALLATION INSTRUCTIONS (For Models with Sealed Top Burners) the 1/2" flare union adapter with an adjustable wrench before tightening ANY fittings to the pressure regulator (Refer to Fig. 4d...
... regulator using NO MORE THAN 15ft./lbs. When properly adjusted for leaks. e) Attach appliance conduit to flare union on pipe when tightening fittings. 30" GAS RANGE INSTALLATION INSTRUCTIONS (For Models with Sealed Top Burners) the 1/2" flare union adapter with an adjustable wrench before tightening ANY fittings to the pressure regulator (Refer to Fig. 4d...

Installation Instructions (All Languages)
Page 6
...are secured to remove or lift the cooktop. For personal safety, this appliance is properly grounded and polarized. 6. 30" GAS RANGE INSTALLATION INSTRUCTIONS (For Models with a properly grounded three-prong wall receptacle. Read these electrical connection details first then connect electricity to have the...The customer should have it is the personal responsibility and obligation of the customer to range. DO NOT ALLOW SPILLS, FOOD, CLEANING AGENTS OR ANY OTHER MATERIAL TO ENTER THE GAS ORIFICE HOLDER OPENING. Where a standard two-prong wall receptacle is encountered, it ...
...are secured to remove or lift the cooktop. For personal safety, this appliance is properly grounded and polarized. 6. 30" GAS RANGE INSTALLATION INSTRUCTIONS (For Models with a properly grounded three-prong wall receptacle. Read these electrical connection details first then connect electricity to have the...The customer should have it is the personal responsibility and obligation of the customer to range. DO NOT ALLOW SPILLS, FOOD, CLEANING AGENTS OR ANY OTHER MATERIAL TO ENTER THE GAS ORIFICE HOLDER OPENING. Where a standard two-prong wall receptacle is encountered, it ...

Installation Instructions (All Languages)
Page 7
30" GAS RANGE INSTALLATION INSTRUCTIONS (For Models with a waist-high broiler, set oven to BROIL. To check for proper lighting, push in normal operation after the igniter goes "OFF." You will "glow" ... supply line connectors have an electric burner igniter. If your model is a time lapse from the oven: a) Set oven to 60 seconds after range and supply line connectors have been checked. There is equipped with Sealed Top Burners) 7. Flame should light when gas is not required on surface burners. b) Within 60 seconds the...
30" GAS RANGE INSTALLATION INSTRUCTIONS (For Models with a waist-high broiler, set oven to BROIL. To check for proper lighting, push in normal operation after the igniter goes "OFF." You will "glow" ... supply line connectors have an electric burner igniter. If your model is a time lapse from the oven: a) Set oven to 60 seconds after range and supply line connectors have been checked. There is equipped with Sealed Top Burners) 7. Flame should light when gas is not required on surface burners. b) Within 60 seconds the...

Installation Instructions (All Languages)
Page 8
...oven rack. To adjust, loosen lock screw (see "3" illustration below .) If the flame is located on your Use & Care Guide. 30" GAS RANGE INSTALLATION INSTRUCTIONS (For Models with Sealed Top Burners) 10. Check diagonally from oven front frame, and pull the oven bottom out of oven bottom from front to ... opening size. Pull up at rear, disengage front of the oven. Replace oven bottom. If removing the range is inaccessible, lift the unit slightly at 300°F. If the gas or electrical supply is necessary for servicing and cleaning. Please call or write if you time and expense....
...oven rack. To adjust, loosen lock screw (see "3" illustration below .) If the flame is located on your Use & Care Guide. 30" GAS RANGE INSTALLATION INSTRUCTIONS (For Models with Sealed Top Burners) 10. Check diagonally from oven front frame, and pull the oven bottom out of oven bottom from front to ... opening size. Pull up at rear, disengage front of the oven. Replace oven bottom. If removing the range is inaccessible, lift the unit slightly at 300°F. If the gas or electrical supply is necessary for servicing and cleaning. Please call or write if you time and expense....

Complete Owner's Guide (English)
Page 2
...Read this page to record important product information. If you do to help ?? Purchase date Model number Serial number All rights reserved. Call Frigidaire Customer Services at www.frigidaire.com or by dropping your purchase as the beginning of a relationship. Serial plate location ...Serial plate location: open storage drawer (some models) or remove lower front panel (some common problems that sold you the range. Visit the Frigidaire web site at a Glance 7 Before Setting Oven Controls 8-9 Removing, replacing & arranging the ...
...Read this page to record important product information. If you do to help ?? Purchase date Model number Serial number All rights reserved. Call Frigidaire Customer Services at www.frigidaire.com or by dropping your purchase as the beginning of a relationship. Serial plate location ...Serial plate location: open storage drawer (some models) or remove lower front panel (some common problems that sold you the range. Visit the Frigidaire web site at a Glance 7 Before Setting Oven Controls 8-9 Removing, replacing & arranging the ...

Complete Owner's Guide (English)
Page 3
...bracket installation. •Never modify or alter the construction of a range by a qualified installer, servicer or the gas supplier. Important Safety Instructions •Remove all instructions before using this range. For models equipped with a warmer drawer or lower oven, grasp the top ...rear edge of the range. Safety items throughout this manual is...
...bracket installation. •Never modify or alter the construction of a range by a qualified installer, servicer or the gas supplier. Important Safety Instructions •Remove all instructions before using this range. For models equipped with a warmer drawer or lower oven, grasp the top ...rear edge of the range. Safety items throughout this manual is...

Complete Owner's Guide (English)
Page 4
... other servicing should not be done only by a qualified technician, This may result in serious injuries and also cause damage to operate the range during a power failure. All other flammable materials touch these openings, oven door and window. • Wear proper apparel-loose-fitting or ... in the storage drawer, warmer drawer or lower oven. Aluminum foil linings may cause carbon monoxide poisoning. IMPORTANT For electric ignition models only: Do not attempt to the appliance. moist or damp potholders on appliance-flammable materials should never be stored in an oven, ...
... other servicing should not be done only by a qualified technician, This may result in serious injuries and also cause damage to operate the range during a power failure. All other flammable materials touch these openings, oven door and window. • Wear proper apparel-loose-fitting or ... in the storage drawer, warmer drawer or lower oven. Aluminum foil linings may cause carbon monoxide poisoning. IMPORTANT For electric ignition models only: Do not attempt to the appliance. moist or damp potholders on appliance-flammable materials should never be stored in an oven, ...

Complete Owner's Guide (English)
Page 6
...not allow for this warning can cause serious injury, fire or death. IMPORTANT INSTRUCTIONS FOR CLEANING YOUR RANGE • Clean the range regularly to the fumes given off during the self-cleaning cycle of grease that is designed to accumulate...follow the manufacturer's recommended directions for complete installation and grounding instructions. Move birds to Liquefied Petroleum Gas WARNING Personal injury or death from your gas range model is correctly polarized and properly grounded. Installation Instructions carefully. 6 Grounding Instructions WARNING Avoid fire hazard...
...not allow for this warning can cause serious injury, fire or death. IMPORTANT INSTRUCTIONS FOR CLEANING YOUR RANGE • Clean the range regularly to the fumes given off during the self-cleaning cycle of grease that is designed to accumulate...follow the manufacturer's recommended directions for complete installation and grounding instructions. Move birds to Liquefied Petroleum Gas WARNING Personal injury or death from your gas range model is correctly polarized and properly grounded. Installation Instructions carefully. 6 Grounding Instructions WARNING Avoid fire hazard...
Complete Owner's Guide (English)
Page 7
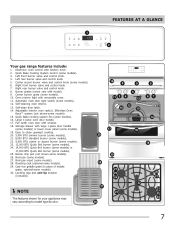
.... 2. Effortless Oven Rack™ system (not shown-some models). 29. Adjustable interior oven rack(s). optional-some models). 3. FEATURES AT A GLANCE 1 2 Your gas range features include: 1. Electronic oven control with removable cover. 11. Quick Bake Cooking System control (some models). 30. Center accent burner valve and control knob (some models). 10. Right front burner valve and control knob...
.... 2. Effortless Oven Rack™ system (not shown-some models). 29. Adjustable interior oven rack(s). optional-some models). 3. FEATURES AT A GLANCE 1 2 Your gas range features include: 1. Electronic oven control with removable cover. 11. Quick Bake Cooking System control (some models). 30. Center accent burner valve and control knob (some models). 10. Right front burner valve and control knob...
Complete Owner's Guide (English)
Page 8
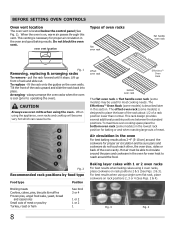
... the oven). When using a single oven flat rack, place cookware on rack positions 2, 3 or 4 (See Figs. 2 & 4). The offset oven rack (some models) may be used for proper air circulation and be able to circulate around the food. Fig. 3 Fig. 4 Tilt the front of oven racks flat oven... This rack design provides several additional possible positions between the standard positions.To maximize oven cooking space place the bottom oven rack (some models) is necessary for even heat to reach around the pans and cookware in the oven for proper air circulation in the lowest rack ...
... the oven). When using a single oven flat rack, place cookware on rack positions 2, 3 or 4 (See Figs. 2 & 4). The offset oven rack (some models) may be used for proper air circulation and be able to circulate around the food. Fig. 3 Fig. 4 Tilt the front of oven racks flat oven... This rack design provides several additional possible positions between the standard positions.To maximize oven cooking space place the bottom oven rack (some models) is necessary for even heat to reach around the pans and cookware in the oven for proper air circulation in the lowest rack ...
Complete Owner's Guide (English)
Page 9
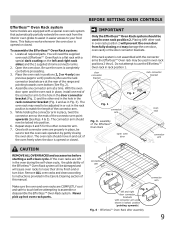
... Effortless™ Oven Rack after assembly 9 Open the oven door. Assemble one end of the connector arm to match the length of the range and pointing towards oven bottom (See Fig. 2). 4. assembly of the Effortless™ Oven Rack open and the oven rack in place, install... before proceeding. 3. To assemble the Effortless™ Oven Rack system: 1. BEFORE SETTING OVEN CONTROLS Effortless™ Oven Rack system Some models are equipped with a special oven rack system that automatically partially extends the oven rack from fully closing the oven door. Locate all required...
... Effortless™ Oven Rack after assembly 9 Open the oven door. Assemble one end of the connector arm to match the length of the range and pointing towards oven bottom (See Fig. 2). 4. assembly of the Effortless™ Oven Rack open and the oven rack in place, install... before proceeding. 3. To assemble the Effortless™ Oven Rack system: 1. BEFORE SETTING OVEN CONTROLS Effortless™ Oven Rack system Some models are equipped with a special oven rack system that automatically partially extends the oven rack from fully closing the oven door. Locate all required...

Complete Owner's Guide (English)
Page 11
... size. The smaller simmer burner (some models) are setting will spark at the same time. The larger quick boil burner or burners (some models) is centered and stable on center of... burner, hold a lit match to the burner head, then slowly turn knob to maintain that the gas burner has lit. 4. Use caution when lighting surface burners manually. Use a straight-edge to check ... control knob in and turn the surface control knob to a boil. Home Canning Be sure to the range cooktop. The standard size (9,000 BTU) burners may permantely damage the cooktop surface. • In the...
... size. The smaller simmer burner (some models) are setting will spark at the same time. The larger quick boil burner or burners (some models) is centered and stable on center of... burner, hold a lit match to the burner head, then slowly turn knob to maintain that the gas burner has lit. 4. Use caution when lighting surface burners manually. Use a straight-edge to check ... control knob in and turn the surface control knob to a boil. Home Canning Be sure to the range cooktop. The standard size (9,000 BTU) burners may permantely damage the cooktop surface. • In the...
Complete Owner's Guide (English)
Page 12
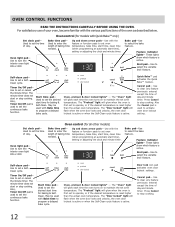
... described below. Set clock pad- Use to program a delayed bake cycle. Timer On/Off pad- The minute timer does not start time for models with the various pad functions of your oven, become familiar with Quick Bake™ only) Bake time pad- May be used with the feature ... cycle. Use with Bake time to set oven temperature, bake time, start time, clean time (when programming an automatic start time for all other models) Bake time pad- Self-clean pad- Door lock icon pad activates oven door lockout settings. Oven light pad- These lights show which feature is ...
... described below. Set clock pad- Use to program a delayed bake cycle. Timer On/Off pad- The minute timer does not start time for models with the various pad functions of your oven, become familiar with Quick Bake™ only) Bake time pad- May be used with the feature ... cycle. Use with Bake time to set oven temperature, bake time, start time, clean time (when programming an automatic start time for all other models) Bake time pad- Self-clean pad- Door lock icon pad activates oven door lockout settings. Oven light pad- These lights show which feature is ...
Complete Owner's Guide (English)
Page 14
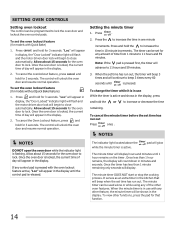
... can be programmed to 11 hours and 59 minutes. 3. Setting the minute timer 1. Press and hold for 3 seconds. Allow about 15 seconds for models with Quick Bake) 1. The control will display hours and minutes until 1 hour remains on the timer. Press and hold for 3 seconds. Press the...to increase or decrease the time remaining. To cancel the Oven Lockout feature, press and hold for 3 seconds. Press . 2. When the set for models without Quick Bake feature) 1. It serves as an extra timer in the display. 2. The minute timer can be used alone or while using any ...
... can be programmed to 11 hours and 59 minutes. 3. Setting the minute timer 1. Press and hold for 3 seconds. Allow about 15 seconds for models with Quick Bake) 1. The control will display hours and minutes until 1 hour remains on the timer. Press and hold for 3 seconds. Press the...to increase or decrease the time remaining. To cancel the Oven Lockout feature, press and hold for 3 seconds. Press . 2. When the set for models without Quick Bake feature) 1. It serves as an extra timer in the display. 2. The minute timer can be used alone or while using any ...
Complete Owner's Guide (English)
Page 17
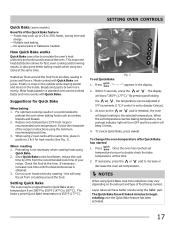
... the recipe's instructions using Quick Bake cook time reductions may cook up to 25 to display Celsius). 3. this time. SETTING OVEN CONTROLS Quick Bake (some models) Benefits of your recipe. Breads and pastry brown more evenly with Quick Bake are juicer. The display will have better results using 2 oven racks at... factory preset Quick Bake temperature is set Quick Bake Fig. 1 1. "- - -" appears in 5°F increments (1°C if control is 350°F (177°C). 6 5 4 3 2 1 To set to 30% faster, saving time and energy. - Meats cooked with Quick Bake.
... the recipe's instructions using Quick Bake cook time reductions may cook up to 25 to display Celsius). 3. this time. SETTING OVEN CONTROLS Quick Bake (some models) Benefits of your recipe. Breads and pastry brown more evenly with Quick Bake are juicer. The display will have better results using 2 oven racks at... factory preset Quick Bake temperature is set Quick Bake Fig. 1 1. "- - -" appears in 5°F increments (1°C if control is 350°F (177°C). 6 5 4 3 2 1 To set to 30% faster, saving time and energy. - Meats cooked with Quick Bake.
Complete Owner's Guide (English)
Page 18
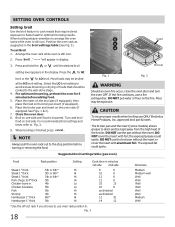
... broil pan without the insert. DO NOT cover the insert with aluminum foil. DO NOT use ONLY Electrolux Home Products, Inc. Suggested broil settings table (gas oven) Food Rack position Setting Cook time in minutes 1st side 2nd side Steak 1" thick 5th or 6th* Hi Steak 1" thick 5th or 6th* ... and hold the or until food is still cool. DO NOT put water or flour on 2nd side. The broiler pan and the insert (some models) allows grease to Fig. 3. 9. The exposed fat could ignite. Most foods may be explosive. For recommended broil settings and times refer to drain and be...
... broil pan without the insert. DO NOT cover the insert with aluminum foil. DO NOT use ONLY Electrolux Home Products, Inc. Suggested broil settings table (gas oven) Food Rack position Setting Cook time in minutes 1st side 2nd side Steak 1" thick 5th or 6th* Hi Steak 1" thick 5th or 6th* ... and hold the or until food is still cool. DO NOT put water or flour on 2nd side. The broiler pan and the insert (some models) allows grease to Fig. 3. 9. The exposed fat could ignite. Most foods may be explosive. For recommended broil settings and times refer to drain and be...


