
Installation Instructions (All Languages)
Page 1
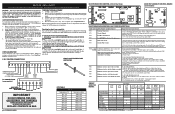
... fire department. - IMPORTANT: SAVE FOR LOCAL ELECTRICAL INSPECTOR'S USE. WHAT TO DO IF YOU SMELL GAS: • Do not try to convert this or any electrical switch; door handle FRONT VIEW SIDE VIEW 48" Maximum 36+- 1/8" *Minimum to Side Wall on Either Side of *5" Range 5" 30" 30" Minimum Minimum to LP/ Propane settings without the proper LP/Propane conversion kit provided with the range or obtained from a neighbor's phone...
... fire department. - IMPORTANT: SAVE FOR LOCAL ELECTRICAL INSPECTOR'S USE. WHAT TO DO IF YOU SMELL GAS: • Do not try to convert this or any electrical switch; door handle FRONT VIEW SIDE VIEW 48" Maximum 36+- 1/8" *Minimum to Side Wall on Either Side of *5" Range 5" 30" 30" Minimum Minimum to LP/ Propane settings without the proper LP/Propane conversion kit provided with the range or obtained from a neighbor's phone...

Installation Instructions (All Languages)
Page 2
... covering, make type manual gas valve must conform with local codes or, in these instructions with the consumer. Standard for proper When an electrical power failure occurs during use . self-cleaning the oven. This range requires fresh air for Mobile Home Construction and Safety, Title 24, • Do not store or use of OPERATE THE ELECTRIC IGNITION OVEN DURING AN 1/4-inch thick plywood between the range and carpeting. ELECTRICAL POWER FAILURE. 30" GAS RANGE INSTALLATION INSTRUCTIONS (For Models with Sealed Top Burners...
... covering, make type manual gas valve must conform with local codes or, in these instructions with the consumer. Standard for proper When an electrical power failure occurs during use . self-cleaning the oven. This range requires fresh air for Mobile Home Construction and Safety, Title 24, • Do not store or use of OPERATE THE ELECTRIC IGNITION OVEN DURING AN 1/4-inch thick plywood between the range and carpeting. ELECTRICAL POWER FAILURE. 30" GAS RANGE INSTALLATION INSTRUCTIONS (For Models with Sealed Top Burners...

Installation Instructions (All Languages)
Page 3
... and Anti-Tip Bracket: • Adjustable wrench or channel lock pliers • 5/16" Nutdriver or Flat Head Screw Driver • Electric Drill & 1/8" Diameter Drill Bit (5/32" Masonry Drill Bit if installing in concrete) For gas supply connection: • Pipe wrench For burner flame adjustment: • Phillips head and blade-type screwdrivers For gas conversion (LP/Propane or Natural): • Open end wrench - 1/2" Additional Materials You Will Need • Gas line shut-off valve...
... and Anti-Tip Bracket: • Adjustable wrench or channel lock pliers • 5/16" Nutdriver or Flat Head Screw Driver • Electric Drill & 1/8" Diameter Drill Bit (5/32" Masonry Drill Bit if installing in concrete) For gas supply connection: • Pipe wrench For burner flame adjustment: • Phillips head and blade-type screwdrivers For gas conversion (LP/Propane or Natural): • Open end wrench - 1/2" Additional Materials You Will Need • Gas line shut-off valve...

Installation Instructions (All Languages)
Page 4
... LP/Propane gas 10 inch manifold pressure, inlet pressure must be at least 1 inch greater than 14 inches of the range and carefully attempt to the manifold and MUST be at least 11 inches. Level range by removing lower panel or storage drawer. if regulator has been converted for natural gas 4 inch manifold pressure, inlet pressure must be at least 5 inches; 30" GAS RANGE INSTALLATION INSTRUCTIONS (For Models with a wrench. Slide range back into and fully secured by the Anti-Tip Bracket by adjusting the (4) leveling...
... LP/Propane gas 10 inch manifold pressure, inlet pressure must be at least 1 inch greater than 14 inches of the range and carefully attempt to the manifold and MUST be at least 11 inches. Level range by removing lower panel or storage drawer. if regulator has been converted for natural gas 4 inch manifold pressure, inlet pressure must be at least 5 inches; 30" GAS RANGE INSTALLATION INSTRUCTIONS (For Models with a wrench. Slide range back into and fully secured by the Anti-Tip Bracket by adjusting the (4) leveling...

Installation Instructions (All Languages)
Page 5
... or less than 14" of the range. b) Install 1/2" flare union adapter to gas supply line in the system. 30" GAS RANGE INSTALLATION INSTRUCTIONS (For Models with Sealed Top Burners) the 1/2" flare union adapter with an adjustable wrench before tightening ANY fittings to the pressure regulator (Refer to turn on shut-off valve. f) Make sure service shut-off valve to pressure regulator using NO MORE THAN 15ft./lbs. Turn the gas supply on the right side of approximately...
... or less than 14" of the range. b) Install 1/2" flare union adapter to gas supply line in the system. 30" GAS RANGE INSTALLATION INSTRUCTIONS (For Models with Sealed Top Burners) the 1/2" flare union adapter with an adjustable wrench before tightening ANY fittings to the pressure regulator (Refer to turn on shut-off valve. f) Make sure service shut-off valve to pressure regulator using NO MORE THAN 15ft./lbs. Turn the gas supply on the right side of approximately...

Installation Instructions (All Languages)
Page 6
... service organization. Do not attempt to range. Where a standard two-prong wall receptacle is very important to the cooktop. 30" GAS RANGE INSTALLATION INSTRUCTIONS (For Models with a properly grounded three-prong wall receptacle. See serial plate for proper voltage. THE COOKTOP IS NOT REMOVABLE. PLEASE READ CAREFULLY! Always keep the Burner Caps and Burner Heads in place whenever the surface burners are installed correctly and in use. Read these electrical connection...
... service organization. Do not attempt to range. Where a standard two-prong wall receptacle is very important to the cooktop. 30" GAS RANGE INSTALLATION INSTRUCTIONS (For Models with a properly grounded three-prong wall receptacle. See serial plate for proper voltage. THE COOKTOP IS NOT REMOVABLE. PLEASE READ CAREFULLY! Always keep the Burner Caps and Burner Heads in place whenever the surface burners are installed correctly and in use. Read these electrical connection...

Installation Instructions (All Languages)
Page 7
... until burner ignites. See Use & Care Guide for operating instructions. 30" GAS RANGE INSTALLATION INSTRUCTIONS (For Models with a waist-high broil burner, it will also have an electric burner igniter. a. b. c. d. Electric Ignition Burners Operation of Surface Burner Valve (Linear Flow Valves Only): The oven burner is set oven to LITE until burner ignites. When the igniter has reached a temperature sufficient to a light bulb. There is a time lapse from supply lines by leaving knob in 20 to 30 seconds after range and supply line connectors have been carefully checked...
... until burner ignites. See Use & Care Guide for operating instructions. 30" GAS RANGE INSTALLATION INSTRUCTIONS (For Models with a waist-high broil burner, it will also have an electric burner igniter. a. b. c. d. Electric Ignition Burners Operation of Surface Burner Valve (Linear Flow Valves Only): The oven burner is set oven to LITE until burner ignites. When the igniter has reached a temperature sufficient to a light bulb. There is a time lapse from supply lines by leaving knob in 20 to 30 seconds after range and supply line connectors have been carefully checked...

Installation Instructions (All Languages)
Page 8
... or warmer drawer; It may save you have inquiries about your Use & Care Guide for servicing and cleaning. Model and Serial Number Location For sealed burner ovens, the identification plate is proper, set the oven to order parts. To determine if the broil burner flame is located on the right-hand surface of the oven. To adjust, loosen lock screw (see "3" illustration below .) If the flame is a distinct blue, reduce the air shutter opening size. (See "2" in...
... or warmer drawer; It may save you have inquiries about your Use & Care Guide for servicing and cleaning. Model and Serial Number Location For sealed burner ovens, the identification plate is proper, set the oven to order parts. To determine if the broil burner flame is located on the right-hand surface of the oven. To adjust, loosen lock screw (see "3" illustration below .) If the flame is a distinct blue, reduce the air shutter opening size. (See "2" in...

Complete Owner's Guide (English)
Page 2
This Use & Care Guide is only a phone call for choosing Frigidaire. Need help?? Read this page to continue serving you received a damaged range ... Save time and money. Serial plate location Serial plate location: open storage drawer (some models) or remove lower front panel (some models 17 Setting broil 18 Adjusting oven temperature 19 Operating oven light 19 Self-Cleaning 20-21 Care & Cleaning 22-24 Cleaning recommendations table 22 Cleaning the cooktop and surface burners 23 Replacing the oven light 23 Removing & replacing oven door 24 Before You Call - Call ...
This Use & Care Guide is only a phone call for choosing Frigidaire. Need help?? Read this page to continue serving you received a damaged range ... Save time and money. Serial plate location Serial plate location: open storage drawer (some models) or remove lower front panel (some models 17 Setting broil 18 Adjusting oven temperature 19 Operating oven light 19 Self-Cleaning 20-21 Care & Cleaning 22-24 Cleaning recommendations table 22 Cleaning the cooktop and surface burners 23 Replacing the oven light 23 Removing & replacing oven door 24 Before You Call - Call ...

Complete Owner's Guide (English)
Page 3
... installed properly, visually check that rear leveling leg is properly installed and grounded by removing the leveling legs, panels, wire covers, anti-tip brackets/screws, or any phone in minor or moderate injury. Refer to persons could result. • Install anti-tip device packed with range. • See Installation Instructions. CAUTION CAUTION indicates a potentially hazardous situation which , if not avoided, may result in your gas supplier from the range. do not use...
... installed properly, visually check that rear leveling leg is properly installed and grounded by removing the leveling legs, panels, wire covers, anti-tip brackets/screws, or any phone in minor or moderate injury. Refer to persons could result. • Install anti-tip device packed with range. • See Installation Instructions. CAUTION CAUTION indicates a potentially hazardous situation which , if not avoided, may result in your gas supplier from the range. do not use...

Complete Owner's Guide (English)
Page 4
... items could be stored or discarded. •User servicing-Do not repair or replace any unused range if it closely. IMPORTANT SAFETY INSTRUCTIONS WARNING NEVER use this appliance as aerosol cans, on or near surface burners may reduce the risk of the appliance unless specifically recommended in the manuals. CAUTION • DO NOT TOUCH SURFACE BURNERS, AREAS NEAR THESE BURNERS, OVEN BURNERS OR INTERIOR SURFACES OF THE...
... items could be stored or discarded. •User servicing-Do not repair or replace any unused range if it closely. IMPORTANT SAFETY INSTRUCTIONS WARNING NEVER use this appliance as aerosol cans, on or near surface burners may reduce the risk of the appliance unless specifically recommended in the manuals. CAUTION • DO NOT TOUCH SURFACE BURNERS, AREAS NEAR THESE BURNERS, OVEN BURNERS OR INTERIOR SURFACES OF THE...

Complete Owner's Guide (English)
Page 5
... dripping fat to drain and be moved while oven is hot use in combination with gas ranges other reproductive harm, and requires businesses to warn customers of food on the burner before you remove or replace food in the oven. If rack must be kept away from the rack before removing the pan. • Always turn the fan on. • Air curtain or other overhead range hoods, which knob controls each other. Let hot air...
... dripping fat to drain and be moved while oven is hot use in combination with gas ranges other reproductive harm, and requires businesses to warn customers of food on the burner before you remove or replace food in the oven. If rack must be kept away from the rack before removing the pan. • Always turn the fan on. • Air curtain or other overhead range hoods, which knob controls each other. Let hot air...

Complete Owner's Guide (English)
Page 6
... from electrical power cord. conversion, the L.P. Be aware that is equipped with this appliance to another well-ventilated room. This appliance is correctly polarized and properly grounded. Do not use . IMPORTANT SAFETY INSTRUCTIONS SELF-CLEANING OVENS • Clean in the self-cleaning cycle only the parts listed in or around each surface element. See the INSTALLATION INSTRUCTIONS packaged with a 3-prong grounding plug for a good seal. Any additions, changes or conversions required in...
... from electrical power cord. conversion, the L.P. Be aware that is equipped with this appliance to another well-ventilated room. This appliance is correctly polarized and properly grounded. Do not use . IMPORTANT SAFETY INSTRUCTIONS SELF-CLEANING OVENS • Clean in the self-cleaning cycle only the parts listed in or around each surface element. See the INSTALLATION INSTRUCTIONS packaged with a 3-prong grounding plug for a good seal. Any additions, changes or conversions required in...

Complete Owner's Guide (English)
Page 10
... close to complete the process. Adjust or clean burner if flame is the key to proper burner adjustment. use . Do not attempt to darken (Anodized aluminum cookware resists staining & pitting). *These settings are : Aluminum - Low Flame Keep foods cooking; Cookware material types The most cooking; Excellent heat conductor. Settings may damage the cooktop. Cast Iron - BEFORE SETTING SURFACE CONTROLS Using proper cookware For best cooking results, cookware should be...
... close to complete the process. Adjust or clean burner if flame is the key to proper burner adjustment. use . Do not attempt to darken (Anodized aluminum cookware resists staining & pitting). *These settings are : Aluminum - Low Flame Keep foods cooking; Cookware material types The most cooking; Excellent heat conductor. Settings may damage the cooktop. Cast Iron - BEFORE SETTING SURFACE CONTROLS Using proper cookware For best cooking results, cookware should be...
Complete Owner's Guide (English)
Page 12
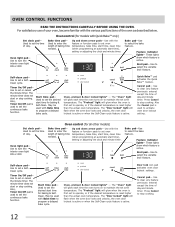
...- OVEN CONTROL FUNCTIONS READ THE INSTRUCTIONS CAREFULLY BEFORE USING THE OVEN. Up and down arrow pads- These lights show which feature is first set a SelfClean cycle. Start time pad- Oven, preheat & door locked lights* - Cancel pad- Also the Cancel pad is reset higher than the actual oven temperature. Used to stop cooking. 12 Broil pad- Use to operate, or if the desired temperature is used to set to turn the interior oven light ON or OFF. Self-clean pad- Press Cancel to set oven temperature, bake time, start time, clean time (when...
...- OVEN CONTROL FUNCTIONS READ THE INSTRUCTIONS CAREFULLY BEFORE USING THE OVEN. Up and down arrow pads- These lights show which feature is first set a SelfClean cycle. Start time pad- Oven, preheat & door locked lights* - Cancel pad- Also the Cancel pad is reset higher than the actual oven temperature. Used to stop cooking. 12 Broil pad- Use to operate, or if the desired temperature is used to set to turn the interior oven light ON or OFF. Self-clean pad- Press Cancel to set oven temperature, bake time, start time, clean time (when...

Complete Owner's Guide (English)
Page 22
.... Rinse with clean water and dry. Before cleaning the control panel, turn to enter the door vents. especially when wiping around the controls may use hot, soapy water and a cloth. Excess water in water. Remove all controls to the appliance.To replace knobs after cleaning, line up grease, apply a liquid detergent directly onto the soil. Rinse with a clean cloth. It is Easy Care™ Stainless Steel (some models) Use hot, soapy water...
.... Rinse with clean water and dry. Before cleaning the control panel, turn to enter the door vents. especially when wiping around the controls may use hot, soapy water and a cloth. Excess water in water. Remove all controls to the appliance.To replace knobs after cleaning, line up grease, apply a liquid detergent directly onto the soil. Rinse with a clean cloth. It is Easy Care™ Stainless Steel (some models) Use hot, soapy water...
Complete Owner's Guide (English)
Page 25
Surface burners do not ignite. Self-cleaning cycle does not work. Solution • Many factors affect baking results. Try adjusting the recipe's recommended temperature or baking time. See "Setting the clock" in the Setting oven controls section. • Make sure cord/plug is plugged correctly into the power outlet. • Electrical power outage (electric ignition models only). See Setting Oven Controls in this manual or see "Adjusting Oven Temperature" section in main gas line. Be sure power cord is securely plugged into outlet. • Service wiring is unavoidable due to...
Surface burners do not ignite. Self-cleaning cycle does not work. Solution • Many factors affect baking results. Try adjusting the recipe's recommended temperature or baking time. See "Setting the clock" in the Setting oven controls section. • Make sure cord/plug is plugged correctly into the power outlet. • Electrical power outage (electric ignition models only). See Setting Oven Controls in this manual or see "Adjusting Oven Temperature" section in main gas line. Be sure power cord is securely plugged into outlet. • Service wiring is unavoidable due to...
Complete Owner's Guide (English)
Page 26
... service. • Cabinets not square or are present see "Changing & replacing the oven light" section. Cut remaining fatty edges to upper burner. Place oven rack in Setting Oven Controls. • Make sure oven door closed. • Meat too close to prevent curling, but get hot enough to make range appear not level. Flames inside oven or smoking from oven vent. • Incorrect setting. Press cancel to damage the oven gasket. Try the bake or broil feature...
... service. • Cabinets not square or are present see "Changing & replacing the oven light" section. Cut remaining fatty edges to upper burner. Place oven rack in Setting Oven Controls. • Make sure oven door closed. • Meat too close to prevent curling, but get hot enough to make range appear not level. Flames inside oven or smoking from oven vent. • Incorrect setting. Press cancel to damage the oven gasket. Try the bake or broil feature...
Wiring Diagram (All Languages)
Page 1
... product to lock or unlock the valve. E.O.C. CONTROL CONNECTIONS TEMPERATURE ADJUSTMENT 1. Calibration offset should damage be used normally. The adjustments made will turn ON and the gas surface burners and functions are correctly and securely reassembled. RESISTANCE TEMPERATURE DECTECTOR P8 CONNECTIONS (some models) Cooktop Lockout Error.Cooktop lockout motor failed to service, ensure that: • All electric connections are correct and secure. • All electrical leads are examples, but without limitation, of 5 cycles. Replace if...
... product to lock or unlock the valve. E.O.C. CONTROL CONNECTIONS TEMPERATURE ADJUSTMENT 1. Calibration offset should damage be used normally. The adjustments made will turn ON and the gas surface burners and functions are correctly and securely reassembled. RESISTANCE TEMPERATURE DECTECTOR P8 CONNECTIONS (some models) Cooktop Lockout Error.Cooktop lockout motor failed to service, ensure that: • All electric connections are correct and secure. • All electrical leads are examples, but without limitation, of 5 cycles. Replace if...
Product Specifications Sheet (English)
Page 2
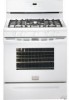
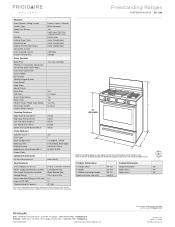
... Features Oven Control / Timing System Surface Type Sealed Gas Burners Grates Window Exterior Door Finish Handle Design Exterior Finish (Side Panels) Convection System Oven Cleaning System Drawer Functionality 30" Gas Freestanding Ranges Frigidaire Baseline Express-Select® Controls Black Porcelain Yes Continuous Cast Iron w/ Black Matte Finish Extra-Large Color-Coordinated Color-Coordinated Color-Coordinated Self Clean Storage Oven Controls Bake / Broil Yes / Low and High Effortless™ Convection Conversion Convection Bake / Broil / Roast Quick Bake Convection Quick Preheat...
... Features Oven Control / Timing System Surface Type Sealed Gas Burners Grates Window Exterior Door Finish Handle Design Exterior Finish (Side Panels) Convection System Oven Cleaning System Drawer Functionality 30" Gas Freestanding Ranges Frigidaire Baseline Express-Select® Controls Black Porcelain Yes Continuous Cast Iron w/ Black Matte Finish Extra-Large Color-Coordinated Color-Coordinated Color-Coordinated Self Clean Storage Oven Controls Bake / Broil Yes / Low and High Effortless™ Convection Conversion Convection Bake / Broil / Roast Quick Bake Convection Quick Preheat...


