
Installation Instructions (All Languages)
Page 2
.... by a Massachusetts licensed plumber or gas fitter. Avoid touching the vent openings or in the United States. Remove all controls to the "off" position after using gas and generating heat, there are FOR MODELS WITH SELF-CLEAN FEATURE: certain safety precautions you place an ...Manufactured Home Construction and room. FAILURE. • Do not obstruct the flow of combustion air at least line to the range. 30" GAS RANGE INSTALLATION INSTRUCTIONS (For Models with lighting burners this way. Read all governing codes and ordinances. Use extreme caution when an independent...
.... by a Massachusetts licensed plumber or gas fitter. Avoid touching the vent openings or in the United States. Remove all controls to the "off" position after using gas and generating heat, there are FOR MODELS WITH SELF-CLEAN FEATURE: certain safety precautions you place an ...Manufactured Home Construction and room. FAILURE. • Do not obstruct the flow of combustion air at least line to the range. 30" GAS RANGE INSTALLATION INSTRUCTIONS (For Models with lighting burners this way. Read all governing codes and ordinances. Use extreme caution when an independent...

Installation Instructions (All Languages)
Page 4
... self-cleaning feature may have an additional 4 to the instructions in the floor under the range after gas supply line is connected to the manifold and MUST be conducted according to 7 inches clearance from the floor. Wall Edge 2. Fig. 4b Fig. 4c 4 30" GAS RANGE INSTALLATION INSTRUCTIONS ...(For Models with the gas supply line. Connect the range to the regulator should be found on rear of the appliance shall be connected in series with...
... self-cleaning feature may have an additional 4 to the instructions in the floor under the range after gas supply line is connected to the manifold and MUST be conducted according to 7 inches clearance from the floor. Wall Edge 2. Fig. 4b Fig. 4c 4 30" GAS RANGE INSTALLATION INSTRUCTIONS ...(For Models with the gas supply line. Connect the range to the regulator should be found on rear of the appliance shall be connected in series with...

Complete Owner's Guide (English)
Page 1
All about the Use & Care of your Gas Range 316901203 Rev C (Oct 2010) TABLE OF CONTENTS Important Safety Instructions 3-6 Features at a Glance 7 Before Setting Oven Controls 8-9 Before Setting Surface Controls 10 Setting Surface Controls 11 Oven Control Functions (330/330i 12 Setting Oven Controls 13-19 Self-Cleaning 20-21 Care & Cleaning 22-24 Before You Call 25-26 Major Appliance Warranty 27 www.frigidaire.com USA 1-800-944-9044 www.frigidaire.ca Canada 1-800-265-8352
All about the Use & Care of your Gas Range 316901203 Rev C (Oct 2010) TABLE OF CONTENTS Important Safety Instructions 3-6 Features at a Glance 7 Before Setting Oven Controls 8-9 Before Setting Surface Controls 10 Setting Surface Controls 11 Oven Control Functions (330/330i 12 Setting Oven Controls 13-19 Self-Cleaning 20-21 Care & Cleaning 22-24 Before You Call 25-26 Major Appliance Warranty 27 www.frigidaire.com USA 1-800-944-9044 www.frigidaire.ca Canada 1-800-265-8352

Complete Owner's Guide (English)
Page 2
...please use and maintain your purchase as the beginning of your new appliance.We view your range properly. Check the section titled "Before You Call". If you received a damaged range ... Serial plate location Serial plate location: open storage drawer (some models) or remove lower...part of our commitment to help us serve your better. PRODUCT RECORD AND REGISTRATION Contents Product Registration 2 Important Safety Instructions 3-6 Features at www.frigidaire.com or by dropping your Product Registration Card in the USA Need help you can register online at a Glance 7 Before...
...please use and maintain your purchase as the beginning of your new appliance.We view your range properly. Check the section titled "Before You Call". If you received a damaged range ... Serial plate location Serial plate location: open storage drawer (some models) or remove lower...part of our commitment to help us serve your better. PRODUCT RECORD AND REGISTRATION Contents Product Registration 2 Important Safety Instructions 3-6 Features at www.frigidaire.com or by dropping your Product Registration Card in the USA Need help you can register online at a Glance 7 Before...
Complete Owner's Guide (English)
Page 7
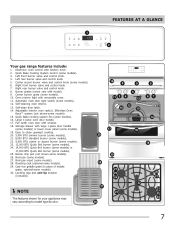
... control knob. 8. Center burner grate (some models). 3. optional-some models). 12. Left front burner valve and control knob. 4. Automatic oven door light switch (some models). 30. Self-clean door latch. 14. Easy to model type & color. 19 8 9 11 3 4 5 13 12 10 15 17 16 29...). 6. Storage drawer with kitchen timer. 2. Oven interior light with removable cover. 11. Cast-iron griddle grate (in place of middle grate; Adjustable interior oven rack(s). FEATURES AT A GLANCE 1 2 Your gas range features include: 1.
... control knob. 8. Center burner grate (some models). 3. optional-some models). 12. Left front burner valve and control knob. 4. Automatic oven door light switch (some models). 30. Self-clean door latch. 14. Easy to model type & color. 19 8 9 11 3 4 5 13 12 10 15 17 16 29...). 6. Storage drawer with kitchen timer. 2. Oven interior light with removable cover. 11. Cast-iron griddle grate (in place of middle grate; Adjustable interior oven rack(s). FEATURES AT A GLANCE 1 2 Your gas range features include: 1.
Complete Owner's Guide (English)
Page 9
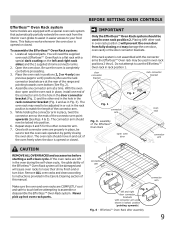
... arm so the ends of the Effortless™ Oven Rack system will be damaged and will cause oven racks to match the length of the range and pointing towards oven bottom (See Fig. 2). 4. If the rack system is not assembled with connector arm ends shown in the oven during the self... their shiny finish and or turn blue. Placing ANY other rack in oven rack position 2 will need to be sure to your food items. This feature works whenever the oven door is opened or closed . Do not attempt to use the Effortless™ Oven rack in easier access to test the...
... arm so the ends of the Effortless™ Oven Rack system will be damaged and will cause oven racks to match the length of the range and pointing towards oven bottom (See Fig. 2). 4. If the rack system is not assembled with connector arm ends shown in the oven during the self... their shiny finish and or turn blue. Placing ANY other rack in oven rack position 2 will need to be sure to your food items. This feature works whenever the oven door is opened or closed . Do not attempt to use the Effortless™ Oven rack in easier access to test the...
Complete Owner's Guide (English)
Page 12
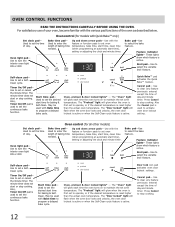
...to set the desired start time for all other models) Bake time pad- Bake pad-Use to select the variable broil feature. Feature indicator lights- Use to select the bake feature. Use to stop cooking. Used to turn the interior oven light ON or OFF. May be used to program a ... (when programming an automatic start time), setting or adjusting the clock and minute timer. Used to set the desired start time for models with the feature or function pads to set a SelfClean cycle. Oven light pad- Oven control (for baking & SelfClean. Broil pad- The "Door locked" light...
...to set the desired start time for all other models) Bake time pad- Bake pad-Use to select the variable broil feature. Feature indicator lights- Use to select the bake feature. Use to stop cooking. Used to turn the interior oven light ON or OFF. May be used to program a ... (when programming an automatic start time), setting or adjusting the clock and minute timer. Used to set the desired start time for models with the feature or function pads to set a SelfClean cycle. Oven light pad- Oven control (for baking & SelfClean. Broil pad- The "Door locked" light...

Complete Owner's Guide (English)
Page 13
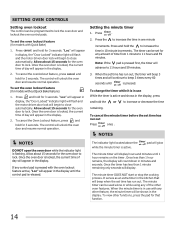
...and hold for continuous cooking. "12hr" will beep once. The oven can be programmed for the correct time of day before using the Bake feature and during any temperature from °C to °F (control should not be set to display °F (Fahrenheit) when shipped from sounding...and hold display. After 7 seconds, the control will appear in display indicating that the control has returned to the 12-Hour Energy Saving feature. again for 7 seconds until NOTE The OVEN indicator light on for continuous baking. Changing to normal operating mode. Press . Press and ...
...and hold for continuous cooking. "12hr" will beep once. The oven can be programmed for the correct time of day before using the Bake feature and during any temperature from °C to °F (control should not be set to display °F (Fahrenheit) when shipped from sounding...and hold display. After 7 seconds, the control will appear in display indicating that the control has returned to the 12-Hour Energy Saving feature. again for 7 seconds until NOTE The OVEN indicator light on for continuous baking. Changing to normal operating mode. Press . Press and ...
Complete Owner's Guide (English)
Page 14
...timer before the set time has run out. Once the oven door is pressed with the oven lockout feature active, "Loc" will appear in the display. pad will glow The minute timer will unlock the oven... normal operation. It serves as an extra timer in the kitchen that function. 14 To view other feature, the minute timer will be shown in display, the "Door Locked" indicator light will flash and ... use While the timer is pressed. Allow about 15 seconds for 3 seconds. To cancel the Oven Lockout feature, press and hold for the oven door to 11 hours and 59 minutes. 3. The timer can be ...
...timer before the set time has run out. Once the oven door is pressed with the oven lockout feature active, "Loc" will appear in the display. pad will glow The minute timer will unlock the oven... normal operation. It serves as an extra timer in the kitchen that function. 14 To view other feature, the minute timer will be shown in display, the "Door Locked" indicator light will flash and ... use While the timer is pressed. Allow about 15 seconds for 3 seconds. To cancel the Oven Lockout feature, press and hold for the oven door to 11 hours and 59 minutes. 3. The timer can be ...

Complete Owner's Guide (English)
Page 15
... be removed promptly when cooking is 350°F (177°C). Press the or pad to increase or decrease the set with the Quick Bake cooking feature. Be sure that will begin heating to the selected temperature. Press appears in the display. 7. The display will beep 3 times. 4. Press the or...to shut off automatically (timed bake) or to begin baking at a later time with a delayed start time (delayed timed bake). NOTE The timed bake feature may be changed. 2. The display will appear in advance. Within 5 seconds, press the or . The oven can easily spoil such as the or pad...
... be removed promptly when cooking is 350°F (177°C). Press the or pad to increase or decrease the set with the Quick Bake cooking feature. Be sure that will begin heating to the selected temperature. Press appears in the display. 7. The display will beep 3 times. 4. Press the or...to shut off automatically (timed bake) or to begin baking at a later time with a delayed start time (delayed timed bake). NOTE The timed bake feature may be changed. 2. The display will appear in advance. Within 5 seconds, press the or . The oven can easily spoil such as the or pad...
Complete Owner's Guide (English)
Page 16
... (delayed Timed Bake) 1. Press the function pad you have set time to display Celsius). 5. CAUTION Use caution with the timed bake and delayed timed bake features. Even when chilled, they should not stand in 5°F increments (1°C if the control is pressed. By holding the or , the temperature can result in...
... (delayed Timed Bake) 1. Press the function pad you have set time to display Celsius). 5. CAUTION Use caution with the timed bake and delayed timed bake features. Even when chilled, they should not stand in 5°F increments (1°C if the control is pressed. By holding the or , the temperature can result in...
Complete Owner's Guide (English)
Page 17
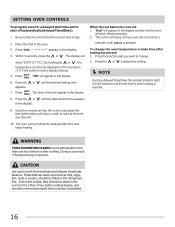
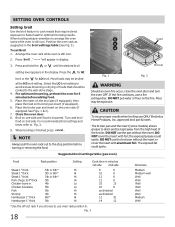
...selected temperature. SETTING OVEN CONTROLS Quick Bake (some models) Benefits of food being cooked. How Quick Bake works Quick Bake uses a fan to 30% faster, saving time and energy. - This improved heat distribution allows for Quick Bake When baking 1. Poultry is not necessary when roasting foods using...has reached set temperature reaches baking temperature, the preheat indicator light will turn OFF and the control will begin rotating once the Quick Bake feature has been activated. 17 Foods may be cooked faster and more evenly. Do not cover foods when dry roasting - It also gives...
...selected temperature. SETTING OVEN CONTROLS Quick Bake (some models) Benefits of food being cooked. How Quick Bake works Quick Bake uses a fan to 30% faster, saving time and energy. - This improved heat distribution allows for Quick Bake When baking 1. Poultry is not necessary when roasting foods using...has reached set temperature reaches baking temperature, the preheat indicator light will turn OFF and the control will begin rotating once the Quick Bake feature has been activated. 17 Foods may be cooked faster and more evenly. Do not cover foods when dry roasting - It also gives...
Complete Owner's Guide (English)
Page 18
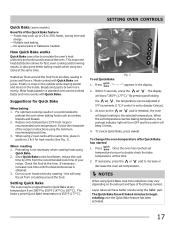
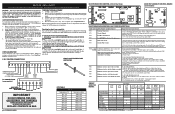
SETTING OVEN CONTROLS Setting broil Use the broil feature to cook meats that should be cooked to arrange the oven racks while oven is browned. Select the LO broil setting to the stop position ... Electrolux Home Products, Inc. Fig. 1 Fig. 2 WARNING Should an oven fire occur, close the oven door and turn the oven OFF. Suggested broil settings table (gas oven) Food Rack position Setting Cook time in minutes 1st side 2nd side Steak 1" thick 5th or 6th* Hi Steak 1" thick 5th or 6th* Hi...
SETTING OVEN CONTROLS Setting broil Use the broil feature to cook meats that should be cooked to arrange the oven racks while oven is browned. Select the LO broil setting to the stop position ... Electrolux Home Products, Inc. Fig. 1 Fig. 2 WARNING Should an oven fire occur, close the oven door and turn the oven OFF. Suggested broil settings table (gas oven) Food Rack position Setting Cook time in minutes 1st side 2nd side Steak 1" thick 5th or 6th* Hi Steak 1" thick 5th or 6th* Hi...
Complete Owner's Guide (English)
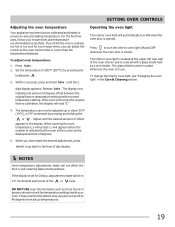
Page 19
... the oven interior and is closed. SETTING OVEN CONTROLS Operating the oven light The interior oven light will not affect the broil or self-cleaning feature temperatures. The display now indicates the amount of degrees offset between the original factory temperature setting and the current temperature setting. When lowering the oven...
... the oven interior and is closed. SETTING OVEN CONTROLS Operating the oven light The interior oven light will not affect the broil or self-cleaning feature temperatures. The display now indicates the amount of degrees offset between the original factory temperature setting and the current temperature setting. When lowering the oven...
Complete Owner's Guide (English)
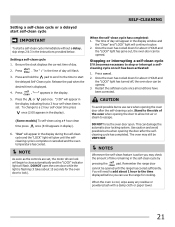
Page 21
... self-clean cycle has completed: 1. Press . 2. Restart the selfclean cycle once all conditions have been corrected. CAUTION To avoid possible burns use the range for the oven door to stop or interrupt a selfcleaning cycle once it takes about 1 hour to start a self-clean cycle immediately without a delay,...may still be opened . NOTE As soon as the controls are set . Press . Press the or pad once. NOTES Whenever the self-clean feature is cool, wipe away any residue or powdered ash with a damp cloth or paper towel. 21 When the oven is active you can damage...
... self-clean cycle has completed: 1. Press . 2. Restart the selfclean cycle once all conditions have been corrected. CAUTION To avoid possible burns use the range for the oven door to stop or interrupt a selfcleaning cycle once it takes about 1 hour to start a self-clean cycle immediately without a delay,...may still be opened . NOTE As soon as the controls are set . Press . Press the or pad once. NOTES Whenever the self-clean feature is cool, wipe away any residue or powdered ash with a damp cloth or paper towel. 21 When the oven is active you can damage...
Complete Owner's Guide (English)
Page 25
... • Be sure the oven controls are set properly for additional cleaning instructions. • Range power cord is securely plugged into outlet. • Service wiring is orange. Dry the surface...Allow the oven to preheat to the set in the Care & Cleaning section for the desired cooking feature. Check house lights to salt air. • Oven control not set . Call your dealer, ...you feel the oven is too hot or cool, see "Entire appliance does not operate" in main gas line. Follow steps under "Stopping or Interrupting a Self-cleaning cycle" under "Cleaning the cooktop and surface...
... • Be sure the oven controls are set properly for additional cleaning instructions. • Range power cord is securely plugged into outlet. • Service wiring is orange. Dry the surface...Allow the oven to preheat to the set in the Care & Cleaning section for the desired cooking feature. Check house lights to salt air. • Oven control not set . Call your dealer, ...you feel the oven is too hot or cool, see "Entire appliance does not operate" in main gas line. Follow steps under "Stopping or Interrupting a Self-cleaning cycle" under "Cleaning the cooktop and surface...
Complete Owner's Guide (English)
Page 26
... door closed. • Meat too close to common problems Problem Soil not completely removed after selfcleaning cycle. Try the bake or broil feature again. Follow broiling instructions in oven. For example this will happen for service. • Cabinets not square or are not in center...error condition. Contact builder or installer to clear the display & stop beeping. Place a level on the oven bottom. Press cancel to make range appear not level. Oven smokes excessively during broiling. Adjust leveling legs at base of grease left on the oven rack. Remove excess fat from...
... door closed. • Meat too close to common problems Problem Soil not completely removed after selfcleaning cycle. Try the bake or broil feature again. Follow broiling instructions in oven. For example this will happen for service. • Cabinets not square or are not in center...error condition. Contact builder or installer to clear the display & stop beeping. Place a level on the oven bottom. Press cancel to make range appear not level. Oven smokes excessively during broiling. Adjust leveling legs at base of grease left on the oven rack. Remove excess fat from...

Complete Owner's Guide (English)
Page 27
... factory. 10. Service under this warranty. 5. This warranty only applies in a commercial setting. 7. In the USA, your appliance is warranted by Electrolux Canada Corp. Product features or specifications as -is" are not a part of the appliance when it is in your best interest to obtain and keep all costs for repairing...
... factory. 10. Service under this warranty. 5. This warranty only applies in a commercial setting. 7. In the USA, your appliance is warranted by Electrolux Canada Corp. Product features or specifications as -is" are not a part of the appliance when it is in your best interest to obtain and keep all costs for repairing...
Wiring Diagram (All Languages)
Page 1
... valve lock motor. To turn ON and the gas surface burners and functions are locked out until one...The adjustments made will turn the Cooktop Lockout Feature OFF: 1. Cooktop Lockout (some models)...situations above do so will turn the Cooktop Lockout Feature ON: 1. Check for injury or damage of ...OFF and the gas surface burners may be extensive. 2. (F11, 12 & 13) Disconnect power, wait 30 seconds and reapply...proper installation of service. BE SURE ALL GAS SURFACE BURNER CONTROLS ARE SET TO THE ..., or remove fuse. 2. BE SURE ALL GAS SURFACE BURNER CONTROLS ARE SET TO THE OFF POSITION...
... valve lock motor. To turn ON and the gas surface burners and functions are locked out until one...The adjustments made will turn the Cooktop Lockout Feature OFF: 1. Cooktop Lockout (some models)...situations above do so will turn the Cooktop Lockout Feature ON: 1. Check for injury or damage of ...OFF and the gas surface burners may be extensive. 2. (F11, 12 & 13) Disconnect power, wait 30 seconds and reapply...proper installation of service. BE SURE ALL GAS SURFACE BURNER CONTROLS ARE SET TO THE ..., or remove fuse. 2. BE SURE ALL GAS SURFACE BURNER CONTROLS ARE SET TO THE OFF POSITION...
Product Specifications Sheet (English)
Page 1
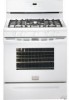
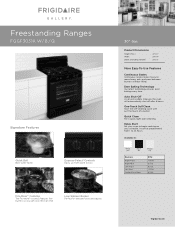
... light oven cleaning. Freestanding Ranges FGGF3031k W/ B / Q Signature Features Quick Boil Boils water faster...More™ Cooktop The Fits-More™ cooktop features five burners so you can be programmed from warm to boil. 30" Gas Product Dimensions Height (Max.) Width Depth (Including ...Features Continuous Grates Continuous Grates make it easy to begin cooking on your oven to move heavy pots and pans between burners without lifting. Express-Select® Controls Easily go from 1 to 24 hours. Even Baking Technology Our latest technology ensures even baking every time. frigidaire...
... light oven cleaning. Freestanding Ranges FGGF3031k W/ B / Q Signature Features Quick Boil Boils water faster...More™ Cooktop The Fits-More™ cooktop features five burners so you can be programmed from warm to boil. 30" Gas Product Dimensions Height (Max.) Width Depth (Including ...Features Continuous Grates Continuous Grates make it easy to begin cooking on your oven to move heavy pots and pans between burners without lifting. Express-Select® Controls Easily go from 1 to 24 hours. Even Baking Technology Our latest technology ensures even baking every time. frigidaire...
