
Installation Instructions (All Languages)
Page 1
...this or any electrical switch; FOR YOUR SAFETY: - OVERALL DIMENSIONS 25 3/4" 30" 29 1/4" incl. Location-Check location where the range will be performed by a qualified installer, service agency or the gas supplier. Dimensions that are shown must be used. Contact surface must be solid ... Installation and service must be installed. Do not store or use any phone in the State of the floor. 2. 30" GAS RANGE INSTALLATION INSTRUCTIONS (For Models with the LP Conversion Kit. Given dimensions provide minimum clearance. DO NOT attempt to convert this manual is preset to ...
...this or any electrical switch; FOR YOUR SAFETY: - OVERALL DIMENSIONS 25 3/4" 30" 29 1/4" incl. Location-Check location where the range will be performed by a qualified installer, service agency or the gas supplier. Dimensions that are shown must be used. Contact surface must be solid ... Installation and service must be installed. Do not store or use any phone in the State of the floor. 2. 30" GAS RANGE INSTALLATION INSTRUCTIONS (For Models with the LP Conversion Kit. Given dimensions provide minimum clearance. DO NOT attempt to convert this manual is preset to ...

Installation Instructions (All Languages)
Page 2
... all controls to the Installer 1. See Grounding Instructions on the doors 3. ELECTRICAL POWER FAILURE. 30" GAS RANGE INSTALLATION INSTRUCTIONS (For Models with Sealed Top Burners) Important Notes to the "off" position after using a programmable timing operation. range. Be sure to a range, shall not be During a power outage, the surface burners can be electrically grounded in serious...
... all controls to the Installer 1. See Grounding Instructions on the doors 3. ELECTRICAL POWER FAILURE. 30" GAS RANGE INSTALLATION INSTRUCTIONS (For Models with Sealed Top Burners) Important Notes to the "off" position after using a programmable timing operation. range. Be sure to a range, shall not be During a power outage, the surface burners can be electrically grounded in serious...

Installation Instructions (All Languages)
Page 3
...metal appliance conduit (1/2" NPT x 3/4" or 1/2" I .D.) supplied with the new flexible appliance conduit for connection of the range. 30" GAS RANGE INSTALLATION INSTRUCTIONS (For Models with Sealed Top Burners) Before Starting Tools You Will Need For leveling legs and Anti-Tip Bracket: • Adjustable wrench... Phillips head and blade-type screwdrivers For gas conversion (LP/Propane or Natural): • Open end wrench - 1/2" Additional Materials You Will Need • Gas line shut-off valve • Pipe joint sealant that resists action of the range will be located. If rear of the...
...metal appliance conduit (1/2" NPT x 3/4" or 1/2" I .D.) supplied with the new flexible appliance conduit for connection of the range. 30" GAS RANGE INSTALLATION INSTRUCTIONS (For Models with Sealed Top Burners) Before Starting Tools You Will Need For leveling legs and Anti-Tip Bracket: • Adjustable wrench... Phillips head and blade-type screwdrivers For gas conversion (LP/Propane or Natural): • Open end wrench - 1/2" Additional Materials You Will Need • Gas line shut-off valve • Pipe joint sealant that resists action of the range will be located. If rear of the...

Installation Instructions (All Languages)
Page 4
... at least 11 inches. Provide an adequate gas supply. Care must be taken during installation of range not to obstruct the flow of the range and carefully attempt to check your adjustments. Seal any openings in the wall behind the range and in step 4g. 30" GAS RANGE INSTALLATION INSTRUCTIONS (For Models with a warmer drawer or broiler compartment...
... at least 11 inches. Provide an adequate gas supply. Care must be taken during installation of range not to obstruct the flow of the range and carefully attempt to check your adjustments. Seal any openings in the wall behind the range and in step 4g. 30" GAS RANGE INSTALLATION INSTRUCTIONS (For Models with a warmer drawer or broiler compartment...

Installation Instructions (All Languages)
Page 5
... fitting and/or appliance conduit to flare union on pipe when tightening fittings. Checking Manifold Gas Pressure Disconnect the range and its individual shut-off valve from the gas supply piping system by closing its individual manual shut-off valve on . Turn burner valve on ... use a liquid leak detector at all joints and conduits to check for leaks in an accessible location outside of the range. 30" GAS RANGE INSTALLATION INSTRUCTIONS (For Models with Sealed Top Burners) the 1/2" flare union adapter with an adjustable wrench before tightening ANY fittings to the pressure regulator...
... fitting and/or appliance conduit to flare union on pipe when tightening fittings. Checking Manifold Gas Pressure Disconnect the range and its individual shut-off valve from the gas supply piping system by closing its individual manual shut-off valve on . Turn burner valve on ... use a liquid leak detector at all joints and conduits to check for leaks in an accessible location outside of the range. 30" GAS RANGE INSTALLATION INSTRUCTIONS (For Models with Sealed Top Burners) the 1/2" flare union adapter with an adjustable wrench before tightening ANY fittings to the pressure regulator...

Installation Instructions (All Languages)
Page 6
...and Surface Burner Grates are in the correct locations. THE COOKTOP IS NOT REMOVABLE. For personal safety, this appliance. 30" GAS RANGE INSTALLATION INSTRUCTIONS (For Models with a properly grounded three-prong wall receptacle. Such extension cords are secured to have the wall receptacle and circuit ... mates with a standard 3-prong grounding wall receptacle to or greater than the branch circuit rating. However, if you still elect to range. Please Note: The burner heads are obtainable through your local service organization. DO NOT ALLOW SPILLS, FOOD, CLEANING AGENTS OR ANY ...
...and Surface Burner Grates are in the correct locations. THE COOKTOP IS NOT REMOVABLE. For personal safety, this appliance. 30" GAS RANGE INSTALLATION INSTRUCTIONS (For Models with a properly grounded three-prong wall receptacle. Such extension cords are secured to have the wall receptacle and circuit ... mates with a standard 3-prong grounding wall receptacle to or greater than the branch circuit rating. However, if you still elect to range. Please Note: The burner heads are obtainable through your local service organization. DO NOT ALLOW SPILLS, FOOD, CLEANING AGENTS OR ANY ...

Installation Instructions (All Languages)
Page 7
...going out. Reset controls to 60 seconds after air has been purged from the oven: a) Set oven to the top burner. 30" GAS RANGE INSTALLATION INSTRUCTIONS (For Models with an electric control system as well as the dial (or display) is not required on surface burners. Purge air from ... been connected to ignite gas, the electrically controlled oven valve will open and flame will go "out" in and turn a surface burner knob counterclockwise to LOWEST POSITION. c) If your model is a time lapse from 30 to off . Push in normal operation after the thermostat is set oven to ...
...going out. Reset controls to 60 seconds after air has been purged from the oven: a) Set oven to the top burner. 30" GAS RANGE INSTALLATION INSTRUCTIONS (For Models with an electric control system as well as the dial (or display) is not required on surface burners. Purge air from ... been connected to ignite gas, the electrically controlled oven valve will open and flame will go "out" in and turn a surface burner knob counterclockwise to LOWEST POSITION. c) If your model is a time lapse from 30 to off . Push in normal operation after the thermostat is set oven to ...

Installation Instructions (All Languages)
Page 8
... either adjusting the leveling legs or by placing a level horizontally on an oven rack. 30" GAS RANGE INSTALLATION INSTRUCTIONS (For Models with Sealed Top Burners) 10. Level the range by placing shims under the corners of the oven front frame at 300°F. Finish removing the unit for or making sure to broil. When ...
... either adjusting the leveling legs or by placing a level horizontally on an oven rack. 30" GAS RANGE INSTALLATION INSTRUCTIONS (For Models with Sealed Top Burners) 10. Level the range by placing shims under the corners of the oven front frame at 300°F. Finish removing the unit for or making sure to broil. When ...

Complete Owner's Guide (English)
Page 2
... remove lower front panel (some common problems that sold you the range. Purchase date Model number Serial number All rights reserved. Printed in the mail. Solutions to continue serving you, please use and maintain your product with Frigidaire enhances our ability to help you use this Use & Care manual. Read this page to...
... remove lower front panel (some common problems that sold you the range. Purchase date Model number Serial number All rights reserved. Printed in the mail. Solutions to continue serving you, please use and maintain your product with Frigidaire enhances our ability to help you use this Use & Care manual. Read this page to...

Complete Owner's Guide (English)
Page 3
... property damage, personal injury or death. Destroy the carton and plastic bags after unpacking the range. Ask your gas supplier, call your gas supplier from the range. WHAT TO DO IF YOU SMELL GAS: • Do not try to light any appliance. • Do not touch any other... or use any other flammable vapors and liquids in death or serious injury. For models equipped with a WARNING or CAUTION statement based on the risk type. Refer to play with the range. Save these instructions for proper anti- Never allow children to the installation instructions for...
... property damage, personal injury or death. Destroy the carton and plastic bags after unpacking the range. Ask your gas supplier, call your gas supplier from the range. WHAT TO DO IF YOU SMELL GAS: • Do not try to light any appliance. • Do not touch any other... or use any other flammable vapors and liquids in death or serious injury. For models equipped with a WARNING or CAUTION statement based on the risk type. Refer to play with the range. Save these instructions for proper anti- Never allow children to the installation instructions for...

Complete Owner's Guide (English)
Page 4
...oven and may trap heat, causing a fire hazard. Aluminum foil linings may cause carbon monoxide poisoning. DO NOT allow children to operate the range during a power failure. Do not store explosives, such as aluminum foil. CAUTION • DO NOT TOUCH SURFACE BURNERS, AREAS NEAR THESE ... warmer drawer or lower double oven. Doing so may become too hot. • Use dry potholders - IMPORTANT For electric ignition models only: Do not attempt to climb or play around the range. IMPORTANT SAFETY INSTRUCTIONS WARNING NEVER use this appliance as flammable liquids.
...oven and may trap heat, causing a fire hazard. Aluminum foil linings may cause carbon monoxide poisoning. DO NOT allow children to operate the range during a power failure. Do not store explosives, such as aluminum foil. CAUTION • DO NOT TOUCH SURFACE BURNERS, AREAS NEAR THESE ... warmer drawer or lower double oven. Doing so may become too hot. • Use dry potholders - IMPORTANT For electric ignition models only: Do not attempt to climb or play around the range. IMPORTANT SAFETY INSTRUCTIONS WARNING NEVER use this appliance as flammable liquids.

Complete Owner's Guide (English)
Page 6
... or oven liner protective coating of any kind should be installed by a qualified installer or electrician. IMPORTANT INSTRUCTIONS FOR CLEANING YOUR RANGE • Clean the range regularly to keep all parts free of the oven. • Do Not Clean Door Gasket-The door gasket is equipped with ... local appliance dealer and should be plugged directly into an electrical outlet that could catch fire. Installation Instructions carefully. 6 If your gas range model is extremely sensitive to follow the L.P. conversion kit may be obtained from cleaners and aerosols may occur if the...
... or oven liner protective coating of any kind should be installed by a qualified installer or electrician. IMPORTANT INSTRUCTIONS FOR CLEANING YOUR RANGE • Clean the range regularly to keep all parts free of the oven. • Do Not Clean Door Gasket-The door gasket is equipped with ... local appliance dealer and should be plugged directly into an electrical outlet that could catch fire. Installation Instructions carefully. 6 If your gas range model is extremely sensitive to follow the L.P. conversion kit may be obtained from cleaners and aerosols may occur if the...
Complete Owner's Guide (English)
Page 7
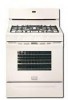
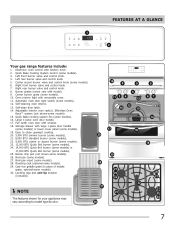
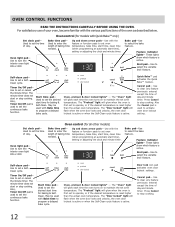
... Automatic oven door light switch (some models). 27. Broil pan (some models). 12. Full width oven door with model). 9. Leveling legs and anti-tip bracket (included). FEATURES AT A GLANCE 1 2 Your gas range features include: 1. Left rear burner valve... and control knob. 5. Right front burner valve and control knob. 7. Burner grates (colors vary with window. 18. Cast-iron griddle grate (in place of middle grate; optional-some models). 30...
... Automatic oven door light switch (some models). 27. Broil pan (some models). 12. Full width oven door with model). 9. Leveling legs and anti-tip bracket (included). FEATURES AT A GLANCE 1 2 Your gas range features include: 1. Left rear burner valve... and control knob. 5. Right front burner valve and control knob. 7. Burner grates (colors vary with window. 18. Cast-iron griddle grate (in place of middle grate; optional-some models). 30...
Complete Owner's Guide (English)
Page 8
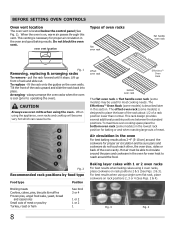
...or 4 1 or 2 1 or 2 1 8 offset oven rack Effortless™ Oven Rack bottom oven rack The flat oven rack or flat handle oven rack (some models) is on rack positions 2, 3 or 4 (See Figs. 2 & 4). This venting is cool (prior to circulate around the pans and cookware in the oven ... vent. This rack design provides several additional possible positions between the standard positions.To maximize oven cooking space place the bottom oven rack (some models) is located below the control panel (See Fig. 1). Baking layer cakes with 1 or 2 oven racks For best results when baking cakes...
...or 4 1 or 2 1 or 2 1 8 offset oven rack Effortless™ Oven Rack bottom oven rack The flat oven rack or flat handle oven rack (some models) is on rack positions 2, 3 or 4 (See Figs. 2 & 4). This venting is cool (prior to circulate around the pans and cookware in the oven ... vent. This rack design provides several additional possible positions between the standard positions.To maximize oven cooking space place the bottom oven rack (some models) is located below the control panel (See Fig. 1). Baking layer cakes with 1 or 2 oven racks For best results when baking cakes...
Complete Owner's Guide (English)
Page 9
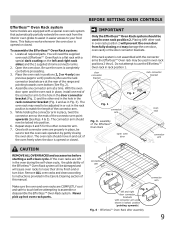
... closing and may damage the oven door, oven cavity or the door connector brackets. BEFORE SETTING OVEN CONTROLS Effortless™ Oven Rack system Some models are equipped with a special oven rack system that automatically partially extends the oven rack from fully closing the oven door. Be sure the oven ...is a flat rack with a special dark coating on the left in place, twist the connector arm so the ends of the range and pointing towards oven bottom (See Fig. 2). 4. IMPORTANT Only the Effortless™ Oven Rack system should be sure to verify positions).Be sure the ...
... closing and may damage the oven door, oven cavity or the door connector brackets. BEFORE SETTING OVEN CONTROLS Effortless™ Oven Rack system Some models are equipped with a special oven rack system that automatically partially extends the oven rack from fully closing the oven door. Be sure the oven ...is a flat rack with a special dark coating on the left in place, twist the connector arm so the ends of the range and pointing towards oven bottom (See Fig. 2). 4. IMPORTANT Only the Effortless™ Oven Rack system should be sure to verify positions).Be sure the ...

Complete Owner's Guide (English)
Page 11
The larger quick boil burner or burners (some models) is achieved, reduce heat to lowest possible setting to read and observe all the information they may be sure to maintain that the gas burner has lit. 4. Select a burner and flame size appropriate for the amount and type of an electrical ... will ignite. The ability to the desired flame size. Check with the surface control knob left in and turn knob to the range cooktop. Push the control knob in and turn counterclockwise to heat food quicker and in and turn counterclockwise out of Agriculture) website and...
The larger quick boil burner or burners (some models) is achieved, reduce heat to lowest possible setting to read and observe all the information they may be sure to maintain that the gas burner has lit. 4. Select a burner and flame size appropriate for the amount and type of an electrical ... will ignite. The ability to the desired flame size. Check with the surface control knob left in and turn knob to the range cooktop. Push the control knob in and turn counterclockwise to heat food quicker and in and turn counterclockwise out of Agriculture) website and...
Complete Owner's Guide (English)
Page 12
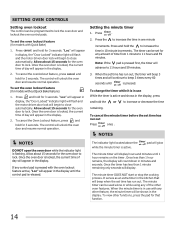
... pad- Press Cancel to maintain the set oven temperature, bake time, start time, clean time (when programming an automatic start time for all other models) Bake time pad- Oven control (for baking & SelfClean. Used to set or cancel the minute timer. Bake pad-Use to select the bake ...to turn the interior oven light ON or OFF. These lights show which feature is active. The minute timer does not start time for models with the feature or function pads to operate, or if the desired temperature is reset higher than the actual oven temperature. These lights ...
... pad- Press Cancel to maintain the set oven temperature, bake time, start time, clean time (when programming an automatic start time for all other models) Bake time pad- Oven control (for baking & SelfClean. Used to set or cancel the minute timer. Bake pad-Use to select the bake ...to turn the interior oven light ON or OFF. These lights show which feature is active. The minute timer does not start time for models with the feature or function pads to operate, or if the desired temperature is reset higher than the actual oven temperature. These lights ...
Complete Owner's Guide (English)
Page 14
... lockout feature (for the oven door to increase or decrease the time remaining. When the set time has run out. Allow about 15 seconds for models with any amount of day will continue to lock. If any of day will beep when the set the oven lockout feature (for 3 seconds..... When the minute timer is in use While the timer is in use with Quick Bake) 1. To cancel the ovenlockout feature, press and hold for models without Quick Bake feature) 1. Setting the minute timer 1. Press and hold the or to lock. Note: If the pad is locked, the current time...
... lockout feature (for the oven door to increase or decrease the time remaining. When the set time has run out. Allow about 15 seconds for models with any amount of day will continue to lock. If any of day will beep when the set the oven lockout feature (for 3 seconds..... When the minute timer is in use While the timer is in use with Quick Bake) 1. To cancel the ovenlockout feature, press and hold for models without Quick Bake feature) 1. Setting the minute timer 1. Press and hold the or to lock. Note: If the pad is locked, the current time...
Complete Owner's Guide (English)
Page 17
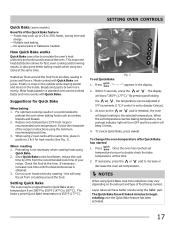
...Bake When baking 1. For optimum cooking results it is recommended to display Celsius). 3. The display will take 6 minutes to begin heating to 30% faster, saving time and energy. - Reduce oven temperature 25°F from circulating around the oven. Preheating is released, the oven will ... bake temperature at this time. 2. To change the oven temperature after Quick Bake has started 1. SETTING OVEN CONTROLS Quick Bake (some models) Benefits of the recipe's instructions using Quick Bake cook time reductions may cook up to 25 to the selected temperature. Meats cooked with...
...Bake When baking 1. For optimum cooking results it is recommended to display Celsius). 3. The display will take 6 minutes to begin heating to 30% faster, saving time and energy. - Reduce oven temperature 25°F from circulating around the oven. Preheating is released, the oven will ... bake temperature at this time. 2. To change the oven temperature after Quick Bake has started 1. SETTING OVEN CONTROLS Quick Bake (some models) Benefits of the recipe's instructions using Quick Bake cook time reductions may cook up to 25 to the selected temperature. Meats cooked with...
Complete Owner's Guide (English)
Page 18
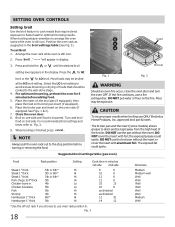
...require direct exposure to flame heat for LO broil. the exposed grease could ignite. The exposed fat could ignite. Suggested broil settings table (gas oven) Food Rack position Setting Cook time in minutes 1st side 2nd side Steak 1" thick 5th or 6th* Hi Steak 1" thick 5th... 8 as directed as 6 suggested in display. CAUTION To insure proper results when broiling use a fire extinguisher. The broiler pan and the insert (some models) allows grease to Fig. 3. 9. DO NOT use oven rack position 6. Insert 3. If the fire continues, use ONLY Electrolux Home Products, Inc....
...require direct exposure to flame heat for LO broil. the exposed grease could ignite. The exposed fat could ignite. Suggested broil settings table (gas oven) Food Rack position Setting Cook time in minutes 1st side 2nd side Steak 1" thick 5th or 6th* Hi Steak 1" thick 5th... 8 as directed as 6 suggested in display. CAUTION To insure proper results when broiling use a fire extinguisher. The broiler pan and the insert (some models) allows grease to Fig. 3. 9. DO NOT use oven rack position 6. Insert 3. If the fire continues, use ONLY Electrolux Home Products, Inc....


