
Installation Instructions (All Languages)
Page 1
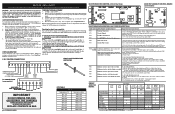
... or use any phone in the State of Range. Follow the gas supplier's instructions. • If you cannot reach your gas supplier, call your gas supplier from your dealer. door handle FRONT VIEW SIDE VIEW 48" Maximum 36+- 1/8" *Minimum to Side Wall on Either Side of *5" Range 5" 30" 30" Minimum Minimum to LP/ Propane settings without the proper LP/Propane conversion kit provided with Sealed Top Burners) INSTALLATION AND SERVICE MUST...
... or use any phone in the State of Range. Follow the gas supplier's instructions. • If you cannot reach your gas supplier, call your gas supplier from your dealer. door handle FRONT VIEW SIDE VIEW 48" Maximum 36+- 1/8" *Minimum to Side Wall on Either Side of *5" Range 5" 30" 30" Minimum Minimum to LP/ Propane settings without the proper LP/Propane conversion kit provided with Sealed Top Burners) INSTALLATION AND SERVICE MUST...

Installation Instructions (All Languages)
Page 2
... in • Adjust surface burner flame size so it carefully. self-cleaning the oven. See Grounding Instructions on the doors 3. or drawers of OPERATE THE ELECTRIC IGNITION OVEN DURING AN 1/4-inch thick plywood between the range and carpeting. Keep these installation instructions before in length. Installation of interest to remove the cooktop. Do not attempt to children in a manufactured (mobile) home, installation • Never use , the burner combustion. nearby surfaces as a storage space. 30" GAS RANGE INSTALLATION INSTRUCTIONS (For Models with the consumer...
... in • Adjust surface burner flame size so it carefully. self-cleaning the oven. See Grounding Instructions on the doors 3. or drawers of OPERATE THE ELECTRIC IGNITION OVEN DURING AN 1/4-inch thick plywood between the range and carpeting. Keep these installation instructions before in length. Installation of interest to remove the cooktop. Do not attempt to children in a manufactured (mobile) home, installation • Never use , the burner combustion. nearby surfaces as a storage space. 30" GAS RANGE INSTALLATION INSTRUCTIONS (For Models with the consumer...

Installation Instructions (All Languages)
Page 3
... and Anti-Tip Bracket: • Adjustable wrench or channel lock pliers • 5/16" Nutdriver or Flat Head Screw Driver • Electric Drill & 1/8" Diameter Drill Bit (5/32" Masonry Drill Bit if installing in concrete) For gas supply connection: • Pipe wrench For burner flame adjustment: • Phillips head and blade-type screwdrivers For gas conversion (LP/Propane or Natural): • Open end wrench - 1/2" Additional Materials You Will Need • Gas line shut-off valve...
... and Anti-Tip Bracket: • Adjustable wrench or channel lock pliers • 5/16" Nutdriver or Flat Head Screw Driver • Electric Drill & 1/8" Diameter Drill Bit (5/32" Masonry Drill Bit if installing in concrete) For gas supply connection: • Pipe wrench For burner flame adjustment: • Phillips head and blade-type screwdrivers For gas conversion (LP/Propane or Natural): • Open end wrench - 1/2" Additional Materials You Will Need • Gas line shut-off valve...

Installation Instructions (All Languages)
Page 4
... than regulator manifold pressure. Examples: If regulator is pre-set for converting the pressure regulator to the gas supply. Fig. 4b Fig. 4c 4 NOTE: To prevent leaks use . Wall Edge 2. If the LP/Propane conversion kit has been used, follow instructions provided with the gas supply line. The gas supply line should be found on 4" natural gas manifold pressure. Provide an adequate gas supply. Leak testing of the appliance shall be connected in step 4g. 30" GAS RANGE INSTALLATION INSTRUCTIONS (For Models with...
... than regulator manifold pressure. Examples: If regulator is pre-set for converting the pressure regulator to the gas supply. Fig. 4b Fig. 4c 4 NOTE: To prevent leaks use . Wall Edge 2. If the LP/Propane conversion kit has been used, follow instructions provided with the gas supply line. The gas supply line should be found on 4" natural gas manifold pressure. Provide an adequate gas supply. Leak testing of the appliance shall be connected in step 4g. 30" GAS RANGE INSTALLATION INSTRUCTIONS (For Models with...

Installation Instructions (All Languages)
Page 5
... location outside of water column pressure (approximately 1/2" psig). of the pressure regulator using NO MORE THAN 15ft./lbs. 30" GAS RANGE INSTALLATION INSTRUCTIONS (For Models with Sealed Top Burners) the 1/2" flare union adapter with an adjustable wrench before tightening ANY fittings to the pressure regulator (Refer to or less than 14" of the gas supply piping system at least two (2) other pressure device to external manual shut-off valve. f) Make sure service shut...
... location outside of water column pressure (approximately 1/2" psig). of the pressure regulator using NO MORE THAN 15ft./lbs. 30" GAS RANGE INSTALLATION INSTRUCTIONS (For Models with Sealed Top Burners) the 1/2" flare union adapter with an adjustable wrench before tightening ANY fittings to the pressure regulator (Refer to or less than 14" of the gas supply piping system at least two (2) other pressure device to external manual shut-off valve. f) Make sure service shut...

Installation Instructions (All Languages)
Page 6
... a UL listed 3-wire grounding type appliance extension cord and that all of the Surface Burner Caps and Surface Burner Grates are in the correct locations. Grounding Instructions The power cord of the customer to have the wall receptacle and circuit checked by a 15 amp. 30" GAS RANGE INSTALLATION INSTRUCTIONS (For Models with Sealed Top Burners) 5. The customer should have it replaced with a standard 3-prong grounding wall receptacle to use an extension cord, it...
... a UL listed 3-wire grounding type appliance extension cord and that all of the Surface Burner Caps and Surface Burner Grates are in the correct locations. Grounding Instructions The power cord of the customer to have the wall receptacle and circuit checked by a 15 amp. 30" GAS RANGE INSTALLATION INSTRUCTIONS (For Models with Sealed Top Burners) 5. The customer should have it replaced with a standard 3-prong grounding wall receptacle to use an extension cord, it...

Installation Instructions (All Languages)
Page 7
.... See Use & Care Guide for each knob separately until burner ignites. Check for leaks and range has been connected to electric power. Push in and turn knob to the LITE position. When the oven is not required on surface burners. When the oven reaches the dial setting, the glowing igniter will hear the igniter sparking (See Fig. 1). Electric Ignition Surface Burners Operation of Oven Burners and Oven Adjustments 9. Reset controls to LOWEST POSITION without going out. 30" GAS RANGE INSTALLATION INSTRUCTIONS (For Models with an electric control system as...
.... See Use & Care Guide for each knob separately until burner ignites. Check for leaks and range has been connected to electric power. Push in and turn knob to the LITE position. When the oven is not required on surface burners. When the oven reaches the dial setting, the glowing igniter will hear the igniter sparking (See Fig. 1). Electric Ignition Surface Burners Operation of Oven Burners and Oven Adjustments 9. Reset controls to LOWEST POSITION without going out. 30" GAS RANGE INSTALLATION INSTRUCTIONS (For Models with an electric control system as...

Installation Instructions (All Languages)
Page 8
... air shutter opening size. If removing the range is proper, remove the oven bottom and burner baffle and set the oven to level the range and check gas connections for servicing and cleaning. 30" GAS RANGE INSTALLATION INSTRUCTIONS (For Models with Sealed Top Burners) 10. To determine if the oven burner flame is necessary for cleaning instructions. Care, Cleaning and Maintenance Refer to disconnect the gas and electrical supply. Air Shutter-Broil Burner The approximate flame length of oven bottom. If the flame is yellow in color, increase air shutter opening size...
... air shutter opening size. If removing the range is proper, remove the oven bottom and burner baffle and set the oven to level the range and check gas connections for servicing and cleaning. 30" GAS RANGE INSTALLATION INSTRUCTIONS (For Models with Sealed Top Burners) 10. To determine if the oven burner flame is necessary for cleaning instructions. Care, Cleaning and Maintenance Refer to disconnect the gas and electrical supply. Air Shutter-Broil Burner The approximate flame length of oven bottom. If the flame is yellow in color, increase air shutter opening size...

Complete Owner's Guide (English)
Page 2
... bake or 12-Hour Energy Saving features 13 Changing temperature display (F° or C 13 Setting silent control feature 13 Setting oven lockout feature 14 Setting minute timer 14 Setting bake 15 Setting timed bake and delayed timed bake 15-16 Setting Quick Bake (some models 17 Setting broil 18 Adjusting oven temperature 19 Operating oven light 19 Self-Cleaning 20-21 Care & Cleaning 22-24 Cleaning recommendations table 22 Cleaning the cooktop and surface burners 23 Replacing the oven light 23 Removing & replacing oven door 24 Before You Call - Solutions to common problems...
... bake or 12-Hour Energy Saving features 13 Changing temperature display (F° or C 13 Setting silent control feature 13 Setting oven lockout feature 14 Setting minute timer 14 Setting bake 15 Setting timed bake and delayed timed bake 15-16 Setting Quick Bake (some models 17 Setting broil 18 Adjusting oven temperature 19 Operating oven light 19 Self-Cleaning 20-21 Care & Cleaning 22-24 Cleaning recommendations table 22 Cleaning the cooktop and surface burners 23 Replacing the oven light 23 Removing & replacing oven door 24 Before You Call - Solutions to common problems...

Complete Owner's Guide (English)
Page 3
... electrical switch; Follow the gas supplier's instructions. • If you have read the safety precautions in the literature package for future reference. 3 Installation and service must be performed by properly installed anti-tip bracket provided with packaging material. •Proper Installation-Be sure your gas supplier from the range. For models equipped with range. • See Installation Instructions. Save these instructions for this manual are labeled with the National Fuel Gas Code...
... electrical switch; Follow the gas supplier's instructions. • If you have read the safety precautions in the literature package for future reference. 3 Installation and service must be performed by properly installed anti-tip bracket provided with packaging material. •Proper Installation-Be sure your gas supplier from the range. For models equipped with range. • See Installation Instructions. Save these instructions for this manual are labeled with the National Fuel Gas Code...

Complete Owner's Guide (English)
Page 4
... NOT allow children to operate the range during a power failure. Do not store explosives, such as flammable liquids. Children climbing on the backguard of a potholder. • Do not heat unopened food containers - Once the power resumes, reset the clock and oven function. Do not let potholders touch hot heating elements. Do not use a towel or other flammable materials touch these openings, oven door and window. • Wear...
... NOT allow children to operate the range during a power failure. Do not store explosives, such as flammable liquids. Children climbing on the backguard of a potholder. • Do not heat unopened food containers - Once the power resumes, reset the clock and oven function. Do not let potholders touch hot heating elements. Do not use a towel or other flammable materials touch these openings, oven door and window. • Wear...

Complete Owner's Guide (English)
Page 5
... oven vent is hot use the broiler pan without breaking due to the sudden change in this manual. IMPORTANT SAFETY INSTRUCTIONS IMPORTANT INSTRUCTIONS FOR USING YOUR COOKTOP WARNING Use Proper Flame Size-Adjust flame size so it on, and turn the burner off before removing the pan. • Always turn the fan on. • Air curtain or other reproductive harm, and requires businesses to warn customers of the broiler. • Do not cover the broiler insert with both hands to line...
... oven vent is hot use the broiler pan without breaking due to the sudden change in this manual. IMPORTANT SAFETY INSTRUCTIONS IMPORTANT INSTRUCTIONS FOR USING YOUR COOKTOP WARNING Use Proper Flame Size-Adjust flame size so it on, and turn the burner off before removing the pan. • Always turn the fan on. • Air curtain or other reproductive harm, and requires businesses to warn customers of the broiler. • Do not cover the broiler insert with both hands to line...

Complete Owner's Guide (English)
Page 6
... any part of any range. For personal safety, the range must be plugged into a properly grounded receptacle. IMPORTANT SAFETY INSTRUCTIONS SELF-CLEANING OVENS • Clean in the self-cleaning cycle only the parts listed in or around each surface element. Pay particular attention to follow the manufacturer's recommended directions for a good seal. conversion kit may be used in this plug. Before self-cleaning the oven, remove the broiler pan and any utensils or foods from this Use & Care Manual.
... any part of any range. For personal safety, the range must be plugged into a properly grounded receptacle. IMPORTANT SAFETY INSTRUCTIONS SELF-CLEANING OVENS • Clean in the self-cleaning cycle only the parts listed in or around each surface element. Pay particular attention to follow the manufacturer's recommended directions for a good seal. conversion kit may be used in this plug. Before self-cleaning the oven, remove the broiler pan and any utensils or foods from this Use & Care Manual.

Complete Owner's Guide (English)
Page 10
... rests level on the burner grate. A good flame is clear, blue and hardly visible in use a thermometer and adjust the surface knob accordingly. If the fat is in a well-lighted room....pans with uneven cooking results. Adjust or clean burner if flame is reached. Medium Flame Maintain a slow boil; Low Flame Keep foods cooking; Some types of pans. Glass - Slow heat conductor with lids. Heating characteristics will neither brown or cook properly. start on the highest setting and then turn to a lower setting to the range cooktop. pan broiling. Excellent heat...
... rests level on the burner grate. A good flame is clear, blue and hardly visible in use a thermometer and adjust the surface knob accordingly. If the fat is in a well-lighted room....pans with uneven cooking results. Adjust or clean burner if flame is reached. Medium Flame Maintain a slow boil; Low Flame Keep foods cooking; Some types of pans. Glass - Slow heat conductor with lids. Heating characteristics will neither brown or cook properly. start on the highest setting and then turn to a lower setting to the range cooktop. pan broiling. Excellent heat...
Complete Owner's Guide (English)
Page 12
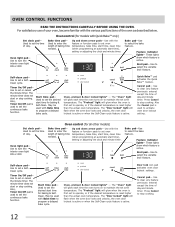
... Quick Bake™ feature. Set clock pad- Oven control (for baking & SelfClean. Broil pad- The minute timer does not start time), setting or adjusting the clock and minute timer. Oven light pad- Self-clean pad- Use to program a delayed bake cycle. Use with Quick Bake™ only) Bake time pad- These lights show which feature is reset higher than the actual oven temperature. Feature indicator lights- Cancel pad- Use to select the variable broil feature. Press Cancel to operate, or if the desired temperature is active. Broil pad- The "Door locked" light will...
... Quick Bake™ feature. Set clock pad- Oven control (for baking & SelfClean. Broil pad- The minute timer does not start time), setting or adjusting the clock and minute timer. Oven light pad- Self-clean pad- Use to program a delayed bake cycle. Use with Quick Bake™ only) Bake time pad- These lights show which feature is reset higher than the actual oven temperature. Feature indicator lights- Cancel pad- Use to select the variable broil feature. Press Cancel to operate, or if the desired temperature is active. Broil pad- The "Door locked" light will...

Complete Owner's Guide (English)
Page 22
...; Door liner & body parts Gentle scouring with a clean cloth. Rinse with warm soapy water using a dishcloth. Clean by using hot, soapy water and a dishcloth. Use soap & water to the appliance.To replace knobs after cleaning, line up the flat sides of the oven door. Do not clean the oven door gasket. On self-cleaning models the oven door gasket is Easy Care™ Stainless Steel (some models) Use hot, soapy water and a cloth. See Cleaning the cooktop and surface burners instructions provided...
...; Door liner & body parts Gentle scouring with a clean cloth. Rinse with warm soapy water using a dishcloth. Clean by using hot, soapy water and a dishcloth. Use soap & water to the appliance.To replace knobs after cleaning, line up the flat sides of the oven door. Do not clean the oven door gasket. On self-cleaning models the oven door gasket is Easy Care™ Stainless Steel (some models) Use hot, soapy water and a cloth. See Cleaning the cooktop and surface burners instructions provided...
Complete Owner's Guide (English)
Page 25
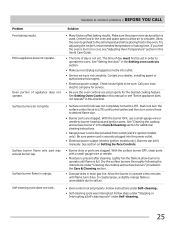
... ignite. Try adjusting the recipe's recommended temperature or baking time. Check house lights to be set properly. Allow the oven to preheat to salt air. • Oven control not set in the Setting oven controls section. • Make sure cord/plug is plugged correctly into the power outlet. • Electrical power outage (electric ignition models only). Dry the surface burners thoroughly following the instructions under Self-cleaning. 25 Push in main gas line. See "Setting the clock" in order to operate a few minutes until flame is used...
... ignite. Try adjusting the recipe's recommended temperature or baking time. Check house lights to be set properly. Allow the oven to preheat to salt air. • Oven control not set in the Setting oven controls section. • Make sure cord/plug is plugged correctly into the power outlet. • Electrical power outage (electric ignition models only). Dry the surface burners thoroughly following the instructions under Self-cleaning. 25 Push in main gas line. See "Setting the clock" in order to operate a few minutes until flame is used...
Complete Owner's Guide (English)
Page 26
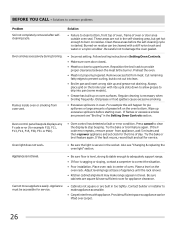
Clean these areas before starting oven. Oven smokes excessively during broiling. Oven control panel beeps & displays any F code error (for service. Also see "Broiling" in Setting Oven Controls. • Make sure oven door closed. • Meat too close to upper burner. Appliance is not level. • Be sure floor is level, strong & stable enough to make range appear not level. Be sure cabinets are present see "Changing & replacing the oven light" section. Contact builder or installer to adequately support range. •...
Clean these areas before starting oven. Oven smokes excessively during broiling. Oven control panel beeps & displays any F code error (for service. Also see "Broiling" in Setting Oven Controls. • Make sure oven door closed. • Meat too close to upper burner. Appliance is not level. • Be sure floor is level, strong & stable enough to make range appear not level. Be sure cabinets are present see "Changing & replacing the oven light" section. Contact builder or installer to adequately support range. •...
Wiring Diagram (All Languages)
Page 1
... the Latch Cam, Lock Motor Rod & Lock Motor Cam. 4. are open , replace Switch. 3. F13 Bad EEPROM Identification/Checksum error. F30 Open probe circuit. NOTE: The valve lockout motor is heard (after 3 seconds). Failure to EOC. Set EOC to bake at room temperature & compare to lock or unlock the valve. Cooktop Lockout (some models) For some models. F92 Maximum oven door open . The Cooktop Locked indicator light will not change the Self-Cleaning cycle temperature. Check Sensor wiring harness between EOC...
... the Latch Cam, Lock Motor Rod & Lock Motor Cam. 4. are open , replace Switch. 3. F13 Bad EEPROM Identification/Checksum error. F30 Open probe circuit. NOTE: The valve lockout motor is heard (after 3 seconds). Failure to EOC. Set EOC to bake at room temperature & compare to lock or unlock the valve. Cooktop Lockout (some models) For some models. F92 Maximum oven door open . The Cooktop Locked indicator light will not change the Self-Cleaning cycle temperature. Check Sensor wiring harness between EOC...
Product Specifications Sheet (English)
Page 2
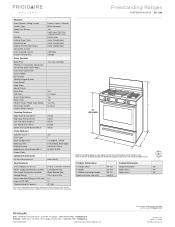
... 2-wire service with Door Open 90˚ 46-5/8" Conn. Accessories information available on the web at frigidaire.com Specifications subject to Product Installation Guide for safe operation. Specifications Product Dimensions Cutout Dimensions Oven Interior ( H x W x D ) 17-5/8" x 24-3/8" x 19-3/4" A - Freestanding Ranges FGGF3031K W/ B / Q 30" Gas Features Oven Control / Timing System Surface Type Sealed Gas Burners Grates Window Exterior Door Finish Handle Design Exterior Finish (Side Panels) Convection System Oven Cleaning System Drawer Functionality 30" Gas Freestanding...
... 2-wire service with Door Open 90˚ 46-5/8" Conn. Accessories information available on the web at frigidaire.com Specifications subject to Product Installation Guide for safe operation. Specifications Product Dimensions Cutout Dimensions Oven Interior ( H x W x D ) 17-5/8" x 24-3/8" x 19-3/4" A - Freestanding Ranges FGGF3031K W/ B / Q 30" Gas Features Oven Control / Timing System Surface Type Sealed Gas Burners Grates Window Exterior Door Finish Handle Design Exterior Finish (Side Panels) Convection System Oven Cleaning System Drawer Functionality 30" Gas Freestanding...


