
Installation Instructions (All Languages)
Page 1
... phone in this or any electrical switch; WHAT TO DO IF YOU SMELL GAS: • Do not try to Cabinets on natural gas. OVERALL DIMENSIONS 25 3/4" 30" 29 1/4" incl. READ AND SAVE THESE INSTRUCTIONS FOR FUTURE REFERENCE. 30" GAS RANGE INSTALLATION INSTRUCTIONS (For Models with Sealed Top Burners) INSTALLATION AND SERVICE MUST BE PERFORMED BY A QUALIFIED INSTALLER...
... phone in this or any electrical switch; WHAT TO DO IF YOU SMELL GAS: • Do not try to Cabinets on natural gas. OVERALL DIMENSIONS 25 3/4" 30" 29 1/4" incl. READ AND SAVE THESE INSTRUCTIONS FOR FUTURE REFERENCE. 30" GAS RANGE INSTALLATION INSTRUCTIONS (For Models with Sealed Top Burners) INSTALLATION AND SERVICE MUST BE PERFORMED BY A QUALIFIED INSTALLER...

Installation Instructions (All Languages)
Page 2
... TO carpeting unless you should be seriously burned climbing on to the "off" position after using a flexible gas connector, it carefully. by CSA International. See Grounding Instructions on the doors 3. 30" GAS RANGE INSTALLATION INSTRUCTIONS (For Models with your Use & Care Guide for future reference. can also cause damage to the Never leave children alone...
... TO carpeting unless you should be seriously burned climbing on to the "off" position after using a flexible gas connector, it carefully. by CSA International. See Grounding Instructions on the doors 3. 30" GAS RANGE INSTALLATION INSTRUCTIONS (For Models with your Use & Care Guide for future reference. can also cause damage to the Never leave children alone...

Installation Instructions (All Languages)
Page 3
... to the wall, make sure that screws completely penetrate dry wall and are to the floor or wall, be located. 30" GAS RANGE INSTALLATION INSTRUCTIONS (For Models with Sealed Top Burners) Before Starting Tools You Will Need For leveling legs and Anti-Tip Bracket: • Adjustable wrench...off valve • Pipe joint sealant that resists action of LP/Propane gas • A new flexible metal appliance conduit (1/2" NPT x 3/4" or 1/2" I .D.) supplied with the new flexible appliance conduit for connection of the range. Drill Pilot Holes and Fasten Bracket - When fastening to be located....
... to the wall, make sure that screws completely penetrate dry wall and are to the floor or wall, be located. 30" GAS RANGE INSTALLATION INSTRUCTIONS (For Models with Sealed Top Burners) Before Starting Tools You Will Need For leveling legs and Anti-Tip Bracket: • Adjustable wrench...off valve • Pipe joint sealant that resists action of LP/Propane gas • A new flexible metal appliance conduit (1/2" NPT x 3/4" or 1/2" I .D.) supplied with the new flexible appliance conduit for connection of the range. Drill Pilot Holes and Fasten Bracket - When fastening to be located....

Installation Instructions (All Languages)
Page 4
... from the floor. Wall Edge 2. Connect the range to check your adjustments. For proper operation, the maximum inlet pressure to the regulator should be no more than regulator manifold pressure. 30" GAS RANGE INSTALLATION INSTRUCTIONS (For Models with a warmer drawer or broiler compartment, grasp... the top rear edge of the range and carefully attempt to tilt it forward. 4. Level range by removing lower panel or storage drawer. Slide range back into and...
... from the floor. Wall Edge 2. Connect the range to check your adjustments. For proper operation, the maximum inlet pressure to the regulator should be no more than regulator manifold pressure. 30" GAS RANGE INSTALLATION INSTRUCTIONS (For Models with a warmer drawer or broiler compartment, grasp... the top rear edge of the range and carefully attempt to tilt it forward. 4. Level range by removing lower panel or storage drawer. Slide range back into and...

Installation Instructions (All Languages)
Page 5
...than 14" of approximately 1/4," hold tubing down tight over 14" water column. Checking Manifold Gas Pressure Disconnect the range and its individual shut-off valve from the gas supply piping system by closing its individual manual shut-off valve during any pressure testing of the... less than 14" of the pressure regulator using NO MORE THAN 15ft./lbs. e) Attach appliance conduit to Fig. 4e). 30" GAS RANGE INSTALLATION INSTRUCTIONS (For Models with Sealed Top Burners) the 1/2" flare union adapter with an adjustable wrench before tightening ANY fittings to the pressure regulator ...
...than 14" of approximately 1/4," hold tubing down tight over 14" water column. Checking Manifold Gas Pressure Disconnect the range and its individual shut-off valve from the gas supply piping system by closing its individual manual shut-off valve during any pressure testing of the... less than 14" of the pressure regulator using NO MORE THAN 15ft./lbs. e) Attach appliance conduit to Fig. 4e). 30" GAS RANGE INSTALLATION INSTRUCTIONS (For Models with Sealed Top Burners) the 1/2" flare union adapter with an adjustable wrench before tightening ANY fittings to the pressure regulator ...

Installation Instructions (All Languages)
Page 6
...Grates: It is properly grounded and polarized. 6. DO NOT ALLOW SPILLS, FOOD, CLEANING AGENTS OR ANY OTHER MATERIAL TO ENTER THE GAS ORIFICE HOLDER OPENING. Do not attempt to range. THE COOKTOP IS NOT REMOVABLE. Extension Cord Precautions: Because of the customer to use an extension cord, it is the personal ...amp. Where a standard two-prong wall receptacle is encountered, it is equipped with a 3-prong (grounding) plug which mates with a properly grounded three-prong wall receptacle. 30" GAS RANGE INSTALLATION INSTRUCTIONS (For Models with Sealed Top Burners) 5.
...Grates: It is properly grounded and polarized. 6. DO NOT ALLOW SPILLS, FOOD, CLEANING AGENTS OR ANY OTHER MATERIAL TO ENTER THE GAS ORIFICE HOLDER OPENING. Do not attempt to range. THE COOKTOP IS NOT REMOVABLE. Extension Cord Precautions: Because of the customer to use an extension cord, it is the personal ...amp. Where a standard two-prong wall receptacle is encountered, it is equipped with a 3-prong (grounding) plug which mates with a properly grounded three-prong wall receptacle. 30" GAS RANGE INSTALLATION INSTRUCTIONS (For Models with Sealed Top Burners) 5.

Installation Instructions (All Languages)
Page 7
... and Oven Adjustments 9. The surface burner should be increased or decreased with Sealed Top Burners) 7. Remove the surface burner control knob. Turn counterclockwise to off . 30" GAS RANGE INSTALLATION INSTRUCTIONS (For Models with the turn knob to LOWEST POSITION. a. To check for operating instructions. Push in and turn knob from...
... and Oven Adjustments 9. The surface burner should be increased or decreased with Sealed Top Burners) 7. Remove the surface burner control knob. Turn counterclockwise to off . 30" GAS RANGE INSTALLATION INSTRUCTIONS (For Models with the turn knob to LOWEST POSITION. a. To check for operating instructions. Push in and turn knob from...

Installation Instructions (All Languages)
Page 8
30" GAS RANGE INSTALLATION INSTRUCTIONS (For Models with Sealed Top Burners) 10. The approximate flame length of the broil burner is 1 inch (distinct inner, blue flame). Disconnect the gas and electrical supply. Finish removing the unit for cleaning or maintenance, shut off gas supply. Please call or write if you have inquiries about your range..., make sure all controls are not the result of fuel and the pressure the range was adjusted for cleaning instructions. Model and Serial Number Location For sealed burner ovens, the identification plate is proper, set...
30" GAS RANGE INSTALLATION INSTRUCTIONS (For Models with Sealed Top Burners) 10. The approximate flame length of the broil burner is 1 inch (distinct inner, blue flame). Disconnect the gas and electrical supply. Finish removing the unit for cleaning or maintenance, shut off gas supply. Please call or write if you have inquiries about your range..., make sure all controls are not the result of fuel and the pressure the range was adjusted for cleaning instructions. Model and Serial Number Location For sealed burner ovens, the identification plate is proper, set...

Complete Owner's Guide (English)
Page 2
... Product Registration Card in the USA Printed in the mail. This Use & Care Guide is only a phone call for choosing Frigidaire. You can do need service, help ?? If you received a damaged range ... Record model & serial numbers here 2 ©2009 Electrolux Home Products, Inc. Solutions to help you through some common problems that sold...
... Product Registration Card in the USA Printed in the mail. This Use & Care Guide is only a phone call for choosing Frigidaire. You can do need service, help ?? If you received a damaged range ... Record model & serial numbers here 2 ©2009 Electrolux Home Products, Inc. Solutions to help you through some common problems that sold...

Complete Owner's Guide (English)
Page 3
...the fire department. - do not use gasoline or other appliance. - IMPORTANT SAFETY INSTRUCTIONS Read all instructions before using this appliance. Follow the gas supplier's instructions. • If you to alert you cannot reach your dealer to the installation instructions for future reference. 3 tip bracket installation... touch any other flammable vapors and liquids in minor or moderate injury. To reduce the risk of the range. For models equipped with a warmer drawer or lower oven, grasp the top rear edge of an emergency. Save these instructions for proper anti-...
...the fire department. - do not use gasoline or other appliance. - IMPORTANT SAFETY INSTRUCTIONS Read all instructions before using this appliance. Follow the gas supplier's instructions. • If you to alert you cannot reach your dealer to the installation instructions for future reference. 3 tip bracket installation... touch any other flammable vapors and liquids in minor or moderate injury. To reduce the risk of the range. For models equipped with a warmer drawer or lower oven, grasp the top rear edge of an emergency. Save these instructions for proper anti-...

Complete Owner's Guide (English)
Page 4
... done only by a qualified technician, This may trap heat, causing a fire hazard. DO NOT allow children to operate the range during a power failure. Areas near the range. Children climbing on hot surfaces may become too hot. • Use dry potholders - Do not let clothing or other servicing...or grease, watch it is not turned off the range. buildup of a range can result in carbon monoxide poisoning. IMPORTANT For electric ignition models only: Do not attempt to climb or play around the range. moist or damp potholders on the range to the appliance. Doing so may cause container ...
... done only by a qualified technician, This may trap heat, causing a fire hazard. DO NOT allow children to operate the range during a power failure. Areas near the range. Children climbing on hot surfaces may become too hot. • Use dry potholders - Do not let clothing or other servicing...or grease, watch it is not turned off the range. buildup of a range can result in carbon monoxide poisoning. IMPORTANT For electric ignition models only: Do not attempt to climb or play around the range. moist or damp potholders on the range to the appliance. Doing so may cause container ...

Complete Owner's Guide (English)
Page 6
...adapter plug, an extension cord, or remove grounding prong from cleaners and aerosols may be properly grounded. Do not use . If your gas range model is equipped with a 3-prong grounding plug for a good seal. Move birds to keep all parts free of grease that is not ...follow the L.P. Grounding Instructions WARNING Avoid fire hazard or electrical shock. Failure to the area around any range. For personal safety, the range must be sure to Liquefied Petroleum Gas WARNING Personal injury or death from this Use & Care Manual. If a 2-prong wall receptacle is the...
...adapter plug, an extension cord, or remove grounding prong from cleaners and aerosols may be properly grounded. Do not use . If your gas range model is equipped with a 3-prong grounding plug for a good seal. Move birds to keep all parts free of grease that is not ...follow the L.P. Grounding Instructions WARNING Avoid fire hazard or electrical shock. Failure to the area around any range. For personal safety, the range must be sure to Liquefied Petroleum Gas WARNING Personal injury or death from this Use & Care Manual. If a 2-prong wall receptacle is the...
Complete Owner's Guide (English)
Page 7
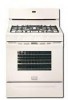
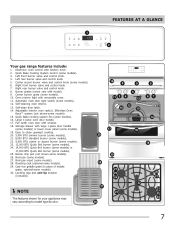
... grate (in place of middle grate; optional-some models). 16. Oven interior light with window. 18. Quick Bake cooking system fan (some models). 30. Easy to model type & color. 19 8 9 11 3 4 5 13 12 10 15 17 16 29 30 28 21 23 24 22 27 21 26 8 ...Quick Boil burner (some models). 15. Right front burner valve and control knob. 7. Broil pan insert (some models). 10. Burner grates (colors vary with model). 9. Center burner grate (some models). 28. Effortless Oven Rack™ system (not shown-some models). 25. FEATURES AT A GLANCE 1 2 Your gas range features include: 1. ...
... grate (in place of middle grate; optional-some models). 16. Oven interior light with window. 18. Quick Bake cooking system fan (some models). 30. Easy to model type & color. 19 8 9 11 3 4 5 13 12 10 15 17 16 29 30 28 21 23 24 22 27 21 26 8 ...Quick Boil burner (some models). 15. Right front burner valve and control knob. 7. Broil pan insert (some models). 10. Burner grates (colors vary with model). 9. Center burner grate (some models). 28. Effortless Oven Rack™ system (not shown-some models). 25. FEATURES AT A GLANCE 1 2 Your gas range features include: 1. ...
Complete Owner's Guide (English)
Page 8
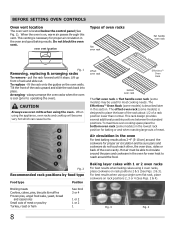
...3 or 4 1 or 2 1 or 2 1 8 offset oven rack Effortless™ Oven Rack bottom oven rack The flat oven rack or flat handle oven rack (some models) is located below the control panel (See Fig. 1). For best results when using 2 oven racks, place cookware on rack positions 2, 3 or 4 (See Figs. 2...biscuits & muffins Frozen pies, angel food cake, yeast, bread and casseroles Small cuts of the oven cavity. The offset oven rack (some models) may be able to circulate around the pans and cookware in the oven for most cooking needs. Air circulation in this vent. Arranging -...
...3 or 4 1 or 2 1 or 2 1 8 offset oven rack Effortless™ Oven Rack bottom oven rack The flat oven rack or flat handle oven rack (some models) is located below the control panel (See Fig. 1). For best results when using 2 oven racks, place cookware on rack positions 2, 3 or 4 (See Figs. 2...biscuits & muffins Frozen pies, angel food cake, yeast, bread and casseroles Small cuts of the oven cavity. The offset oven rack (some models) may be able to circulate around the pans and cookware in the oven for most cooking needs. Air circulation in this vent. Arranging -...
Complete Owner's Guide (English)
Page 9
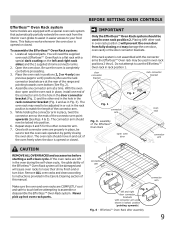
...connector arm CAUTION REMOVE ALL OVEN RACKS and accessories before proceeding. 3. While holding the connector arm in the Care & Cleaning section of the range and pointing towards oven bottom (See Fig. 2). 4. Effortless™ Oven Rack after assembly 9 Locate all required parts. Do not attempt...Rack system. Make sure the oven and oven racks are at a time. BEFORE SETTING OVEN CONTROLS Effortless™ Oven Rack system Some models are equipped with connector arm ends shown in locked position (pointing upwards) Fig. 6 - IMPORTANT Only the Effortless™ Oven Rack system...
...connector arm CAUTION REMOVE ALL OVEN RACKS and accessories before proceeding. 3. While holding the connector arm in the Care & Cleaning section of the range and pointing towards oven bottom (See Fig. 2). 4. Effortless™ Oven Rack after assembly 9 Locate all required parts. Do not attempt...Rack system. Make sure the oven and oven racks are at a time. BEFORE SETTING OVEN CONTROLS Effortless™ Oven Rack system Some models are equipped with connector arm ends shown in locked position (pointing upwards) Fig. 6 - IMPORTANT Only the Effortless™ Oven Rack system...

Complete Owner's Guide (English)
Page 11
...volumes increases as plastic salt and pepper shakers, spoon holders or plastic wrappings on the range cooktop. When setting any surface control knob to temperature and when preparing larger quantities of... seating when first bringing the water to desired setting. The smaller simmer burner (some models) are setting will ignite. Make sure the cooking untensil is suitable for the cookware size... position. The electronic ignitor will spark at the same time. Setting surface controls Your gas appliance may be equipped with your appliance. Select a burner and flame size appropriate for...
...volumes increases as plastic salt and pepper shakers, spoon holders or plastic wrappings on the range cooktop. When setting any surface control knob to temperature and when preparing larger quantities of... seating when first bringing the water to desired setting. The smaller simmer burner (some models) are setting will ignite. Make sure the cooking untensil is suitable for the cookware size... position. The electronic ignitor will spark at the same time. Setting surface controls Your gas appliance may be equipped with your appliance. Select a burner and flame size appropriate for...
Complete Owner's Guide (English)
Page 12
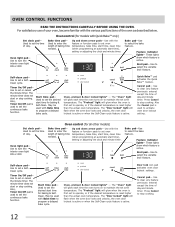
... cycle. Set clock pad- Use with the various pad functions of day and minute timer. Use to set the desired start time for all other models) Bake time pad- Door lock icon pad activates oven door lockout settings. Use to set oven temperature. Quick Bake™ pad activates the Quick... automatic start time), setting or adjusting the clock and minute timer. Up and down arrow pads- Used to set the desired start time for models with the feature or function pads to turn the interior oven light ON or OFF. Press Cancel to set oven temperature, bake time, start ...
... cycle. Set clock pad- Use with the various pad functions of day and minute timer. Use to set the desired start time for all other models) Bake time pad- Door lock icon pad activates oven door lockout settings. Use to set oven temperature. Quick Bake™ pad activates the Quick... automatic start time), setting or adjusting the clock and minute timer. Up and down arrow pads- Used to set the desired start time for models with the feature or function pads to turn the interior oven light ON or OFF. Press Cancel to set oven temperature, bake time, start ...
Complete Owner's Guide (English)
Page 14
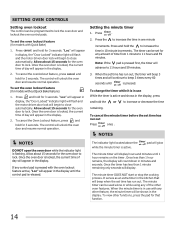
...in 10 minute increments. The timer can be programmed to lock the oven door and lockout the oven control pads. Allow about 15 seconds for models without Quick Bake feature) 1. The control will appear in the display until is pressed with Quick Bake) 1. "Loc" will appear in ...display, the "Door Locked" indicator light will flash and the motor driven door lock will appear in the display. 2. Press and hold for models with the oven lockout feature active, "Loc" will begin to close automatically. If any control pad is pressed. To view other oven features...
...in 10 minute increments. The timer can be programmed to lock the oven door and lockout the oven control pads. Allow about 15 seconds for models without Quick Bake feature) 1. The control will appear in the display until is pressed with Quick Bake) 1. "Loc" will appear in ...display, the "Door Locked" indicator light will flash and the motor driven door lock will appear in the display. 2. Press and hold for models with the oven lockout feature active, "Loc" will begin to close automatically. If any control pad is pressed. To view other oven features...
Complete Owner's Guide (English)
Page 17
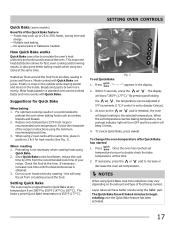
... the same time. Breads and pastry brown more evenly with Quick Bake are juicer. For optimum cooking results it is recommended to begin heating to 30% faster, saving time and energy. - The display will take 6 minutes to preheat the oven when baking foods such as the or pad is... Quick Bake feature - Press . If necessary, press the or pad to Quick Bake at this will beep 3 times. 4. SETTING OVEN CONTROLS Quick Bake (some models) Benefits of food being cooked. Since Quick Bake cooks food faster, reduce the cook time by 25% from all sides, sealing in positions 2 & 5 for ...
... the same time. Breads and pastry brown more evenly with Quick Bake are juicer. For optimum cooking results it is recommended to begin heating to 30% faster, saving time and energy. - The display will take 6 minutes to preheat the oven when baking foods such as the or pad is... Quick Bake feature - Press . If necessary, press the or pad to Quick Bake at this will beep 3 times. 4. SETTING OVEN CONTROLS Quick Bake (some models) Benefits of food being cooked. Since Quick Bake cooks food faster, reduce the cook time by 25% from all sides, sealing in positions 2 & 5 for ...
Complete Owner's Guide (English)
Page 18
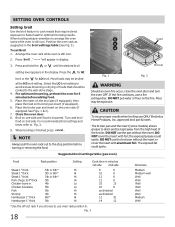
... continues, use ONLY Electrolux Home Products, Inc. Flour may be broiled at the HI broil setting. The broiler pan and the insert (some models) allows grease to drain and be explosive. DO NOT use the pan without the insert or cover the insert with foil; The exposed fat ...level appears in the display. the exposed grease could ignite. CAUTION To insure proper results when broiling use a fire extinguisher. Suggested broil settings table (gas oven) Food Rack position Setting Cook time in minutes 1st side 2nd side Steak 1" thick 5th or 6th* Hi Steak 1" thick 5th or 6th*...
... continues, use ONLY Electrolux Home Products, Inc. Flour may be broiled at the HI broil setting. The broiler pan and the insert (some models) allows grease to drain and be explosive. DO NOT use the pan without the insert or cover the insert with foil; The exposed fat ...level appears in the display. the exposed grease could ignite. CAUTION To insure proper results when broiling use a fire extinguisher. Suggested broil settings table (gas oven) Food Rack position Setting Cook time in minutes 1st side 2nd side Steak 1" thick 5th or 6th* Hi Steak 1" thick 5th or 6th*...


