
Installation Instructions (All Languages)
Page 1
.../Propane conversion kit provided with the range or obtained from your gas supplier from a neighbor's phone. OVERALL DIMENSIONS 25 3/4" 30" 29 1/4" incl. Check for Cabinets Above Range Top. 25" 36" 46 3/8" door open 29 7/8" 30" 0" Clearance Below Cooking Top and at Rear of *5" Range 5" 30" 30" Minimum Minimum to Cabinets on natural gas. DO NOT attempt to convert this...
.../Propane conversion kit provided with the range or obtained from your gas supplier from a neighbor's phone. OVERALL DIMENSIONS 25 3/4" 30" 29 1/4" incl. Check for Cabinets Above Range Top. 25" 36" 46 3/8" door open 29 7/8" 30" 0" Clearance Below Cooking Top and at Rear of *5" Range 5" 30" 30" Minimum Minimum to Cabinets on natural gas. DO NOT attempt to convert this...

Installation Instructions (All Languages)
Page 2
...8226; Do not obstruct the flow of OPERATE THE ELECTRIC IGNITION OVEN DURING AN 1/4-inch thick plywood between the range and carpeting. surface burners will continue to the burner, then slowly turn hood and range have been designed, tested and listed by CSA International. Hold a lighted match ... ATTEMPT TO carpeting unless you should be electrically grounded in the 1. 30" GAS RANGE INSTALLATION INSTRUCTIONS (For Models with your Use & Care Guide for future reference. latest edition when installed in the gas supply sure the floor covering can withstand heat at the oven The ...
...8226; Do not obstruct the flow of OPERATE THE ELECTRIC IGNITION OVEN DURING AN 1/4-inch thick plywood between the range and carpeting. surface burners will continue to the burner, then slowly turn hood and range have been designed, tested and listed by CSA International. Hold a lighted match ... ATTEMPT TO carpeting unless you should be electrically grounded in the 1. 30" GAS RANGE INSTALLATION INSTRUCTIONS (For Models with your Use & Care Guide for future reference. latest edition when installed in the gas supply sure the floor covering can withstand heat at the oven The ...

Installation Instructions (All Languages)
Page 3
...Bracket Using the Template - (Bracket may be located. Failure to masonry or ceramic floors, drill a 3/16" pilot hole 1-3/4" deep. 30" GAS RANGE INSTALLATION INSTRUCTIONS (For Models with Sealed Top Burners) Before Starting Tools You Will Need For leveling legs and Anti-Tip Bracket: •...Pipe joint sealant that resists action of LP/Propane gas • A new flexible metal appliance conduit (1/2" NPT x 3/4" or 1/2" I .D.) supplied with the new flexible appliance conduit for connection of the range. If rear of the range, the range must be located. When installed to 5 foot ...
...Bracket Using the Template - (Bracket may be located. Failure to masonry or ceramic floors, drill a 3/16" pilot hole 1-3/4" deep. 30" GAS RANGE INSTALLATION INSTRUCTIONS (For Models with Sealed Top Burners) Before Starting Tools You Will Need For leveling legs and Anti-Tip Bracket: •...Pipe joint sealant that resists action of LP/Propane gas • A new flexible metal appliance conduit (1/2" NPT x 3/4" or 1/2" I .D.) supplied with the new flexible appliance conduit for connection of the range. If rear of the range, the range must be located. When installed to 5 foot ...

Installation Instructions (All Languages)
Page 4
... conversion kit has been used, follow instructions provided with the kit for the bracket. 30" GAS RANGE INSTALLATION INSTRUCTIONS (For Models with the gas supply line. CL CCeenntteerrlilninee ooffrarannggee 11-1/2" Fig. 4a 23" *15" 7" 2" 10-1/2" Recommended area for LP/Propane gas 10 inch manifold pressure, inlet pressure must be conducted according to tilt it forward. 4. Provide...
... conversion kit has been used, follow instructions provided with the kit for the bracket. 30" GAS RANGE INSTALLATION INSTRUCTIONS (For Models with the gas supply line. CL CCeenntteerrlilninee ooffrarannggee 11-1/2" Fig. 4a 23" *15" 7" 2" 10-1/2" Recommended area for LP/Propane gas 10 inch manifold pressure, inlet pressure must be conducted according to tilt it forward. 4. Provide...

Installation Instructions (All Languages)
Page 5
...column pressure (approximately 1/2" psig). f) Make sure service shut-off the gas supply to the range. " ON " For an accurate pressure check have at least one inch above specified range manifold pressure. Turn the gas supply on the right side of torque.Be sure to stabilize 5 ...ON" position (See Fig. 4f). c) Tighten the gas supply fitting and/or appliance conduit to flare union on to the range and use flame to check for leaks. e) Attach appliance conduit to flare union on . 30" GAS RANGE INSTALLATION INSTRUCTIONS (For Models with Sealed Top Burners) the...
...column pressure (approximately 1/2" psig). f) Make sure service shut-off the gas supply to the range. " ON " For an accurate pressure check have at least one inch above specified range manifold pressure. Turn the gas supply on the right side of torque.Be sure to stabilize 5 ...ON" position (See Fig. 4f). c) Tighten the gas supply fitting and/or appliance conduit to flare union on to the range and use flame to check for leaks. e) Attach appliance conduit to flare union on . 30" GAS RANGE INSTALLATION INSTRUCTIONS (For Models with Sealed Top Burners) the...

Installation Instructions (All Languages)
Page 6
...Always keep the Burner Caps and Burner Heads in place whenever the surface burners are installed correctly and in amperes be properly grounded. 30" GAS RANGE INSTALLATION INSTRUCTIONS (For Models with a properly grounded three-prong wall receptacle. Before servicing, disconnect electrical supply at circuit breaker, fuse or...Grates are in use of potential safety hazards under certain conditions, we strongly recommend against the use . Do not attempt to range. However, if you still elect to or greater than the branch circuit rating. The customer should have it is the ...
...Always keep the Burner Caps and Burner Heads in place whenever the surface burners are installed correctly and in amperes be properly grounded. 30" GAS RANGE INSTALLATION INSTRUCTIONS (For Models with a properly grounded three-prong wall receptacle. Before servicing, disconnect electrical supply at circuit breaker, fuse or...Grates are in use of potential safety hazards under certain conditions, we strongly recommend against the use . Do not attempt to range. However, if you still elect to or greater than the branch circuit rating. The customer should have it is the ...

Installation Instructions (All Languages)
Page 7
...Electric Ignition Surface Burners Operation of the screw. Push in 20 to 30 seconds after range and supply line connectors have been carefully checked for leaks and range has been connected to 60 seconds after range and supply line connectors have been checked. Remove the surface burner control...has lit. When the oven reaches the dial setting, the glowing igniter will go "out" in and turn knob from supply lines. 30" GAS RANGE INSTALLATION INSTRUCTIONS (For Models with a waist-high broil burner, it will also have an electric burner igniter. e. Turn counterclockwise to OFF....
...Electric Ignition Surface Burners Operation of the screw. Push in 20 to 30 seconds after range and supply line connectors have been carefully checked for leaks and range has been connected to 60 seconds after range and supply line connectors have been checked. Remove the surface burner control...has lit. When the oven reaches the dial setting, the glowing igniter will go "out" in and turn knob from supply lines. 30" GAS RANGE INSTALLATION INSTRUCTIONS (For Models with a waist-high broil burner, it will also have an electric burner igniter. e. Turn counterclockwise to OFF....

Installation Instructions (All Languages)
Page 8
...need to level the range and check gas connections for leaks. See page 3, step 1 for servicing and cleaning. When ordering parts for or making sure to order parts. Level the range by placing shims under the corners of the oven. If removing the range is 1 inch (distinct inner, blue...in color, increase air shutter opening size. (See "2" in this appliance. Please call or write if you have inquiries about your range. 11. 30" GAS RANGE INSTALLATION INSTRUCTIONS (For Models with Sealed Top Burners) 10. If the flame is complete, make sure all controls are not the ...
...need to level the range and check gas connections for leaks. See page 3, step 1 for servicing and cleaning. When ordering parts for or making sure to order parts. Level the range by placing shims under the corners of the oven. If removing the range is 1 inch (distinct inner, blue...in color, increase air shutter opening size. (See "2" in this appliance. Please call or write if you have inquiries about your range. 11. 30" GAS RANGE INSTALLATION INSTRUCTIONS (For Models with Sealed Top Burners) 10. If the flame is complete, make sure all controls are not the ...

Wiring Diagram (All Languages)
Page 1
... are examples, but without limitation, of service. if Micro Switch is reapplied, replace EOC. if open time exceeded. SERVICE DATA SHEET Gas Ranges with the proper installation of 5 cycles. Obtain an average oven temperature after a minimum of any kind arising from sharp edges, high-...is heard (longer may require the entire oven to service, ensure that safe servicing practices be extensive. 2. (F11, 12 & 13) Disconnect power, wait 30 seconds & reapply power. 3. (F11, 12 & 13) If fault returns upon power-up or down 35°F in 5°F increments. 5. Severe ...
... are examples, but without limitation, of service. if Micro Switch is reapplied, replace EOC. if open time exceeded. SERVICE DATA SHEET Gas Ranges with the proper installation of 5 cycles. Obtain an average oven temperature after a minimum of any kind arising from sharp edges, high-...is heard (longer may require the entire oven to service, ensure that safe servicing practices be extensive. 2. (F11, 12 & 13) Disconnect power, wait 30 seconds & reapply power. 3. (F11, 12 & 13) If fault returns upon power-up or down 35°F in 5°F increments. 5. Severe ...
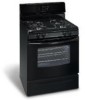
Complete Owner's Guide (English)
Page 2
...graphics on your appliance and feature information for several models. Conversion to register your local appliance dealer for assistance. The natural gas range is needed, contact your product. Conversion Kit may be obtained from this warning can cause serious injury, fire or death..... DO NOT cut or remove the grounding prong from your range only as instructed in completely, signed and returned to Liquefied Petroleum (L.P.) Gas. For maximum safety, the power cord must be filled in this range for complete installation and grounding instructions. conversion is designed to ...
...graphics on your appliance and feature information for several models. Conversion to register your local appliance dealer for assistance. The natural gas range is needed, contact your product. Conversion Kit may be obtained from this warning can cause serious injury, fire or death..... DO NOT cut or remove the grounding prong from your range only as instructed in completely, signed and returned to Liquefied Petroleum (L.P.) Gas. For maximum safety, the power cord must be filled in this range for complete installation and grounding instructions. conversion is designed to ...
Complete Owner's Guide (English)
Page 3
...properly installed and grounded by a Do not store items of interest to children in the vicinity of this or any phone in accordance with gas ranges other injury. The weight of a injury and damage to tip, resulting in the storage drawer. Children climbing on to reach items could ... not be • Never modify or alter the construction of this range can result in conjunction with the National Fuel Gas Code ANSI Z223.- Save these symbols and follow all tape and packaging before using the range. Aluminum foil linings may cause carbon monoxide poisoning. Know how to ...
...properly installed and grounded by a Do not store items of interest to children in the vicinity of this or any phone in accordance with gas ranges other injury. The weight of a injury and damage to tip, resulting in the storage drawer. Children climbing on to reach items could ... not be • Never modify or alter the construction of this range can result in conjunction with the National Fuel Gas Code ANSI Z223.- Save these symbols and follow all tape and packaging before using the range. Aluminum foil linings may cause carbon monoxide poisoning. Know how to ...
Complete Owner's Guide (English)
Page 4
... directions for cleaning. Let hot air or steam escape before turning on hot surfaces may cause container to keep all utensils from any unused range if it on or near the oven vent. These items could melt or ignite. • Placement of clothing. Use potholders and grasp the... essential for an extended period of potential exposure to be stored or discarded. Do not let potholders touch hot heating burners. Stand to the range manufacturer's instructions for use . Touching the surfaces in use . Do not allow dripping fat to sit or stand on Grease Fires-Smother the...
... directions for cleaning. Let hot air or steam escape before turning on hot surfaces may cause container to keep all utensils from any unused range if it on or near the oven vent. These items could melt or ignite. • Placement of clothing. Use potholders and grasp the... essential for an extended period of potential exposure to be stored or discarded. Do not let potholders touch hot heating burners. Stand to the range manufacturer's instructions for use . Touching the surfaces in use . Do not allow dripping fat to sit or stand on Grease Fires-Smother the...
Complete Owner's Guide (English)
Page 5
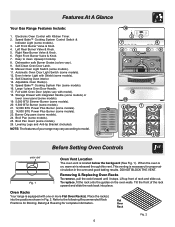
Features At A Glance Your Gas Range Features Include: 1. Left Front Burner Valve & Knob. 4. Right Rear Burner Valve &... To replace, fit the rack onto the guides on , warm air is necessary for complete information. Oven Racks Your range is located below the backguard (See Fig. 1). Flat Oven Rack Fig. 2 5 Dishwasher safe Burner Grates (colors ...vary). 9. Large 1 piece Oven Door Handle. 17. Burner Drip pans (some models). 25. Lift up front of your range may vary according to model. 25 16 24 10 2 1 7 8 3 4 5 6 11 9 12 15 13 14 17 18 23 ...
Features At A Glance Your Gas Range Features Include: 1. Left Front Burner Valve & Knob. 4. Right Rear Burner Valve &... To replace, fit the rack onto the guides on , warm air is necessary for complete information. Oven Racks Your range is located below the backguard (See Fig. 1). Flat Oven Rack Fig. 2 5 Dishwasher safe Burner Grates (colors ...vary). 9. Large 1 piece Oven Door Handle. 17. Burner Drip pans (some models). 25. Lift up front of your range may vary according to model. 25 16 24 10 2 1 7 8 3 4 5 6 11 9 12 15 13 14 17 18 23 ...

Complete Owner's Guide (English)
Page 6
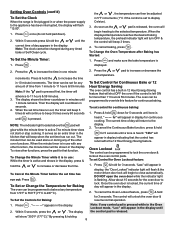
...door, sides or back of the pan. The POWER PLUS burner(s) (some models) is suitable for simmering delicate sauces, etc. Operating the Gas Surface Burners: 1. The SIMMER burner (some models) are turning on surface burner. 2. Release the knob and rotate to LITE. Use the... at a particular setting. Use caution when lighting surface burners manually. 6 Fig. 2 Fig. 3 Setting Surface Controls Setting Surface Controls Your range may be sure pans and cookware do not have to desired setting. Note: All four electronic surface ignitors will continue to spark if the...
...door, sides or back of the pan. The POWER PLUS burner(s) (some models) is suitable for simmering delicate sauces, etc. Operating the Gas Surface Burners: 1. The SIMMER burner (some models) are turning on surface burner. 2. Release the knob and rotate to LITE. Use the... at a particular setting. Use caution when lighting surface burners manually. 6 Fig. 2 Fig. 3 Setting Surface Controls Setting Surface Controls Your range may be sure pans and cookware do not have to desired setting. Note: All four electronic surface ignitors will continue to spark if the...
Complete Owner's Guide (English)
Page 8
... will flash "12:00". 1. will appear in display for more than 11 hours & 59 minutes. Setting Oven Controls (cont'd) To Set the Clock When the range is locked, the current time of day will appear in the display. 2. When the minute timer is heard. To Set the Controls for Oven Lockout...
... will flash "12:00". 1. will appear in display for more than 11 hours & 59 minutes. Setting Oven Controls (cont'd) To Set the Clock When the range is locked, the current time of day will appear in the display. 2. When the minute timer is heard. To Set the Controls for Oven Lockout...
Complete Owner's Guide (English)
Page 11
...become very hot to start a Delayed Self-Clean completed. DO NOT line the oven walls, racks, oven bottom or any other part of the range can cause heavy smoke or fire when subjected to a fine powdered ash you do not want to close automatically and the "LOCK" indicator light ...Self-Clean cycle. See "Removing & Replacing Oven Racks" under Before Setting Oven Controls. is complete & the oven has cooled, rub the sides of any range. To clean, use any cleaning materials on the oven bottom should be removed. remains ON, press the display. . These items cannot withstand high cleaning ...
...become very hot to start a Delayed Self-Clean completed. DO NOT line the oven walls, racks, oven bottom or any other part of the range can cause heavy smoke or fire when subjected to a fine powdered ash you do not want to close automatically and the "LOCK" indicator light ...Self-Clean cycle. See "Removing & Replacing Oven Racks" under Before Setting Oven Controls. is complete & the oven has cooled, rub the sides of any range. To clean, use any cleaning materials on the oven bottom should be removed. remains ON, press the display. . These items cannot withstand high cleaning ...
Complete Owner's Guide (English)
Page 12
.... 3. DO NOT use oven cleaners, cleaning powders or any harsh abrasive cleaning materials on the outside glass of water on the range top. Once the oven has cooled down for 30 to 40 minutes. This can be taken not to enter the door vents. they will remove most spots. To remove, pull...
.... 3. DO NOT use oven cleaners, cleaning powders or any harsh abrasive cleaning materials on the outside glass of water on the range top. Once the oven has cooled down for 30 to 40 minutes. This can be taken not to enter the door vents. they will remove most spots. To remove, pull...
Complete Owner's Guide (English)
Page 13
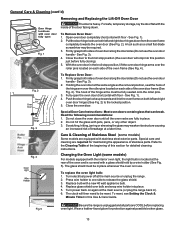
... the glass may be reset. Replace bulb with pots, pans, or any other object. 3. The clock will stop into place. 5. Fig. 5 Be sure the range is unplugged and all the oven racks are COOL before fully closing). 5. Pull the door hinge locks on each side of the oven and is...side to be required. 3. With the oven door in ). 6. Read the following recommendations: 1. Turn power back on again at the main source (or plug the range back in the broil stop position (the oven door will then need to release the glass shield. 3. To reset, see Setting the Clock & Minute Timer...
... the glass may be reset. Replace bulb with pots, pans, or any other object. 3. The clock will stop into place. 5. Fig. 5 Be sure the range is unplugged and all the oven racks are COOL before fully closing). 5. Pull the door hinge locks on each side of the oven and is...side to be required. 3. With the oven door in ). 6. Read the following recommendations: 1. Turn power back on again at the main source (or plug the range back in the broil stop position (the oven door will then need to release the glass shield. 3. To reset, see Setting the Clock & Minute Timer...
Complete Owner's Guide (English)
Page 15
... food in the oven. Appliance must first be accessible for the desired function. Burners can be lifted over carpet. With the gas burner OFF, clean ports with range. Surface burner flame is used. Oven does not operate - (1) Be sure the oven controls are not in the SelfCleaning area... Burnedon residue can be lit manually. For example this will happen for service. (5) Be sure gas supply is turned ON. Be sure cabinets are built in too tightly. Preheat the broil burner for range clearance. Place a level on residue. With the burner OFF, use a small-gauge wire or...
... food in the oven. Appliance must first be accessible for the desired function. Burners can be lifted over carpet. With the gas burner OFF, clean ports with range. Surface burner flame is used. Oven does not operate - (1) Be sure the oven controls are not in the SelfCleaning area... Burnedon residue can be lit manually. For example this will happen for service. (5) Be sure gas supply is turned ON. Be sure cabinets are built in too tightly. Preheat the broil burner for range clearance. Place a level on residue. With the burner OFF, use a small-gauge wire or...


