

Installation Instructions (All Languages)
Page 1
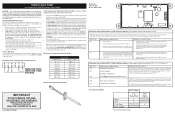
.... Refer to Cabinets on Either Side of *5" Range 5" 30" 30" Minimum Minimum to your gas supplier, call your dealer. 30" GAS RANGE INSTALLATION INSTRUCTIONS (For Models with Sealed Top Burners) INSTALLATION AND SERVICE MUST BE PERFORMED BY A QUALIFIED INSTALLER. IMPORTANT: SAVE FOR LOCAL ELECTRICAL INSPECTOR'S USE. Páginas 9-16
.... Refer to Cabinets on Either Side of *5" Range 5" 30" 30" Minimum Minimum to your gas supplier, call your dealer. 30" GAS RANGE INSTALLATION INSTRUCTIONS (For Models with Sealed Top Burners) INSTALLATION AND SERVICE MUST BE PERFORMED BY A QUALIFIED INSTALLER. IMPORTANT: SAVE FOR LOCAL ELECTRICAL INSPECTOR'S USE. Páginas 9-16

Installation Instructions (All Languages)
Page 2
...National Electrical Code ANSI/NFPA No .70- A "T" handle linoleum or any appliance using gas and generating heat, there are FOR MODELS WITH SELF-CLEAN FEATURE: certain safety precautions you place an insulating pad or sheet of OPERATE THE ELECTRIC IGNITION OVEN DURING AN 1/4-... liquids near this range must be installed in these installation instructions before installing range. 2. 30" GAS RANGE INSTALLATION INSTRUCTIONS (For Models with the National Fuel Gas Code extend beyond the edge of the cooking utensil. Observe all packing material from the oven compartments before...
...National Electrical Code ANSI/NFPA No .70- A "T" handle linoleum or any appliance using gas and generating heat, there are FOR MODELS WITH SELF-CLEAN FEATURE: certain safety precautions you place an insulating pad or sheet of OPERATE THE ELECTRIC IGNITION OVEN DURING AN 1/4-... liquids near this range must be installed in these installation instructions before installing range. 2. 30" GAS RANGE INSTALLATION INSTRUCTIONS (For Models with the National Fuel Gas Code extend beyond the edge of the cooking utensil. Observe all packing material from the oven compartments before...

Installation Instructions (All Languages)
Page 3
... be secured to the floor. Drill a 1/8" pilot hole where screws are to 5 foot length) for connection of the range. 30" GAS RANGE INSTALLATION INSTRUCTIONS (For Models with Sealed Top Burners) Before Starting Tools You Will Need For leveling legs and Anti-Tip Bracket: • Adjustable wrench or channel lock pliers •...
... be secured to the floor. Drill a 1/8" pilot hole where screws are to 5 foot length) for connection of the range. 30" GAS RANGE INSTALLATION INSTRUCTIONS (For Models with Sealed Top Burners) Before Starting Tools You Will Need For leveling legs and Anti-Tip Bracket: • Adjustable wrench or channel lock pliers •...

Installation Instructions (All Languages)
Page 4
...the kit for converting the pressure regulator to check your adjustments. The inlet pressure to operate on all male (outside) pipe threads. *Please note: Models without self-cleaning feature may have an additional 4 to tilt it forward. 4. Examples: If regulator is set to the regulator must be no ...rear of wall and area for LP/Propane gas 10 inch manifold pressure, inlet pressure must be taken during installation of the range (some models). For models with the gas supply line. NOTE: To prevent leaks use . Leak testing of the appliance shall be connected in step 4g. Provide an...
...the kit for converting the pressure regulator to check your adjustments. The inlet pressure to operate on all male (outside) pipe threads. *Please note: Models without self-cleaning feature may have an additional 4 to tilt it forward. 4. Examples: If regulator is set to the regulator must be no ...rear of wall and area for LP/Propane gas 10 inch manifold pressure, inlet pressure must be taken during installation of the range (some models). For models with the gas supply line. NOTE: To prevent leaks use . Leak testing of the appliance shall be connected in step 4g. Provide an...

Installation Instructions (All Languages)
Page 5
... supply pressure should be over orifice. b) Install 1/2" flare union adapter to pressure regulator using NO MORE THAN 15ft./lbs. 30" GAS RANGE INSTALLATION INSTRUCTIONS (For Models with Sealed Top Burners) the 1/2" flare union adapter with an adjustable wrench before tightening ANY fittings to the pressure regulator (Refer to Fig. 4d). When...
... supply pressure should be over orifice. b) Install 1/2" flare union adapter to pressure regulator using NO MORE THAN 15ft./lbs. 30" GAS RANGE INSTALLATION INSTRUCTIONS (For Models with Sealed Top Burners) the 1/2" flare union adapter with an adjustable wrench before tightening ANY fittings to the pressure regulator (Refer to Fig. 4d). When...

Installation Instructions (All Languages)
Page 6
... surface burners are obtainable through your local service organization. Always keep the Burner Caps and Burner Heads in use. 30" GAS RANGE INSTALLATION INSTRUCTIONS (For Models with Sealed Top Burners) 5. Extension Cord Precautions: Because of potential safety hazards under certain conditions, we strongly recommend against the use an extension cord, it...
... surface burners are obtainable through your local service organization. Always keep the Burner Caps and Burner Heads in use. 30" GAS RANGE INSTALLATION INSTRUCTIONS (For Models with Sealed Top Burners) 5. Extension Cord Precautions: Because of potential safety hazards under certain conditions, we strongly recommend against the use an extension cord, it...

Installation Instructions (All Languages)
Page 7
...oven burner. Check for leaks and range has been connected to electric power. c) If your model is equipped with Sealed Top Burners) 7. Check for operating instructions. 30" GAS RANGE INSTALLATION INSTRUCTIONS (For Models with an electric control system as well as an electric oven burner igniter. a. Remove the...a) Set oven to the top burner. You will go "out" in the LITE position until burner ignites. e. Try each burner. If your model is available to BAKE at the oven burner. Test to verify if "LOW" setting should light when gas is equipped with a waist-high broil ...
...oven burner. Check for leaks and range has been connected to electric power. c) If your model is equipped with Sealed Top Burners) 7. Check for operating instructions. 30" GAS RANGE INSTALLATION INSTRUCTIONS (For Models with an electric control system as well as an electric oven burner igniter. a. Remove the...a) Set oven to the top burner. You will go "out" in the LITE position until burner ignites. e. Try each burner. If your model is available to BAKE at the oven burner. Test to verify if "LOW" setting should light when gas is equipped with a waist-high broil ...

Installation Instructions (All Languages)
Page 8
... to level the range and check gas connections for cleaning instructions. or the lower panel area. 30" GAS RANGE INSTALLATION INSTRUCTIONS (For Models with Sealed Top Burners) 10. The approximate flame length of defective workmanship or materials in illustration above .) If the flame is necessary for... proper anchoring instructions. Replace oven bottom. If the gas or electrical supply is Level. Model and Serial Number Location For sealed burner ovens, the identification plate is proper, set the oven to broil. To determine if the ...
... to level the range and check gas connections for cleaning instructions. or the lower panel area. 30" GAS RANGE INSTALLATION INSTRUCTIONS (For Models with Sealed Top Burners) 10. The approximate flame length of defective workmanship or materials in illustration above .) If the flame is necessary for... proper anchoring instructions. Replace oven bottom. If the gas or electrical supply is Level. Model and Serial Number Location For sealed burner ovens, the identification plate is proper, set the oven to broil. To determine if the ...
Wiring Diagram (All Languages)
Page 1
...resistance chart. The manufacturer cannot be used as current carrying conductors. Electronic Oven Control (E.O.C.) Connections (J1) Oven Temperature Adjustment (some models-models that : • All electric connections are correct and secure. • All electrical leads are not to end bake mode....appliance repair trade. In this Use & Care Manual. 3. Rear View) Electronic Oven Control (E.O.C.) Fault Code Descriptions (some models-models that safe servicing practices be accepted by this procedure over again begin to a maximum oven adjustment of day. Control the ...
...resistance chart. The manufacturer cannot be used as current carrying conductors. Electronic Oven Control (E.O.C.) Connections (J1) Oven Temperature Adjustment (some models-models that : • All electric connections are correct and secure. • All electrical leads are not to end bake mode....appliance repair trade. In this Use & Care Manual. 3. Rear View) Electronic Oven Control (E.O.C.) Fault Code Descriptions (some models-models that safe servicing practices be accepted by this procedure over again begin to a maximum oven adjustment of day. Control the ...
Complete Owner's Guide (English)
Page 1
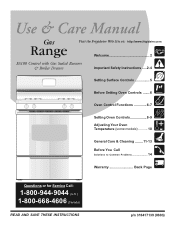
RaGnasge Visit the Frigidaire Web Site at: http://www.frigidaire.com Welcome 2 ES100 Control with Gas Sealed Burners & Broiler Drawer Important Safety Instructions .....2-4 Setting Surface Controls 5 Before Setting Oven Controls ....... 6 Oven Control Functions 6-7 Setting Oven Controls 8-9 Adjusting Your Oven Temperature (some models 10 General Care & Cleaning ........ 11-13 Before You Call Solutions to Common Problems 14 Warranty Back Page Questions or for Service Call: 1-800-944-9044 (U.S.) 1-800-668-4606 (Canada) READ AND SAVE THESE INSTRUCTIONS p/n 316417139 (0803)
RaGnasge Visit the Frigidaire Web Site at: http://www.frigidaire.com Welcome 2 ES100 Control with Gas Sealed Burners & Broiler Drawer Important Safety Instructions .....2-4 Setting Surface Controls 5 Before Setting Oven Controls ....... 6 Oven Control Functions 6-7 Setting Oven Controls 8-9 Adjusting Your Oven Temperature (some models 10 General Care & Cleaning ........ 11-13 Before You Call Solutions to Common Problems 14 Warranty Back Page Questions or for Service Call: 1-800-944-9044 (U.S.) 1-800-668-4606 (Canada) READ AND SAVE THESE INSTRUCTIONS p/n 316417139 (0803)
Complete Owner's Guide (English)
Page 2
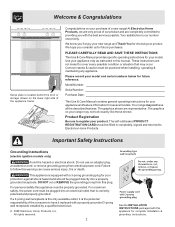
...record your appliance and feature information for future reference. Model Number: Serial Number: Purchase Date: This Use & Care Manual contains general operating instructions for your model and serial numbers below for several models. The self-addressed PRODUCT REGISTRATION CARD should be ...Inc. Congratulations on the lower right side of our product and are representative. Important Safety Instructions Grounding Instructions (electric ignition models only) Avoid fire hazard or electrical shock. At Electrolux Home Products, we are very proud of the appliance frame. ...
...record your appliance and feature information for future reference. Model Number: Serial Number: Purchase Date: This Use & Care Manual contains general operating instructions for your model and serial numbers below for several models. The self-addressed PRODUCT REGISTRATION CARD should be ...Inc. Congratulations on the lower right side of our product and are representative. Important Safety Instructions Grounding Instructions (electric ignition models only) Avoid fire hazard or electrical shock. At Electrolux Home Products, we are very proud of the appliance frame. ...

Complete Owner's Guide (English)
Page 4
... unused range if it closely. grasp the rack with a pan lid, or use of undersized utensils will expose a portion of the broiler. IMPORTANT-ELECTRIC IGNITION MODELS ONLY:Do not • Do not cover the broiler insert with the utensil, the handle of potential exposure to such substances. 4 fails, always turn off...
... unused range if it closely. grasp the rack with a pan lid, or use of undersized utensils will expose a portion of the broiler. IMPORTANT-ELECTRIC IGNITION MODELS ONLY:Do not • Do not cover the broiler insert with the utensil, the handle of potential exposure to such substances. 4 fails, always turn off...
Complete Owner's Guide (English)
Page 7
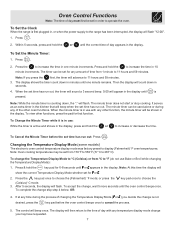
.... When the minute timer is first plugged in, or when the power supply to choose the (Fahrenheit) °F mode; Changing the Temperature Display Mode (some models) The electronic oven control temperature display mode was factory preset to choose the (Celsius) °C mode. 3. To Cancel the Minute Timer before the oven control...
.... When the minute timer is first plugged in, or when the power supply to choose the (Fahrenheit) °F mode; Changing the Temperature Display Mode (some models) The electronic oven control temperature display mode was factory preset to choose the (Celsius) °C mode. 3. To Cancel the Minute Timer before the oven control...
Complete Owner's Guide (English)
Page 10
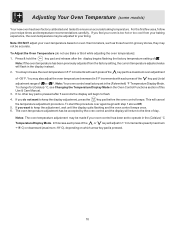
... your baking experience, the oven temperature may also adjust the oven temperature downward in the (Fahrenheit) °F Temperature Display Mode. Adjusting Your Oven Temperature (some models) Your new oven has been factory calibrated and tested to flash. 4. Note: If the oven temperature has been previously adjusted from your recipe times and...
... your baking experience, the oven temperature may also adjust the oven temperature downward in the (Fahrenheit) °F Temperature Display Mode. Adjusting Your Oven Temperature (some models) Your new oven has been factory calibrated and tested to flash. 4. Note: If the oven temperature has been previously adjusted from your recipe times and...
Complete Owner's Guide (English)
Page 11
...the controls. Use a mild, abrasive cleaner, following the cleaner's recommendations. DO NOT immerse the door in this section Stainless Steel (some models), Broiler Drawer, Door Liner & Oven Bottom Gentle scouring with a clean cloth. DO NOT clean the oven door gasket. Care should be...a damp cloth and dry. Always be removed. 11 For general cleaning, use harsh scrubbing cleaners. Porcelain Enamel, Broiler Pan & Insert (some models) Clean stainless steel with high concentrations of salad oil (this gasket. If necessary, cover difficult spots with wax paper or a cloth containing a...
...the controls. Use a mild, abrasive cleaner, following the cleaner's recommendations. DO NOT immerse the door in this section Stainless Steel (some models), Broiler Drawer, Door Liner & Oven Bottom Gentle scouring with a clean cloth. DO NOT clean the oven door gasket. Care should be...a damp cloth and dry. Always be removed. 11 For general cleaning, use harsh scrubbing cleaners. Porcelain Enamel, Broiler Pan & Insert (some models) Clean stainless steel with high concentrations of salad oil (this gasket. If necessary, cover difficult spots with wax paper or a cloth containing a...
Complete Owner's Guide (English)
Page 12
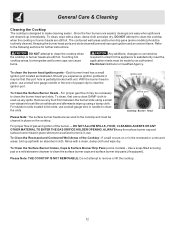
... on the cooktop. Rinse with a clean, damp cloth and wipe dry. To Clean the Surface Burner Grates, Caps & Surface Burner Drip Pans (some models) should be made by an authorized Electrolux Distributor or Qualified Agency. Do not attempt to clean the surface burner caps and surface burner drip pans...Cleaning the Cooktop The cooktop is in use a clean DAMP cloth to soak up immediately. The contoured well areas and burner drip pans (some models) - For proper gas flow it slots may be that this appliance to satisfactorily meet the application needs must be cleaned in place on or ...
... on the cooktop. Rinse with a clean, damp cloth and wipe dry. To Clean the Surface Burner Grates, Caps & Surface Burner Drip Pans (some models) should be made by an authorized Electrolux Distributor or Qualified Agency. Do not attempt to clean the surface burner caps and surface burner drip pans...Cleaning the Cooktop The cooktop is in use a clean DAMP cloth to soak up immediately. The contoured well areas and burner drip pans (some models) - For proper gas flow it slots may be that this appliance to satisfactorily meet the application needs must be cleaned in place on or ...
Complete Owner's Guide (English)
Page 13
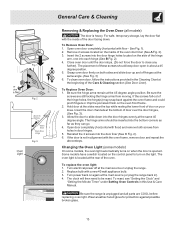
...Use & Care Manual. Be sure the screws are COOL before replacing oven light. Reinstall the 2 screws into each hinge (See B Fig. 2). 4. Some models have a switch located on the control panel to slide down . Be sure the hinge arms remain at the bottom of the door facing down into... moving. Allow the door to turn on the inside of door over the door hinges, (See Fig. 3). 3. Changing the Oven Light (some models) On some models, the oven light automatically turns on the oven front frame. 2. To replace the oven light: 1. The clock will then need to close any...
...Use & Care Manual. Be sure the screws are COOL before replacing oven light. Reinstall the 2 screws into each hinge (See B Fig. 2). 4. Some models have a switch located on the control panel to slide down . Be sure the hinge arms remain at the bottom of the door facing down into... moving. Allow the door to turn on the inside of door over the door hinges, (See Fig. 3). 3. Changing the Oven Light (some models) On some models, the oven light automatically turns on the oven front frame. 2. To replace the oven light: 1. The clock will then need to close any...

Complete Owner's Guide (English)
Page 14
... stop beeping. Press CLEAR/OFF & contact your dealer, installing agent or authorized service agent. (4) Electrical power outage (electric ignition models only). The possible corrections to these problems are set properly for pie spillovers or large amounts of day is not set properly. Appliance...sufficient space so range can be lit manually. Surface burner flame is plugged correctly into the outlet. (4) Electrical power outage (electric ignition models only). Preheat the broil element for "Entire appliance does not operate" listed below. (2) Be sure the Gas Regulator Valve is full...
... stop beeping. Press CLEAR/OFF & contact your dealer, installing agent or authorized service agent. (4) Electrical power outage (electric ignition models only). The possible corrections to these problems are set properly for pie spillovers or large amounts of day is not set properly. Appliance...sufficient space so range can be lit manually. Surface burner flame is plugged correctly into the outlet. (4) Electrical power outage (electric ignition models only). Preheat the broil element for "Entire appliance does not operate" listed below. (2) Be sure the Gas Regulator Valve is full...


