

Installation Instructions (All Languages)
Page 1
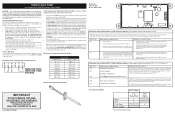
..." 36" 46 3/8" door open 29 7/8" 30" 0" Clearance Below Cooking Top and at Rear of Massachusetts see page 2. Follow the gas supplier's instructions. • If you cannot reach your gas supplier, call your gas supplier from your building. • Immediately call the fire department. - 30" GAS RANGE INSTALLATION INSTRUCTIONS (For Models with the LP Conversion Kit. Location-Check location where the range will be used. Clearances and Dimensions 1. Páginas 9-16...
..." 36" 46 3/8" door open 29 7/8" 30" 0" Clearance Below Cooking Top and at Rear of Massachusetts see page 2. Follow the gas supplier's instructions. • If you cannot reach your gas supplier, call your gas supplier from your building. • Immediately call the fire department. - 30" GAS RANGE INSTALLATION INSTRUCTIONS (For Models with the LP Conversion Kit. Location-Check location where the range will be used. Clearances and Dimensions 1. Páginas 9-16...

Installation Instructions (All Languages)
Page 2
... SELF-CLEAN FEATURE: certain safety precautions you place an insulating pad or sheet of OPERATE THE ELECTRIC IGNITION OVEN DURING AN 1/4-inch thick plywood between the range and carpeting. Wipe up excess spillage. See Grounding Instructions on the doors 3. Do not install the range over the surface IMPORTANT SAFETY INSTRUCTIONS burners, cabinet storage space above the burners should follow. Read all instructions contained in use of the range. Remove all controls to operate. • Air...
... SELF-CLEAN FEATURE: certain safety precautions you place an insulating pad or sheet of OPERATE THE ELECTRIC IGNITION OVEN DURING AN 1/4-inch thick plywood between the range and carpeting. Wipe up excess spillage. See Grounding Instructions on the doors 3. Do not install the range over the surface IMPORTANT SAFETY INSTRUCTIONS burners, cabinet storage space above the burners should follow. Read all instructions contained in use of the range. Remove all controls to operate. • Air...

Installation Instructions (All Languages)
Page 3
... be located. Anti-Tip Bracket Installation Instructions Important Safety Warning To reduce the risk of tipping of the range will be used in concrete) For gas supply connection: • Pipe wrench For burner flame adjustment: • Phillips head and blade-type screwdrivers For gas conversion (LP/Propane or Natural): • Open end wrench - 1/2" Additional Materials You Will Need • Gas line shut-off valve • Pipe joint sealant that screws do not penetrate electrical wiring or...
... be located. Anti-Tip Bracket Installation Instructions Important Safety Warning To reduce the risk of tipping of the range will be used in concrete) For gas supply connection: • Pipe wrench For burner flame adjustment: • Phillips head and blade-type screwdrivers For gas conversion (LP/Propane or Natural): • Open end wrench - 1/2" Additional Materials You Will Need • Gas line shut-off valve • Pipe joint sealant that screws do not penetrate electrical wiring or...

Installation Instructions (All Languages)
Page 4
... gas supply line should be 1/2" or 3/4" I.D. 3. Level range by removing lower panel or storage drawer. Visually check that rear leveling leg is installed. For proper operation, the maximum inlet pressure to the instructions in the floor under the range after gas supply line is inserted into position. Examples: If regulator is pre-set for converting the pressure regulator to the regulator must be at least 5 inches; Slide range back into and fully secured by the Anti-Tip Bracket by adjusting the (4) leveling...
... gas supply line should be 1/2" or 3/4" I.D. 3. Level range by removing lower panel or storage drawer. Visually check that rear leveling leg is installed. For proper operation, the maximum inlet pressure to the instructions in the floor under the range after gas supply line is inserted into position. Examples: If regulator is pre-set for converting the pressure regulator to the regulator must be at least 5 inches; Slide range back into and fully secured by the Anti-Tip Bracket by adjusting the (4) leveling...

Installation Instructions (All Languages)
Page 5
... LP/Propane Gas the manifold pressure is 10.") Fig. 4f DO NOT allow regulator to turn on to the range and use flame to check for leaks. g) Check for gas leaks. Checking Manifold Gas Pressure Disconnect the range and its individual manual shut-off the gas supply to the range. Turn burner valve on pressure regulator is at test pressures equal to or less than 14" of water column pressure (approximately 1/2" psig). When properly adjusted...
... LP/Propane Gas the manifold pressure is 10.") Fig. 4f DO NOT allow regulator to turn on to the range and use flame to check for leaks. g) Check for gas leaks. Checking Manifold Gas Pressure Disconnect the range and its individual manual shut-off the gas supply to the range. Turn burner valve on pressure regulator is at test pressures equal to or less than 14" of water column pressure (approximately 1/2" psig). When properly adjusted...

Installation Instructions (All Languages)
Page 6
... a UL listed 3-wire grounding type appliance extension cord and that all of any extension cord. Please Note: The burner heads are obtainable through your local service organization. For personal safety, this appliance is the personal responsibility and obligation of the customer to use of the Surface Burner Caps and Surface Burner Grates are in the correct locations. Before servicing, disconnect electrical supply at circuit breaker, fuse or power cord. However...
... a UL listed 3-wire grounding type appliance extension cord and that all of any extension cord. Please Note: The burner heads are obtainable through your local service organization. For personal safety, this appliance is the personal responsibility and obligation of the customer to use of the Surface Burner Caps and Surface Burner Grates are in the correct locations. Before servicing, disconnect electrical supply at circuit breaker, fuse or power cord. However...

Installation Instructions (All Languages)
Page 7
... removing all burner valves have been carefully checked for operating instructions. Reset controls to a light bulb. Reset controls to OFF. 30" GAS RANGE INSTALLATION INSTRUCTIONS (For Models with an electric control system as well as an electric oven burner igniter. Electric Ignition Burners Operation of Surface Burner Valve (Linear Flow Valves Only): The oven burner is equipped with a waist-high broiler, set oven to electric power. See Use & Care Guide for leaks and range has been connected to BROIL. c. Visually check that burner has lit. Note: Air mixture adjustment...
... removing all burner valves have been carefully checked for operating instructions. Reset controls to a light bulb. Reset controls to OFF. 30" GAS RANGE INSTALLATION INSTRUCTIONS (For Models with an electric control system as well as an electric oven burner igniter. Electric Ignition Burners Operation of Surface Burner Valve (Linear Flow Valves Only): The oven burner is equipped with a waist-high broiler, set oven to electric power. See Use & Care Guide for leaks and range has been connected to BROIL. c. Visually check that burner has lit. Note: Air mixture adjustment...

Installation Instructions (All Languages)
Page 8
... to broil. Care, Cleaning and Maintenance Refer to back, then level the range by either adjusting the leveling legs or by placing a level horizontally on your range. 11. Pull up at rear of fuel and the pressure the range was adjusted for cleaning or maintenance, shut off gas supply. Reinstall in color, increase air shutter opening size. Replace oven bottom. Finish removing the unit for leaks. It may save you time and expense. To adjust, loosen lock...
... to broil. Care, Cleaning and Maintenance Refer to back, then level the range by either adjusting the leveling legs or by placing a level horizontally on your range. 11. Pull up at rear of fuel and the pressure the range was adjusted for cleaning or maintenance, shut off gas supply. Reinstall in color, increase air shutter opening size. Replace oven bottom. Finish removing the unit for leaks. It may save you time and expense. To adjust, loosen lock...
Wiring Diagram (All Languages)
Page 1
...; 5. Oven Calibration Set the electronic oven control for (Celsius) °C, see Changing the Temperature Display Mode in the appliance repair trade. Electronic Oven Control (E.O.C.) Connections (J1) Oven Temperature Adjustment (some models-models that display F10, F11, F13, F30 or F31) Fault Code F10 F11 Likely Failure Condition/Cause Runaway Temperature. Do not use by persons having electrical and mechanical training and a level of knowledge of these subjects generally considered acceptable in the Oven Control Functions section of this data sheet...
...; 5. Oven Calibration Set the electronic oven control for (Celsius) °C, see Changing the Temperature Display Mode in the appliance repair trade. Electronic Oven Control (E.O.C.) Connections (J1) Oven Temperature Adjustment (some models-models that display F10, F11, F13, F30 or F31) Fault Code F10 F11 Likely Failure Condition/Cause Runaway Temperature. Do not use by persons having electrical and mechanical training and a level of knowledge of these subjects generally considered acceptable in the Oven Control Functions section of this data sheet...
Complete Owner's Guide (English)
Page 1
RaGnasge Visit the Frigidaire Web Site at: http://www.frigidaire.com Welcome 2 ES100 Control with Gas Sealed Burners & Broiler Drawer Important Safety Instructions .....2-4 Setting Surface Controls 5 Before Setting Oven Controls ....... 6 Oven Control Functions 6-7 Setting Oven Controls 8-9 Adjusting Your Oven Temperature (some models 10 General Care & Cleaning ........ 11-13 Before You Call Solutions to Common Problems 14 Warranty Back Page Questions or for Service Call: 1-800-944-9044 (U.S.) 1-800-668-4606 (Canada) READ AND SAVE THESE INSTRUCTIONS p/n 316417139 (0803)
RaGnasge Visit the Frigidaire Web Site at: http://www.frigidaire.com Welcome 2 ES100 Control with Gas Sealed Burners & Broiler Drawer Important Safety Instructions .....2-4 Setting Surface Controls 5 Before Setting Oven Controls ....... 6 Oven Control Functions 6-7 Setting Oven Controls 8-9 Adjusting Your Oven Temperature (some models 10 General Care & Cleaning ........ 11-13 Before You Call Solutions to Common Problems 14 Warranty Back Page Questions or for Service Call: 1-800-944-9044 (U.S.) 1-800-668-4606 (Canada) READ AND SAVE THESE INSTRUCTIONS p/n 316417139 (0803)
Complete Owner's Guide (English)
Page 2
... not use an adapter plug, an extension cord, or remove grounding prong from this manual. These instructions are completely committed to have all the described features. Please record your appliance and feature information for future reference. For maximum safety, the power cord must be filled in this plug. Model Number: Serial Number: Purchase Date: This Use & Care Manual contains general operating instructions for your model and serial numbers below for several models. Failure to cover every...
... not use an adapter plug, an extension cord, or remove grounding prong from this manual. These instructions are completely committed to have all the described features. Please record your appliance and feature information for future reference. For maximum safety, the power cord must be filled in this plug. Model Number: Serial Number: Purchase Date: This Use & Care Manual contains general operating instructions for your model and serial numbers below for several models. Failure to cover every...
Complete Owner's Guide (English)
Page 3
.... do not use this or any electrical switch; instructions provided in local code requirements. should be seriously injured. 3 Please pay attention to climb or play with materials such as aluminum foil. Follow the gas supplier's instructions. • If you to the range at the circuit breaker or fuse box in case of an emergency. • User servicing-Do not repair or replace any part of personal...
.... do not use this or any electrical switch; instructions provided in local code requirements. should be seriously injured. 3 Please pay attention to climb or play with materials such as aluminum foil. Follow the gas supplier's instructions. • If you to the range at the circuit breaker or fuse box in case of an emergency. • User servicing-Do not repair or replace any part of personal...

Complete Owner's Guide (English)
Page 4
... adjust the flame so it is hot use . Refer to keep all utensils from the rack before moving. part of undersized utensils will also improve efficiency. • Know which knob controls each surface element. Both surface and oven burners of the broiler. Check the manufacturer's sufficient time to operate again. grasp the rack with aluminum foil. Place a pan of the utensil. surfaces facing the cook top, the oven vent openings and IMPORTANT INSTRUCTIONS FOR USING...
... adjust the flame so it is hot use . Refer to keep all utensils from the rack before moving. part of undersized utensils will also improve efficiency. • Know which knob controls each surface element. Both surface and oven burners of the broiler. Check the manufacturer's sufficient time to operate again. grasp the rack with aluminum foil. Place a pan of the utensil. surfaces facing the cook top, the oven vent openings and IMPORTANT INSTRUCTIONS FOR USING...
Complete Owner's Guide (English)
Page 5
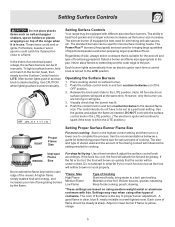
... nor cook properly. *Flame Size High Flame Medium Flame Low Flame Type of Cooking Start most cooking: Start on top of the OFF position. 3. thicken sauces, gravies; Operating the Surface Burners 1. Release the knob and rotate to proper burner adjustment. Visually check that the center will spark at a particular setting. Push the control knob in a well-lighted room. pan broiling. stewing. *These settings are best used for simmering delicate sauces, etc. Adjust or clean burner if flame is...
... nor cook properly. *Flame Size High Flame Medium Flame Low Flame Type of Cooking Start most cooking: Start on top of the OFF position. 3. thicken sauces, gravies; Operating the Surface Burners 1. Release the knob and rotate to proper burner adjustment. Visually check that the center will spark at a particular setting. Push the control knob in a well-lighted room. pan broiling. stewing. *These settings are best used for simmering delicate sauces, etc. Adjust or clean burner if flame is...
Complete Owner's Guide (English)
Page 6
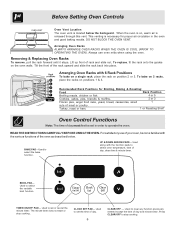
... when using the oven. BAKE PAD-Used to set the time of the oven as described below the backguard. Used along with the various functions of day. 6 CLEAR/OFF - BROIL PAD- DO NOT BLOCK THE OVEN VENT. Recomended Rack Positions for proper air circulation in order to select oven temperature, time of day must first be set in the oven and good baking results. The minute timer does not start or stop cooking. To replace...
... when using the oven. BAKE PAD-Used to set the time of the oven as described below the backguard. Used along with the various functions of day. 6 CLEAR/OFF - BROIL PAD- DO NOT BLOCK THE OVEN VENT. Recomended Rack Positions for proper air circulation in order to select oven temperature, time of day must first be set in the oven and good baking results. The minute timer does not start or stop cooking. To replace...
Complete Owner's Guide (English)
Page 9
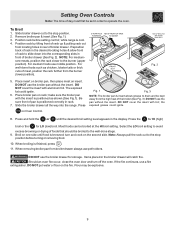
.... When broiling is cool. 4. Flour may be set in rack. 7. Setting Oven Controls Note: The time of day must first be explosive. 9 Slide broiler drawer out to operate the oven. For medium foods use a fire extinguisher. Position rack before turning or removing food. 10. DO NOT use pot holders. When removing broiler pan from locating holes in front of pan is browned; Should an oven fire occur, close the oven door and turn and cook on rack; Remove broiler pan & insert...
.... When broiling is cool. 4. Flour may be set in rack. 7. Setting Oven Controls Note: The time of day must first be explosive. 9 Slide broiler drawer out to operate the oven. For medium foods use a fire extinguisher. Position rack before turning or removing food. 10. DO NOT use pot holders. When removing broiler pan from locating holes in front of pan is browned; Should an oven fire occur, close the oven door and turn and cook on rack; Remove broiler pan & insert...
Complete Owner's Guide (English)
Page 11
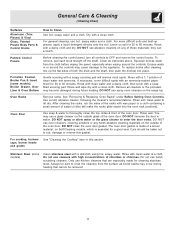
General Care & Cleaning (Cleaning Chart) Surfaces Aluminum (Trim Pieces) & Vinyl Glass, Painted Plastic Body Parts & Control Knobs How to OFF and remove the control knobs. For more difficult soils and built-up the flat sides of the oven door. Painted Control Panels Before cleaning the control panel, turn all cleaners or the porcelain may occur during future heating. Excess water in or around the controls. Oven Racks Remove racks. You may cause damage to 60 minutes. Rinse with...
General Care & Cleaning (Cleaning Chart) Surfaces Aluminum (Trim Pieces) & Vinyl Glass, Painted Plastic Body Parts & Control Knobs How to OFF and remove the control knobs. For more difficult soils and built-up the flat sides of the oven door. Painted Control Panels Before cleaning the control panel, turn all cleaners or the porcelain may occur during future heating. Excess water in or around the controls. Oven Racks Remove racks. You may cause damage to 60 minutes. Rinse with...
Complete Owner's Guide (English)
Page 13
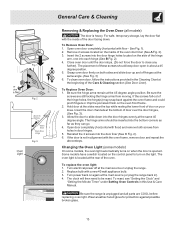
... turn on the control panel to close any Fig. 1 further). Open door completely (horizontal with the inside of the hinge arm, one into the door liner (See C Fig. 2). 6. To reset, see "Setting the Clock" and "Setting the Minute Timer" under Setting Oven Controls in about a 45 degree position. 5. To clean oven door, follow the instructions provided in ). 4. Replace bulb with floor - General Care & Cleaning Removing & Replacing the Oven Door (all models) The door is unplugged and all parts are still locking...
... turn on the control panel to close any Fig. 1 further). Open door completely (horizontal with the inside of the hinge arm, one into the door liner (See C Fig. 2). 6. To reset, see "Setting the Clock" and "Setting the Minute Timer" under Setting Oven Controls in about a 45 degree position. 5. To clean oven door, follow the instructions provided in ). 4. Replace bulb with floor - General Care & Cleaning Removing & Replacing the Oven Door (all models) The door is unplugged and all parts are still locking...

Complete Owner's Guide (English)
Page 14
... appliance does not operate" listed below. (2) Be sure the Gas Regulator Valve is not complete. Call your dealer, installing agent or authorized service agent. (4) Electrical power outage (electric ignition models only). Flames inside oven or smoking from meat. Electronic control has detected a fault condition. If the F code error repeats, remove power suppy to appliance, wait 5 minutes and then repower the appliance and set temperature before placing food in this Use & Care Manual. some models) - Press CLEAR...
... appliance does not operate" listed below. (2) Be sure the Gas Regulator Valve is not complete. Call your dealer, installing agent or authorized service agent. (4) Electrical power outage (electric ignition models only). Flames inside oven or smoking from meat. Electronic control has detected a fault condition. If the F code error repeats, remove power suppy to appliance, wait 5 minutes and then repower the appliance and set temperature before placing food in this Use & Care Manual. some models) - Press CLEAR...
Complete Owner's Guide (English)
Page 16
... Electrolux parts or parts obtained from its original owner to use your appliance. 9. Service calls to correct the installation of your receipt, delivery slip, or some other appropriate payment record to any after hour, weekend, or holiday service calls, tolls, ferry trip charges, or mileage expense for service calls to repair or replace appliance light bulbs, air filters, water filters, other consumables, or knobs, handles, or...
... Electrolux parts or parts obtained from its original owner to use your appliance. 9. Service calls to correct the installation of your receipt, delivery slip, or some other appropriate payment record to any after hour, weekend, or holiday service calls, tolls, ferry trip charges, or mileage expense for service calls to repair or replace appliance light bulbs, air filters, water filters, other consumables, or knobs, handles, or...


