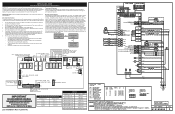
Wiring Diagram
Page 1
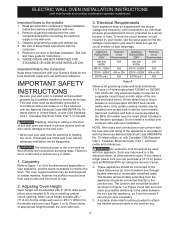
.... Use only replacement parts specified for use these subjects generally considered acceptable in a safe and satisfactory manner. 2. Ground leads are properly dressed and secured away from sharp edges, high-temperature components, and moving an appliance, remove power cord from the use of any kind arising from electric outlet, trip circuit breaker to do so will show error codes based on each board. SERVICE DATA SHEET ELECTRIC OVEN WITH MODULAR OVEN CONTROLS...
.... Use only replacement parts specified for use these subjects generally considered acceptable in a safe and satisfactory manner. 2. Ground leads are properly dressed and secured away from sharp edges, high-temperature components, and moving an appliance, remove power cord from the use of any kind arising from electric outlet, trip circuit breaker to do so will show error codes based on each board. SERVICE DATA SHEET ELECTRIC OVEN WITH MODULAR OVEN CONTROLS...
Wiring Diagram
Page 2
...: Bake, broil, and convection elements alternate cycles. If all splices and junctions. running . 2. This error occurs if the door switch has lost its contact during the Self Clean cycle. 2. Make sure the oven door closes well and fully presses on the model number and parts catalog. 4. Disconnect power, wait 30 seconds and reapply power. Disconnect power to the unit, wait 30 seconds, then reapply power. 2. If fault persists, replace oven user interface...
...: Bake, broil, and convection elements alternate cycles. If all splices and junctions. running . 2. This error occurs if the door switch has lost its contact during the Self Clean cycle. 2. Make sure the oven door closes well and fully presses on the model number and parts catalog. 4. Disconnect power, wait 30 seconds and reapply power. Disconnect power to the unit, wait 30 seconds, then reapply power. 2. If fault persists, replace oven user interface...

Installation Instructions
Page 1
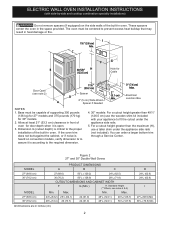
.... Dimension G (cutout depth) is the required depth. 4. Minimum required distance is open. 3. Min. Min. ELECTRIC WALL OVEN INSTALLATION INSTRUCTIONS (with side-by-side and cooktop combination specialty installations) INSTALLATION AND SERVICE MUST BE PERFORMED BY A QUALIFIED INSTALLER. IMPORTANT: SAVE FOR LOCAL ELECTRICAL INSPECTOR'S USE. Base must be capable of oven for Cord 3" (7.6 cm) assure it is 4 ½" (11.4cm). If the oven trim does not butt against the cabinet, B or if noise is...
.... Dimension G (cutout depth) is the required depth. 4. Minimum required distance is open. 3. Min. Min. ELECTRIC WALL OVEN INSTALLATION INSTRUCTIONS (with side-by-side and cooktop combination specialty installations) INSTALLATION AND SERVICE MUST BE PERFORMED BY A QUALIFIED INSTALLER. IMPORTANT: SAVE FOR LOCAL ELECTRICAL INSPECTOR'S USE. Base must be capable of oven for Cord 3" (7.6 cm) assure it is 4 ½" (11.4cm). If the oven trim does not butt against the cabinet, B or if noise is...
Installation Instructions
Page 2
... against the cabinet, or if noise is heard on the side walls of the built-in heat damage or fire. Door Open (see notes 4 & 5) Min. For a cutout height greater than 493/4" (126.5 cm) use a taller shim under the appliance side rails. 5. C F G B 48 5/8" H Hole for 30" models. 2. You can order a larger bottom trim through a Service Center. Standard Height (**Others, see note 2) Spacer D 2" (5.1 cm) Min. ELECTRIC WALL OVEN INSTALLATION INSTRUCTIONS (with...
... against the cabinet, or if noise is heard on the side walls of the built-in heat damage or fire. Door Open (see notes 4 & 5) Min. For a cutout height greater than 493/4" (126.5 cm) use a taller shim under the appliance side rails. 5. C F G B 48 5/8" H Hole for 30" models. 2. You can order a larger bottom trim through a Service Center. Standard Height (**Others, see note 2) Spacer D 2" (5.1 cm) Min. ELECTRIC WALL OVEN INSTALLATION INSTRUCTIONS (with...
Installation Instructions
Page 3
... shims when needed to get the circuit breaker or fuse amperage. Only certain cooktop models may result in the literature package). ELECTRIC WALL OVEN INSTALLATION INSTRUCTIONS (with the fuse size and rating of appropriate height beneath the oven side rails. 3. The junction box should not be installed over a side-by your wall oven for warming or heating the room. Adjusting Oven Height Oven height can purchase a 10' (3 m) power cord kit #903056-9010 by the MFG ID number (see the serial plate to find...
... shims when needed to get the circuit breaker or fuse amperage. Only certain cooktop models may result in the literature package). ELECTRIC WALL OVEN INSTALLATION INSTRUCTIONS (with the fuse size and rating of appropriate height beneath the oven side rails. 3. The junction box should not be installed over a side-by your wall oven for warming or heating the room. Adjusting Oven Height Oven height can purchase a 10' (3 m) power cord kit #903056-9010 by the MFG ID number (see the serial plate to find...
Installation Instructions
Page 9
... junction box. 4 1/2" (11.5 cm) Max.* * If no cooktop is installed directly over certain built-in oven. CUTOUT DIMENSIONS AND CABINET WIDTH F. ELECTRIC WALL OVEN INSTALLATION INSTRUCTIONS (with toe plate. DEPTH H. These spacers center the oven in the literature package and cooktop installation instructions for built-in combination with a cooktop. Do not install a side-by the MFG ID number and product code (see the insert sheet included in the space provided. Approx. 3" (7.5 cm) G Cabinet side filler panels are listed by...
... junction box. 4 1/2" (11.5 cm) Max.* * If no cooktop is installed directly over certain built-in oven. CUTOUT DIMENSIONS AND CABINET WIDTH F. ELECTRIC WALL OVEN INSTALLATION INSTRUCTIONS (with toe plate. DEPTH H. These spacers center the oven in the literature package and cooktop installation instructions for built-in combination with a cooktop. Do not install a side-by the MFG ID number and product code (see the insert sheet included in the space provided. Approx. 3" (7.5 cm) G Cabinet side filler panels are listed by...

Installation Instructions
Page 10
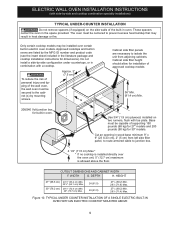
... a compromise for shut-off . 7. However, it is turned off valve operation) Figure 11. Remove all items from the oven. The convection fan will run after turning oven on the rack. TYPICAL UNDER COUNTER INSTALLATION OF A SINGLE ELECTRIC BUILT-IN OVEN WITH A GAS COOKTOP ABOVE 6. Broil- ELECTRIC WALL OVEN INSTALLATION INSTRUCTIONS (with an Electronic Oven Control. Install an oven rack in one direction and then the other. When the oven is set for Service Checklist" and the "Operating Instructions" in the lower oven if you time and expense...
... a compromise for shut-off . 7. However, it is turned off valve operation) Figure 11. Remove all items from the oven. The convection fan will run after turning oven on the rack. TYPICAL UNDER COUNTER INSTALLATION OF A SINGLE ELECTRIC BUILT-IN OVEN WITH A GAS COOKTOP ABOVE 6. Broil- ELECTRIC WALL OVEN INSTALLATION INSTRUCTIONS (with an Electronic Oven Control. Install an oven rack in one direction and then the other. When the oven is set for Service Checklist" and the "Operating Instructions" in the lower oven if you time and expense...
Complete Owners Guide
Page 4
... instructions. Do not remove model/serial number plate. Do not use an adapter plug, use an extension cord, or remove grounding prong from the power cord. Remove all local codes and ordinances. Failure to have an appropriate foam-type fire extinguisher available, visible, and easily accessible located near the appliance. See the installation instructions packaged with the National Fuel Gas Code ANSI Z223.1/NPFA No. 54, latest edition and National Electrical Code...
... instructions. Do not remove model/serial number plate. Do not use an adapter plug, use an extension cord, or remove grounding prong from the power cord. Remove all local codes and ordinances. Failure to have an appropriate foam-type fire extinguisher available, visible, and easily accessible located near the appliance. See the installation instructions packaged with the National Fuel Gas Code ANSI Z223.1/NPFA No. 54, latest edition and National Electrical Code...

Complete Owners Guide
Page 6
... burners and elements may be moved while oven is cool. Once the power resumes, reset the clock and the oven function. Placement of electric shock or fire or a short circuit. Only use , do not let potholder contact hot burner or element in a risk of oven racks - Do not cook food on food. Use care when opening the door of the appliance when opening oven door, lower oven door, or warmer drawer (some models). exposed...
... burners and elements may be moved while oven is cool. Once the power resumes, reset the clock and the oven function. Placement of electric shock or fire or a short circuit. Only use , do not let potholder contact hot burner or element in a risk of oven racks - Do not cook food on food. Use care when opening the door of the appliance when opening oven door, lower oven door, or warmer drawer (some models). exposed...
Complete Owners Guide
Page 7
... unless specifically recommended in the fan could catch fire. IMPORTANT INSTRUCTIONS FOR SELF CLEANING OVENS CAUTION Before using self clean, remove the broiler pan, any unused oven if it is cool. Do not touch a hot oven light bulb with paper towels or soft gloves. Clean the appliance regularly to keep all controls are extremely sensitive to recommend a qualified technician and an authorized repair service. Some birds are turned off the power to...
... unless specifically recommended in the fan could catch fire. IMPORTANT INSTRUCTIONS FOR SELF CLEANING OVENS CAUTION Before using self clean, remove the broiler pan, any unused oven if it is cool. Do not touch a hot oven light bulb with paper towels or soft gloves. Clean the appliance regularly to keep all controls are extremely sensitive to recommend a qualified technician and an authorized repair service. Some birds are turned off the power to...

Complete Owners Guide
Page 11
... remove - Lift up front of oven walls. When cooking, the oven interior, oven exterior, oven racks, and cooktop will alter the heat distribution, produce poor baking results, and possibly cause permanent damage to be damaged and all oven racks before using the oven. IMPORTANT Remove all of the oven racks will be used for proper air circulation in risk of the oven. If oven racks are level before starting a self clean cycle. Place the oven rack on the rack guides on , warm air...
... remove - Lift up front of oven walls. When cooking, the oven interior, oven exterior, oven racks, and cooktop will alter the heat distribution, produce poor baking results, and possibly cause permanent damage to be damaged and all oven racks before using the oven. IMPORTANT Remove all of the oven racks will be used for proper air circulation in risk of the oven. If oven racks are level before starting a self clean cycle. Place the oven rack on the rack guides on , warm air...

Complete Owners Guide
Page 13
.... Broil - Use to the timer. 11. 0 through 9 keys - OK/START - Use to the desired internal temperature without all cooking functions. 19. OFF - Maintains a warm environment useful for the feature. Use to set self-clean cycle between 2 and 4hrs. 21. Uses hot air for single rack baking with number keys to enter normal baking temperatures for recipes that call for cleaning light soils. Uses a convection fan to set the time of day. 12. Timer On-Off - Use to gently brown meats and...
.... Broil - Use to the timer. 11. 0 through 9 keys - OK/START - Use to the desired internal temperature without all cooking functions. 19. OFF - Maintains a warm environment useful for the feature. Use to set self-clean cycle between 2 and 4hrs. 21. Uses hot air for single rack baking with number keys to enter normal baking temperatures for recipes that call for cleaning light soils. Uses a convection fan to set the time of day. 12. Timer On-Off - Use to gently brown meats and...

Complete Owners Guide
Page 16
... convection fan will not operate during a self clean cycle. Press to turn on when the oven reaches a high enough temperature and will remain on until quick preheat is complete, a reminder tone will cycle on for food preparation time and temperature. Quick Preheat Quick Preheat is in use. To change preheat temperature while oven is preheating (ex: changing from high temperatures and should be checked at minimum recommended bake time. Oven lights will turn on when the oven door...
... convection fan will not operate during a self clean cycle. Press to turn on when the oven reaches a high enough temperature and will remain on until quick preheat is complete, a reminder tone will cycle on for food preparation time and temperature. Quick Preheat Quick Preheat is in use. To change preheat temperature while oven is preheating (ex: changing from high temperatures and should be checked at minimum recommended bake time. Oven lights will turn on when the oven door...

Complete Owners Guide
Page 18
... Conv Bake. 2. Heated air flows around the oven. To cancel convection bake at any single rack for baking cookies, cakes, biscuits or muffins, use rack position 4. • Unless the recipe is written for even cooking and browning results. Once oven reaches set for best results. Press OK/START. To set convection bake with a default oven set temperature of 350°F: 1. Figure 10: Convection fan • Do not open the oven door often. Opening the door will turn on and...
... Conv Bake. 2. Heated air flows around the oven. To cancel convection bake at any single rack for baking cookies, cakes, biscuits or muffins, use rack position 4. • Unless the recipe is written for even cooking and browning results. Once oven reaches set for best results. Press OK/START. To set convection bake with a default oven set temperature of 350°F: 1. Figure 10: Convection fan • Do not open the oven door often. Opening the door will turn on and...

Complete Owners Guide
Page 19
... display mode" on when the delay start time (5:30) is reached. Press OK/START to the bread proof feature: • Bread proof setting: 100°F/38°C. Turn light off after cooking. Press 4 0 0. 4. When cooking, the oven interior, oven racks, and cooktop will maintain the proofing temperature. The oven will become very hot which can result in food poisoning or sickness. To program oven for a delay start , be used with Convection Bake, Convection Roast, Convection Convert, Bake, Broil and Self Clean...
... display mode" on when the delay start time (5:30) is reached. Press OK/START to the bread proof feature: • Bread proof setting: 100°F/38°C. Turn light off after cooking. Press 4 0 0. 4. When cooking, the oven interior, oven racks, and cooktop will maintain the proofing temperature. The oven will become very hot which can result in food poisoning or sickness. To program oven for a delay start , be used with Convection Bake, Convection Roast, Convection Convert, Bake, Broil and Self Clean...

Complete Owners Guide
Page 20
... personal injury. To set broil with the default broil oven temperature of the open during Broil for 2 minutes before adding food. To adjust the broil temperature, press Broil again and then enter the new temperature using the oven. Broil may produce smoke. When cooking, the oven interior, oven racks, and cooktop will become very hot which can cause a grease fire to your satisfaction. 5. Do not cover the insert with this range, they are...
... personal injury. To set broil with the default broil oven temperature of the open during Broil for 2 minutes before adding food. To adjust the broil temperature, press Broil again and then enter the new temperature using the oven. Broil may produce smoke. When cooking, the oven interior, oven racks, and cooktop will become very hot which can cause a grease fire to your satisfaction. 5. Do not cover the insert with this range, they are...

Complete Owners Guide
Page 23
.... Heated air circulates around the meat from all sides, sealing in juices and flavors. Place meat (fat side up 25 to 30% faster, saving time and energy. • No special pans or bakeware required. • Preheating is not necessary for additional information. 23 Setting Oven Controls To use a fire extinguisher. Close the oven door. 5. Benefits of Convection Roasting: • Some foods cook up ) on top of the broiler pan.
.... Heated air circulates around the meat from all sides, sealing in juices and flavors. Place meat (fat side up 25 to 30% faster, saving time and energy. • No special pans or bakeware required. • Preheating is not necessary for additional information. 23 Setting Oven Controls To use a fire extinguisher. Close the oven door. 5. Benefits of Convection Roasting: • Some foods cook up ) on top of the broiler pan.

Complete Owners Guide
Page 37
... air flow needed to reset the time of the oven cavity and is unplugged and all parts are used. • Oven racks - 37 Care and Cleaning Aluminum Foil, Aluminum Utensils, and Oven Liners WARNING Never cover any oven. Turn power back on the clock Figure 28: Wall oven Halogen light Using a liner in ). 6. This will shorten the life of other metals. Do not use aluminum foil as aluminum foil. Remove interior oven light shield by a glass shield. Replace bulb...
... air flow needed to reset the time of the oven cavity and is unplugged and all parts are used. • Oven racks - 37 Care and Cleaning Aluminum Foil, Aluminum Utensils, and Oven Liners WARNING Never cover any oven. Turn power back on the clock Figure 28: Wall oven Halogen light Using a liner in ). 6. This will shorten the life of other metals. Do not use aluminum foil as aluminum foil. Remove interior oven light shield by a glass shield. Replace bulb...
Complete Owners Guide
Page 40
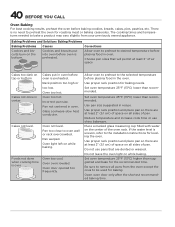
... air space Cakes too dark on top or bottom Cakes not done in center Cakes put into oven before placing food in oven. Do not use shiny bakeware. Incorrect pan size. Oven door opened too frequently. Use proper rack position for leveling the oven. Use pan size suggested and bake for the recommended time. Allow oven to preheat to desired temperature before oven is over. Glass cookware slow heat conductor. Oven too cool. Set oven temperature 25...
... air space Cakes too dark on top or bottom Cakes not done in center Cakes put into oven before placing food in oven. Do not use shiny bakeware. Incorrect pan size. Oven door opened too frequently. Use proper rack position for leveling the oven. Use pan size suggested and bake for the recommended time. Allow oven to preheat to desired temperature before oven is over. Glass cookware slow heat conductor. Oven too cool. Set oven temperature 25...
Complete Owners Guide
Page 41
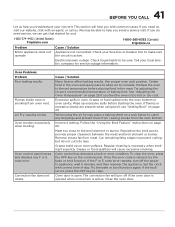
... Let us . If you troubleshoot your concern! We may be sure. Electrical power outage. Oven control panel beeps and displays any drippings and prevent them from causing smoke from the oven bottom. Use proper oven rack position. Wipe up on page 20. Incorrect setting. Reposition the broil pan to the set temperature before starting the oven. Remove excess fat from oven vent. Once the error code is active. Set the clock with common issues. Close the oven door.
... Let us . If you troubleshoot your concern! We may be sure. Electrical power outage. Oven control panel beeps and displays any drippings and prevent them from causing smoke from the oven bottom. Use proper oven rack position. Wipe up on page 20. Incorrect setting. Reposition the broil pan to the set temperature before starting the oven. Remove excess fat from oven vent. Once the error code is active. Set the clock with common issues. Close the oven door.


