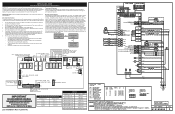
Wiring Diagram
Page 1
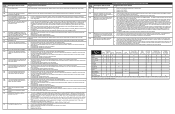
...; 13.6 (482 ±7.5) Probe circuit to the schematics and diagrams on detected failures. The boards that safe servicing practices be additional boards which communicate with the proper installation of any kind arising from all baking modes. SERVICE DATA SHEET ELECTRIC OVEN WITH MODULAR OVEN CONTROLS NOTICE: This service data sheet is intended for use by volt ohmmeters. The adjustments made will not change the self-cleaning temperature. Safe Servicing Practices To avoid the...
...; 13.6 (482 ±7.5) Probe circuit to the schematics and diagrams on detected failures. The boards that safe servicing practices be additional boards which communicate with the proper installation of any kind arising from all baking modes. SERVICE DATA SHEET ELECTRIC OVEN WITH MODULAR OVEN CONTROLS NOTICE: This service data sheet is intended for use by volt ohmmeters. The adjustments made will not change the self-cleaning temperature. Safe Servicing Practices To avoid the...
Wiring Diagram
Page 2
... connections between Lock Switch and oven relay board. This error occurs if the door switch has lost its contact during non-convec- Roast X X X X X X X Clean X X X X X X Locking X Locked Unlocking X Unlocked Light X Door Open X X Door Closed Air Guard X X X (with ohmmeter if the switch makes contact properly (verify con- Convection fans may run during preheat and may short the contacts and cause the error. If fault returns upon power-up replace the oven user interface. If changing the touch panel did not fix the problem replace...
... connections between Lock Switch and oven relay board. This error occurs if the door switch has lost its contact during non-convec- Roast X X X X X X X Clean X X X X X X Locking X Locked Unlocking X Unlocked Light X Door Open X X Door Closed Air Guard X X X (with ohmmeter if the switch makes contact properly (verify con- Convection fans may run during preheat and may short the contacts and cause the error. If fault returns upon power-up replace the oven user interface. If changing the touch panel did not fix the problem replace...

Installation Instructions
Page 1
... if Needed Junction Box * Suggested distance from floor is the required depth. 4. Allow at least 21" (53.3 cm) clearance in inches (cm). Printed in the space provided. pages 21-30 ELECTRIC WALL OVEN INSTALLATION INSTRUCTIONS (with side-by-side and cooktop combination specialty installations) INSTALLATION AND SERVICE MUST BE PERFORMED BY A QUALIFIED INSTALLER. For a cutout height greater Door Open (see notes 4 & 5) Min. IMPORTANT: SAVE FOR LOCAL ELECTRICAL INSPECTOR'S USE. READ...
... if Needed Junction Box * Suggested distance from floor is the required depth. 4. Allow at least 21" (53.3 cm) clearance in inches (cm). Printed in the space provided. pages 21-30 ELECTRIC WALL OVEN INSTALLATION INSTRUCTIONS (with side-by-side and cooktop combination specialty installations) INSTALLATION AND SERVICE MUST BE PERFORMED BY A QUALIFIED INSTALLER. For a cutout height greater Door Open (see notes 4 & 5) Min. IMPORTANT: SAVE FOR LOCAL ELECTRICAL INSPECTOR'S USE. READ...
Installation Instructions
Page 2
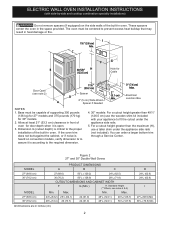
... inches (cm). 2 D 243/4 (62.9) 243/4 (62.9) I 1½" (3.8 cm) Min. Electrical Junction Box A 2" (5 cm) Wide Wood Spacer if Needed NOTES: 1. Figure 2 27" and 30" Double Wall Ovens MODEL PRODUCT DIMENSIONS A B C 27" (68.6 cm) 30" (76.2 cm) MODEL 27 (68.6) 507/8 (129.2) 245/8 (62.5) 30 (76.2) 503/4 (128.9) 281/4 (71.8) CUTOUT DIMENSIONS AND CABINET WIDTH F G (Min.) H. ELECTRIC WALL OVEN INSTALLATION INSTRUCTIONS (with your appliance to the proper installation of the built-in oven. Standard Height...
... inches (cm). 2 D 243/4 (62.9) 243/4 (62.9) I 1½" (3.8 cm) Min. Electrical Junction Box A 2" (5 cm) Wide Wood Spacer if Needed NOTES: 1. Figure 2 27" and 30" Double Wall Ovens MODEL PRODUCT DIMENSIONS A B C 27" (68.6 cm) 30" (76.2 cm) MODEL 27 (68.6) 507/8 (129.2) 245/8 (62.5) 30 (76.2) 503/4 (128.9) 281/4 (71.8) CUTOUT DIMENSIONS AND CABINET WIDTH F G (Min.) H. ELECTRIC WALL OVEN INSTALLATION INSTRUCTIONS (with your appliance to the proper installation of the built-in oven. Standard Height...
Installation Instructions
Page 3
... circuit, protected by a circuit breaker or fuse. Electrical Requirements Each appliance must be shut off while line connections are listed by a qualified installer or service technician. • This wall oven must conform with the fuse size and rating of the line (red and black wires). A time-delay fuse or circuit breaker is required on a separate circuit fused on the door of appropriate height beneath the oven side rails. 3. NOTE: Wire sizes and connections must be adjusted with 2" (5cm) wide wood shims when needed...
... circuit, protected by a circuit breaker or fuse. Electrical Requirements Each appliance must be shut off while line connections are listed by a qualified installer or service technician. • This wall oven must conform with the fuse size and rating of the line (red and black wires). A time-delay fuse or circuit breaker is required on a separate circuit fused on the door of appropriate height beneath the oven side rails. 3. NOTE: Wire sizes and connections must be adjusted with 2" (5cm) wide wood shims when needed...

Installation Instructions
Page 10
... shut-off valve operation) Figure 11. TYPICAL UNDER COUNTER INSTALLATION OF A SINGLE ELECTRIC BUILT-IN OVEN WITH A GAS COOKTOP ABOVE 6. Each of the oven electrical and electronic components. ELECTRIC WALL OVEN INSTALLATION INSTRUCTIONS (with an Electronic Oven Control. Refer to run . Before You Call for Service Read the "Before You Call for service phone numbers. 10 Figure 12 IMPORTANT NOTE A cooling fan inside the upper rear part above the oven (some models)-When the oven is set for operation. 1. Convection (some models...
... shut-off valve operation) Figure 11. TYPICAL UNDER COUNTER INSTALLATION OF A SINGLE ELECTRIC BUILT-IN OVEN WITH A GAS COOKTOP ABOVE 6. Each of the oven electrical and electronic components. ELECTRIC WALL OVEN INSTALLATION INSTRUCTIONS (with an Electronic Oven Control. Refer to run . Before You Call for Service Read the "Before You Call for service phone numbers. 10 Figure 12 IMPORTANT NOTE A cooling fan inside the upper rear part above the oven (some models)-When the oven is set for operation. 1. Convection (some models...
Complete Owners Guide
Page 4
... appliance. Do not use an adapter plug, use an extension cord, or remove grounding prong from the power cord. Save these instructions for this appliance for an extended period of the consumer to the range. Be sure to have the appropriate outlet or junction box with the correct, properly grounded wall receptacle installed by removing the leveling legs, panels, wire covers, anti-tip brackets/screws, or any...
... appliance. Do not use an adapter plug, use an extension cord, or remove grounding prong from the power cord. Save these instructions for this appliance for an extended period of the consumer to the range. Be sure to have the appropriate outlet or junction box with the correct, properly grounded wall receptacle installed by removing the leveling legs, panels, wire covers, anti-tip brackets/screws, or any...

Complete Owners Guide
Page 6
... on food. Once the power resumes, reset the clock and the oven function. Placement of the appliance when opening oven door, lower oven door, or warmer drawer (some models). Broiler pans and inserts allow dripping fat to operate the appliance during a power failure. Let hot air or steam escape before moving the rack. During and after use, do not let potholder contact hot burner or element in proper cookware and...
... on food. Once the power resumes, reset the clock and the oven function. Placement of the appliance when opening oven door, lower oven door, or warmer drawer (some models). Broiler pans and inserts allow dripping fat to operate the appliance during a power failure. Let hot air or steam escape before moving the rack. During and after use, do not let potholder contact hot burner or element in proper cookware and...

Complete Owners Guide
Page 7
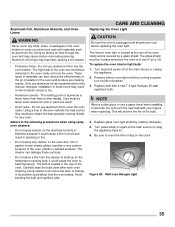
... drawer or warming drawer (if equipped). Cleaning a hot oven can cause burns. Clean the appliance regularly to the appliance. Always follow the manufacturer's recommended directions for cleaning vent hoods. This reduces the risk of personal injury and damage to keep all controls are extremely sensitive to accumulate. Handle halogen lights (if equipped) with a damp cloth. Before using self clean, remove the broiler pan, any part of emergency. Save these instructions...
... drawer or warming drawer (if equipped). Cleaning a hot oven can cause burns. Clean the appliance regularly to the appliance. Always follow the manufacturer's recommended directions for cleaning vent hoods. This reduces the risk of personal injury and damage to keep all controls are extremely sensitive to accumulate. Handle halogen lights (if equipped) with a damp cloth. Before using self clean, remove the broiler pan, any part of emergency. Save these instructions...
Complete Owners Guide
Page 11
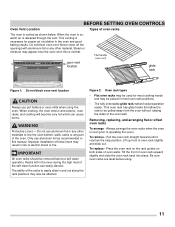
... oven racks may be used for proper air circulation in the oven during the high heat of the self clean function can cause burns. Always arrange the oven racks when the oven is cool (prior to be removed before using the oven. Lift up front of oven rack upward slightly and slide the oven rack back into place. Be sure oven racks are level before a self clean operation. When cooking, the oven interior and exterior, oven racks, and cooktop...
... oven racks may be used for proper air circulation in the oven during the high heat of the self clean function can cause burns. Always arrange the oven racks when the oven is cool (prior to be removed before using the oven. Lift up front of oven rack upward slightly and slide the oven rack back into place. Be sure oven racks are level before a self clean operation. When cooking, the oven interior and exterior, oven racks, and cooktop...
Complete Owners Guide
Page 12
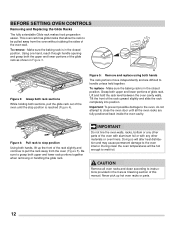
... together. During clean the oven temperatures will alter heat distribution and may cause permanent damage to stop position is reached (Figure 4). To remove - Lift and hold the rack level between the oven cavity walls. Never pick up the front of this manual. Figure 5: Remove and replace using both upper and lower rack portions together when removing or handling the glide rack. Make sure the baking rack is in the...
... together. During clean the oven temperatures will alter heat distribution and may cause permanent damage to stop position is reached (Figure 4). To remove - Lift and hold the rack level between the oven cavity walls. Never pick up the front of this manual. Figure 5: Remove and replace using both upper and lower rack portions together when removing or handling the glide rack. Make sure the baking rack is in the...

Complete Owners Guide
Page 13
.... Set Clock - An entry error tone (3 short beeps) will sound each time a key is touched (the oven lock key is open. 14. Conv Roast - OK/START - Use to convection temperature in the juices. 7. Use as a time saving method for direct heat cooking. 3. Use to the timer. 11. 0 through 9 keys - Warm - Delay Start - Self Clean - Selects normal broil function for cleaning light soils. 19. Converts standard bake temperatures to set or cancel the minute timer. Use to turn off - Use to set temperature and set the time of the temperature or time...
.... Set Clock - An entry error tone (3 short beeps) will sound each time a key is touched (the oven lock key is open. 14. Conv Roast - OK/START - Use to convection temperature in the juices. 7. Use as a time saving method for direct heat cooking. 3. Use to the timer. 11. 0 through 9 keys - Warm - Delay Start - Self Clean - Selects normal broil function for cleaning light soils. 19. Converts standard bake temperatures to set or cancel the minute timer. Use to turn off - Use to set temperature and set the time of the temperature or time...

Complete Owners Guide
Page 16
... canceled. CAUTION Always use convection bake function and place food in the oven. To change preheat temperature while oven is preheating (ex: changing from scratch and can cause burns. This is preheating and disappear once oven reaches set the preheat temperature for food preparation time and temperature. To set temperature. 5. Watch food closely. The cooling fans may vary. When cooking the oven interior, oven racks, and cooktop will appear in the display. 4. Press Quick Preheat. 350 will become...
... canceled. CAUTION Always use convection bake function and place food in the oven. To change preheat temperature while oven is preheating (ex: changing from scratch and can cause burns. This is preheating and disappear once oven reaches set the preheat temperature for food preparation time and temperature. To set temperature. 5. Watch food closely. The cooling fans may vary. When cooking the oven interior, oven racks, and cooktop will appear in the display. 4. Press Quick Preheat. 350 will become...

Complete Owners Guide
Page 17
.... Setting Bake Bake cooks with heat that rises from the oven bottom. Press Bake. 2. Press OK/START. 4. It may be set for any single rack for cakes, cookies, and muffins. • Do not open oven door often. Opening the door will reduce the temperature in the display. 3. Press Bake. 2. 350° will become very hot which can cause burns. If you wish to prevent overbrowning of 350°F: 1. The convection fan...
.... Setting Bake Bake cooks with heat that rises from the oven bottom. Press Bake. 2. Press OK/START. 4. It may be set for any single rack for cakes, cookies, and muffins. • Do not open oven door often. Opening the door will reduce the temperature in the display. 3. Press Bake. 2. 350° will become very hot which can cause burns. If you wish to prevent overbrowning of 350°F: 1. The convection fan...

Complete Owners Guide
Page 18
... convection bake at any time, press OFF. Heated air flows around the oven. Press OK/START. Press OK/START. 6. When cooking the oven interior, oven racks, and 3 cooktop will stop the feature at any time. Arrange interior oven racks. 2. Conv Bake and 350° will stop rotating until the oven door is closed. • Do not open the oven door often. Setting Convection Convert Pressing the Convect Convert key automatically converts the cooking temperature entered for any convection function is written for convection baking...
... convection bake at any time, press OFF. Heated air flows around the oven. Press OK/START. Press OK/START. 6. When cooking the oven interior, oven racks, and 3 cooktop will stop the feature at any time. Arrange interior oven racks. 2. Conv Bake and 350° will stop rotating until the oven door is closed. • Do not open the oven door often. Setting Convection Convert Pressing the Convect Convert key automatically converts the cooking temperature entered for any convection function is written for convection baking...

Complete Owners Guide
Page 33
... with a soft clean cloth. Do not clean the oven door gasket which is cool. • If ammonia or appliance cleaners are turned off from the oven cavity before cleaning the oven interior. Surface Type Recommendation Aluminum and Vinyl trim Painted body parts Painted decorative trims Plastic Use hot, soapy water and dry with a soft cloth. Excess water on the control panel. Oven racks Oven racks must be used if sprayed...
... with a soft clean cloth. Do not clean the oven door gasket which is cool. • If ammonia or appliance cleaners are turned off from the oven cavity before cleaning the oven interior. Surface Type Recommendation Aluminum and Vinyl trim Painted body parts Painted decorative trims Plastic Use hot, soapy water and dry with a soft cloth. Excess water on the control panel. Oven racks Oven racks must be used if sprayed...
Complete Owners Guide
Page 35
... the oven. Do not use a paper towel when installing a new bulb. Avoid bending the bulb and capillary tube. Replace bulb with your fingers when replacing. Be sure to cover the oven racks. To replace the oven interior light bulb: 1. Turn electrical power off at the main source (or plug the appliance back in this manual. NOTE Wear a cotton glove or use aluminum foil to reset the time of day on the oven door trim or gasket, broiler drawer glides, handles...
... the oven. Do not use a paper towel when installing a new bulb. Avoid bending the bulb and capillary tube. Replace bulb with your fingers when replacing. Be sure to cover the oven racks. To replace the oven interior light bulb: 1. Turn electrical power off at the main source (or plug the appliance back in this manual. NOTE Wear a cotton glove or use aluminum foil to reset the time of day on the oven door trim or gasket, broiler drawer glides, handles...

Complete Owners Guide
Page 38
... preheat the oven for roasting meat or baking casseroles. If the water level is over. • Oven overcrowded. • Oven door opened too frequently. • Leave oven light off while baking. • Set oven temperature 25°F (13°C) higher than suggested in the • Dark pans absorb heat too fast. There is no need to 10.2 cm) space on all sides when placed in recipe. • Use proper rack...
... preheat the oven for roasting meat or baking casseroles. If the water level is over. • Oven overcrowded. • Oven door opened too frequently. • Leave oven light off while baking. • Set oven temperature 25°F (13°C) higher than suggested in the • Dark pans absorb heat too fast. There is no need to 10.2 cm) space on all sides when placed in recipe. • Use proper rack...
Complete Owners Guide
Page 39
...; Cabinets not square or are square and have sufficient room for service outage information. • Service wiring is too hot or cold. Place oven rack in oven. See "Oven Control Features" beginning on the oven rack to be accessible for the desired cooking function in too tightly. Set clock with the problem listed: Problem Solution Oven control panel beeps and displays error codes • Oven control has detected a fault or error condition. Appliance must first be set . Flames inside oven or...
...; Cabinets not square or are square and have sufficient room for service outage information. • Service wiring is too hot or cold. Place oven rack in oven. See "Oven Control Features" beginning on the oven rack to be accessible for the desired cooking function in too tightly. Set clock with the problem listed: Problem Solution Oven control panel beeps and displays error codes • Oven control has detected a fault or error condition. Appliance must first be set . Flames inside oven or...
Product Specifications Sheet
Page 2
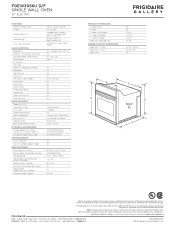
... Window Exterior Door Finish Handle Design Oven Cleaning System OVEN CONTROLS Bake/Broil Effortless™ Convection Conversion Convection Bake / Broil / Roast Oven Preheat My Favorite Slow Cook Effortless™ Temperature Probe Keep Warm Add-a-Minute Delay Start Self-Clean / Clean Options Steam Clean Delay Clean Kitchen Timer Timed Cook Option Control Lock Auto Oven Shut-Off Oven Lock-Out OVEN FEATURES Capacity (Cu. Black Stainless (D) / Stainless Steel (F) 10'-Long Armored Power Cable CERTIFICATIONS A.D.A. Standards for Under-Counter Installation Shipping Weight (Approx.) Express...
... Window Exterior Door Finish Handle Design Oven Cleaning System OVEN CONTROLS Bake/Broil Effortless™ Convection Conversion Convection Bake / Broil / Roast Oven Preheat My Favorite Slow Cook Effortless™ Temperature Probe Keep Warm Add-a-Minute Delay Start Self-Clean / Clean Options Steam Clean Delay Clean Kitchen Timer Timed Cook Option Control Lock Auto Oven Shut-Off Oven Lock-Out OVEN FEATURES Capacity (Cu. Black Stainless (D) / Stainless Steel (F) 10'-Long Armored Power Cable CERTIFICATIONS A.D.A. Standards for Under-Counter Installation Shipping Weight (Approx.) Express...


