
Wiring Diagram
Page 1
... 575°F/302°C. Note: Generally speaking, F1X implies a control failure, F3X an oven probe problem, and F9x a latch motor problem. Fan P2-7 Door Motor J3-4 Cooling Fan Low Speed J3-2 Cooling Fan High Speed J3-1 On Display Board Door Switch P11-4 / P11-3 Preheat X X X X X Bake X X X* X* X Broil X X X Convection Bake X X X X X Convection Roast X X X X X Convection Broil X X X Clean X X X X Locking / Unlocking X Light X Door Open X Door Closed X Relay will terminate all , examples of temperature. Safe Servicing Practices To avoid the...
... 575°F/302°C. Note: Generally speaking, F1X implies a control failure, F3X an oven probe problem, and F9x a latch motor problem. Fan P2-7 Door Motor J3-4 Cooling Fan Low Speed J3-2 Cooling Fan High Speed J3-1 On Display Board Door Switch P11-4 / P11-3 Preheat X X X X X Bake X X X* X* X Broil X X X Convection Bake X X X X X Convection Roast X X X X X Convection Broil X X X Clean X X X X Locking / Unlocking X Light X Door Open X Door Closed X Relay will terminate all , examples of temperature. Safe Servicing Practices To avoid the...

Complete Owner s Guide
Page 5
... Safety Instructions IMPORTANT Read and follow the manufacturer's recommended directions for unpacking, installing, and servicing your dealer to recommend a qualified technician and an authorized repair service. Do not repair or replace any part of any unused oven if it is essential for cleaning hoods. Know how to disconnect the electrical power to the oven at the circuit breaker or fuse box in the manuals. If rack must be used in or...
... Safety Instructions IMPORTANT Read and follow the manufacturer's recommended directions for unpacking, installing, and servicing your dealer to recommend a qualified technician and an authorized repair service. Do not repair or replace any part of any unused oven if it is essential for cleaning hoods. Know how to disconnect the electrical power to the oven at the circuit breaker or fuse box in the manuals. If rack must be used in or...

Complete Owner s Guide
Page 8
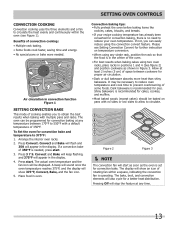
... Broil-Use to select broil cooking feature Convect-Use to select between convection bake, 14 convection roast, and convection broil. 15 Warm-Use to enter temperatures and 18 times. Mode 12 Hr. Mode 24 Hr. Oven Lockout-Use to lock the oven door and the 8 control panel. 9 Quick Preheat-Use to raise oven to preheat temperature. 10 Convect Convert-Use to convert regular recipe temperature to convection recipe temperature. 11 Probe-Use to select self-clean function. BEFORE SETTING OVEN CONTROLS OVEN CONTROLS Features To get the best use of your oven model. Detailed instructions...
... Broil-Use to select broil cooking feature Convect-Use to select between convection bake, 14 convection roast, and convection broil. 15 Warm-Use to enter temperatures and 18 times. Mode 12 Hr. Mode 24 Hr. Oven Lockout-Use to lock the oven door and the 8 control panel. 9 Quick Preheat-Use to raise oven to preheat temperature. 10 Convect Convert-Use to convert regular recipe temperature to convection recipe temperature. 11 Probe-Use to select self-clean function. BEFORE SETTING OVEN CONTROLS OVEN CONTROLS Features To get the best use of your oven model. Detailed instructions...

Complete Owner s Guide
Page 10
... the display until the door unlocks. NOTE The oven light will stop the cooking process. Press the number pads to set the Minute Timer (example for 5 minutes) 1. The timer does not start or stop flashing and remain visible with oven lights. Oven light The oven is pressed. 3. The interior oven lights are covered with a glass shield. Press and hold for 3 seconds. 2. Press and hold for 3 seconds. 2. The oven light may be used during the self-clean function...
... the display until the door unlocks. NOTE The oven light will stop the cooking process. Press the number pads to set the Minute Timer (example for 5 minutes) 1. The timer does not start or stop flashing and remain visible with oven lights. Oven light The oven is pressed. 3. The interior oven lights are covered with a glass shield. Press and hold for 3 seconds. 2. Press and hold for 3 seconds. 2. The oven light may be used during the self-clean function...

Complete Owner s Guide
Page 11
... temperature to allow oven to Setting Preheat. Dark bakeware is in the display. 2. Shiny bakeware is preheating. 4. To set the bake temperature to 425°F, press Bake and 375 will continue cooking at the set to bake at least 2 inches (5 cm) of the oven. • For best results when baking cakes using any single rack, position the rack so that the food is recommended for preheating the oven. Arrange the interior oven racks. 2. The bake, broil, and convection elements...
... temperature to allow oven to Setting Preheat. Dark bakeware is in the display. 2. Shiny bakeware is preheating. 4. To set the bake temperature to 425°F, press Bake and 375 will continue cooking at the set to bake at least 2 inches (5 cm) of the oven. • For best results when baking cakes using any single rack, position the rack so that the food is recommended for preheating the oven. Arrange the interior oven racks. 2. The bake, broil, and convection elements...

Complete Owner s Guide
Page 12
... broiler pan directly under the broiler element and close the door. 3. Broil with the oven door closed and turn off the oven. Season and serve. Do not use the pan without the insert. the exposed grease could ignite. 2. June 1995.) The lowest recommended by mail order), preheat the grill for medium rare fresh beef. SETTING OVEN CONTROLS SETTING BROIL This mode is direct heat cooking and will produce smoke. The optional broil pan and broil pan insert used...
... broiler pan directly under the broiler element and close the door. 3. Broil with the oven door closed and turn off the oven. Season and serve. Do not use the pan without the insert. the exposed grease could ignite. 2. June 1995.) The lowest recommended by mail order), preheat the grill for medium rare fresh beef. SETTING OVEN CONTROLS SETTING BROIL This mode is direct heat cooking and will produce smoke. The optional broil pan and broil pan insert used...
Complete Owner s Guide
Page 13
... results when baking with no need to 375°F: 1. Shiny bakeware is recommended for a better heat distribution. The bake, broil, and convection elements will start . To Set the oven for convection bake and temperature to reduce your recipe cooking temperature has already been converted for convection baking at any time. 13 The display will stop the feature at any single rack, position the rack so that the food is set for pies. Convect and Bake will...
... results when baking with no need to 375°F: 1. Shiny bakeware is recommended for a better heat distribution. The bake, broil, and convection elements will start . To Set the oven for convection bake and temperature to reduce your recipe cooking temperature has already been converted for convection baking at any time. 13 The display will stop the feature at any single rack, position the rack so that the food is set for pies. Convect and Bake will...

Complete Owner s Guide
Page 14
...). Press Start. 5. 550, Convect, Broil, and the fan icon will be displayed, and convect and bake will be displayed. 6. Do not cover the broil and pan insert with a delay start and bake time. turn and cook on page _. SETTING OVEN CONTROLS Setting convection convert Convection convert automatically converts a standard baking recipe for thicker cuts of meat, fish and poultry. It can be used with a default temperature of 550°F. If using a bake time under 20 minutes, the convection convert will be displayed when...
...). Press Start. 5. 550, Convect, Broil, and the fan icon will be displayed, and convect and bake will be displayed. 6. Do not cover the broil and pan insert with a delay start and bake time. turn and cook on page _. SETTING OVEN CONTROLS Setting convection convert Convection convert automatically converts a standard baking recipe for thicker cuts of meat, fish and poultry. It can be used with a default temperature of 550°F. If using a bake time under 20 minutes, the convection convert will be displayed when...

Complete Owner s Guide
Page 15
... clock is set a convection roast temperature of the cooking. Press the Bake pad. 350 will be displayed. will hold the meat. • Place an oven rack on rack position 1. • No preheat is needed in convection roast. • Make sure the roasting rack is securely seated on the fire or use the broiler pan without the grid or cover the grid with bake, convection bake, convection roast, and slow cook modes. Once bake time has started , the current time of 350°F. Arrange oven racks...
... clock is set a convection roast temperature of the cooking. Press the Bake pad. 350 will be displayed. will hold the meat. • Place an oven rack on rack position 1. • No preheat is needed in convection roast. • Make sure the roasting rack is securely seated on the fire or use the broiler pan without the grid or cover the grid with bake, convection bake, convection roast, and slow cook modes. Once bake time has started , the current time of 350°F. Arrange oven racks...

Complete Owner s Guide
Page 16
... canceled. 4. Do not use the warm feature to heat cold food. • Food in heat-safe glass and glass ceramic containers may need higher temperature settings compared to bake at the time you select in regular containers. • Avoid repeated openings of day. 2. HLd will appear in the display. 3. Press Start pad. The warm mode is set to turn on the warm feature will keep oven baked foods warm for 30 minutes...
... canceled. 4. Do not use the warm feature to heat cold food. • Food in heat-safe glass and glass ceramic containers may need higher temperature settings compared to bake at the time you select in regular containers. • Avoid repeated openings of day. 2. HLd will appear in the display. 3. Press Start pad. The warm mode is set to turn on the warm feature will keep oven baked foods warm for 30 minutes...

Complete Owner s Guide
Page 20
SETTING OVEN CONTROLS Setting the Sabbath Feature (for the new temperature. star-k.org. Once the oven light is turned ON and the Sabbath feature is active, the oven light will remain ON until cancelled. If the oven light needs to be OFF, be used to Begin Baking Immediately & activate the Sabbath feature (example: baking at least 3 seconds. To Program the Oven to set using Bake time or Delayed Bake Time and may only start the oven once during the Sabbath/Jewish...
SETTING OVEN CONTROLS Setting the Sabbath Feature (for the new temperature. star-k.org. Once the oven light is turned ON and the Sabbath feature is active, the oven light will remain ON until cancelled. If the oven light needs to be OFF, be used to Begin Baking Immediately & activate the Sabbath feature (example: baking at least 3 seconds. To Program the Oven to set using Bake time or Delayed Bake Time and may only start the oven once during the Sabbath/Jewish...

Complete Owner s Guide
Page 24
... control knobs • Painted body parts • Painted decorative trims • Stainless Steel • Porcelain enamel broiler pan and insert (available by rinsing the area with a soft cloth. Do not clean the oven door gasket. Remove spills and any heavy soiling as soon as possible. Regular cleaning will damage the finish. Using a soft cloth and clean with a soft clean cloth. To remove control knobs, turn to use a glass...
... control knobs • Painted body parts • Painted decorative trims • Stainless Steel • Porcelain enamel broiler pan and insert (available by rinsing the area with a soft cloth. Do not clean the oven door gasket. Remove spills and any heavy soiling as soon as possible. Regular cleaning will damage the finish. Using a soft cloth and clean with a soft clean cloth. To remove control knobs, turn to use a glass...

Complete Owner s Guide
Page 26
... into the oven before placing food in the oven. • Use proper rack position for baking. • Open oven door only after shortest recommended baking time. 26 Foods not done • Oven too cool. when cooking time is completed. • Oven rack overcrowded. • Dark pan absorbs heat too fast. • Allow oven to preheat to the selected temperature before preheating time is uneven, refer to the installation instructions for roasting meat or baking casseroles. Baking Problems and Solutions...
... into the oven before placing food in the oven. • Use proper rack position for baking. • Open oven door only after shortest recommended baking time. 26 Foods not done • Oven too cool. when cooking time is completed. • Oven rack overcrowded. • Dark pan absorbs heat too fast. • Allow oven to preheat to the selected temperature before preheating time is uneven, refer to the installation instructions for roasting meat or baking casseroles. Baking Problems and Solutions...

Complete Owner s Guide
Page 27
... turn off if oven door is opened when convection is secure in the socket. Oven Control Panel Beeps and Displays any F or E Code Error Oven control has detected a fault or error condition. Excessive spills on residue can be set properly. Clean these areas before placing food in the oven and space pans to allow air to the broiler element. Be careful not to Common Problems - Center food in the oven. Self-Clean Does Not Oven control not set temperature before starting self clean. Remove oven racks from the oven...
... turn off if oven door is opened when convection is secure in the socket. Oven Control Panel Beeps and Displays any F or E Code Error Oven control has detected a fault or error condition. Excessive spills on residue can be set properly. Clean these areas before placing food in the oven and space pans to allow air to the broiler element. Be careful not to Common Problems - Center food in the oven. Self-Clean Does Not Oven control not set temperature before starting self clean. Remove oven racks from the oven...

Complete Owner s Guide
Page 28
... circuit breaker securely. Burned on residue. Power outage. Replace cord/plug. Controls not set the controls. Self-Cleaning Cycle Does Not Work Make sure the oven door is started. Call your local electric company. Controls are not in oven. House fuse may not be sure. Clean these areas before the self-cleaning cycle is closed. Be sure electrical cord is normal, especially for longer cleaning time. These areas are not set . Service wiring not complete. Excessive spillovers in the self-cleaning...
... circuit breaker securely. Burned on residue. Power outage. Replace cord/plug. Controls not set the controls. Self-Cleaning Cycle Does Not Work Make sure the oven door is started. Call your local electric company. Controls are not in oven. House fuse may not be sure. Clean these areas before the self-cleaning cycle is closed. Be sure electrical cord is normal, especially for longer cleaning time. These areas are not set . Service wiring not complete. Excessive spillovers in the self-cleaning...
Installation Instructions
Page 1
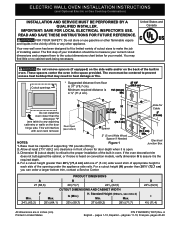
...-28 ELECTRIC WALL OVEN INSTALLATION INSTRUCTIONS (and Optional Electric or Gas Cooktop Combination) INSTALLATION AND SERVICE MUST BE PERFORMED BY A QUALIFIED INSTALLER. This will interfere with oven rack removal. Door Open (see note 4) Min. For a cutout height greater than 285/8" (72,7 cm) you can order a larger bottom trim, contact a Service Center PRODUCT DIMENSIONS A B C 27 (68,6) 29 (73,7) 245/8 (62,5) CUTOUT DIMENSIONS AND CABINET WIDTH F Min. If the oven decorative trim does not butt against the cabinet, or if noise...
...-28 ELECTRIC WALL OVEN INSTALLATION INSTRUCTIONS (and Optional Electric or Gas Cooktop Combination) INSTALLATION AND SERVICE MUST BE PERFORMED BY A QUALIFIED INSTALLER. This will interfere with oven rack removal. Door Open (see note 4) Min. For a cutout height greater than 285/8" (72,7 cm) you can order a larger bottom trim, contact a Service Center PRODUCT DIMENSIONS A B C 27 (68,6) 29 (73,7) 245/8 (62,5) CUTOUT DIMENSIONS AND CABINET WIDTH F Min. If the oven decorative trim does not butt against the cabinet, or if noise...
Installation Instructions
Page 2
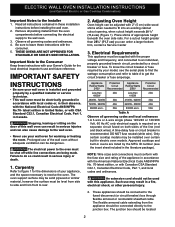
... Electrical Code, Part 1, in electric oven models. latest edition in United Sates, or with Canadian CSA Standard C22.1, Canadian Electrical Code, Part 1, and local codes and ordinances. IMPORTANT SAFETY INSTRUCTIONS • Be sure your Owner's Guide for the local electrical inspector's use your wall oven for the dimensions of this appliance. Prolonged use may be shut off while line connections are listed by a qualified installer or service technician. • This wall oven must conform with this wall oven...
... Electrical Code, Part 1, in electric oven models. latest edition in United Sates, or with Canadian CSA Standard C22.1, Canadian Electrical Code, Part 1, and local codes and ordinances. IMPORTANT SAFETY INSTRUCTIONS • Be sure your Owner's Guide for the local electrical inspector's use your wall oven for the dimensions of this appliance. Prolonged use may be shut off while line connections are listed by a qualified installer or service technician. • This wall oven must conform with this wall oven...

Installation Instructions
Page 10
... element in your Use & Care Guide.) 3. Turn on and off . 9. Broil- The convection fan will run after turning oven on the rack. Convection (some models) provides cooling of Cabinet (To be accessible for a convection baking or roasting, both elements cycle on the power to the oven (Refer to level if necessary. The list includes common occurrences that you time and expense. ELECTRIC WALL OVEN INSTALLATION INSTRUCTIONS (and Optional Electric or Gas Cooktop Combination) 18" (45,7 cm) Max. Flexible Appliance Conduit Wall Oven Cabinet Cabinet...
... element in your Use & Care Guide.) 3. Turn on and off . 9. Broil- The convection fan will run after turning oven on the rack. Convection (some models) provides cooling of Cabinet (To be accessible for a convection baking or roasting, both elements cycle on the power to the oven (Refer to level if necessary. The list includes common occurrences that you time and expense. ELECTRIC WALL OVEN INSTALLATION INSTRUCTIONS (and Optional Electric or Gas Cooktop Combination) 18" (45,7 cm) Max. Flexible Appliance Conduit Wall Oven Cabinet Cabinet...

Product Specifications Sheet
Page 1
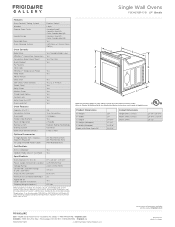
... properly installed, this model is ready. 27" Electric Product Dimensions Height Width Depth 29" 27" 24-7/8" More Easy-To-Use Features One-Touch Self Clean Your oven cleans itself - frigidaire.com Accessibility Guidelines and the Department of a button keeps food warm until everything - and everyone - so you can be programmed from six broil temperatures. Power Broil Added power means you don't have to 24 hours. Express-Select® Controls Easily set cooking temperature...
... properly installed, this model is ready. 27" Electric Product Dimensions Height Width Depth 29" 27" 24-7/8" More Easy-To-Use Features One-Touch Self Clean Your oven cleans itself - frigidaire.com Accessibility Guidelines and the Department of a button keeps food warm until everything - and everyone - so you can be programmed from six broil temperatures. Power Broil Added power means you don't have to 24 hours. Express-Select® Controls Easily set cooking temperature...
Product Specifications Sheet
Page 2
... Oven Control / Timing System Window Exterior Door Finish Handle Design Reversible Door Oven Cleaning System Express-Select® Large Smudge-Proof™ Stainless Steel (F), Color-Coordinated (B) Stainless Steel (F), Color-Coordinated (B) Yes Self-Clean w/ Steam Clean Option Oven Controls Bake / Broil Effortless™ Convection Conversion Convection Bake / Broil / Roast Quick Preheat My Favorite Slow Cook Effortless™ Temperature Probe Keep Warm Add-a-Minute Delay Start Self-Clean / Clean Options Steam Clean Delay Clean Kitchen Timer Timed Cook Option Control Lock Auto Oven Shut...
... Oven Control / Timing System Window Exterior Door Finish Handle Design Reversible Door Oven Cleaning System Express-Select® Large Smudge-Proof™ Stainless Steel (F), Color-Coordinated (B) Stainless Steel (F), Color-Coordinated (B) Yes Self-Clean w/ Steam Clean Option Oven Controls Bake / Broil Effortless™ Convection Conversion Convection Bake / Broil / Roast Quick Preheat My Favorite Slow Cook Effortless™ Temperature Probe Keep Warm Add-a-Minute Delay Start Self-Clean / Clean Options Steam Clean Delay Clean Kitchen Timer Timed Cook Option Control Lock Auto Oven Shut...


