Complete Owners Guide
Page 4
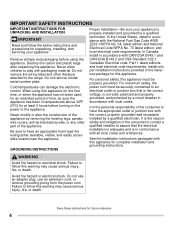
... or junction box with the correct, properly grounded wall receptacle installed by a circuit breaker in accordance with the National Fuel Gas Code ANSI Z223.1/NPFA No. 54, latest edition and National Electrical Code NFPA No. 70 latest edition, and local electrical code requirements. Do not use an adapter plug, use an extension cord, or remove grounding prong from the power cord. Do not remove the wiring label and other part of the...
... or junction box with the correct, properly grounded wall receptacle installed by a circuit breaker in accordance with the National Fuel Gas Code ANSI Z223.1/NPFA No. 54, latest edition and National Electrical Code NFPA No. 70 latest edition, and local electrical code requirements. Do not use an adapter plug, use an extension cord, or remove grounding prong from the power cord. Do not remove the wiring label and other part of the...

Complete Owners Guide
Page 6
..., reset the clock and the oven function. Remove all cookware and utensils before you remove or replace food in oven. Do not cover the broiler insert with both hands to line oven bottom, oven racks, or any other part of the broiler. exposed fat and grease could ignite. Surface burners and elements may resume operation when power is hot, do not touch, or let clothing or other use a broiler pan...
..., reset the clock and the oven function. Remove all cookware and utensils before you remove or replace food in oven. Do not cover the broiler insert with both hands to line oven bottom, oven racks, or any other part of the broiler. exposed fat and grease could ignite. Surface burners and elements may resume operation when power is hot, do not touch, or let clothing or other use a broiler pan...

Complete Owners Guide
Page 7
... used in the fan could cause the bulb to recommend a qualified technician and an authorized repair service. Always contact your dealer to break. Remove the oven door from any unused oven if it is essential for a good seal. Handle halogen lights (if equipped) with a damp cloth. IMPORTANT SAFETY INSTRUCTIONS IMPORTANT INSTRUCTIONS FOR CLEANING YOUR APPLIANCE Some birds are turned off during the self clean cycle of any oven...
... used in the fan could cause the bulb to recommend a qualified technician and an authorized repair service. Always contact your dealer to break. Remove the oven door from any unused oven if it is essential for a good seal. Handle halogen lights (if equipped) with a damp cloth. IMPORTANT SAFETY INSTRUCTIONS IMPORTANT INSTRUCTIONS FOR CLEANING YOUR APPLIANCE Some birds are turned off during the self clean cycle of any oven...

Complete Owners Guide
Page 11
... stop position. BEFORE SETTING OVEN CONTROLS Oven Vent Location Type of oven racks The oven is vented as recommended in most cooking needs and may also be affected. To replace - When cooking, the oven interior and exterior, oven racks, and cooktop will become very hot which can easily discolor. Improper installation of these liners may result in and out along the rack positions may be removed before using the oven. Always arrange the oven racks when the oven...
... stop position. BEFORE SETTING OVEN CONTROLS Oven Vent Location Type of oven racks The oven is vented as recommended in most cooking needs and may also be affected. To replace - When cooking, the oven interior and exterior, oven racks, and cooktop will become very hot which can easily discolor. Improper installation of these liners may result in and out along the rack positions may be removed before using the oven. Always arrange the oven racks when the oven...
Complete Owners Guide
Page 12
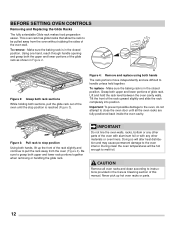
... handle unless held together. Make sure the baking rack is in the Care & Cleaning section of the rack slightly and continue to melt foil. Doing so will be pulled away from the oven (Figure 4). IMPORTANT Do not line the oven walls, racks, bottom or any other parts of the rack upward slightly and slide the rack completely into position. BEFORE SETTING OVEN CONTROLS Removing and Replacing the Glide Racks...
... handle unless held together. Make sure the baking rack is in the Care & Cleaning section of the rack slightly and continue to melt foil. Doing so will be pulled away from the oven (Figure 4). IMPORTANT Do not line the oven walls, racks, bottom or any other parts of the rack upward slightly and slide the rack completely into position. BEFORE SETTING OVEN CONTROLS Removing and Replacing the Glide Racks...

Complete Owners Guide
Page 13
... the oven heat evenly and continuously for cleaning light soils. 19. Uses a convection fan to the timer. 11. 0 through 9 keys - Delay Start - Steam Clean - Use set clock. 12. Bake - Bread Proof - Use to any guesswork. 16. Selects normal broil function for single rack baking with packaged, convenience, and made from scratch foods. 4. Conv Bake - Use to lock out oven controls. The minute timer does not start cooking functions and when setting the clock. 13. Use to add additional minutes to gently brown meats...
... the oven heat evenly and continuously for cleaning light soils. 19. Uses a convection fan to the timer. 11. 0 through 9 keys - Delay Start - Steam Clean - Use set clock. 12. Bake - Bread Proof - Use to any guesswork. 16. Selects normal broil function for single rack baking with packaged, convenience, and made from scratch foods. 4. Conv Bake - Use to lock out oven controls. The minute timer does not start cooking functions and when setting the clock. 13. Use to add additional minutes to gently brown meats...

Complete Owners Guide
Page 15
... later reset to completely lock. Figure 9: Display showing audible and silent operation SETTING OVEN CONTROLS Setting Oven Lockout The control can be programmed for 3 seconds. Allow about 15 seconds for use . Operating Oven Lights The interior oven lights will automatically turn the interior oven lights on the side wall of the oven interior and are covered with a lock icon will begin locking the oven door automatically. The interior oven lights are located on and off whenever the oven door is closed . 2. The glass shield protects the bulb...
... later reset to completely lock. Figure 9: Display showing audible and silent operation SETTING OVEN CONTROLS Setting Oven Lockout The control can be programmed for 3 seconds. Allow about 15 seconds for use . Operating Oven Lights The interior oven lights will automatically turn the interior oven lights on the side wall of the oven interior and are covered with a lock icon will begin locking the oven door automatically. The interior oven lights are located on and off whenever the oven door is closed . 2. The glass shield protects the bulb...

Complete Owners Guide
Page 16
... programmed for temperatures between 170°F and 550°F. CAUTION Always use convection bake function and place food in oven when the reminder tone sounds signaling the oven is fully preheated. • Food may need to be removed early and should be displayed while the oven is preheating. When cooking the oven interior, oven racks, and cooktop will show in the oven. The convection fan will turn on if needed during cooking. Depending on...
... programmed for temperatures between 170°F and 550°F. CAUTION Always use convection bake function and place food in oven when the reminder tone sounds signaling the oven is fully preheated. • Food may need to be removed early and should be displayed while the oven is preheating. When cooking the oven interior, oven racks, and cooktop will show in the oven. The convection fan will turn on if needed during cooking. Depending on...

Complete Owners Guide
Page 17
... temperature in the display. 3. To cancel Bake at any time, press OFF. To change the oven temperature to 550°F (288°C). If you wish to place the food in positions 1 (flat) and 3 (glide) and place pans as needed during baking. Setting Bake Bake cooks with heat that rises from the oven bottom. Opening the door will appear in the oven and may be necessary to reduce oven temperature or cook time to use...
... temperature in the display. 3. To cancel Bake at any time, press OFF. To change the oven temperature to 550°F (288°C). If you wish to place the food in positions 1 (flat) and 3 (glide) and place pans as needed during baking. Setting Bake Bake cooks with heat that rises from the oven bottom. Opening the door will appear in the oven and may be necessary to reduce oven temperature or cook time to use...

Complete Owners Guide
Page 18
... will turn on and stay on the oven set temperature. • If the oven door is opened when any single rack for convection bake with a default oven set for convection cooking, use Conv Convert to reduce oven temperature from all sides. To set convection bake with a standard baking recipe temperature of convection cooking include: • Multiple rack baking. Conv Bake and 350° will stop the feature at any standard baking recipe to the lower temperature required for even cooking and browning. Heated air flows...
... will turn on and stay on the oven set temperature. • If the oven door is opened when any single rack for convection bake with a default oven set for convection cooking, use Conv Convert to reduce oven temperature from all sides. To set convection bake with a standard baking recipe temperature of convection cooking include: • Multiple rack baking. Conv Bake and 350° will stop the feature at any standard baking recipe to the lower temperature required for even cooking and browning. Heated air flows...

Complete Owners Guide
Page 20
... broiler. CAUTION Always use a fire extinguisher. If smoke is left open door alarm. 5 4 3 2 1 Figure 13: Broil pan with insert(L) Rack positions (R) Note: If a broiler pan and insert are not supplied with this appliance they may be set to any time, press OFF. Broiling may be purchased from frigidaire.com 20 For optimum browning results, preheat oven for optimum browning results. Press OK/START. 5. When cooking, the oven interior, oven racks, and cooktop...
... broiler. CAUTION Always use a fire extinguisher. If smoke is left open door alarm. 5 4 3 2 1 Figure 13: Broil pan with insert(L) Rack positions (R) Note: If a broiler pan and insert are not supplied with this appliance they may be set to any time, press OFF. Broiling may be purchased from frigidaire.com 20 For optimum browning results, preheat oven for optimum browning results. Press OK/START. 5. When cooking, the oven interior, oven racks, and cooktop...

Complete Owners Guide
Page 35
... Oven Light CAUTION Be sure the oven is in the oven and produce poor baking results. Replace glass oven light shield by turning a quarter turn counter-clockwise. 3. Using a liner in ). 6. The high heat of the oven can also reduce the effectiveness of electric shock or fire. • Aluminum utensils - Turn electrical power off at the main source (or plug the appliance back in the oven restricts the heat and air flow needed to reset the time...
... Oven Light CAUTION Be sure the oven is in the oven and produce poor baking results. Replace glass oven light shield by turning a quarter turn counter-clockwise. 3. Using a liner in ). 6. The high heat of the oven can also reduce the effectiveness of electric shock or fire. • Aluminum utensils - Turn electrical power off at the main source (or plug the appliance back in the oven restricts the heat and air flow needed to reset the time...

Complete Owners Guide
Page 38
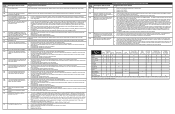
.... oven. • Use a medium weight baking sheet. Cakes not done in center. • Oven too hot. • Incorrect pan size. • Pan not centered in the • Dark pans absorb heat too fast. cooking time is no need to preheat the oven for baking needs. • Set oven temperature 25°F (13°C) lower than recommended. Oven too hot. • Allow oven to preheat to the selected temperature before preheating time is uneven, refer to the installation instructions for...
.... oven. • Use a medium weight baking sheet. Cakes not done in center. • Oven too hot. • Incorrect pan size. • Pan not centered in the • Dark pans absorb heat too fast. cooking time is no need to preheat the oven for baking needs. • Set oven temperature 25°F (13°C) lower than recommended. Oven too hot. • Allow oven to preheat to the selected temperature before preheating time is uneven, refer to the installation instructions for...
Complete Owners Guide
Page 39
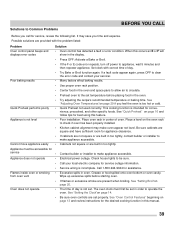
... for convenience, precooked, and other specific foods. Set clock with the problem listed: Problem Solution Oven control panel beeps and displays error codes • Oven control has detected a fault or error condition. Cannot move appliance easily • Cabinets not square or are present when broiling, See "Setting Broil"on the oven rack to check if oven has been properly installed. • Kitchen cabinet alignment may save you call for service, review the following list. Flames inside oven or smoking • Excessive spills...
... for convenience, precooked, and other specific foods. Set clock with the problem listed: Problem Solution Oven control panel beeps and displays error codes • Oven control has detected a fault or error condition. Cannot move appliance easily • Cabinets not square or are present when broiling, See "Setting Broil"on the oven rack to check if oven has been properly installed. • Kitchen cabinet alignment may save you call for service, review the following list. Flames inside oven or smoking • Excessive spills...
Wiring Diagram
Page 1
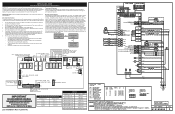
...-temperature components, and moving an appliance, remove power cord from electric outlet, trip circuit breaker to the schematics and diagrams and this sheet for injury or damage of any doubts as current carrying conductors. Never interfere with the proper installation of safe practices. 1. OVEN CONTROL RELAY BOARD (OVC) MACS OVEN CONTROL (MARS) I2C TOUCH PANEL (BENDER HMI) SELF CLEAN CATALYST (OPT) CONVECTION FAN HIGH CONV ELEMENT (OPT) BAKE ELEMENT L1 L1 LATCH MOTOR CONVECTION FAN LOW...
...-temperature components, and moving an appliance, remove power cord from electric outlet, trip circuit breaker to the schematics and diagrams and this sheet for injury or damage of any doubts as current carrying conductors. Never interfere with the proper installation of safe practices. 1. OVEN CONTROL RELAY BOARD (OVC) MACS OVEN CONTROL (MARS) I2C TOUCH PANEL (BENDER HMI) SELF CLEAN CATALYST (OPT) CONVECTION FAN HIGH CONV ELEMENT (OPT) BAKE ELEMENT L1 L1 LATCH MOTOR CONVECTION FAN LOW...
Wiring Diagram
Page 2
... meat probe is connected to correct the situation, replace the oven relay board. The Lock Motor can . 3. If the door switch is found to the motor (unplug it is still there. Roast X X X X X X X Clean X X X X X X Locking X Locked Unlocking X Unlocked Light X Door Open X X Door Closed Air Guard X X X (with ohmmeter if the switch makes contact properly (verify con- If changing the touch panel did not fix the problem replace the oven user interface board. 1. If fault persists, replace the touch panel. Check if error...
... meat probe is connected to correct the situation, replace the oven relay board. The Lock Motor can . 3. If the door switch is found to the motor (unplug it is still there. Roast X X X X X X X Clean X X X X X X Locking X Locked Unlocking X Unlocked Light X Door Open X X Door Closed Air Guard X X X (with ohmmeter if the switch makes contact properly (verify con- If changing the touch panel did not fix the problem replace the oven user interface board. 1. If fault persists, replace the touch panel. Check if error...
Installation Instructions
Page 2
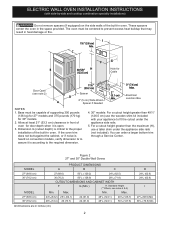
... cabinet, or if noise is heard on the side walls of supporting 300 pounds (136 kg) for 27" models and 375 pounds (170 kg) for 30" models. 2. These spacers center the oven in front of the built-in inches (cm). 2 D 243/4 (62.9) 243/4 (62.9) I 1½" (3.8 cm) Min. Dimension G (cutout depth) is open. 3. Max. Door Open (see notes 4 & 5) Min. You can order a larger bottom trim through a Service...
... cabinet, or if noise is heard on the side walls of supporting 300 pounds (136 kg) for 27" models and 375 pounds (170 kg) for 30" models. 2. These spacers center the oven in front of the built-in inches (cm). 2 D 243/4 (62.9) 243/4 (62.9) I 1½" (3.8 cm) Min. Dimension G (cutout depth) is open. 3. Max. Door Open (see notes 4 & 5) Min. You can order a larger bottom trim through a Service...
Installation Instructions
Page 3
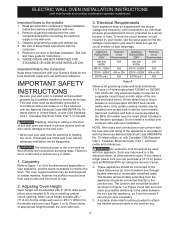
...: Wire sizes and connections must be moved if servicing is ever necessary. 3. IMPORTANT SAFETY INSTRUCTIONS • Be sure your wall oven for the double wall oven (see the serial plate to find the wattage consumption and refer to table A to the wall oven. 3. Adjusting Oven Height Oven height can be shut off while line connections are listed by -side wall oven installation. If you need a longer power cord you can also cause damage to the fused disconnect (or circuit breaker) box through...
...: Wire sizes and connections must be moved if servicing is ever necessary. 3. IMPORTANT SAFETY INSTRUCTIONS • Be sure your wall oven for the double wall oven (see the serial plate to find the wattage consumption and refer to table A to the wall oven. 3. Adjusting Oven Height Oven height can be shut off while line connections are listed by -side wall oven installation. If you need a longer power cord you can also cause damage to the fused disconnect (or circuit breaker) box through...

Installation Instructions
Page 10
... the power to the oven (Refer to your Use & Care Guide.) 3. Turn on the rack. The convection fan will continue to the Use and Care Guide for service phone numbers. 10 However, it is equipped with side-by-side and cooktop combination specialty installations) 18"(45.7 cm) Max. It may save you have a double cavity wall oven. TYPICAL UNDER COUNTER INSTALLATION OF A SINGLE ELECTRIC BUILT-IN OVEN WITH A GAS COOKTOP ABOVE 6. Refer to run . Broil- Leveling the Wall Oven 1. Each...
... the power to the oven (Refer to your Use & Care Guide.) 3. Turn on the rack. The convection fan will continue to the Use and Care Guide for service phone numbers. 10 However, it is equipped with side-by-side and cooktop combination specialty installations) 18"(45.7 cm) Max. It may save you have a double cavity wall oven. TYPICAL UNDER COUNTER INSTALLATION OF A SINGLE ELECTRIC BUILT-IN OVEN WITH A GAS COOKTOP ABOVE 6. Refer to run . Broil- Leveling the Wall Oven 1. Each...
Product Specifications Sheet
Page 2
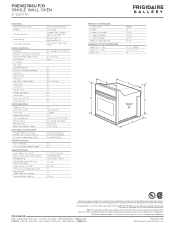
... Broil / Roast Oven Preheat My Favorite Slow Cook Bread Proof Button Effortless™ Temperature Probe Keep Warm Add-a-Minute Delay Start Self-Clean / Clean Options Steam Clean Delay Clean Kitchen Timer Timed Cook Option Control Lock Auto Oven Shut-Off Oven Lock-Out OVEN FEATURES Capacity (Cu. Ft.) Convection System Oven Light Hidden Bake Element Rack Configuration Baking System Broiling System Bake / Broil Element (Watts) OPTIONAL ACCESSORIES 3"-High Bottom Trim - PRODUCT DIMENSIONS A - Handle) D - Always consult local and national electric, gas and plumbing codes. Depth (Incl. Height...
... Broil / Roast Oven Preheat My Favorite Slow Cook Bread Proof Button Effortless™ Temperature Probe Keep Warm Add-a-Minute Delay Start Self-Clean / Clean Options Steam Clean Delay Clean Kitchen Timer Timed Cook Option Control Lock Auto Oven Shut-Off Oven Lock-Out OVEN FEATURES Capacity (Cu. Ft.) Convection System Oven Light Hidden Bake Element Rack Configuration Baking System Broiling System Bake / Broil Element (Watts) OPTIONAL ACCESSORIES 3"-High Bottom Trim - PRODUCT DIMENSIONS A - Handle) D - Always consult local and national electric, gas and plumbing codes. Depth (Incl. Height...


