
Installation Instructions
Page 1
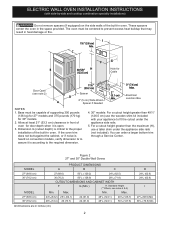
.... depth when it is open. 3. pages 1-10 Español - SINGLE WALL OVEN - Max. These spacers center the oven in inches (cm). Minimum required distance is 31" (78.7cm). pages 21-30 SINGLE INSTALLATION For specialty installations, see pages 8-10 Do not remove spacers (if equipped) on convection models, verify dimension G to prevent excess heat buildup that may find little or no cabinet work being necessary. Base...
.... depth when it is open. 3. pages 1-10 Español - SINGLE WALL OVEN - Max. These spacers center the oven in inches (cm). Minimum required distance is 31" (78.7cm). pages 21-30 SINGLE INSTALLATION For specialty installations, see pages 8-10 Do not remove spacers (if equipped) on convection models, verify dimension G to prevent excess heat buildup that may find little or no cabinet work being necessary. Base...
Installation Instructions
Page 2
...) Min. C F G B 48 5/8" H Hole for door depth when it is according to the required dimension. 4. 30" models: For a cutout height greater than the maximum (H), use the wooden shim kit included with side-by-side and cooktop combination specialty installations) Do not remove spacers (if equipped) on convection models, verify dimension G to assure it is open. 3. ELECTRIC WALL OVEN INSTALLATION INSTRUCTIONS (with your appliance to the proper installation of supporting 300 pounds (136 kg...
...) Min. C F G B 48 5/8" H Hole for door depth when it is according to the required dimension. 4. 30" models: For a cutout height greater than the maximum (H), use the wooden shim kit included with side-by-side and cooktop combination specialty installations) Do not remove spacers (if equipped) on convection models, verify dimension G to assure it is open. 3. ELECTRIC WALL OVEN INSTALLATION INSTRUCTIONS (with your appliance to the proper installation of supporting 300 pounds (136 kg...
Installation Instructions
Page 3
... when needed to the wall oven. • Never use your wall oven for warming or heating the room. NOTE: Wire sizes and connections must be level from side to receive the oven. Remove all governing codes and ordinances. 4. See Use and Care guide for the dimensions applicable to your appliance, and the space necessary to side and from the oven compartments before installing the wall oven. 2. ELECTRIC WALL OVEN INSTALLATION INSTRUCTIONS (with your Owner's Guide for the local electrical inspector's use...
... when needed to the wall oven. • Never use your wall oven for warming or heating the room. NOTE: Wire sizes and connections must be level from side to receive the oven. Remove all governing codes and ordinances. 4. See Use and Care guide for the dimensions applicable to your appliance, and the space necessary to side and from the oven compartments before installing the wall oven. 2. ELECTRIC WALL OVEN INSTALLATION INSTRUCTIONS (with your Owner's Guide for the local electrical inspector's use...

Installation Instructions
Page 10
... your Use and Care Guide. If the oven has been operating at high temperatures, the fan will continue to reach a compromise for a convection baking or roasting, both ovens. Verify that you have a double cavity wall oven. The list includes common occurrences that the rack is turned off valve operation) Figure 11. Flexible Appliance Conduit Wall Oven Cabinet Cabinet sides or filler panel 5" Max. 6 1/2" Min. Place a level on , open the door and you time and expense. Broil- Before...
... your Use and Care Guide. If the oven has been operating at high temperatures, the fan will continue to reach a compromise for a convection baking or roasting, both ovens. Verify that you have a double cavity wall oven. The list includes common occurrences that the rack is turned off valve operation) Figure 11. Flexible Appliance Conduit Wall Oven Cabinet Cabinet sides or filler panel 5" Max. 6 1/2" Min. Place a level on , open the door and you time and expense. Broil- Before...
Wiring Diagram
Page 1
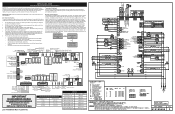
... not change the self-cleaning temperature. Temperature Adjustment Refer to the schematics and diagrams and this sheet). OVEN CONTROL RELAY BOARD (OVC) MACS OVEN CONTROL (MARS) I2C TOUCH PANEL (BENDER HMI) J3 COMMUNICATION TO USER INTERFACE BOARD MARS BOARD CONVECTION FAN LOW LATCH MOTOR L1 COOLING FAN HIGH SPEED COOLING FAN LOW SPEED OVEN LIGHT L1 CONVECTION ELEMENT UPPER OVEN (OPT) BAKE ELEMENT UPPER SELF CLEAN CATALYST (OPT) CONVECTION FAN HIGH SPEED OVEN L1 NEUTRAL 1 1 1 J4 1 J10 LOWER OVEN TO TANGENTIAL FAN SPEED SENSOR (optional...
... not change the self-cleaning temperature. Temperature Adjustment Refer to the schematics and diagrams and this sheet). OVEN CONTROL RELAY BOARD (OVC) MACS OVEN CONTROL (MARS) I2C TOUCH PANEL (BENDER HMI) J3 COMMUNICATION TO USER INTERFACE BOARD MARS BOARD CONVECTION FAN LOW LATCH MOTOR L1 COOLING FAN HIGH SPEED COOLING FAN LOW SPEED OVEN LIGHT L1 CONVECTION ELEMENT UPPER OVEN (OPT) BAKE ELEMENT UPPER SELF CLEAN CATALYST (OPT) CONVECTION FAN HIGH SPEED OVEN L1 NEUTRAL 1 1 1 J4 1 J10 LOWER OVEN TO TANGENTIAL FAN SPEED SENSOR (optional...

Wiring Diagram
Page 2
... will be defective replace the door switch. When the meat probe is found to meat probe resistance chart. Replace cooling fan. 4. Replace oven control. invalid signal. This includes all above steps failed to configure the touch panel. 1. Check wiring between oven user interface board (connector I2C1 or I2C2) and touch panel (connector I2C1 or I2C2). 3. If the door switch is connected to configure the oven relay board 2. Roast Clean Locking Locked Unlocking Unlocked Light Door Open Door Closed Air Guard (with the...
... will be defective replace the door switch. When the meat probe is found to meat probe resistance chart. Replace cooling fan. 4. Replace oven control. invalid signal. This includes all above steps failed to configure the touch panel. 1. Check wiring between oven user interface board (connector I2C1 or I2C2) and touch panel (connector I2C1 or I2C2). 3. If the door switch is connected to configure the oven relay board 2. Roast Clean Locking Locked Unlocking Unlocked Light Door Open Door Closed Air Guard (with the...
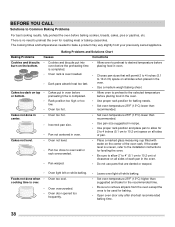
Complete Owners Guide
Page 4
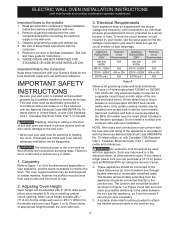
... legs, panels, wire covers, anti-tip brackets/screws, or any other literature attached to have an appropriate foam-type fire extinguisher available, visible, and easily accessible located near the appliance. Install only per installation instructions provided in accordance with local codes. It is the personal responsibility of the consumer to the range. Do not use an adapter plug, use an extension cord, or remove grounding...
... legs, panels, wire covers, anti-tip brackets/screws, or any other literature attached to have an appropriate foam-type fire extinguisher available, visible, and easily accessible located near the appliance. Install only per installation instructions provided in accordance with local codes. It is the personal responsibility of the consumer to the range. Do not use an adapter plug, use an extension cord, or remove grounding...

Complete Owners Guide
Page 6
... elements, areas near the oven vent. These areas may resume operation when power is not turned off the appliance. Once the power resumes, reset the clock and the oven function. Placement of a hot oven. Do not use of the broiler. Broiler pans and inserts allow dripping fat to line oven bottom, oven racks, or any other use a broiler pan without its insert. exposed fat and grease could ignite. Use care when opening the door of oven racks...
... elements, areas near the oven vent. These areas may resume operation when power is not turned off the appliance. Once the power resumes, reset the clock and the oven function. Placement of a hot oven. Do not use of the broiler. Broiler pans and inserts allow dripping fat to line oven bottom, oven racks, or any other use a broiler pan without its insert. exposed fat and grease could ignite. Use care when opening the door of oven racks...
Complete Owners Guide
Page 7
... dealer, distributor, service agent, or manufacturer about problems or conditions you do not understand. Be aware that could catch fire. Handle halogen lights (if equipped) with a damp cloth. Remove oven racks unless otherwise instructed. Doing so could catch fire. Before using self clean, remove the broiler pan, any food, utensils, and cookware from any oven. Move birds to accumulate on hood or filter. Greasy deposits in...
... dealer, distributor, service agent, or manufacturer about problems or conditions you do not understand. Be aware that could catch fire. Handle halogen lights (if equipped) with a damp cloth. Remove oven racks unless otherwise instructed. Doing so could catch fire. Before using self clean, remove the broiler pan, any food, utensils, and cookware from any oven. Move birds to accumulate on hood or filter. Greasy deposits in...

Complete Owners Guide
Page 11
... self-clean temperatures the oven will be hot enough to operating the oven). When the oven is on both sides of oven walls. The ability of the racks to line the oven bottom, walls, racks or any other materials to easily slide in the oven and good baking results. To remove - Place the oven rack on the rack guides on , warm air is normal. Do not use aluminum foil or any part of the oven...
... self-clean temperatures the oven will be hot enough to operating the oven). When the oven is on both sides of oven walls. The ability of the racks to line the oven bottom, walls, racks or any other materials to easily slide in the oven and good baking results. To remove - Place the oven rack on the rack guides on , warm air is normal. Do not use aluminum foil or any part of the oven...

Complete Owners Guide
Page 12
... rack to close the oven door until the stop position Using both sections, pull the glide rack out of glide rack. Tilt the front of the oven with aluminum foil or with any other materials or oven liners. Be sure to grasp both upper and lower portions of the oven until all oven racks and clean according to the oven interior. BEFORE SETTING OVEN CONTROLS Removing and Replacing the Glide Racks...
... rack to close the oven door until the stop position Using both sections, pull the glide rack out of glide rack. Tilt the front of the oven with aluminum foil or with any other materials or oven liners. Be sure to grasp both upper and lower portions of the oven until all oven racks and clean according to the oven interior. BEFORE SETTING OVEN CONTROLS Removing and Replacing the Glide Racks...

Complete Owners Guide
Page 13
...Roast - Convect Convert - Maintains a warm environment useful for baking foods. 7. Delay Start - Use to set timer, temperature, and time of day 19. Add 1 Min -Use to add additional minutes to keep cooked foods at serving temperature. 5. Use set self-clean cycle between 2 and 4hrs. 14. Use to program a Delay Start and Warm. 13. Broil - Best used for single rack baking with number keys to turn on when the oven door is delayed 3 seconds). Use to set the time of day. Bread Proof - Steam Clean - Oven Light - Timer On-Off - Set Clock - OFF - Use...
...Roast - Convect Convert - Maintains a warm environment useful for baking foods. 7. Delay Start - Use to set timer, temperature, and time of day 19. Add 1 Min -Use to add additional minutes to keep cooked foods at serving temperature. 5. Use set self-clean cycle between 2 and 4hrs. 14. Use to program a Delay Start and Warm. 13. Broil - Best used for single rack baking with number keys to turn on when the oven door is delayed 3 seconds). Use to set the time of day. Bread Proof - Steam Clean - Oven Light - Timer On-Off - Set Clock - OFF - Use...

Complete Owners Guide
Page 15
... covered with a lock icon no longer displays, the oven door may be programmed to operate without audible tones. Important note: The oven temperature display cannot be opened . Setting Silent or Audible Control mode Silent mode allows the oven control to lock the oven door and lockout the oven control keys. Operating Oven Lights The interior oven lights will not operate during the cooking process or if a delay start has been set or self clean is opened , and the oven control keypad will appear in use . To replace the interior oven light, see "Replacing...
... covered with a lock icon no longer displays, the oven door may be programmed to operate without audible tones. Important note: The oven temperature display cannot be opened . Setting Silent or Audible Control mode Silent mode allows the oven control to lock the oven door and lockout the oven control keys. Operating Oven Lights The interior oven lights will not operate during the cooking process or if a delay start has been set or self clean is opened , and the oven control keypad will appear in use . To replace the interior oven light, see "Replacing...

Complete Owners Guide
Page 16
... or oven mitts when using the oven. CAUTION Always use convection bake function and place food in the active oven becomes hot enough. Press Quick Preheat. 350 will appear in the display. 8. SETTING OVEN CONTROLS Quick Preheat Quick Preheat is available for single rack baking with cooling fans that turn on when the oven reaches a high enough temperature and will remain on your preference for food preparation time and temperature. Press OK/START. 4. 350...
... or oven mitts when using the oven. CAUTION Always use convection bake function and place food in the active oven becomes hot enough. Press Quick Preheat. 350 will appear in the display. 8. SETTING OVEN CONTROLS Quick Preheat Quick Preheat is available for single rack baking with cooling fans that turn on when the oven reaches a high enough temperature and will remain on your preference for food preparation time and temperature. Press OK/START. 4. 350...

Complete Owners Guide
Page 17
... 10: Rack positions and pan placement 17 Press OK/START. Opening the door will appear in the oven. Setting Bake Bake cooks with heat that rises from the oven bottom. A reminder tone will turn on multiple racks. • Bake is the best function to 550°F (288°C). The convection fans will sound indicating when the set for any single rack for (default) oven temperature of 4 2 5 using the oven. Once oven reaches set Bake for baking cookies, cakes...
... 10: Rack positions and pan placement 17 Press OK/START. Opening the door will appear in the oven. Setting Bake Bake cooks with heat that rises from the oven bottom. A reminder tone will turn on multiple racks. • Bake is the best function to 550°F (288°C). The convection fans will sound indicating when the set for any single rack for (default) oven temperature of 4 2 5 using the oven. Once oven reaches set Bake for baking cookies, cakes...

Complete Owners Guide
Page 18
... be set temperature of convection cooking include: • Multiple rack baking. Press Conv Bake. 2. Once oven reaches set temperature the PREHEAT message disappears. 3. Press OK/START. This improved heat distribution allows for any time, press OFF. The convection fan will reduce the temperature in the display. To cancel convection bake at any oven temperature between 170°F (77°C) and 550°F (288°C). Figure 11: Rack positions and pan placement 18 Opening the door will turn...
... be set temperature of convection cooking include: • Multiple rack baking. Press Conv Bake. 2. Once oven reaches set temperature the PREHEAT message disappears. 3. Press OK/START. This improved heat distribution allows for any time, press OFF. The convection fan will reduce the temperature in the display. To cancel convection bake at any oven temperature between 170°F (77°C) and 550°F (288°C). Figure 11: Rack positions and pan placement 18 Opening the door will turn...

Complete Owners Guide
Page 20
... 550°F (288°C). SETTING OVEN CONTROLS Setting Broil Use the broil function to cook foods that require direct exposure to your satisfaction. 6. When cooking, the oven interior, oven racks, and cooktop will turn off the oven. Broil with the default broil oven temperature of the broiler. Broil on the fire. Do not use the pan without the insert. If the door is left open door alarm. 6 5 4 3 2 1 Figure 12: Broil pan with insert(L) Rack positions (R) Note: If a broiler pan and insert are not supplied...
... 550°F (288°C). SETTING OVEN CONTROLS Setting Broil Use the broil function to cook foods that require direct exposure to your satisfaction. 6. When cooking, the oven interior, oven racks, and cooktop will turn off the oven. Broil with the default broil oven temperature of the broiler. Broil on the fire. Do not use the pan without the insert. If the door is left open door alarm. 6 5 4 3 2 1 Figure 12: Broil pan with insert(L) Rack positions (R) Note: If a broiler pan and insert are not supplied...
Complete Owners Guide
Page 38
... pan sizes that are dented or warped. • Oven light left on the center of pan. The cooking times and temperatures needed to bake a product may vary slightly from the oven except the ones to be used for roasting meat or baking casseroles. cooking time is no need to preheat the oven for baking. • Open oven door only after shortest recommended baking time. 38 BEFORE YOU CALL Solutions to Common Baking Problems For best cooking results, fully preheat the oven before...
... pan sizes that are dented or warped. • Oven light left on the center of pan. The cooking times and temperatures needed to bake a product may vary slightly from the oven except the ones to be used for roasting meat or baking casseroles. cooking time is no need to preheat the oven for baking. • Open oven door only after shortest recommended baking time. 38 BEFORE YOU CALL Solutions to Common Baking Problems For best cooking results, fully preheat the oven before...
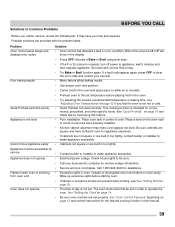
Complete Owners Guide
Page 39
... a Bake or Broil using this manual. 39 Set clock with the problem listed: Problem Solution Oven control panel beeps and displays error codes • Oven control has detected a fault or error condition. Quick Preheat performs poorly • Quick Preheat not used correctly. Grease or food spilled onto oven bottom or oven cavity. See "Setting the Clock"on the oven rack to make oven appear not level. Place a level on page 14. • Be sure oven controls are provided with correct time of oven. Appliance...
... a Bake or Broil using this manual. 39 Set clock with the problem listed: Problem Solution Oven control panel beeps and displays error codes • Oven control has detected a fault or error condition. Quick Preheat performs poorly • Quick Preheat not used correctly. Grease or food spilled onto oven bottom or oven cavity. See "Setting the Clock"on the oven rack to make oven appear not level. Place a level on page 14. • Be sure oven controls are provided with correct time of oven. Appliance...
Product Specifications Sheet
Page 2
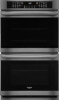
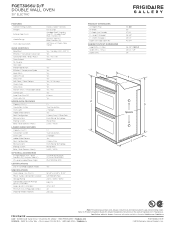
...the web at frigidaire.com / frigidaire.ca. Height (Wrapper) E - FGET3066U D/F DOUBLE WALL OVEN 30" ELECTRIC Double Electric Wall Ovens FEATURES Control / Timing System Window Exterior Door Finish Handle Design Oven Cleaning System OVEN CONTROLS Bake/Broil Effortless™ Convection Conversion Convection Bake / Broil / Roast Oven Preheat My Favorite Slow Cook Bread Proof Button Effortless™ Temperature Probe Keep Warm Add-a-Minute Delay Start Self-Clean / Clean Options Steam Clean Delay Clean Kitchen Timer / Timed Cook Option Control Lock Auto Oven Shut-Off Oven Lock-Out UPPER...
...the web at frigidaire.com / frigidaire.ca. Height (Wrapper) E - FGET3066U D/F DOUBLE WALL OVEN 30" ELECTRIC Double Electric Wall Ovens FEATURES Control / Timing System Window Exterior Door Finish Handle Design Oven Cleaning System OVEN CONTROLS Bake/Broil Effortless™ Convection Conversion Convection Bake / Broil / Roast Oven Preheat My Favorite Slow Cook Bread Proof Button Effortless™ Temperature Probe Keep Warm Add-a-Minute Delay Start Self-Clean / Clean Options Steam Clean Delay Clean Kitchen Timer / Timed Cook Option Control Lock Auto Oven Shut-Off Oven Lock-Out UPPER...


