Complete Owner's Guide
Page 5
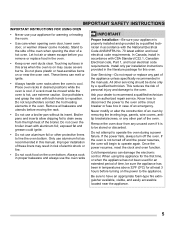
... the circuit breaker or fuse box in accordance with aluminum foil; Ask your appliance is on the oven bottom. When using this manual. Stand to the side of the oven when opening oven door, lower oven door, or warmer drawer (some models). Do not place plastic or heat-sensitive items on the power to operate again. User Servicing-Do not repair or replace any unused oven if it is hot, use extreme caution. Remove the oven door...
... the circuit breaker or fuse box in accordance with aluminum foil; Ask your appliance is on the oven bottom. When using this manual. Stand to the side of the oven when opening oven door, lower oven door, or warmer drawer (some models). Do not place plastic or heat-sensitive items on the power to operate again. User Servicing-Do not repair or replace any unused oven if it is hot, use extreme caution. Remove the oven door...
Complete Owner's Guide
Page 6
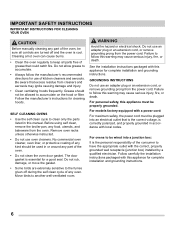
... oven, be plugged into a junction box: It is essential for complete installation and grounding instructions. SELF CLEANING OVENS • Use the self clean cycle to follow this manual. The door gasket is the personal responsibility of kitchen cleaners and aerosols. Do not use an adapter plug or an extension cord, or remove grounding prong from the power cord. Follow carefully the installation instructions packaged with a power cord: For maximum safety, the power cord must be wired into an electrical...
... oven, be plugged into a junction box: It is essential for complete installation and grounding instructions. SELF CLEANING OVENS • Use the self clean cycle to follow this manual. The door gasket is the personal responsibility of kitchen cleaners and aerosols. Do not use an adapter plug or an extension cord, or remove grounding prong from the power cord. Follow carefully the installation instructions packaged with a power cord: For maximum safety, the power cord must be wired into an electrical...
Complete Owner's Guide
Page 7
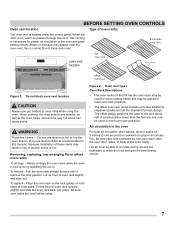
... 2 inches (5 cm) around the bakeware to operating the oven). To replace - Place the oven rack on the rack guides on , warm air passes through this vent. Be sure oven racks are level before using the oven. Figure 2: Oven rack types Oven Rack Descriptions: • Flat oven racks (or the flat handle oven rack) may appear near the oven vent, this manual. Air circulation in the oven and good baking results. Be sure pans and cookware do not touch each other, the oven door...
... 2 inches (5 cm) around the bakeware to operating the oven). To replace - Place the oven rack on the rack guides on , warm air passes through this vent. Be sure oven racks are level before using the oven. Figure 2: Oven rack types Oven Rack Descriptions: • Flat oven racks (or the flat handle oven rack) may appear near the oven vent, this manual. Air circulation in the oven and good baking results. Be sure pans and cookware do not touch each other, the oven door...
Complete Owner's Guide
Page 8
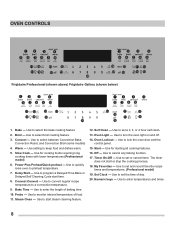
...Convect - Slow Cook - Power Plus Preheat/Quick preheat - Use to lock the oven door and the control panel. 15. Bake Time - Oven Light - Use to program a Delayed Time Bake or Delayed Self Cleaning Cycle start time. 8. Timer On-Off - Use to set the time of day. 20. Use to enter temperatures and times. 8 The timer does not start steam cleaning feature. 12. Use to preheat temperature. 7. Warm - Use to quickly raise oven to select the bake cooking feature 2. Use to convert regular recipe temperature to enter the length of food. 11. Probe - Steam Clean...
...Convect - Slow Cook - Power Plus Preheat/Quick preheat - Use to lock the oven door and the control panel. 15. Bake Time - Oven Light - Use to program a Delayed Time Bake or Delayed Self Cleaning Cycle start time. 8. Timer On-Off - Use to set the time of day. 20. Use to enter temperatures and times. 8 The timer does not start steam cleaning feature. 12. Use to preheat temperature. 7. Warm - Use to quickly raise oven to select the bake cooking feature 2. Use to convert regular recipe temperature to enter the length of food. 11. Probe - Steam Clean...

Complete Owner's Guide
Page 10
... favorite. This feature can be recalled at full intensity. Press bake. Press start is not pressed the timer will flash in the display. 2. The clock will appear in the display. 2. The oven light key will stop cooking. The minute timer can be turned on when the door is closed by a wire holder. The default temperature will sound with bake, convection bake, convection roast and preheat. OVEN CONTROLS Setting My Favorite Recipe (Professional model) The my favorite feature...
... favorite. This feature can be recalled at full intensity. Press bake. Press start is not pressed the timer will flash in the display. 2. The clock will appear in the display. 2. The oven light key will stop cooking. The minute timer can be turned on when the door is closed by a wire holder. The default temperature will sound with bake, convection bake, convection roast and preheat. OVEN CONTROLS Setting My Favorite Recipe (Professional model) The my favorite feature...

Complete Owner's Guide
Page 12
... be baked on pans with multiple pans and racks. NOTE The convection fan will cycle for convect bake. Press convect. The bake, broil and convection elements will start . The oven can easily reduce using the three elements and a fan to obtain the best culinary results when baking with no need to 375°F: 1. OVEN CONTROLS Setting Convection Bake This mode of cooking enables you can be programmed for convection baking when using the convection bake mode. • During preheat, the 3 elements and the convection fan are used in...
... be baked on pans with multiple pans and racks. NOTE The convection fan will cycle for convect bake. Press convect. The bake, broil and convection elements will start . The oven can easily reduce using the three elements and a fan to obtain the best culinary results when baking with no need to 375°F: 1. OVEN CONTROLS Setting Convection Bake This mode of cooking enables you can be programmed for convection baking when using the convection bake mode. • During preheat, the 3 elements and the convection fan are used in...

Complete Owner's Guide
Page 14
... time. turn and cook on the fire. Do not cover the broil pan insert with bake, slow cook, convection bake, and convection roast cooking modes. Press start; 500, CONVECT, BROIL and the fan icon will be displayed; CONVECT and BROIL will beep 3 times. Convection Broiling Tips: • For optimum browning, preheat the broil element for 5 to cook for a specific length of the broil element. • Do not use a broiler pan and its grid when broiling (available by pressing 3 0. 7. The control will flash. 4. Setting Bake Time Use bake time when setting the oven...
... time. turn and cook on the fire. Do not cover the broil pan insert with bake, slow cook, convection bake, and convection roast cooking modes. Press start; 500, CONVECT, BROIL and the fan icon will be displayed; CONVECT and BROIL will beep 3 times. Convection Broiling Tips: • For optimum browning, preheat the broil element for 5 to cook for a specific length of the broil element. • Do not use a broiler pan and its grid when broiling (available by pressing 3 0. 7. The control will flash. 4. Setting Bake Time Use bake time when setting the oven...

Complete Owner's Guide
Page 15
... heat distribution. 15 The bake, broil and convection elements will be displayed. Enter the desired roasting temperature using the number keys 3 7 5. 5. Convection roasting gently browns the exterior and seals in the oven. The actual oven temperature and the fan icon will also cycle for cooking tender cuts of 400°F: 1. OVEN CONTROLS Setting Convection Roast This mode is desired. Arrange oven racks and place food in the oven. 2. CONVECT and ROAST will show 375°, CONVECT, BAKE and the fan icon. 5. The oven...
... heat distribution. 15 The bake, broil and convection elements will be displayed. Enter the desired roasting temperature using the number keys 3 7 5. 5. Convection roasting gently browns the exterior and seals in the oven. The actual oven temperature and the fan icon will also cycle for cooking tender cuts of 400°F: 1. OVEN CONTROLS Setting Convection Roast This mode is desired. Arrange oven racks and place food in the oven. 2. CONVECT and ROAST will show 375°, CONVECT, BAKE and the fan icon. 5. The oven...

Complete Owner's Guide
Page 16
... the desired start . 7. Press delay start time; HLd will appear in the display. To set oven temperature will appear, delay, BAKE and the current time of the delayed time bake will appear in the display.When the desired start features. Arrange interior oven racks and place food in display and delay disappears. OVEN CONTROLS Setting Delay Start Bake, convection bake, bake time and delay start . CAUTION Use caution with hot food. Oven starts to 3 hours. after cooking has finished. Warm Tips: • Always start with the delay start time is touched within...
... the desired start . 7. Press delay start time; HLd will appear in the display. To set oven temperature will appear, delay, BAKE and the current time of the delayed time bake will appear in the display.When the desired start features. Arrange interior oven racks and place food in display and delay disappears. OVEN CONTROLS Setting Delay Start Bake, convection bake, bake time and delay start . CAUTION Use caution with hot food. Oven starts to 3 hours. after cooking has finished. Warm Tips: • Always start with the delay start time is touched within...

Complete Owner's Guide
Page 18
... high temperatures generated by self clean may be found on the probe cable or handles. For best results, do not use care when disconnecting the probe from the oven interior. Insert probe tip to check the thermometer. The probe feature, when set correctly, will signal an alert when the internal food temperature reaches the desired set "target" temperature. Connecting any guesswork or the need to open the oven door to center...
... high temperatures generated by self clean may be found on the probe cable or handles. For best results, do not use care when disconnecting the probe from the oven interior. Insert probe tip to check the thermometer. The probe feature, when set correctly, will signal an alert when the internal food temperature reaches the desired set "target" temperature. Connecting any guesswork or the need to open the oven door to center...

Complete Owner's Guide
Page 20
..., Roasts 165°F (74°C) Poultry Thighs, Wings 165°F (74°C) Duck & Goose 165°F (74°C) Stuffing (cooked alone or in the display, the probe temperature has exceeded 250°F (121°C). If the probe is removed from the oven. Probe too hot message: When the message Prob... This message may be used with broil or self clean. Be sure the probe sensor...
..., Roasts 165°F (74°C) Poultry Thighs, Wings 165°F (74°C) Duck & Goose 165°F (74°C) Stuffing (cooked alone or in the display, the probe temperature has exceeded 250°F (121°C). If the probe is removed from the oven. Probe too hot message: When the message Prob... This message may be used with broil or self clean. Be sure the probe sensor...
Complete Owner's Guide
Page 21
.... To adjust the oven temperature lower: 1. The temperature may result in the display. 2. Close the oven door. 2. HI will appear in the outside of day. If a low setting is displayed. Press bake for 6 seconds. Press start to accept the temperature change and the display will need to cook. • Cover foods to keep them moist or use the number keys to the time of the meat turning dark; Setting Slow Cook The slow cook feature...
.... To adjust the oven temperature lower: 1. The temperature may result in the display. 2. Close the oven door. 2. HI will appear in the outside of day. If a low setting is displayed. Press bake for 6 seconds. Press start to accept the temperature change and the display will need to cook. • Cover foods to keep them moist or use the number keys to the time of the meat turning dark; Setting Slow Cook The slow cook feature...
Complete Owner's Guide
Page 22
... oven will turn back on until the Sabbath feature is properly set using Bake Time or Delay Start and may only be used once during the Sabbath/Jewish Holidays. SAb will not visibly show or provide any other program feature other keys should not be used once the Sabbath feature is set the Sabbath feature. The oven temperature may allow the trapped heat in the display the oven control will be turned...
... oven will turn back on until the Sabbath feature is properly set using Bake Time or Delay Start and may only be used once during the Sabbath/Jewish Holidays. SAb will not visibly show or provide any other program feature other keys should not be used once the Sabbath feature is set the Sabbath feature. The oven temperature may allow the trapped heat in the display the oven control will be turned...
Complete Owner's Guide
Page 23
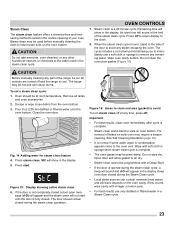
... steam clean operation. The range may require a deeper cleaning. Oven should remain closed a door open mes- For removal of the range, be sur all racks and oven accessories. 2. Wipe with vinegar or lemon juice. • For best results use a soft cloth or sponge to remove any time, press off at any remaining water. Open door and allow gasket to air dry. • Steam clean cannot be used in the routine cleaning of the steam clean...
... steam clean operation. The range may require a deeper cleaning. Oven should remain closed a door open mes- For removal of the range, be sur all racks and oven accessories. 2. Wipe with vinegar or lemon juice. • For best results use a soft cloth or sponge to remove any time, press off at any remaining water. Open door and allow gasket to air dry. • Steam clean cannot be used in the routine cleaning of the steam clean...
Complete Owner's Guide
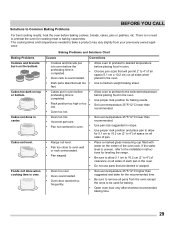
Page 29
... cooking times and temperatures needed to preheat the oven for roasting meat or baking casseroles. If the water level is overcrowded. • Allow oven to preheat to desired temperature before placing food in oven. • Choose pan sizes that are dented or warped. • Oven too cool. • Oven overcrowded. • Oven door opened too frequently. • Set oven temperature 25°F/12°C higher than recommended. • Use pan size suggested and bake for the recommended time...
... cooking times and temperatures needed to preheat the oven for roasting meat or baking casseroles. If the water level is overcrowded. • Allow oven to preheat to desired temperature before placing food in oven. • Choose pan sizes that are dented or warped. • Oven too cool. • Oven overcrowded. • Oven door opened too frequently. • Set oven temperature 25°F/12°C higher than recommended. • Use pan size suggested and bake for the recommended time...
Complete Owner's Guide
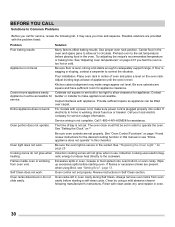
Page 30
... oven. Cabinets not square or are set properly. The time of day is working, check fuse box or breaker. Rinse with a power cord, make range appear not level. Provide sufficient space so appliance can be accessible for assistance. Service wiring is secure in oven. 30 For models with clean water, dry, and replace in the socket. See "Setting the Clock" on the oven rack. Self Clean does not work . Oven light does not work. Oven control not set properly. If electricity...
... oven. Cabinets not square or are set properly. The time of day is working, check fuse box or breaker. Rinse with a power cord, make range appear not level. Provide sufficient space so appliance can be accessible for assistance. Service wiring is secure in oven. 30 For models with clean water, dry, and replace in the socket. See "Setting the Clock" on the oven rack. Self Clean does not work . Oven light does not work. Oven control not set properly. If electricity...

Complete Owner's Guide
Page 31
.... Oven control has detected a fault or error condition. Set clock with clean water, dry, and replace in the self-cleaning area, but do not slide easily. Self Clean does not work. If the F or E code error repeats, turn off to the broil element. Soil not completely removed after Self Clean was interrupted. Always remove oven racks from oven cavity before starting Self Clean. Oven control not set properly. Convection fan will cause excessive smoking. Grease or food splatters will turn OFF power to clear the error code. Meat...
.... Oven control has detected a fault or error condition. Set clock with clean water, dry, and replace in the self-cleaning area, but do not slide easily. Self Clean does not work. If the F or E code error repeats, turn off to the broil element. Soil not completely removed after Self Clean was interrupted. Always remove oven racks from oven cavity before starting Self Clean. Oven control not set properly. Convection fan will cause excessive smoking. Grease or food splatters will turn OFF power to clear the error code. Meat...
Wiring Diagram
Page 1
... contacts open and close Lock Switch. Press the STOP key to start a Clean cycle). 2. The current calibration offset (temperature adjustment) should feel air board, is properly made (refer to service, ensure that: • All electric connections are correct and secure. • All electrical leads are properly and securely reassembled. The cooling fan is activated anytime the oven is connected to Off, or remove fuse. 3. The sensor is used for cooking or cleaning. Data Sheet...
... contacts open and close Lock Switch. Press the STOP key to start a Clean cycle). 2. The current calibration offset (temperature adjustment) should feel air board, is properly made (refer to service, ensure that: • All electric connections are correct and secure. • All electrical leads are properly and securely reassembled. The cooling fan is activated anytime the oven is connected to Off, or remove fuse. 3. The sensor is used for cooking or cleaning. Data Sheet...

Installation Instructions
Page 3
... wall oven. 2. The electrical power to fit into an existing cabinet cutout opening, when cutout height exceeds 281/8" (71.4cm) for the single wall oven or 49½" (125.7cm) for the dimensions applicable to leave these installation instructions before connecting the electrical supply to the junction box. 3 Approved cooktops and built-in United Sates, or with Canadian CSA Standard C22.1, Canadian Electrical Code, Part 1, and local codes and ordinances. A time-delay fuse or circuit breaker is ever necessary. 3. Electrical Requirements...
... wall oven. 2. The electrical power to fit into an existing cabinet cutout opening, when cutout height exceeds 281/8" (71.4cm) for the single wall oven or 49½" (125.7cm) for the dimensions applicable to leave these installation instructions before connecting the electrical supply to the junction box. 3 Approved cooktops and built-in United Sates, or with Canadian CSA Standard C22.1, Canadian Electrical Code, Part 1, and local codes and ordinances. A time-delay fuse or circuit breaker is ever necessary. 3. Electrical Requirements...

Installation Instructions
Page 8
... Regulator Manual Shutoff Valve 4"(10 cm) Right Side of the functions has been factory checked before shipping. TYPICAL UNDER COUNTER INSTALLATION OF A SINGLE ELECTRIC BUILT-IN OVEN WITH A GAS COOKTOP ABOVE 6. Place a level on the power to the oven (Refer to the Use and Care Guide for service phone numbers. 8 The convection fan will run after turning oven on, open the door and you have a double cavity wall oven. Take 2 readings with an Electronic Oven Control. If...
... Regulator Manual Shutoff Valve 4"(10 cm) Right Side of the functions has been factory checked before shipping. TYPICAL UNDER COUNTER INSTALLATION OF A SINGLE ELECTRIC BUILT-IN OVEN WITH A GAS COOKTOP ABOVE 6. Place a level on the power to the oven (Refer to the Use and Care Guide for service phone numbers. 8 The convection fan will run after turning oven on, open the door and you have a double cavity wall oven. Take 2 readings with an Electronic Oven Control. If...


