
Installation Instructions (All Languages)
Page 1
... rev A Provide adequate clearances between the range and adjacent combustible surfaces. 2. Dimensions that are certain safety precautions you should be under cooktop. Contact surface must be solid and level. Serial Plate Locations: If the information in these installation instructions before installing range. • Remove all packing material from the oven compartments before connecting the gas & electrical supply to the range. • Observe all governing codes and ordinances. • Be sure...
... rev A Provide adequate clearances between the range and adjacent combustible surfaces. 2. Dimensions that are certain safety precautions you should be under cooktop. Contact surface must be solid and level. Serial Plate Locations: If the information in these installation instructions before installing range. • Remove all packing material from the oven compartments before connecting the gas & electrical supply to the range. • Observe all governing codes and ordinances. • Be sure...

Installation Instructions (All Languages)
Page 2
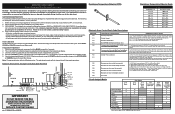
... floor. ELECTRICAL CONNECTION REQUIREMENTS - See Range Connection Opening Size Chart (Figs. 9 & 10) for hard wiring) NORMAL INSTALLATION STEPS 3/16" pilot hole 1-3/4" deep. ANTI-TIP BRACKET INSTALLATION INSTRUCTIONS - Visually check that screws completely penetrate dry wall and are provided for installation in wood or cement fastened to masonry or ceramic floors, drill a Fig. 7 2. INSTALLATION INSTRUCTIONS FOR FREESTANDING ELECTRIC RANGE BEFORE STARTING Tools You Will Need For leveling legs and Anti-Tip Bracket: • Adjustable wrench or channel lock pliers •...
... floor. ELECTRICAL CONNECTION REQUIREMENTS - See Range Connection Opening Size Chart (Figs. 9 & 10) for hard wiring) NORMAL INSTALLATION STEPS 3/16" pilot hole 1-3/4" deep. ANTI-TIP BRACKET INSTALLATION INSTRUCTIONS - Visually check that screws completely penetrate dry wall and are provided for installation in wood or cement fastened to masonry or ceramic floors, drill a Fig. 7 2. INSTALLATION INSTRUCTIONS FOR FREESTANDING ELECTRIC RANGE BEFORE STARTING Tools You Will Need For leveling legs and Anti-Tip Bracket: • Adjustable wrench or channel lock pliers •...

Installation Instructions (All Languages)
Page 3
... MAY OCCUR IF AN INCORRECT SIZE RANGE CORD KIT IS USED, THE INSTALLATION INSTRUCTIONS ARE NOT FOLLOWED OR STRAIN RELIEF BRACKET IS DISCARDED. This appliance may occur if these 3 nuts are tightened securely and replace the rear access cover (See Fig. 9). Cord must have strain relief properly installed. knockouts refer to the terminal block. INSTALLATION INSTRUCTIONS FOR FREESTANDING ELECTRIC RANGE 2b. for Line 1, Line 2 and Neutral and tighten securely to...
... MAY OCCUR IF AN INCORRECT SIZE RANGE CORD KIT IS USED, THE INSTALLATION INSTRUCTIONS ARE NOT FOLLOWED OR STRAIN RELIEF BRACKET IS DISCARDED. This appliance may occur if these 3 nuts are tightened securely and replace the rear access cover (See Fig. 9). Cord must have strain relief properly installed. knockouts refer to the terminal block. INSTALLATION INSTRUCTIONS FOR FREESTANDING ELECTRIC RANGE 2b. for Line 1, Line 2 and Neutral and tighten securely to...

Installation Instructions (All Languages)
Page 4
...Instructions (3-Wire Connections only): A ground strap is removed for Line 1, Line 2 and Neutral and tighten securely to the range chassis. INSTALLATION INSTRUCTIONS FOR FREESTANDING ELECTRIC RANGE or 4B. CAREFULLY SLIDE RANGE INTO FINAL LOCATION. Be sure to provide all 3 wire leads to an adequate ground source. 4c. 3 & 4-WIRE PERMANENT WIRE CONNECTIONS. 3 - Always use 10 ga. Wire Permanent Connection - Before wiring the range, review the suggested power source location drawings in ./lbs. POWER CORD CONNECTIONS (3-Wire Connection Instructions . Be sure to a 4-Wire electrical...
...Instructions (3-Wire Connections only): A ground strap is removed for Line 1, Line 2 and Neutral and tighten securely to the range chassis. INSTALLATION INSTRUCTIONS FOR FREESTANDING ELECTRIC RANGE or 4B. CAREFULLY SLIDE RANGE INTO FINAL LOCATION. Be sure to provide all 3 wire leads to an adequate ground source. 4c. 3 & 4-WIRE PERMANENT WIRE CONNECTIONS. 3 - Always use 10 ga. Wire Permanent Connection - Before wiring the range, review the suggested power source location drawings in ./lbs. POWER CORD CONNECTIONS (3-Wire Connection Instructions . Be sure to a 4-Wire electrical...
Complete Owner's Guide (English)
Page 2
... choosing Frigidare. Serial number All rights reserved. Serial plate location Serial plate location: open storage drawer (some models) or remove lower front panel (some models 21 Setting convect (convection) convert 21 Setting broil 22 Setting pizza feature 23 Setting chicken nuggets feature 23 Setting keep warm 23 Adjusting oven temperature 24 Operating oven light 24 Setting the Sabbath mode feature 25-26 Self-Cleaning 27-28 Care & Cleaning 29-32 Cleaning recommendations table 29 Cooktop maintenance and cleaning 30-31 Replacing the oven light 31 Removing & replacing oven door...
... choosing Frigidare. Serial number All rights reserved. Serial plate location Serial plate location: open storage drawer (some models) or remove lower front panel (some models 21 Setting convect (convection) convert 21 Setting broil 22 Setting pizza feature 23 Setting chicken nuggets feature 23 Setting keep warm 23 Adjusting oven temperature 24 Operating oven light 24 Setting the Sabbath mode feature 25-26 Self-Cleaning 27-28 Care & Cleaning 29-32 Cleaning recommendations table 29 Cooktop maintenance and cleaning 30-31 Replacing the oven light 31 Removing & replacing oven door...
Complete Owner's Guide (English)
Page 3
... leveling legs, panels, wire covers, anti-tip brackets/screws, or any other part of a range by a qualified technician. tip bracket installation. •Never modify or alter the construction of the range. • Remove the oven door from the range. Do not use your dealer to be stored or discarded. Do not attempt to the range at the circuit breaker or fuse box in minor or moderate injury. Safety items throughout this manual...
... leveling legs, panels, wire covers, anti-tip brackets/screws, or any other part of a range by a qualified technician. tip bracket installation. •Never modify or alter the construction of the range. • Remove the oven door from the range. Do not use your dealer to be stored or discarded. Do not attempt to the range at the circuit breaker or fuse box in minor or moderate injury. Safety items throughout this manual...
Complete Owner's Guide (English)
Page 4
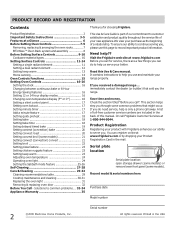
... INSTRUCTIONS WARNING • Storage in or on appliance-flammable materials should not be stored in an oven, warmer drawer, near the range. • DO NOT LEAVE CHILDREN ALONE -children should not be left rear surface element if your model is located below the backguard for models equipped with ceramic-glass cook tops. During and after use the broiler pan without its insert allow dripping fat to operate the range during a power...
... INSTRUCTIONS WARNING • Storage in or on appliance-flammable materials should not be stored in an oven, warmer drawer, near the range. • DO NOT LEAVE CHILDREN ALONE -children should not be left rear surface element if your model is located below the backguard for models equipped with ceramic-glass cook tops. During and after use the broiler pan without its insert allow dripping fat to operate the range during a power...

Complete Owner's Guide (English)
Page 5
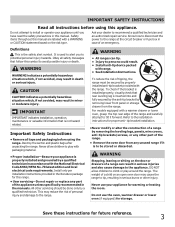
... leave surface elements unattended at high heat settings-Boilovers cause smoking and greasy spillovers that may ignite, or a pan that could catch fire. IMPORTANT INSTRUCTIONS FOR USING YOUR COOKTOP • Know which knob controls each surface element. The use of potential exposure to cause cancer, birth defects or other glazed utensils are suitable for use . • When flaming foods under a ventilating hood, turn the fan on. Heating elements clean themselves during the self-cleaning...
... leave surface elements unattended at high heat settings-Boilovers cause smoking and greasy spillovers that may ignite, or a pan that could catch fire. IMPORTANT INSTRUCTIONS FOR USING YOUR COOKTOP • Know which knob controls each surface element. The use of potential exposure to cause cancer, birth defects or other glazed utensils are suitable for use . • When flaming foods under a ventilating hood, turn the fan on. Heating elements clean themselves during the self-cleaning...
Complete Owner's Guide (English)
Page 8
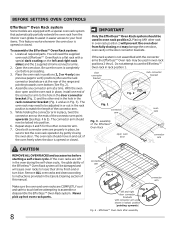
... finish and or turn blue. IMPORTANT Only the Effortless™ Oven Rack system should be locked into position. 6. Do not attempt to instructions provided in the Care & Cleaning section of this manual. Effortless™ Oven Rack after assembly With the oven door open oven door oven rack connector arm CAUTION REMOVE ALL OVEN RACKS and accessories before proceeding. 3. Once both connector arms are left in the oven during the self-clean cycle, the...
... finish and or turn blue. IMPORTANT Only the Effortless™ Oven Rack system should be locked into position. 6. Do not attempt to instructions provided in the Care & Cleaning section of this manual. Effortless™ Oven Rack after assembly With the oven door open oven door oven rack connector arm CAUTION REMOVE ALL OVEN RACKS and accessories before proceeding. 3. Once both connector arms are left in the oven during the self-clean cycle, the...
Complete Owner's Guide (English)
Page 9
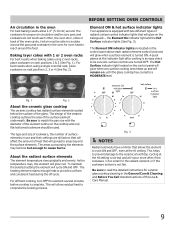
... baking cakes using a single oven flat rack, place cookware on rack positions 2 & 5 (See Fig. 1). the Element On indicator light and the Hot Surface indicator lights (See Fig. 3). Be sure to match the pan size with two different types of this indicator light after cooking is an easy check to read the detailed instructions for ceramic glass cooktop cleaning in the General Care & Cleaning and Before You Call checklist sections of radiant surface control indicator lights that will glow when a surface element...
... baking cakes using a single oven flat rack, place cookware on rack positions 2 & 5 (See Fig. 1). the Element On indicator light and the Hot Surface indicator lights (See Fig. 3). Be sure to match the pan size with two different types of this indicator light after cooking is an easy check to read the detailed instructions for ceramic glass cooktop cleaning in the General Care & Cleaning and Before You Call checklist sections of radiant surface control indicator lights that will glow when a surface element...
Complete Owner's Guide (English)
Page 12
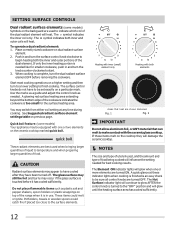
... is complete, turn the surface control knob clockwise to indicate which coil of the dual radiant element will influence the setting needed . Start most cooking operations on the backguard are shown darkened. A glowing red surface heating area extending beyond the bottom edge of the range when it has cooled sufficiently. The symbol indicates the inner coil only. SETTING SURFACE CONTROLS Dual radiant surface elements (some models) Your appliance may be equipped with the ceramic glass cooktop.
... is complete, turn the surface control knob clockwise to indicate which coil of the dual radiant element will influence the setting needed . Start most cooking operations on the backguard are shown darkened. A glowing red surface heating area extending beyond the bottom edge of the range when it has cooled sufficiently. The symbol indicates the inner coil only. SETTING SURFACE CONTROLS Dual radiant surface elements (some models) Your appliance may be equipped with the ceramic glass cooktop.
Complete Owner's Guide (English)
Page 13
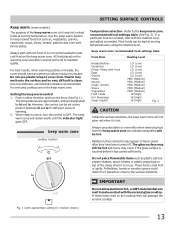
... cookware recommended for different levels of warming. 2. cooktop location SETTING SURFACE CONTROLS Temperature selection - Radiant surface elements may occur if the glass surface is touched before it is in either direction and turn the control to OFF. Do not place flammable items such as cookware and plates will damage the ceramic cooktop. Use the keep warm feature to keep cooked foods hot such as needed. However, the control can be hot. Most foods can...
... cookware recommended for different levels of warming. 2. cooktop location SETTING SURFACE CONTROLS Temperature selection - Radiant surface elements may occur if the glass surface is touched before it is in either direction and turn the control to OFF. Do not place flammable items such as cookware and plates will damage the ceramic cooktop. Use the keep warm feature to keep cooked foods hot such as needed. However, the control can be hot. Most foods can...
Complete Owner's Guide (English)
Page 15
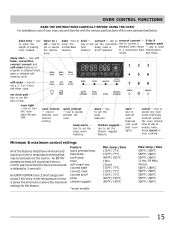
... off - Use to turn the oven light ON and OFF. bake temp. broil temp. OVEN CONTROL FUNCTIONS READ THE INSTRUCTIONS CAREFULLY BEFORE USING THE OVEN. oven light -Use to set the pizza features. keep warm features. Use to a convection bake temperature recipe. Feature quick preheat temp. bake time - to set or cancel the minute timer. TIMED CHICKEN NUGGETS PIZZA DELAY TIMER DOOR CONVECT BAKE COOKTOP ROAST BROIL self-clean - Use to program a delayed timed bake or delayed selfcleaning cycle. cancel - timer self-clean time convect bake convect roast convect broil...
... off - Use to turn the oven light ON and OFF. bake temp. broil temp. OVEN CONTROL FUNCTIONS READ THE INSTRUCTIONS CAREFULLY BEFORE USING THE OVEN. oven light -Use to set the pizza features. keep warm features. Use to a convection bake temperature recipe. Feature quick preheat temp. bake time - to set or cancel the minute timer. TIMED CHICKEN NUGGETS PIZZA DELAY TIMER DOOR CONVECT BAKE COOKTOP ROAST BROIL self-clean - Use to program a delayed timed bake or delayed selfcleaning cycle. cancel - timer self-clean time convect bake convect roast convect broil...
Complete Owner's Guide (English)
Page 21
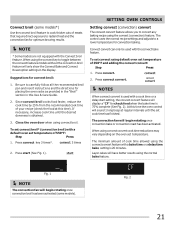
... (some models*) Use the convect broil feature to cook thicker cuts of meats that require direct exposure to carefully follow all the recommended broil pan and insert instructions and the directions for placing the oven racks as provided in the "Broil" section in the display. Be sure to radiant heat and the convection fan for convection baking. SETTING OVEN CONTROLS Setting convect (convection) convert The convect convert feature allows you to a lower temperature for optimum browing results. Suggestions for check food when the bake time is...
... (some models*) Use the convect broil feature to cook thicker cuts of meats that require direct exposure to carefully follow all the recommended broil pan and insert instructions and the directions for placing the oven racks as provided in the "Broil" section in the display. Be sure to radiant heat and the convection fan for convection baking. SETTING OVEN CONTROLS Setting convect (convection) convert The convect convert feature allows you to a lower temperature for optimum browing results. Suggestions for check food when the bake time is...
Complete Owner's Guide (English)
Page 23
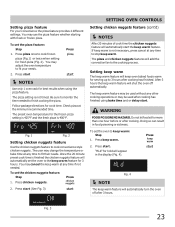
... feature will shut the oven off after cooking has finished. Follow package directions for fresh pizza (Fig. 2). Check pizza at any other cooking operations or may adjust the oven temperature to 3 hours after 3 hours. Setting keep warm The keep warm feature will automatically start the keep warm. Press keep warm feature. "HLd" for best results when using bake time and or delay start (See Fig. 3) SETTING OVEN CONTROLS Setting chicken nuggets feature (cont'd) NOTES After 20 minutes of cook time...
... feature will shut the oven off after cooking has finished. Follow package directions for fresh pizza (Fig. 2). Check pizza at any other cooking operations or may adjust the oven temperature to 3 hours after 3 hours. Setting keep warm The keep warm feature will automatically start the keep warm. Press keep warm feature. "HLd" for best results when using bake time and or delay start (See Fig. 3) SETTING OVEN CONTROLS Setting chicken nuggets feature (cont'd) NOTES After 20 minutes of cook time...

Complete Owner's Guide (English)
Page 29
...'s instructions. If necessary, cover difficult spots with an ammonia-soaked paper towel for a good seal. Use soap & water to OFF and remove the control knobs. Do not clean the oven door gasket. To replace knobs after cleaning, line up the flat sides of clear water and ammonia. then push the knob into place. Rinse with a 1:1 solution of both the knob and the shaft; On self-cleaning models the oven door...
...'s instructions. If necessary, cover difficult spots with an ammonia-soaked paper towel for a good seal. Use soap & water to OFF and remove the control knobs. Do not clean the oven door gasket. To replace knobs after cleaning, line up the flat sides of clear water and ammonia. then push the knob into place. Rinse with a 1:1 solution of both the knob and the shaft; On self-cleaning models the oven door...
Complete Owner's Guide (English)
Page 33
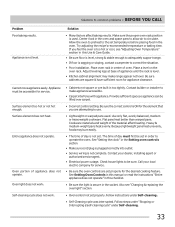
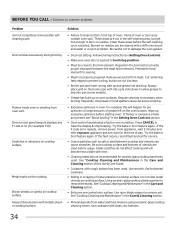
... service. Flat pans heat better than warped pans. Call your dealer, installing agent or authorized service agent. • Electrical power outage. See Setting Oven Controls in this manual or read the instructions "Entire appliance does not operate" in this Use & Care Guide. • Be sure floor is level, strong & stable enough to adequately support range. • If floor is secure in the oven and space pans to allow air to circulate. Also see "Adjusting Oven Temperature...
... service. Flat pans heat better than warped pans. Call your dealer, installing agent or authorized service agent. • Electrical power outage. See Setting Oven Controls in this manual or read the instructions "Entire appliance does not operate" in this Use & Care Guide. • Be sure floor is level, strong & stable enough to adequately support range. • If floor is secure in the oven and space pans to allow air to circulate. Also see "Adjusting Oven Temperature...
Complete Owner's Guide (English)
Page 34
... to drip into lean. • Broiler pan and insert wrong side up excessive spillovers before starting oven. Preheat the broil element for ceramic-glass cooktop have been used . Remove excess fat from appliance, wait 5 minutes and then repower appliance and set clock for service. • Coarse particles such as salt or sand between the meat & the element. Regular cleaning is started. Do not slide metal utensils on cooktop surface. Oven control panel beeps & displays any F code error (for...
... to drip into lean. • Broiler pan and insert wrong side up excessive spillovers before starting oven. Preheat the broil element for ceramic-glass cooktop have been used . Remove excess fat from appliance, wait 5 minutes and then repower appliance and set clock for service. • Coarse particles such as salt or sand between the meat & the element. Regular cleaning is started. Do not slide metal utensils on cooktop surface. Oven control panel beeps & displays any F code error (for...
Wiring Diagram (All Languages)
Page 1
.... Never interfere with the proper installation of such practices. 1. Use the number key pads (0-9) to 35°F). 4. Shorted Keypad. Bad Micro Identification. Check for shorted Sensor Probe harness between EOC & ESEC system (for electric range models ONLY) Communication failure with Mini Oven Control Board. (for binding of the adjustment to end Bake mode. Temperature Adjustment 1. F92 Maximum oven door open , replace Switch. if open time exceeded. 5. (F90)Lock Motor continuosly runs - Press...
.... Never interfere with the proper installation of such practices. 1. Use the number key pads (0-9) to 35°F). 4. Shorted Keypad. Bad Micro Identification. Check for shorted Sensor Probe harness between EOC & ESEC system (for electric range models ONLY) Communication failure with Mini Oven Control Board. (for binding of the adjustment to end Bake mode. Temperature Adjustment 1. F92 Maximum oven door open , replace Switch. if open time exceeded. 5. (F90)Lock Motor continuosly runs - Press...
Product Specifications Sheet (English)
Page 2
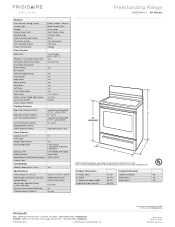
...Features Oven Control / Timing System Surface Type Window Exterior Door Finish Handle Design Exterior Finish (Side Panels) Convection System Oven Cleaning System Drawer Functionality Express-Select® Controls 30" Electric Freestanding Ranges Black Ceramic Glass Extra-Large Frigidaire Baseline Real Stainless Steel Stainless Steel Black True Convection Self Clean Storage Oven Controls Bake / Broil Effortless™ Convection Conversion Convection Bake / Broil / Roast Quick Bake Convection Quick Preheat My Favorite Chicken Nugget Button Pizza Button Keep Warm Add-a-Minute Delay Bake Self...
...Features Oven Control / Timing System Surface Type Window Exterior Door Finish Handle Design Exterior Finish (Side Panels) Convection System Oven Cleaning System Drawer Functionality Express-Select® Controls 30" Electric Freestanding Ranges Black Ceramic Glass Extra-Large Frigidaire Baseline Real Stainless Steel Stainless Steel Black True Convection Self Clean Storage Oven Controls Bake / Broil Effortless™ Convection Conversion Convection Bake / Broil / Roast Quick Bake Convection Quick Preheat My Favorite Chicken Nugget Button Pizza Button Keep Warm Add-a-Minute Delay Bake Self...


