
Installation Instructions (All Languages)
Page 1
... elements should follow. Clearances and Dimensions 1. IF CABINET STORAGE IS TO BE PROVIDED, THE RISK CAN BE REDUCED BY INSTALLING A RANGE HOOD THAT PROJECTS HORIZONTALLY A MINIMUM OF 5" BEYOND THE BOTTOM OF THE CABINETS. Important Notes to the Installer • Read all... reference. • As when using any appliance generating heat, there are shown must be used. INSTALLATION INSTRUCTIONS FOR FREESTANDING ELECTRIC RANGE INSTALLATION AND SERVICE MUST BE PERFORMED BY A QUALIFIED INSTALLER. Dimensions that are certain safety precautions you should be installed. TO ELIMINATE...
... elements should follow. Clearances and Dimensions 1. IF CABINET STORAGE IS TO BE PROVIDED, THE RISK CAN BE REDUCED BY INSTALLING A RANGE HOOD THAT PROJECTS HORIZONTALLY A MINIMUM OF 5" BEYOND THE BOTTOM OF THE CABINETS. Important Notes to the Installer • Read all... reference. • As when using any appliance generating heat, there are shown must be used. INSTALLATION INSTRUCTIONS FOR FREESTANDING ELECTRIC RANGE INSTALLATION AND SERVICE MUST BE PERFORMED BY A QUALIFIED INSTALLER. Dimensions that are certain safety precautions you should be installed. TO ELIMINATE...

Installation Instructions (All Languages)
Page 2
...1c. Visually check that screws completely penetrate dry wall and are to tip over if excessive weight is required between the bottom of the range and carefully attempt to either closed loop or open door or if a child climbs upon it forward. 1. and Local Electrical Code requirements...is to be mounted to the floor. Drill a 1/8" pilot hole where screws are secured in wood or metal. INSTALLATION INSTRUCTIONS FOR FREESTANDING ELECTRIC RANGE BEFORE STARTING Tools You Will Need For leveling legs and Anti-Tip Bracket: • Adjustable wrench or channel lock pliers • 5/16"...
...1c. Visually check that screws completely penetrate dry wall and are to tip over if excessive weight is required between the bottom of the range and carefully attempt to either closed loop or open door or if a child climbs upon it forward. 1. and Local Electrical Code requirements...is to be mounted to the floor. Drill a 1/8" pilot hole where screws are secured in wood or metal. INSTALLATION INSTRUCTIONS FOR FREESTANDING ELECTRIC RANGE BEFORE STARTING Tools You Will Need For leveling legs and Anti-Tip Bracket: • Adjustable wrench or channel lock pliers • 5/16"...

Installation Instructions (All Languages)
Page 3
... connecting to the terminal block. Cord must be accessible. 3 & 4 - for cord kit ampere rating information. To use with ranges shall be connected by means of a power supply cord. Follow the manufacturer's installation instructions supplied with 1-3/8" dia. Electrical failure or ...loss of the appliance. INSTALLATION INSTRUCTIONS FOR FREESTANDING ELECTRIC RANGE 2b. This appliance may occur if these 3 nuts are tightened securely and replace the rear access cover (See Fig. 9). ...
... connecting to the terminal block. Cord must be accessible. 3 & 4 - for cord kit ampere rating information. To use with ranges shall be connected by means of a power supply cord. Follow the manufacturer's installation instructions supplied with 1-3/8" dia. Electrical failure or ...loss of the appliance. INSTALLATION INSTRUCTIONS FOR FREESTANDING ELECTRIC RANGE 2b. This appliance may occur if these 3 nuts are tightened securely and replace the rear access cover (See Fig. 9). ...

Installation Instructions (All Languages)
Page 4
...5. 3. (4-Wire Permanent Connection ONLY) Disconnect the ground strap. Be sure to provide all connections are loosened or removed. 3. CAREFULLY SLIDE RANGE INTO FINAL LOCATION. wire or larger. POWER CORD CONNECTIONS (3-Wire Connection Instructions . Refer to the terminal block (See Fig. 13). Insert...Grounding Instructions (3-Wire Connections only): A ground strap is removed for Line 1, Line 2, Neutral (also strip ground wire on this range which secure the range wiring to the terminal block. NOTE: If the ground strap is installed on 4-Wire Connections). follow Steps 1,2 & 5 below...
...5. 3. (4-Wire Permanent Connection ONLY) Disconnect the ground strap. Be sure to provide all connections are loosened or removed. 3. CAREFULLY SLIDE RANGE INTO FINAL LOCATION. wire or larger. POWER CORD CONNECTIONS (3-Wire Connection Instructions . Refer to the terminal block (See Fig. 13). Insert...Grounding Instructions (3-Wire Connections only): A ground strap is removed for Line 1, Line 2, Neutral (also strip ground wire on this range which secure the range wiring to the terminal block. NOTE: If the ground strap is installed on 4-Wire Connections). follow Steps 1,2 & 5 below...

Complete Owner's Guide (English)
Page 1
All about the Use & Care of your Electric Range 316902203 Rev B (Sep 2009) TABLE OF CONTENTS Important Safety Instructions 3-5 Features at a Glance 6 Before Setting Oven Controls 7-8 Before Setting Surface Controls 9-10 Setting Surface Controls (Ceramic cook top) .. 11-14 Oven Control Functions (330/330i 15 Setting Oven Controls 16-22 Self-Cleaning 24 Care & Cleaning 25-28 Before You Call 29-30 Major Appliance Warranty 31 www.frigidaire.com USA 1-800-944-9044 www.frigidaire.ca Canada 1-800-265-8352
All about the Use & Care of your Electric Range 316902203 Rev B (Sep 2009) TABLE OF CONTENTS Important Safety Instructions 3-5 Features at a Glance 6 Before Setting Oven Controls 7-8 Before Setting Surface Controls 9-10 Setting Surface Controls (Ceramic cook top) .. 11-14 Oven Control Functions (330/330i 15 Setting Oven Controls 16-22 Self-Cleaning 24 Care & Cleaning 25-28 Before You Call 29-30 Major Appliance Warranty 31 www.frigidaire.com USA 1-800-944-9044 www.frigidaire.ca Canada 1-800-265-8352

Complete Owner's Guide (English)
Page 2
... of a relationship. Product Registration Registering your product with Frigidaire enhances our ability to serve you the range. Purchase date Model number Serial number All rights reserved. Visit the Frigidaire web site at www.frigidaire.com Before you call away. This section helps step you...some common problems that sold you . Check the section titled "Before you received a damaged range ... Save time and money. Printed in the mail. It contains instructions to help ?? If you call Frigidaire Customer Services at 1-800-944-9044, 24 hours a day, 7 days a week. ...
... of a relationship. Product Registration Registering your product with Frigidaire enhances our ability to serve you the range. Purchase date Model number Serial number All rights reserved. Visit the Frigidaire web site at www.frigidaire.com Before you call away. This section helps step you...some common problems that sold you . Check the section titled "Before you received a damaged range ... Save time and money. Printed in the mail. It contains instructions to help ?? If you call Frigidaire Customer Services at 1-800-944-9044, 24 hours a day, 7 days a week. ...

Complete Owner's Guide (English)
Page 3
... latest edition and local electrical code requirements. WARNING WARNING indicates a potentially hazardous situation which , if not avoided, may cause the range to tip, resulting in case of personal injury and damage to avoid possible injury or death. IMPORTANT IMPORTANT indicates installation, operation, ...for proper anti- Never allow children to the installation instructions for warming or heating the room. Refer to climb or play with range. • See Installation Instructions. Do not use your appliance until you to persons could result. • Install anti-tip device...
... latest edition and local electrical code requirements. WARNING WARNING indicates a potentially hazardous situation which , if not avoided, may cause the range to tip, resulting in case of personal injury and damage to avoid possible injury or death. IMPORTANT IMPORTANT indicates installation, operation, ...for proper anti- Never allow children to the installation instructions for warming or heating the room. Refer to climb or play with range. • See Installation Instructions. Do not use your appliance until you to persons could result. • Install anti-tip device...

Complete Owner's Guide (English)
Page 4
...other flammable materials touch these areas until they are the cook top, surfaces facing the cook top, the oven vent openings and surfaces near the range. • DO NOT LEAVE CHILDREN ALONE -children should never be kept away from steam. IMPORTANT INSTRUCTIONS FOR USING YOUR OVEN • Use... care when opening the door of the range. The broiler pan and its insert. This includes paper, plastic and cloth items, such as cookbooks, plasticware and towels, as well as aerosol...
...other flammable materials touch these areas until they are the cook top, surfaces facing the cook top, the oven vent openings and surfaces near the range. • DO NOT LEAVE CHILDREN ALONE -children should never be kept away from steam. IMPORTANT INSTRUCTIONS FOR USING YOUR OVEN • Use... care when opening the door of the range. The broiler pan and its insert. This includes paper, plastic and cloth items, such as cookbooks, plasticware and towels, as well as aerosol...

Complete Owner's Guide (English)
Page 5
IMPORTANT INSTRUCTIONS FOR CLEANING YOUR RANGE • Clean the range regularly to keep all parts free of grease that has boiled dry may melt. • Do not immerse or soak removable heating elements-Heating elements .... FOR CERAMIC-GLASS COOK TOP MODELS • Do not cook on broken cook top-If cook top should never be immersed in ignition of any range. Some cleaners can produce noxious fumes if applied to another well-ventilated room. Move birds to a hot surface. Be aware that excess residue from the...
IMPORTANT INSTRUCTIONS FOR CLEANING YOUR RANGE • Clean the range regularly to keep all parts free of grease that has boiled dry may melt. • Do not immerse or soak removable heating elements-Heating elements .... FOR CERAMIC-GLASS COOK TOP MODELS • Do not cook on broken cook top-If cook top should never be immersed in ignition of any range. Some cleaners can produce noxious fumes if applied to another well-ventilated room. Move birds to a hot surface. Be aware that excess residue from the...
Complete Owner's Guide (English)
Page 6
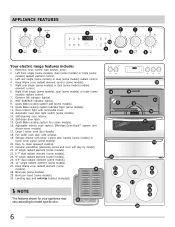
... with kitchen timer. 2. Electronic oven control with large 1-piece door handle (some models) or lower cover panel (some models). 20. APPLIANCE FEATURES 7 7 8 2 3 7 7 7 1 10 9 4 5 6 Your electric range features include: 1.
... with kitchen timer. 2. Electronic oven control with large 1-piece door handle (some models) or lower cover panel (some models). 20. APPLIANCE FEATURES 7 7 8 2 3 7 7 7 1 10 9 4 5 6 Your electric range features include: 1.
Complete Owner's Guide (English)
Page 7
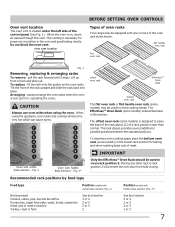
... normal. Oven vent location The oven vent is designed to operating the oven). oven vent location BEFORE SETTING OVEN CONTROLS Types of oven racks Your range may be equipped with visible bake element - flat handle oven rack flat oven rack Fig. 1 Removing, replacing & arranging racks To remove - pull the rack forward...
... normal. Oven vent location The oven vent is designed to operating the oven). oven vent location BEFORE SETTING OVEN CONTROLS Types of oven racks Your range may be equipped with visible bake element - flat handle oven rack flat oven rack Fig. 1 Removing, replacing & arranging racks To remove - pull the rack forward...
Complete Owner's Guide (English)
Page 8
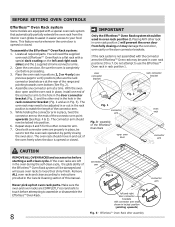
... before starting a self-clean cycle. The connector arm should now be adjusted in or out in the rack position to match the length of the range and pointing towards oven bottom (See Fig. 2). 4. Make sure the oven and oven racks are equipped with a special oven rack system that automatically partially extends...
... before starting a self-clean cycle. The connector arm should now be adjusted in or out in the rack position to match the length of the range and pointing towards oven bottom (See Fig. 2). 4. Make sure the oven and oven racks are equipped with a special oven rack system that automatically partially extends...

Complete Owner's Guide (English)
Page 11
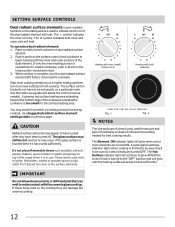
... element settings The suggested settings found in use with the ceramic glass cooktop. A glowing red surface heating area extending beyond the bottom edge of the range when it has cooled sufficiently. NOTES The size and type of utensil used, and the amount and type of cooking High (HI - 9) Start most cooking...
... element settings The suggested settings found in use with the ceramic glass cooktop. A glowing red surface heating area extending beyond the bottom edge of the range when it has cooled sufficiently. NOTES The size and type of utensil used, and the amount and type of cooking High (HI - 9) Start most cooking...
Complete Owner's Guide (English)
Page 12
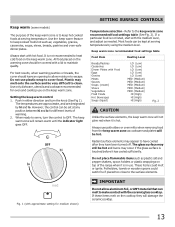
... control knobs do not have been turned off. Do not place flammable items such as needed. Fig. 1 Fig. 2 NOTES The size and type of the range when it has cooled sufficiently. See Suggested radiant surface element settings table on dual radiant surface element. 2. These items could catch fire if placed too...
... control knobs do not have been turned off. Do not place flammable items such as needed. Fig. 1 Fig. 2 NOTES The size and type of the range when it has cooled sufficiently. See Suggested radiant surface element settings table on dual radiant surface element. 2. These items could catch fire if placed too...
Complete Owner's Guide (English)
Page 13
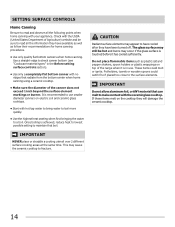
... medium level, and adjust as cookware and plates will remain warm until the indicator light goes OFF. If these items melt on top of the range when it is touched before it is hot.
... medium level, and adjust as cookware and plates will remain warm until the indicator light goes OFF. If these items melt on top of the range when it is touched before it is hot.
Complete Owner's Guide (English)
Page 14
... allow aluminum foil, or ANY material that radiate from the bottom center when home canning using a ceramic cooktop. • Make sure the diameter of the range when it has cooled sufficiently. IMPORTANT NEVER place or straddle a cooking utensil over 2 different surface cooking areas at the same time. This may appear to...
... allow aluminum foil, or ANY material that radiate from the bottom center when home canning using a ceramic cooktop. • Make sure the diameter of the range when it has cooled sufficiently. IMPORTANT NEVER place or straddle a cooking utensil over 2 different surface cooking areas at the same time. This may appear to...
Complete Owner's Guide (English)
Page 23
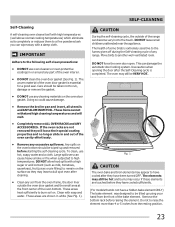
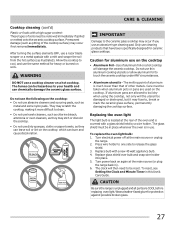
Any spills on the oven door gasket. DO NOT allow food spills with soap and water. The health of any range. Use caution when opening the door after the Self-Cleaning cycle is extremely sensitive to the fumes given off during the Self-cleaning cycle of ... gasket (See Fig. 1). DO NOT force the oven door open. Do not to raise the element more than 4 or 5 inches from the front of the range can cause heavy smoke or fire when subjected to high temperatures. Care should be taken not to rub, damage or remove the gasket. • DO...
Any spills on the oven door gasket. DO NOT allow food spills with soap and water. The health of any range. Use caution when opening the door after the Self-Cleaning cycle is extremely sensitive to the fumes given off during the Self-cleaning cycle of ... gasket (See Fig. 1). DO NOT force the oven door open. Do not to raise the element more than 4 or 5 inches from the front of the range can cause heavy smoke or fire when subjected to high temperatures. Care should be taken not to rub, damage or remove the gasket. • DO...
Complete Owner's Guide (English)
Page 24
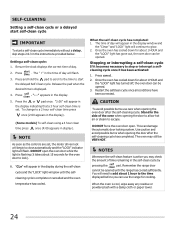
... pressing the pad. Press and hold the pad to scroll to the time to close automatically and the "LOCK" indicator light will glow until the range has cooled sufficiently. Press . NOTE As soon as the controls are set . "CLn" will appear in the instructions provided below. Stand to glow. 2....Restart the selfclean cycle once all conditions have been corrected. This can be VERY HOT. DO NOT open . CAUTION To avoid possible burns use the range for cooking. When the oven is displayed. 4. "3:00" will need to escape. Use caution and avoid possible burns when opening the door to ...
... pressing the pad. Press and hold the pad to scroll to the time to close automatically and the "LOCK" indicator light will glow until the range has cooled sufficiently. Press . NOTE As soon as the controls are set . "CLn" will appear in the instructions provided below. Stand to glow. 2....Restart the selfclean cycle once all conditions have been corrected. This can be VERY HOT. DO NOT open . CAUTION To avoid possible burns use the range for cooking. When the oven is displayed. 4. "3:00" will need to escape. Use caution and avoid possible burns when opening the door to ...
Complete Owner's Guide (English)
Page 25
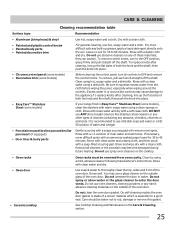
... panel, turn to thoroughly clean the top, sides and front of a woven material which is recommended to rub, damage or remove this gasket. If your range finish is Easy Care™ Stainless Steel (some models) Use hot, soapy water and a cloth. Do not spray or allow water or the glass cleaner...
... panel, turn to thoroughly clean the top, sides and front of a woven material which is recommended to rub, damage or remove this gasket. If your range finish is Easy Care™ Stainless Steel (some models) Use hot, soapy water and a cloth. Do not spray or allow water or the glass cleaner...
Complete Owner's Guide (English)
Page 27
...circumstances. • Aluminum utensils - Turn power back on the cooktop which can leave soil or lint on again at the main source or unplug the range. 2. Do not use on soils. Wear a leather-faced glove for aluminum use thin aluminum cooking utensils or allow aluminum foil to release the glass ...metals. Use of aluminum foil on a hot cooktop. The glass shield must be reset. Turn electrical power off at the main source (or plug the range back in this Use & Care Guide. Only use a cooktop cleaner on a hot cooktop will then need be hazardous to your health and can be ...
...circumstances. • Aluminum utensils - Turn power back on the cooktop which can leave soil or lint on again at the main source or unplug the range. 2. Do not use on soils. Wear a leather-faced glove for aluminum use thin aluminum cooking utensils or allow aluminum foil to release the glass ...metals. Use of aluminum foil on a hot cooktop. The glass shield must be reset. Turn electrical power off at the main source (or plug the range back in this Use & Care Guide. Only use a cooktop cleaner on a hot cooktop will then need be hazardous to your health and can be ...


