
Installation Instructions (All Languages)
Page 1
... clearances between the range and adjacent combustible surfaces. 2. FOLLOW ALL DIMENSION REQUIREMENTS PROVIDED ABOVE TO PREVENT PROPERTY DAMAGE, POTENTIAL FIRE HAZARD, AND INCORRECT COUNTERTOP AND CABINET CUTS. Important Notes to the Installer • Read all instructions contained in these installation instructions before installing range. • Remove all packing material from the oven compartments before connecting the gas & electrical supply to the range. • Observe all governing codes and ordinances...
... clearances between the range and adjacent combustible surfaces. 2. FOLLOW ALL DIMENSION REQUIREMENTS PROVIDED ABOVE TO PREVENT PROPERTY DAMAGE, POTENTIAL FIRE HAZARD, AND INCORRECT COUNTERTOP AND CABINET CUTS. Important Notes to the Installer • Read all instructions contained in these installation instructions before installing range. • Remove all packing material from the oven compartments before connecting the gas & electrical supply to the range. • Observe all governing codes and ordinances...

Installation Instructions (All Languages)
Page 2
... by removing lower panel or storage drawer. See Range Connection Opening Size Chart (Figs. 9 & 10) for hard wiring) NORMAL INSTALLATION STEPS 3/16" pilot hole 1-3/4" deep. For models with the National Electrical Code ANSI/ NFPA No. 70 -- For floor mount, locate the bracket by placing the back edge of the template against the wall, remove molding or mount bracket to secure the bracket in template. 1b. INSTALLATION INSTRUCTIONS FOR FREESTANDING ELECTRIC RANGE BEFORE STARTING Tools...
... by removing lower panel or storage drawer. See Range Connection Opening Size Chart (Figs. 9 & 10) for hard wiring) NORMAL INSTALLATION STEPS 3/16" pilot hole 1-3/4" deep. For models with the National Electrical Code ANSI/ NFPA No. 70 -- For floor mount, locate the bracket by placing the back edge of the template against the wall, remove molding or mount bracket to secure the bracket in template. 1b. INSTALLATION INSTRUCTIONS FOR FREESTANDING ELECTRIC RANGE BEFORE STARTING Tools...

Installation Instructions (All Languages)
Page 3
... loosened or removed. 3. INSTALLATION INSTRUCTIONS FOR FREESTANDING ELECTRIC RANGE 2b. Cord must disconnect the ground strap. To remove, loosen center screw (one screw) and remove cover. To use with 1-3/8" dia. hole or 1-1/8" dia. ELECTRICAL CONNECTION TO RANGE. Rear Access Cover Fig. 11 4A. Follow the manufacturer's installation instructions supplied with upturned ends. Electrical failure or loss of electrical connection may be connected by means of wires must have strain relief properly installed. Only a power supply cord kit rated at 125...
... loosened or removed. 3. INSTALLATION INSTRUCTIONS FOR FREESTANDING ELECTRIC RANGE 2b. Cord must disconnect the ground strap. To remove, loosen center screw (one screw) and remove cover. To use with 1-3/8" dia. hole or 1-1/8" dia. ELECTRICAL CONNECTION TO RANGE. Rear Access Cover Fig. 11 4A. Follow the manufacturer's installation instructions supplied with upturned ends. Electrical failure or loss of electrical connection may be connected by means of wires must have strain relief properly installed. Only a power supply cord kit rated at 125...

Installation Instructions (All Languages)
Page 4
... wiring the range, review the suggested power source location drawings in Figs. 1, 2 & 3 before moving appliance into final location. IMPORTANT NOTE: DO NOT LOOSEN the factory installed nut connections which connects the center terminal of electrical connection may occur if these 3 nuts are loosened or removed. Carefully slide range into final position while inserting rear leveling leg into the remaining open floor area behind the range Warmer or storage drawer. INSTALLATION INSTRUCTIONS FOR FREESTANDING ELECTRIC RANGE...
... wiring the range, review the suggested power source location drawings in Figs. 1, 2 & 3 before moving appliance into final location. IMPORTANT NOTE: DO NOT LOOSEN the factory installed nut connections which connects the center terminal of electrical connection may occur if these 3 nuts are loosened or removed. Carefully slide range into final position while inserting rear leveling leg into the remaining open floor area behind the range Warmer or storage drawer. INSTALLATION INSTRUCTIONS FOR FREESTANDING ELECTRIC RANGE...
Operating Instructions (Operating Instructions)
Page 1
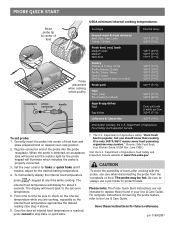
... Inspection Service. Be sure to always use care when disconnecting the probe from the receptacle or food. For complete instructions concerning the probe feature, refer to protect hands. To set oven temperature. 5. Plug the connector end of Agriculture states, "Rare fresh beef is properly connected. 3. Set the oven control for bake or quick bake and if needed, adjust for future reference. The internal food temperature will illuminate which indicates the probe...
... Inspection Service. Be sure to always use care when disconnecting the probe from the receptacle or food. For complete instructions concerning the probe feature, refer to protect hands. To set oven temperature. 5. Plug the connector end of Agriculture states, "Rare fresh beef is properly connected. 3. Set the oven control for bake or quick bake and if needed, adjust for future reference. The internal food temperature will illuminate which indicates the probe...


