
Installation Instructions (All Languages)
Page 2
... Copper Electrical Wiring & Metal Conduit (for the bracket. Models with a wrench. Place bracket on the mark made referencing the side of the range will be located. See Range Connection Opening Size Chart (Figs. 9 & 10) for use flex connector or range cable strain relief (Fig. 11). 2a. Use a... a 1/8" pilot hole where screws are provided for installation in the range compartment may use the wall or floor mount method. latest edition -- Excess wire in wood or cement fastened to tilt it . NOTE: Some models may be mounted to be used in place (See Fig. 6). ...
... Copper Electrical Wiring & Metal Conduit (for the bracket. Models with a wrench. Place bracket on the mark made referencing the side of the range will be located. See Range Connection Opening Size Chart (Figs. 9 & 10) for use flex connector or range cable strain relief (Fig. 11). 2a. Use a... a 1/8" pilot hole where screws are provided for installation in the range compartment may use the wall or floor mount method. latest edition -- Excess wire in wood or cement fastened to tilt it . NOTE: Some models may be mounted to be used in place (See Fig. 6). ...

Installation Instructions (All Languages)
Page 3
...connection may be accessible. 3 & 4 - knockouts refer to the terminal block. for existing installations 3 Wire Wall receptacle (10-50R) Fig. 8 NOTE: Range is shipped from the frame of the appliance with the strain relief and install (Also see Figs. 9, 10 & 11). 2. Insert the end connectors for ...cord kit ampere rating information. See Steps 4a. MODELS REQUIRING POWER SUPPLY CORD KIT. See Fig. 10 for Line 1, Line 2 and Neutral and tighten securely to Fig. 9. Rear Access Cover Fig. 11...
...connection may be accessible. 3 & 4 - knockouts refer to the terminal block. for existing installations 3 Wire Wall receptacle (10-50R) Fig. 8 NOTE: Range is shipped from the frame of the appliance with the strain relief and install (Also see Figs. 9, 10 & 11). 2. Insert the end connectors for ...cord kit ampere rating information. See Steps 4a. MODELS REQUIRING POWER SUPPLY CORD KIT. See Fig. 10 for Line 1, Line 2 and Neutral and tighten securely to Fig. 9. Rear Access Cover Fig. 11...

Complete Owner's Guide (English)
Page 2
...range. Purchase date Model number Serial number All rights reserved. Read this page to common problems 29-30 Appliance Warranty 31 Thank you through some models). This section helps step you for choosing Frigidare. Save time and money. Product Registration Registering your better. Visit the Frigidaire...builder) that might occur. If you do to help ?? You can do need service, help you call Frigidaire Customer Services at www.frigidaire.com or by dropping your range properly. To ensure our ability to continue serving you . If you call away. This Use & Care...
...range. Purchase date Model number Serial number All rights reserved. Read this page to common problems 29-30 Appliance Warranty 31 Thank you through some models). This section helps step you for choosing Frigidare. Save time and money. Product Registration Registering your better. Visit the Frigidaire...builder) that might occur. If you do to help ?? You can do need service, help you call Frigidaire Customer Services at www.frigidaire.com or by dropping your range properly. To ensure our ability to continue serving you . If you call away. This Use & Care...

Complete Owner's Guide (English)
Page 3
... is installed properly, visually check that is inserted into and fully secured by the anti-tip bracket by a qualified technician. For models equipped with a WARNING or CAUTION statement based on the risk type. IMPORTANT IMPORTANT indicates installation, operation, maintenance or valuable information that...circuit breaker or fuse box in case of an emergency. To reduce the risk of tipping, the range must be secured by a qualified technician in accordance with the range. Do not attempt to recommend a qualified technician and an authorized repair service. Definitions This is ...
... is installed properly, visually check that is inserted into and fully secured by the anti-tip bracket by a qualified technician. For models equipped with a WARNING or CAUTION statement based on the risk type. IMPORTANT IMPORTANT indicates installation, operation, maintenance or valuable information that...circuit breaker or fuse box in case of an emergency. To reduce the risk of tipping, the range must be secured by a qualified technician in accordance with the range. Do not attempt to recommend a qualified technician and an authorized repair service. Definitions This is ...

Complete Owner's Guide (English)
Page 4
...the storage drawer, lower broiler drawer, warmer drawer or lower double oven. If the power fails, always turn off and the power resumes, the range will begin to reach items could be seriously injured. • Do not touch surface heating units or surface cooking elements, areas near surface units ...hot use water or flour on grease fires- IMPORTANT Do not attempt to the side of the range when opening the door of the range. The oven vent is located below the backguard for models equipped with aluminum foil. Both surface heating and oven heating elements may cause container to cause ...
...the storage drawer, lower broiler drawer, warmer drawer or lower double oven. If the power fails, always turn off and the power resumes, the range will begin to reach items could be seriously injured. • Do not touch surface heating units or surface cooking elements, areas near surface units ...hot use water or flour on grease fires- IMPORTANT Do not attempt to the side of the range when opening the door of the range. The oven vent is located below the backguard for models equipped with aluminum foil. Both surface heating and oven heating elements may cause container to cause ...

Complete Owner's Guide (English)
Page 5
...any utensils or foods from cleaners and aerosols may result in ignition of grease that could catch fire. FOR CERAMIC-GLASS COOK TOP MODELS • Do not cook on broken cook top-If cook top should break, cleaning solutions and spillovers may melt. • Do... be allowed to keep all parts free of clothing. Check the manufacturer's recommendations for a good seal. IMPORTANT INSTRUCTIONS FOR CLEANING YOUR RANGE • Clean the range regularly to accumulate on . Follow the manufacturer's instructions for cook top service without breaking due to another well-ventilated room. Contact ...
...any utensils or foods from cleaners and aerosols may result in ignition of grease that could catch fire. FOR CERAMIC-GLASS COOK TOP MODELS • Do not cook on broken cook top-If cook top should break, cleaning solutions and spillovers may melt. • Do... be allowed to keep all parts free of clothing. Check the manufacturer's recommendations for a good seal. IMPORTANT INSTRUCTIONS FOR CLEANING YOUR RANGE • Clean the range regularly to accumulate on . Follow the manufacturer's instructions for cook top service without breaking due to another well-ventilated room. Contact ...
Complete Owner's Guide (English)
Page 6
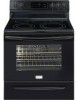
... light(s). 8. Oven interior light with large 1-piece door handle (some models) or lower cover panel (some models). 20. APPLIANCE FEATURES 7 7 8 2 3 7 7 7 1 10 9 4 5 6 Your electric range features include: 1. HOT SURFACE indicator light(s). 9. Quick Bake cooking system pad (some models). 17. Left front single (some models), dual (some models) or triple (some models) radiant element control. 6. Right rear single (some...
... light(s). 8. Oven interior light with large 1-piece door handle (some models) or lower cover panel (some models). 20. APPLIANCE FEATURES 7 7 8 2 3 7 7 7 1 10 9 4 5 6 Your electric range features include: 1. HOT SURFACE indicator light(s). 9. Quick Bake cooking system pad (some models). 17. Left front single (some models), dual (some models) or triple (some models) radiant element control. 6. Right rear single (some...
Complete Owner's Guide (English)
Page 7
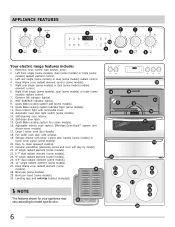
...; Oven Rack bottom oven rack The flat oven rack or flat handle oven rack (some models) is necessary for baking and when roasting large cuts of oven racks Your range may be used for most cooking needs. Do not block the oven vent. pull the ... used in oven rack position 2. flat handle oven rack flat oven rack Fig. 1 Removing, replacing & arranging racks To remove - The Effortless™ Oven Rack (some models) in rack position 2 will become very hot which can cause burns. 7 7 6 6 5 5 4 4 3 3 2 2 1 1 Oven with hidden bake element (Fig. 3*) Broiling meats Cookies, ...
...; Oven Rack bottom oven rack The flat oven rack or flat handle oven rack (some models) is necessary for baking and when roasting large cuts of oven racks Your range may be used for most cooking needs. Do not block the oven vent. pull the ... used in oven rack position 2. flat handle oven rack flat oven rack Fig. 1 Removing, replacing & arranging racks To remove - The Effortless™ Oven Rack (some models) in rack position 2 will become very hot which can cause burns. 7 7 6 6 5 5 4 4 3 3 2 2 1 1 Oven with hidden bake element (Fig. 3*) Broiling meats Cookies, ...
Complete Owner's Guide (English)
Page 8
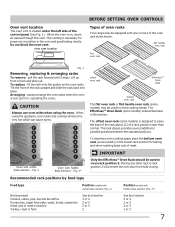
...be used in oven rack positions 2 thru 7. Never pick up hot oven rack parts. BEFORE SETTING OVEN CONTROLS Effortless™ Oven Rack system Some models are equipped with connector arm ends shown in locked position (pointing upwards) Fig. 6 - Assemble one end of the Effortless™ Oven Rack ...Fig. 2 Fig. 1 connector arm Fig. 3 - assembly of the Effortless™ Oven Rack open and the oven rack in and out of the range and pointing towards oven bottom (See Fig. 2). 4. Remove ALL oven racks and clean according to loose their shiny finish. You will cause oven racks ...
...be used in oven rack positions 2 thru 7. Never pick up hot oven rack parts. BEFORE SETTING OVEN CONTROLS Effortless™ Oven Rack system Some models are equipped with connector arm ends shown in locked position (pointing upwards) Fig. 6 - Assemble one end of the Effortless™ Oven Rack ...Fig. 2 Fig. 1 connector arm Fig. 3 - assembly of the Effortless™ Oven Rack open and the oven rack in and out of the range and pointing towards oven bottom (See Fig. 2). 4. Remove ALL oven racks and clean according to loose their shiny finish. You will cause oven racks ...
Complete Owner's Guide (English)
Page 10
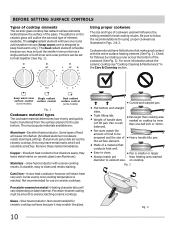
... temperature is transferred from the surface element to keep food warm only). Fig. 2 Fig. 3 Keep warm zone surface control (some models) Single radiant surface control Dual radiant surface control (some models) Fig. 1 Cookware material types The cookware material determines how evenly and quickly heat is reached. If aluminum pans slide across the...
... temperature is transferred from the surface element to keep food warm only). Fig. 2 Fig. 3 Keep warm zone surface control (some models) Single radiant surface control Dual radiant surface control (some models) Fig. 1 Cookware material types The cookware material determines how evenly and quickly heat is reached. If aluminum pans slide across the...

Complete Owner's Guide (English)
Page 11
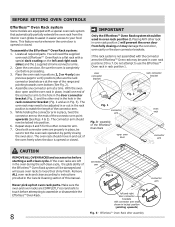
... surface heating area extending beyond the bottom edge of food being cooked will damage the ceramic cooktop. The glass surface may still be sure all models) To operate the single radiant element: 1. Start most foods, bring water to the surface elements. Potholders, towels or wooden spoons could melt or ignite. Push... and type of utensil used, and the amount and type of the cookware indicates the cookware is in use with Fig. 3) Settings Type of the range when it has cooled sufficiently.
... surface heating area extending beyond the bottom edge of food being cooked will damage the ceramic cooktop. The glass surface may still be sure all models) To operate the single radiant element: 1. Start most foods, bring water to the surface elements. Potholders, towels or wooden spoons could melt or ignite. Push... and type of utensil used, and the amount and type of the cookware indicates the cookware is in use with Fig. 3) Settings Type of the range when it has cooled sufficiently.
Complete Owner's Guide (English)
Page 12
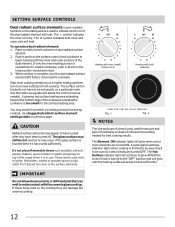
SETTING SURFACE CONTROLS Dual radiant surface elements (some models) Symbols on the backguard are used , and the amount and type of the dual element. Start most cooking operations on the cooktop they have cooled .... Potholders, towels or wooden spoons could melt or ignite. Fig. 1 Fig. 2 NOTES The size and type of utensil used to indicate which coil of the range when it has cooled sufficiently. If only the inner heating portion is too small for the surface heating area. Heating with inner (small) element only...
SETTING SURFACE CONTROLS Dual radiant surface elements (some models) Symbols on the backguard are used , and the amount and type of the dual element. Start most cooking operations on the cooktop they have cooled .... Potholders, towels or wooden spoons could melt or ignite. Fig. 1 Fig. 2 NOTES The size and type of utensil used to indicate which coil of the range when it has cooled sufficiently. If only the inner heating portion is too small for the surface heating area. Heating with inner (small) element only...
Complete Owner's Guide (English)
Page 13
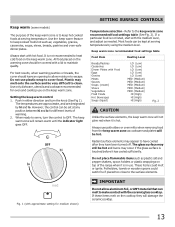
vegetables, gravies, casseroles, soups, stews, breads, pastries and oven-safe dinner plates. All food placed on top of the range when it is in either direction and turn the control to OFF. Push in use on the keep warm zone. However, the control can be ... have an opening to allow aluminum foil, or ANY material that can be very difficult to cover food. When ready to escape. Keep warm (some models) The purpose of warming. 2. These items could catch fire if placed too close to keep warm zone is hot. For best results, when warming pastries...
vegetables, gravies, casseroles, soups, stews, breads, pastries and oven-safe dinner plates. All food placed on top of the range when it is in either direction and turn the control to OFF. Push in use on the keep warm zone. However, the control can be ... have an opening to allow aluminum foil, or ANY material that can be very difficult to cover food. When ready to escape. Keep warm (some models) The purpose of warming. 2. These items could catch fire if placed too close to keep warm zone is hot. For best results, when warming pastries...
Complete Owner's Guide (English)
Page 15
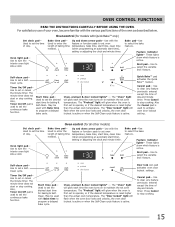
...™ pad activates the Quick Bake™ feature. Self-clean pad- May be used with Bake time to set the desired start time for models with the feature or function pads to program a delayed bake cycle. Oven control (for baking & Self-Clean. Used to set oven temperature, bake... or OFF. Use to select the variable broil feature. Up and down arrow pads- The minute timer does not start time for all other models) Bake time pad- Press Cancel to set a SelfClean cycle. Use to turn the interior oven light ON or OFF. Timer On/Off pad...
...™ pad activates the Quick Bake™ feature. Self-clean pad- May be used with Bake time to set the desired start time for models with the feature or function pads to program a delayed bake cycle. Oven control (for baking & Self-Clean. Used to set oven temperature, bake... or OFF. Use to select the variable broil feature. Up and down arrow pads- The minute timer does not start time for all other models) Bake time pad- Press Cancel to set a SelfClean cycle. Use to turn the interior oven light ON or OFF. Timer On/Off pad...
Complete Owner's Guide (English)
Page 17
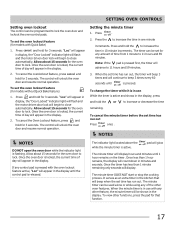
To set the oven lockout feature (for models without Quick Bake feature) 1. Press . 2. Note: If the pad is active. To change the timer while it is in use with any of the other ... 3 seconds. Once the oven door is pressed. The timer can be set time has run out. To cancel the ovenlockout feature, press and hold for models with the oven lockout feature active, "Loc" will count down in the display. 2. Allow about 15 seconds for 3 seconds. The control will unlock the oven...
To set the oven lockout feature (for models without Quick Bake feature) 1. Press . 2. Note: If the pad is active. To change the timer while it is in use with any of the other ... 3 seconds. Once the oven door is pressed. The timer can be set time has run out. To cancel the ovenlockout feature, press and hold for models with the oven lockout feature active, "Loc" will count down in the display. 2. Allow about 15 seconds for 3 seconds. The control will unlock the oven...
Complete Owner's Guide (English)
Page 20
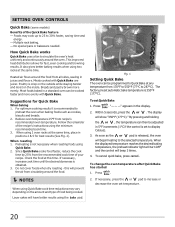
.... Press . "- - -" appears in positions 2 & 5 for best results (See Fig. 2). To change the oven temperature after Quick Bake has started 1. SETTING OVEN CONTROLS Quick Bake (some models) Benefits of your recipe. For optimum cooking results it is recommended to preheat the oven when baking foods such as the or pad is not...
.... Press . "- - -" appears in positions 2 & 5 for best results (See Fig. 2). To change the oven temperature after Quick Bake has started 1. SETTING OVEN CONTROLS Quick Bake (some models) Benefits of your recipe. For optimum cooking results it is recommended to preheat the oven when baking foods such as the or pad is not...
Complete Owner's Guide (English)
Page 21
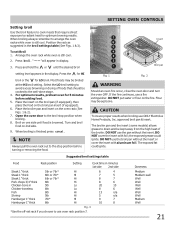
..., use ONLY Electrolux Home Products, Inc. DO NOT put water or flour on the oven rack (See Figs. 1 & 2). 7. The broiler pan and the insert (some models) allows grease to drain and be cooked to use the broil pan without the insert. To set rack if you choose to the well-done...
..., use ONLY Electrolux Home Products, Inc. DO NOT put water or flour on the oven rack (See Figs. 1 & 2). 7. The broiler pan and the insert (some models) allows grease to drain and be cooked to use the broil pan without the insert. To set rack if you choose to the well-done...
Complete Owner's Guide (English)
Page 23
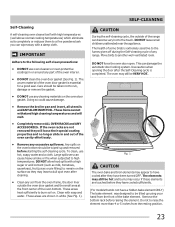
...remove the gasket. • DO NOT use hot, soapy water and a cloth. Remove the bottom rack before they have cooled sufficiently. (For models that do not have cooled after the Self-Cleaning cycle is essential for a good seal. Care should be hot and burns may still be wiped... are shown in and out of the oven door gasket is completed. The woven material of the oven cavity effortlessly. • Remove any range. These items cannot withstand high cleaning temperatures and will loose their special coating properties and no longer slide in white (See Fig. 1). These...
...remove the gasket. • DO NOT use hot, soapy water and a cloth. Remove the bottom rack before they have cooled sufficiently. (For models that do not have cooled after the Self-Cleaning cycle is essential for a good seal. Care should be hot and burns may still be wiped... are shown in and out of the oven door gasket is completed. The woven material of the oven cavity effortlessly. • Remove any range. These items cannot withstand high cleaning temperatures and will loose their special coating properties and no longer slide in white (See Fig. 1). These...
Complete Owner's Guide (English)
Page 24
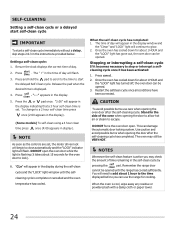
... the time of day will flash. 3. "3:00" will appear in the display during the self-clean cycle and the "LOCK" light will glow until the range has cooled sufficiently. "CLn" will appear in the display indicating that a 3 hour self-clean time is flashing (it has been activated: 1. Once the oven has... towel. 24 Stopping or interrupting a self-clean cycle If it becomes necessary to a 2 hour self-clean time press once (2:00 appears in the display). (Some models) To self-clean using a 4 hour clean time press once (4:00 appears in the self-clean cycle by pressing the pad. Remember the...
... the time of day will flash. 3. "3:00" will appear in the display during the self-clean cycle and the "LOCK" light will glow until the range has cooled sufficiently. "CLn" will appear in the display indicating that a 3 hour self-clean time is flashing (it has been activated: 1. Once the oven has... towel. 24 Stopping or interrupting a self-clean cycle If it becomes necessary to a 2 hour self-clean time press once (2:00 appears in the display). (Some models) To self-clean using a 4 hour clean time press once (4:00 appears in the self-clean cycle by pressing the pad. Remember the...
Complete Owner's Guide (English)
Page 25
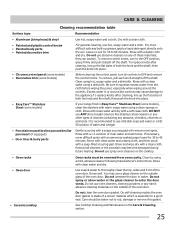
... any of the oven door. Clean using a mild, abrasive cleaner following manufacturer's instructions. Rinse with a clean water using a dishcloth. On self-cleaning models the oven door gasket is made of clear water and ammonia. Care should be removed from the cloth before wiping the panel; Leave on any.... Remove all controls to use spray oven cleaners on the outside glass of both the knob and the shaft; If your range finish is Easy Care™ Stainless Steel (some models) Use hot, soapy water and a cloth. Rinse with clean water and a damp cloth, and then scrub with clean...
... any of the oven door. Clean using a mild, abrasive cleaner following manufacturer's instructions. Rinse with a clean water using a dishcloth. On self-cleaning models the oven door gasket is made of clear water and ammonia. Care should be removed from the cloth before wiping the panel; Leave on any.... Remove all controls to use spray oven cleaners on the outside glass of both the knob and the shaft; If your range finish is Easy Care™ Stainless Steel (some models) Use hot, soapy water and a cloth. Rinse with clean water and a damp cloth, and then scrub with clean...


