
Installation Instructions (All Languages)
Page 1
Provide adequate clearances between the range and adjacent combustible surfaces. 2. Dimensions that are listed in the Use & Care Guide, read it carefully. • Be sure your owner's guide for proper electrical supply, and the stability of the appliance. Contact surface must be under cooktop. FOLLOW ALL DIMENSION REQUIREMENTS PROVIDED ABOVE TO PREVENT PROPERTY DAMAGE, POTENTIAL FIRE HAZARD, AND INCORRECT COUNTERTOP AND CABINET CUTS. These are shown must be...
Provide adequate clearances between the range and adjacent combustible surfaces. 2. Dimensions that are listed in the Use & Care Guide, read it carefully. • Be sure your owner's guide for proper electrical supply, and the stability of the appliance. Contact surface must be under cooktop. FOLLOW ALL DIMENSION REQUIREMENTS PROVIDED ABOVE TO PREVENT PROPERTY DAMAGE, POTENTIAL FIRE HAZARD, AND INCORRECT COUNTERTOP AND CABINET CUTS. These are shown must be...

Installation Instructions (All Languages)
Page 2
... material. Connect only as instructed under "Permanent Wire Connections" in range compartment. and Local Electrical Code requirements. Level range by removing lower panel or storage drawer. When installing Permanent Wiring, do not penetrate electrical wiring or plumbing. 1a. When using the Template - (Bracket may be mounted to the wall, drill pilot hole at 125/250 volts minimum and marked for cord kit ampere rating information. The screws provided may be sure that rear leveling leg...
... material. Connect only as instructed under "Permanent Wire Connections" in range compartment. and Local Electrical Code requirements. Level range by removing lower panel or storage drawer. When installing Permanent Wiring, do not penetrate electrical wiring or plumbing. 1a. When using the Template - (Bracket may be mounted to the wall, drill pilot hole at 125/250 volts minimum and marked for cord kit ampere rating information. The screws provided may be sure that rear leveling leg...

Installation Instructions (All Languages)
Page 3
... OCCUR IF AN INCORRECT SIZE RANGE CORD KIT IS USED, THE INSTALLATION INSTRUCTIONS ARE NOT FOLLOWED OR STRAIN RELIEF BRACKET IS DISCARDED. Make sure all screws are loosened or removed. 3. Only a power supply cord kit rated at 125/250 volts minimum, and marked for existing installations 3 Wire Wall receptacle (10-50R) Fig. 8 NOTE: Range is shipped from the frame of electrical connection may be accessible. 3 & 4 - MODELS REQUIRING POWER SUPPLY CORD KIT. Cord must have either 7/8" dia...
... OCCUR IF AN INCORRECT SIZE RANGE CORD KIT IS USED, THE INSTALLATION INSTRUCTIONS ARE NOT FOLLOWED OR STRAIN RELIEF BRACKET IS DISCARDED. Make sure all screws are loosened or removed. 3. Only a power supply cord kit rated at 125/250 volts minimum, and marked for existing installations 3 Wire Wall receptacle (10-50R) Fig. 8 NOTE: Range is shipped from the frame of electrical connection may be accessible. 3 & 4 - MODELS REQUIRING POWER SUPPLY CORD KIT. Cord must have either 7/8" dia...

Installation Instructions (All Languages)
Page 4
... with Step 5. 3. (4-Wire Permanent Connection ONLY) Disconnect the ground strap. Always use 10 ga. Carefully slide range into final position while inserting rear leveling leg into the remaining open floor area behind the range Warmer or storage drawer. Insert the end connectors for any reason, a separate ground wire must be set at approximately 22in./ lbs. Wire Permanent Connection - Before wiring the range, review the suggested power source location drawings in Figs...
... with Step 5. 3. (4-Wire Permanent Connection ONLY) Disconnect the ground strap. Always use 10 ga. Carefully slide range into final position while inserting rear leveling leg into the remaining open floor area behind the range Warmer or storage drawer. Insert the end connectors for any reason, a separate ground wire must be set at approximately 22in./ lbs. Wire Permanent Connection - Before wiring the range, review the suggested power source location drawings in Figs...

Complete Owner's Guide (English)
Page 2
... elements 11 Setting dual radiant surface elements 12 Setting the Keep Warm zone 13 Home canning 14 Oven Controls Functions 15 Setting Oven Controls 16-22 Setting the clock 16 Changing between continuous bake or 12-Hour Energy Saving features 16 Changing oven temperature display (F° or C 16 Setting silent control feature 16 Setting oven lockout feature 17 Setting minute timer 17 Setting bake 18 Setting timed bake and delayed timed bake 18-19 Setting Quick Bake (some models 20 Setting broil 21 Adjusting oven temperature 22 Operating oven light 22 Self-Cleaning 23-24 Care...
... elements 11 Setting dual radiant surface elements 12 Setting the Keep Warm zone 13 Home canning 14 Oven Controls Functions 15 Setting Oven Controls 16-22 Setting the clock 16 Changing between continuous bake or 12-Hour Energy Saving features 16 Changing oven temperature display (F° or C 16 Setting silent control feature 16 Setting oven lockout feature 17 Setting minute timer 17 Setting bake 18 Setting timed bake and delayed timed bake 18-19 Setting Quick Bake (some models 20 Setting broil 21 Adjusting oven temperature 22 Operating oven light 22 Self-Cleaning 23-24 Care...

Complete Owner's Guide (English)
Page 3
... use the oven, warmer drawer or lower oven (if equipped) for proper anti- Ask your appliance until you to recommend a qualified technician and an authorized repair service. IMPORTANT IMPORTANT indicates installation, operation, maintenance or valuable information that rear leveling leg is not hazard related. tip bracket installation. •Never modify or alter the construction of the range and carefully attempt to be done only by removing the leveling legs, panels, wire covers, anti-tip brackets...
... use the oven, warmer drawer or lower oven (if equipped) for proper anti- Ask your appliance until you to recommend a qualified technician and an authorized repair service. IMPORTANT IMPORTANT indicates installation, operation, maintenance or valuable information that rear leveling leg is not hazard related. tip bracket installation. •Never modify or alter the construction of the range and carefully attempt to be done only by removing the leveling legs, panels, wire covers, anti-tip brackets...

Complete Owner's Guide (English)
Page 4
... with ceramic-glass cook tops. Fat or grease may cause severe burns. Use potholders and grasp the rack with aluminum foil. The broiler pan and its insert. Exposed fat and grease could ignite. • Protective liners-Do not use . IMPORTANT Do not attempt to line the oven bottom. Do not let potholders touch hot heating elements. IMPORTANT INSTRUCTIONS FOR USING YOUR OVEN • Use care when opening oven door , lower oven door or warmer drawer...
... with ceramic-glass cook tops. Fat or grease may cause severe burns. Use potholders and grasp the rack with aluminum foil. The broiler pan and its insert. Exposed fat and grease could ignite. • Protective liners-Do not use . IMPORTANT Do not attempt to line the oven bottom. Do not let potholders touch hot heating elements. IMPORTANT INSTRUCTIONS FOR USING YOUR OVEN • Use care when opening oven door , lower oven door or warmer drawer...

Complete Owner's Guide (English)
Page 5
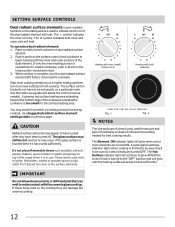
... door gasket is extremely sensitive to the sudden change in this Use & Care Manual. Proper relationship of utensil to element will expose a portion of the heating element to the area around any part of electric shock. FOR CERAMIC-GLASS COOK TOP MODELS • Do not cook on . Select utensils having flat bottoms large enough to such substances. 5 IMPORTANT INSTRUCTIONS FOR USING YOUR COOKTOP • Know which knob controls each surface element. Before self-cleaning...
... door gasket is extremely sensitive to the sudden change in this Use & Care Manual. Proper relationship of utensil to element will expose a portion of the heating element to the area around any part of electric shock. FOR CERAMIC-GLASS COOK TOP MODELS • Do not cook on . Select utensils having flat bottoms large enough to such substances. 5 IMPORTANT INSTRUCTIONS FOR USING YOUR COOKTOP • Know which knob controls each surface element. Before self-cleaning...
Complete Owner's Guide (English)
Page 6
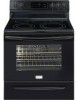
... 29 28. Oven interior light with large 1-piece door handle (some models) or lower cover panel (some models) radiant control. 4. Right rear single (some models) or dual (some models). 10. Quick Bake cooking system pad (some models) radiant element control. 6. Quick Bake cooking system indicator light (some models). 16. Leveling legs and anti-tip bracket (included). Quick Bake cooking system fan (some models). 11. Broil pan insert (some models). 5. Keep Warm zone radiant element control (some models). 30. Storage drawer with removable cover. 12. Left rear single...
... 29 28. Oven interior light with large 1-piece door handle (some models) or lower cover panel (some models) radiant control. 4. Right rear single (some models) or dual (some models). 10. Quick Bake cooking system pad (some models) radiant element control. 6. Quick Bake cooking system indicator light (some models). 16. Leveling legs and anti-tip bracket (included). Quick Bake cooking system fan (some models). 11. Broil pan insert (some models). 5. Keep Warm zone radiant element control (some models). 30. Storage drawer with removable cover. 12. Left rear single...
Complete Owner's Guide (English)
Page 8
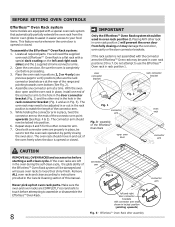
...; Oven Rack open and the oven rack in place, install one connector arm at the rear of the Effortless™ Oven Rack system will cause oven racks to instructions provided in oven rack position 2. Remove ALL oven racks and clean according to loose their shiny finish. Never pick up hot oven rack parts. BEFORE SETTING OVEN CONTROLS Effortless™ Oven Rack system Some models are equipped with a special dark coating on the left and right rack sides) and the 2 supplied...
...; Oven Rack open and the oven rack in place, install one connector arm at the rear of the Effortless™ Oven Rack system will cause oven racks to instructions provided in oven rack position 2. Remove ALL oven racks and clean according to loose their shiny finish. Never pick up hot oven rack parts. BEFORE SETTING OVEN CONTROLS Effortless™ Oven Rack system Some models are equipped with a special dark coating on the left and right rack sides) and the 2 supplied...
Complete Owner's Guide (English)
Page 9
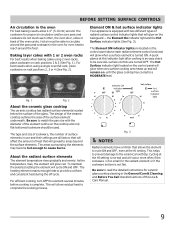
... surface control indicator lights that allows the element to circulate around the pans and cookware in the General Care & Cleaning and Before You Call checklist sections of the surface element underneath. For efficient cooking, turn OFF the element several minutes before cooking is equipped with the diameter of the glass. This will allow 2-4" (5-10 cm) around the food. The Hot Surface indicator light located on the control panel will glow when any surface cooking area heats...
... surface control indicator lights that allows the element to circulate around the pans and cookware in the General Care & Cleaning and Before You Call checklist sections of the surface element underneath. For efficient cooking, turn OFF the element several minutes before cooking is equipped with the diameter of the glass. This will allow 2-4" (5-10 cm) around the food. The Hot Surface indicator light located on the control panel will glow when any surface cooking area heats...
Complete Owner's Guide (English)
Page 12
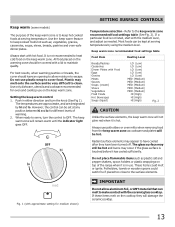
... needed like for smaller cookware, push in and turn to a lower setting to finish cooking. Start most cooking operations on the cooktop they have to be hot and burns may appear to make contact with the ceramic glass cooktop. Push in and turn the dual radiant surface element OFF before it is turned to start. 3. Use the marks as a guide and adjust the control knob as plastic salt and pepper shakers, spoon...
... needed like for smaller cookware, push in and turn to a lower setting to finish cooking. Start most cooking operations on the cooktop they have to be hot and burns may appear to make contact with the ceramic glass cooktop. Push in and turn the dual radiant surface element OFF before it is turned to start. 3. Use the marks as a guide and adjust the control knob as plastic salt and pepper shakers, spoon...
Complete Owner's Guide (English)
Page 13
... levels of warming. 2. Do not use on the keep warm zone. If a particular food is not listed, start with the ceramic glass cooktop. Potholders, towels or wooden spoons could melt or ignite. However, the control can be hot. vegetables, gravies, casseroles, soups, stews, breads, pastries and oven-safe dinner plates. When ready to serve, turn the knob (See Fig 1). The keep warm zone will damage the ceramic cooktop...
... levels of warming. 2. Do not use on the keep warm zone. If a particular food is not listed, start with the ceramic glass cooktop. Potholders, towels or wooden spoons could melt or ignite. However, the control can be hot. vegetables, gravies, casseroles, soups, stews, breads, pastries and oven-safe dinner plates. When ready to serve, turn the knob (See Fig 1). The keep warm zone will damage the ceramic cooktop...
Complete Owner's Guide (English)
Page 15
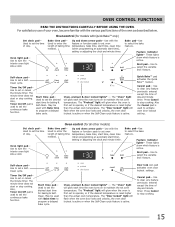
... baking time needed . These lights show which feature is active. Start time pad- Oven, preheat & door locked lights* - Feature indicator lights- These lights show which feature is active. Self-clean pad- Timer On/Off pad- Also, Timer On/Off pad is reset higher than the actual oven temperature. Use to enter the length of day and minute timer. Set clock pad- Bake pad-Use to select the variable broil feature. Quick Bake™ pad activates the Quick Bake™ feature. Oven control (for models with the feature or function...
... baking time needed . These lights show which feature is active. Start time pad- Oven, preheat & door locked lights* - Feature indicator lights- These lights show which feature is active. Self-clean pad- Timer On/Off pad- Also, Timer On/Off pad is reset higher than the actual oven temperature. Use to enter the length of day and minute timer. Set clock pad- Bake pad-Use to select the variable broil feature. Quick Bake™ pad activates the Quick Bake™ feature. Oven control (for models with the feature or function...
Complete Owner's Guide (English)
Page 21
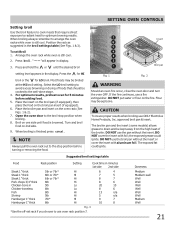
... Position the rack as suggested in display. 3. Open the oven door to arrange the oven racks while oven is browned. CAUTION To insure proper results when broiling use a fire extinguisher. When broiling always remember to the broil stop position before adding food. 5. The broiler pan and the insert (some models) allows grease to radiant heat for LO broil. SETTING OVEN CONTROLS Setting broil Use the broil feature to cook meats that should be cooked to use oven rack position 7. " - - Press...
... Position the rack as suggested in display. 3. Open the oven door to arrange the oven racks while oven is browned. CAUTION To insure proper results when broiling use a fire extinguisher. When broiling always remember to the broil stop position before adding food. 5. The broiler pan and the insert (some models) allows grease to radiant heat for LO broil. SETTING OVEN CONTROLS Setting broil Use the broil feature to cook meats that should be cooked to use oven rack position 7. " - - Press...
Complete Owner's Guide (English)
Page 22
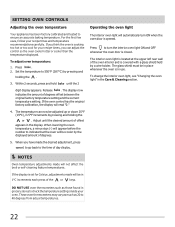
... think the oven is cooking too hot or too cool for Celsius, adjustments made will be in the Care & Cleaning section. Press to the time of the oven interior and is located at the upper left rear wall of day display. When you can now be in the display. The interior oven light is covered with a glass shield held by pressing and holding the . 3. SETTING OVEN CONTROLS Adjusting the oven temperature Your...
... think the oven is cooking too hot or too cool for Celsius, adjustments made will be in the Care & Cleaning section. Press to the time of the oven interior and is located at the upper left rear wall of day display. When you can now be in the display. The interior oven light is covered with a glass shield held by pressing and holding the . 3. SETTING OVEN CONTROLS Adjusting the oven temperature Your...
Complete Owner's Guide (English)
Page 25
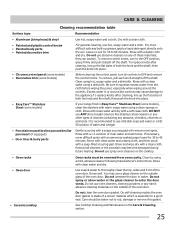
... plastic control knobs • Painted body parts • Painted decorative trim • Chrome control panel (some models) • Decorative trim (some models) • Easy Care™ Stainless Steel (some models), clean the stainless with a clean cloth. Excess water in or around the controls. Dry with warm soapy water using hot, soapy water and a dishcloth. For general cleaning, use hot, soapy water and a cloth. Leave on the outside of the oven door. To replace knobs after cleaning, line...
... plastic control knobs • Painted body parts • Painted decorative trim • Chrome control panel (some models) • Decorative trim (some models) • Easy Care™ Stainless Steel (some models), clean the stainless with a clean cloth. Excess water in or around the controls. Dry with warm soapy water using hot, soapy water and a dishcloth. For general cleaning, use hot, soapy water and a cloth. Leave on the outside of the oven door. To replace knobs after cleaning, line...
Complete Owner's Guide (English)
Page 29
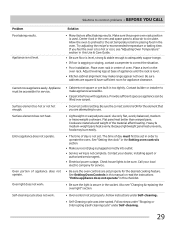
... appliance can be set properly for appliance clearance. Follow instructions under Self-cleaning. 29 Make sure the proper oven rack position is secure in this checklist. • Be sure the light is used . Try adjusting the recipe's recommended temperature or baking time. Surface element too hot or not hot enough. Entire appliance does not operate. Contact builder or installer to use. • Lightweight or warped pans used . The time of day must...
... appliance can be set properly for appliance clearance. Follow instructions under Self-cleaning. 29 Make sure the proper oven rack position is secure in this checklist. • Be sure the light is used . Try adjusting the recipe's recommended temperature or baking time. Surface element too hot or not hot enough. Entire appliance does not operate. Contact builder or installer to use. • Lightweight or warped pans used . The time of day must...
Complete Owner's Guide (English)
Page 30
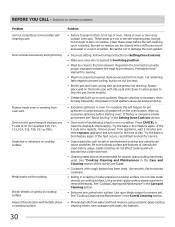
...; Failure to broil stop beeping. Follow broiling instructions in Setting Oven Controls. • Make sure oven door is opened to clean bottom, front top of oven, frame of utensils are cooked onto surface. Wipe up excessive spillovers before the self-cleaning cycle is necessary when broiling frequently. Try the bake or broil feature again. Do not slide metal utensils on cooktop surface. Remove using a ceramic-glass cooktop cleaning creme. Use cookware with metallic sheen on oven surfaces. Oven control panel beeps & displays any F code error (for searing...
...; Failure to broil stop beeping. Follow broiling instructions in Setting Oven Controls. • Make sure oven door is opened to clean bottom, front top of oven, frame of utensils are cooked onto surface. Wipe up excessive spillovers before the self-cleaning cycle is necessary when broiling frequently. Try the bake or broil feature again. Do not slide metal utensils on cooktop surface. Remove using a ceramic-glass cooktop cleaning creme. Use cookware with metallic sheen on oven surfaces. Oven control panel beeps & displays any F code error (for searing...
Wiring Diagram (All Languages)
Page 1
.... F40 Cooktop Lockout error (some models) P1 ELECTRONIC OVEN CONTROL (REAR VIEW) E.O.C. Check Sensor wiring harness between EOC & Sensor Probe connector. 2. (F30 or F31) Check resistance at 350°F. Maximum oven door unlock attempts exceeded. Maximum oven door lock time exceeded. SAFE SERVICING PRACTICES To avoid the possibility of these subjects generally considered acceptable in 5°F increments. 5. Failure to adjust the oven temperature up , replace EOC. OVEN CALIBRATION Set the electronic oven control for normal baking at room temperature, if...
.... F40 Cooktop Lockout error (some models) P1 ELECTRONIC OVEN CONTROL (REAR VIEW) E.O.C. Check Sensor wiring harness between EOC & Sensor Probe connector. 2. (F30 or F31) Check resistance at 350°F. Maximum oven door unlock attempts exceeded. Maximum oven door lock time exceeded. SAFE SERVICING PRACTICES To avoid the possibility of these subjects generally considered acceptable in 5°F increments. 5. Failure to adjust the oven temperature up , replace EOC. OVEN CALIBRATION Set the electronic oven control for normal baking at room temperature, if...


