
Complete Owner's Guide (English)
Page 1
All about the Use &Care of your Built-In Range 318205853 (July 2009) Rev. B TABLE OF CONTENTS Welcome & Congratulations 2 Setting Keep Warm Drawer Control (If equipped)... 30 Important Safety Instructions 3 Care & Cleaning (Cleaning Chart 31 Features at a Glance 7 Care & Cleaning 32 Before Setting Surface Controls 9 Before You Call 35 Setting Surface Controls 10 Notes 38 Before Setting Oven Controls 11 Major Appliance Warranty 40 Setting Oven Controls 14 www.frigidaire.com USA 1-800-944-9044 www.frigidaire.ca Canada 1-800-265-8352
All about the Use &Care of your Built-In Range 318205853 (July 2009) Rev. B TABLE OF CONTENTS Welcome & Congratulations 2 Setting Keep Warm Drawer Control (If equipped)... 30 Important Safety Instructions 3 Care & Cleaning (Cleaning Chart 31 Features at a Glance 7 Care & Cleaning 32 Before Setting Surface Controls 9 Before You Call 35 Setting Surface Controls 10 Notes 38 Before Setting Oven Controls 11 Major Appliance Warranty 40 Setting Oven Controls 14 www.frigidaire.com USA 1-800-944-9044 www.frigidaire.ca Canada 1-800-265-8352
Complete Owner's Guide (English)
Page 2
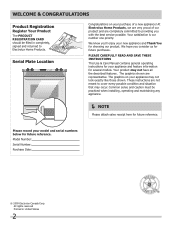
...consider us for several models. The graphics shown are not meant to Electrolux Home Products. The graphics on your appliance may not have all the described features. These instructions are representative. Welcome & Congratulations Product Registration Register Your Product... The PRODUCT REGISTRATION CARD should be practiced when installing, operating and maintaining any appliance. NOTE Please attach sales receipt here for choosing our product. All rights reserved Printed in completely, signed ...
...consider us for several models. The graphics shown are not meant to Electrolux Home Products. The graphics on your appliance may not have all the described features. These instructions are representative. Welcome & Congratulations Product Registration Register Your Product... The PRODUCT REGISTRATION CARD should be practiced when installing, operating and maintaining any appliance. NOTE Please attach sales receipt here for choosing our product. All rights reserved Printed in completely, signed ...
Complete Owner's Guide (English)
Page 3
...gas supplier. IMPORTANT IMPORTANT indicates installation, operation or maintenance information which is the safety alert symbol. All other part of the appliance unless specifically recommended in serious injuries and also cause damage to potential personal injury hazards. Follow the gas supplier's instructions. &#..., sitting or pulling down on an open door may cause bodily injury or property damage. WARNING If the information in this appliance can tip. • Injury to climb or play with the unit. Definitions This is important but not hazard-related. Ask...
...gas supplier. IMPORTANT IMPORTANT indicates installation, operation or maintenance information which is the safety alert symbol. All other part of the appliance unless specifically recommended in serious injuries and also cause damage to potential personal injury hazards. Follow the gas supplier's instructions. &#..., sitting or pulling down on an open door may cause bodily injury or property damage. WARNING If the information in this appliance can tip. • Injury to climb or play with the unit. Definitions This is important but not hazard-related. Ask...
Complete Owner's Guide (English)
Page 4
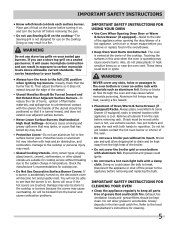
... soda, a dry chemical or foam-type extinguisher. • When heating fat or grease, watch it has been exposed to a temperature above the appliance. Among these areas are not visible. Fat or grease may explode and result in fire or property damage. • Do not leave children alone....utensil. IMPORTANT INSTRUCTIONS FOR USING YOUR cooktop WARNING Use Proper Flame Size-Adjust flame size so it to the power supply. Areas near the appliance. Do not let the pot holders touch hot surface units. Once the power resumes, reset the clock and the oven function. Important ...
... soda, a dry chemical or foam-type extinguisher. • When heating fat or grease, watch it has been exposed to a temperature above the appliance. Among these areas are not visible. Fat or grease may explode and result in fire or property damage. • Do not leave children alone....utensil. IMPORTANT INSTRUCTIONS FOR USING YOUR cooktop WARNING Use Proper Flame Size-Adjust flame size so it to the power supply. Areas near the appliance. Do not let the pot holders touch hot surface units. Once the power resumes, reset the clock and the oven function. Important ...
Complete Owner's Guide (English)
Page 5
...cooktop or burners because the covers may cause severe burns. Always place oven/Warm & Serve Drawer (if equipped) racks in desired location while appliance is vented at High Heat Settings-Boilovers cause smoking and greasy spillovers that may ignite, or a pan that could cause the bulb to the... sudden change in the oven/drawer. • Keep Oven Vent Ducts Unobstructed. Disconnect the appliance or shut off before removing the pan. • Do not use a broiler pan without breaking due to break. Exhaust fan ventilation hoods and grease...
...cooktop or burners because the covers may cause severe burns. Always place oven/Warm & Serve Drawer (if equipped) racks in desired location while appliance is vented at High Heat Settings-Boilovers cause smoking and greasy spillovers that may ignite, or a pan that could cause the bulb to the... sudden change in the oven/drawer. • Keep Oven Vent Ducts Unobstructed. Disconnect the appliance or shut off before removing the pan. • Do not use a broiler pan without breaking due to break. Exhaust fan ventilation hoods and grease...
Complete Owner's Guide (English)
Page 6
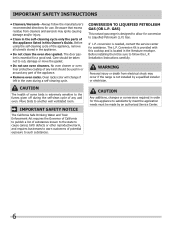
... L.P. Before using the self-cleaning cycle of any kind should be sure to such substances. No oven cleaner or oven liner protective coating of the appliance, remove all utensils stored in order for assistance. Care should be made by a qualified installer or electrician. Gas) This natural gas range is needed, ... excess residue from electrical shock may ignite causing damage and/or injury. • Clean in the self-cleaning cycle only the parts of the appliance listed in the oven during the self-clean cycle of any part of some birds is located in or around any wall oven.
... L.P. Before using the self-cleaning cycle of any kind should be sure to such substances. No oven cleaner or oven liner protective coating of the appliance, remove all utensils stored in order for assistance. Care should be made by a qualified installer or electrician. Gas) This natural gas range is needed, ... excess residue from electrical shock may ignite causing damage and/or injury. • Clean in the self-cleaning cycle only the parts of the appliance listed in the oven during the self-clean cycle of any part of some birds is located in or around any wall oven.
Complete Owner's Guide (English)
Page 7
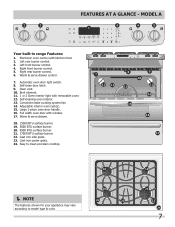
... control. 4. Warm & serve drawer control. 7. Left rear burner control. 3. Right rear burner control. 6. Easy to clean porcelain cooktop. NOTE The features shown for your appliance may vary according to model type & color. 7 Oven vent. 10. Automatic oven door light switch. 8. Self-clean door latch. 9. Full width oven door with window...
... control. 4. Warm & serve drawer control. 7. Left rear burner control. 3. Right rear burner control. 6. Easy to clean porcelain cooktop. NOTE The features shown for your appliance may vary according to model type & color. 7 Oven vent. 10. Automatic oven door light switch. 8. Self-clean door latch. 9. Full width oven door with window...
Complete Owner's Guide (English)
Page 8
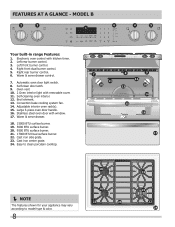
... oven door light switch. 8. Broil element. 13. Convection bake cooking system fan. 14. Easy to clean porcelain cooktop. NOTE The features shown for your appliance may vary according to model type & color. 8 Left rear burner control. 3. Warm & serve drawer control. 7. Adjustable interior oven rack(s). 15. Large 3-piece oven door handle...
... oven door light switch. 8. Broil element. 13. Convection bake cooking system fan. 14. Easy to clean porcelain cooktop. NOTE The features shown for your appliance may vary according to model type & color. 8 Left rear burner control. 3. Warm & serve drawer control. 7. Adjustable interior oven rack(s). 15. Large 3-piece oven door handle...
Complete Owner's Guide (English)
Page 14
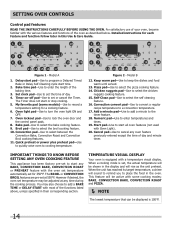
.... 11. Quick preheat or power plus preheat pad-Use to quickly raise oven to cooking temperature. 12 delay bake start any Oven Cooking Feature This appliance has been factory pre-set at any oven feature previously entered except the time of day. 4. Self-Clean pad-Use to select the pizza cooking...
.... 11. Quick preheat or power plus preheat pad-Use to quickly raise oven to cooking temperature. 12 delay bake start any Oven Cooking Feature This appliance has been factory pre-set at any oven feature previously entered except the time of day. 4. Self-Clean pad-Use to select the pizza cooking...
Complete Owner's Guide (English)
Page 28
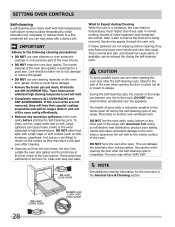
... should be VERY HOT. NOTE See additional cleaning information for a good seal. This is being removed. DO NOT leave small children unattended near the appliance. DO NOT line the oven walls, racks, bottom or any aluminum foil. If the oven racks are normal. This can cause heavy smoke or fire...
... should be VERY HOT. NOTE See additional cleaning information for a good seal. This is being removed. DO NOT leave small children unattended near the appliance. DO NOT line the oven walls, racks, bottom or any aluminum foil. If the oven racks are normal. This can cause heavy smoke or fire...
Complete Owner's Guide (English)
Page 31
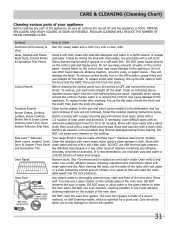
...Stainless Steel cleaners or any other liquid cleaners, abrasive cleaners, scouring pads, or paper towels - The oven door gasket is recommended to the appliance. Vinyl Glass, Painted and Plastic Body Parts, Control Knobs & Decorative Trim Pieces Using a soft cloth, clean with a 1:1 solution of...Cleaning various parts of your appliance Before cleaning any part of the appliance, be sure all controls are not removed, follow the cooktop cleaning instructions below. Steel (some models) in water. Easy Care™ Stainless Your range finish is essential for 30 to the OFF position; ...
...Stainless Steel cleaners or any other liquid cleaners, abrasive cleaners, scouring pads, or paper towels - The oven door gasket is recommended to the appliance. Vinyl Glass, Painted and Plastic Body Parts, Control Knobs & Decorative Trim Pieces Using a soft cloth, clean with a 1:1 solution of...Cleaning various parts of your appliance Before cleaning any part of the appliance, be sure all controls are not removed, follow the cooktop cleaning instructions below. Steel (some models) in water. Easy Care™ Stainless Your range finish is essential for 30 to the OFF position; ...
Complete Owner's Guide (English)
Page 32
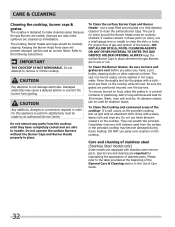
..., rinse well and dry. The cooktop, Burner Heads and Caps should be washed in this appliance to the table provided at the beginning of stainless steel (Stainless Steel models only) Some models are required for 30 minutes. Do not operate the surface Burners without the Burner Caps and Burner Heads properly in...
..., rinse well and dry. The cooktop, Burner Heads and Caps should be washed in this appliance to the table provided at the beginning of stainless steel (Stainless Steel models only) Some models are required for 30 minutes. Do not operate the surface Burners without the Burner Caps and Burner Heads properly in...
Complete Owner's Guide (English)
Page 33
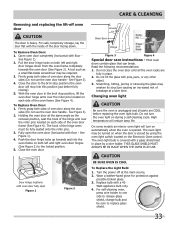
... the broil stop into the oven frame on both left and right door hinges down . See Figure 3). 2. Do not hit the glass with a 40 Watt appliance bulb only. 4. Changing oven light CAUTION Be sure the oven is unplugged and all the oven racks are COOL before fully closing). 5. THIS GLASS SHIELD...
... the broil stop into the oven frame on both left and right door hinges down . See Figure 3). 2. Do not hit the glass with a 40 Watt appliance bulb only. 4. Changing oven light CAUTION Be sure the oven is unplugged and all the oven racks are COOL before fully closing). 5. THIS GLASS SHIELD...

Complete Owner's Guide (English)
Page 34
... Turn the keep warmer drawer 1. To replace keep warm drawer WARNING Turn power off before cleaning and servicing the keep warm drawer. 3. Disconnect appliance from the appliance. 5. Care & Cleaning To remove and replace keep warm drawer 1. Rinse with an ammonia-soaked paper towel for... 30 to the fully opened position. 2. Push the drawer back into the appliance. DO NOT touch the keep warm drawer, gently scour with clean water and a damp cloth. The element may become damaged...
... Turn the keep warmer drawer 1. To replace keep warm drawer WARNING Turn power off before cleaning and servicing the keep warm drawer. 3. Disconnect appliance from the appliance. 5. Care & Cleaning To remove and replace keep warm drawer 1. Rinse with an ammonia-soaked paper towel for... 30 to the fully opened position. 2. Push the drawer back into the appliance. DO NOT touch the keep warm drawer, gently scour with clean water and a damp cloth. The element may become damaged...
Complete Owner's Guide (English)
Page 35
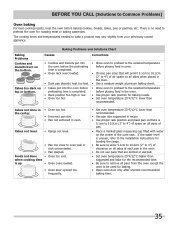
... temperature 25°F/12°C higher than suggested and bake for the recommended time. • Be sure to remove all pans from your previously owned appliance. when cooking time is no need to oven wall or rack overcrowded. • Pan warped. Baking Problems and Solutions Chart Baking Problems Cookies and biscuits...
... temperature 25°F/12°C higher than suggested and bake for the recommended time. • Be sure to remove all pans from your previously owned appliance. when cooking time is no need to oven wall or rack overcrowded. • Pan warped. Baking Problems and Solutions Chart Baking Problems Cookies and biscuits...
Complete Owner's Guide (English)
Page 36
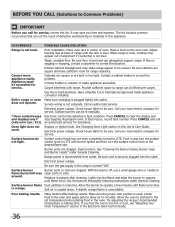
... and have sufficient room for service. Contact a cabinet maker to correct the situation. Have a flexible C.S.A international approved metal appliance connector installed. Call an authorized servicer. Call your local electric company for service. Electrical power outage. With the burner off,...burner flame Dust particles in coastal areas. Salt air in main line. Poor installation. Kitchen cabinet misalignment may make appliance accessible. Carpet interferes with range. Entire range or oven Make sure cord/plug is securely plugged into outlet. ...
... and have sufficient room for service. Contact a cabinet maker to correct the situation. Have a flexible C.S.A international approved metal appliance connector installed. Call an authorized servicer. Call your local electric company for service. Electrical power outage. With the burner off,...burner flame Dust particles in coastal areas. Salt air in main line. Poor installation. Kitchen cabinet misalignment may make appliance accessible. Carpet interferes with range. Entire range or oven Make sure cord/plug is securely plugged into outlet. ...
Complete Owner's Guide (English)
Page 40
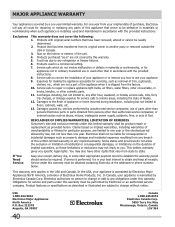
... but not limited to any after hour, weekend, or holiday service calls, tolls, ferry trip charges, or mileage expense for appliances not in ordinary household use of merchantability or fitness for servicing, such as property damage and incidental expenses resulting from the factory....may also have been removed, altered or cannot be obtained contacting Electrolux at the addresses or phone numbers below. MAJOR APPLIANCE WARRANTY Your appliance is covered by unauthorized service companies; Surcharges including, but not limited to change without notice. or external causes such ...
... but not limited to any after hour, weekend, or holiday service calls, tolls, ferry trip charges, or mileage expense for appliances not in ordinary household use of merchantability or fitness for servicing, such as property damage and incidental expenses resulting from the factory....may also have been removed, altered or cannot be obtained contacting Electrolux at the addresses or phone numbers below. MAJOR APPLIANCE WARRANTY Your appliance is covered by unauthorized service companies; Surcharges including, but not limited to change without notice. or external causes such ...

Installation Instructions (All Languages)
Page 1
...the unit in this booklet. HEIGHT OF COUNTERTOP 35 7/8" (91,1 cm) 30" (76,2 cm) 36 5/8" (93 cm) 31 1/2" (80 cm) 28 5/16" (71,9 cm) 30±1/16" (76,2±0,15 cm) NOTE: Wiring diagram for these appliances are enclosed in United States 1 21 3/4" (55,2 cm) Min. ...(5.1 cm to Clear Space for applicable agency certification FOR YOUR SAFETY: - Installation and service must be performed by a Massachusetts • Do not touch any appliance. A. WALL 30" Min. (76.2 cm Min.) Shave 1 ½" Max. (3.8 cm Max.) Raised Edge to 10.2 cm) From Floor. WIDTH (Under Cooktop) ...
...the unit in this booklet. HEIGHT OF COUNTERTOP 35 7/8" (91,1 cm) 30" (76,2 cm) 36 5/8" (93 cm) 31 1/2" (80 cm) 28 5/16" (71,9 cm) 30±1/16" (76,2±0,15 cm) NOTE: Wiring diagram for these appliances are enclosed in United States 1 21 3/4" (55,2 cm) Min. ...(5.1 cm to Clear Space for applicable agency certification FOR YOUR SAFETY: - Installation and service must be performed by a Massachusetts • Do not touch any appliance. A. WALL 30" Min. (76.2 cm Min.) Shave 1 ½" Max. (3.8 cm Max.) Raised Edge to 10.2 cm) From Floor. WIDTH (Under Cooktop) ...

Installation Instructions (All Languages)
Page 2
... cm) clearance for cutout width (E dimension) of the cabinet. 5. E E 22 7/8"(58.1 cm) min. 23 1/4"(59.05 cm) max. (see page 3), insert the appliance in the counter opening while pushing into it is unprotected. 4. WIDTH (Under Cooktop) C. with not less than the cabinet height (see Note 4) FRONT OF CABINET... open. Make sure the unit is supported by the leveling legs and NOT by not less than 30 1/16" (76,4 cm), make sure the appliance is protected by the cooktop itself. COOKTOP WIDTH 35 7/8" (91,1 cm) 30" (76,2 cm) 36 5/8" (93 cm) 31 1/2" (80 cm) D. TOTAL DEPTH TO ...
... cm) clearance for cutout width (E dimension) of the cabinet. 5. E E 22 7/8"(58.1 cm) min. 23 1/4"(59.05 cm) max. (see page 3), insert the appliance in the counter opening while pushing into it is unprotected. 4. WIDTH (Under Cooktop) C. with not less than the cabinet height (see Note 4) FRONT OF CABINET... open. Make sure the unit is supported by the leveling legs and NOT by not less than 30 1/16" (76,4 cm), make sure the appliance is protected by the cooktop itself. COOKTOP WIDTH 35 7/8" (91,1 cm) 30" (76,2 cm) 36 5/8" (93 cm) 31 1/2" (80 cm) D. TOTAL DEPTH TO ...
Installation Instructions (All Languages)
Page 4
...SELF-CLEAN FEATURE: • Remove broiler pan, food and other synthetic floor covering, make sure the range is installed properly, grasp appliance. 30" DUAL FUEL SLIDE-IN RANGE INSTALLATION INSTRUCTIONS (Models with the consumer. 5. Be sure to leave these installation instructions before self-cleaning ...must conform with linoleum or any other utensils before installing range. 2. Never leave children alone or unattended in the area where an appliance is hazardous. • Do not use of interest to LITE. Follow the precleaning instructions in use your Owner's Guide for ...
...SELF-CLEAN FEATURE: • Remove broiler pan, food and other synthetic floor covering, make sure the range is installed properly, grasp appliance. 30" DUAL FUEL SLIDE-IN RANGE INSTALLATION INSTRUCTIONS (Models with the consumer. 5. Be sure to leave these installation instructions before self-cleaning ...must conform with linoleum or any other utensils before installing range. 2. Never leave children alone or unattended in the area where an appliance is hazardous. • Do not use of interest to LITE. Follow the precleaning instructions in use your Owner's Guide for ...