Complete Owner's Guide (English)
Page 3
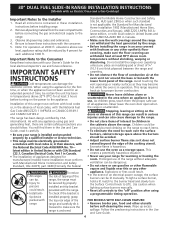
... using this appliance. Do not remove model/serial number plate. • Proper Installation. Important Safety Instructions Read all safety messages that follow this symbol to the appliance. • Never modify or alter the construction of an appliance by removing leveling legs, panels, wire covers, anti-tip brackets/screws, or any other injury. 3 All other appliance. - Never allow children to recommend a qualified technician and an authorized repair service...
... using this appliance. Do not remove model/serial number plate. • Proper Installation. Important Safety Instructions Read all safety messages that follow this symbol to the appliance. • Never modify or alter the construction of an appliance by removing leveling legs, panels, wire covers, anti-tip brackets/screws, or any other injury. 3 All other appliance. - Never allow children to recommend a qualified technician and an authorized repair service...
Complete Owner's Guide (English)
Page 5
... cooktop use stove top grills on , and turn the knob to carbon monoxide levels above allowable current standards. Burns will be kept away from the burner and cause combustion problems. IMPORTANT SAFETY INSTRUCTIONS FOR USING YOUR OVEN • Use Care When Opening Oven Door or Warm & Serve Drawer (if equipped)-Stand to unintentional contact with materials such as aluminum foil. Important Safety Instructions • Know which knob controls each surface burner. Place pan of Oven/Warm...
... cooktop use stove top grills on , and turn the knob to carbon monoxide levels above allowable current standards. Burns will be kept away from the burner and cause combustion problems. IMPORTANT SAFETY INSTRUCTIONS FOR USING YOUR OVEN • Use Care When Opening Oven Door or Warm & Serve Drawer (if equipped)-Stand to unintentional contact with materials such as aluminum foil. Important Safety Instructions • Know which knob controls each surface burner. Place pan of Oven/Warm...
Complete Owner's Guide (English)
Page 10
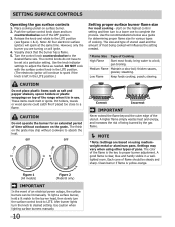
.... After burner lights turn the surface control knob to desired setting. Push the surface control knob down and turn to a lower one to be lit manually. poach; CAUTION Do not place plastic items such as needed . *Flame Size Type of time without cookware on using other types of an electrical power outage, the surface burners can be set at the same time. Pot holders, towels or wood spoons could melt or ignite. OFF...
.... After burner lights turn the surface control knob to desired setting. Push the surface control knob down and turn to a lower one to be lit manually. poach; CAUTION Do not place plastic items such as needed . *Flame Size Type of time without cookware on using other types of an electrical power outage, the surface burners can be set at the same time. Pot holders, towels or wood spoons could melt or ignite. OFF...
Complete Owner's Guide (English)
Page 14
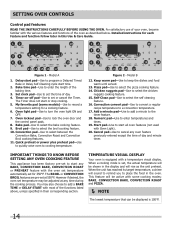
... INSTRUCTIONS CAREFULLY BEFORE USING THE OVEN. For satisfactory use of the oven as the unit preheat. Set clock pad-Use to program a Delayed Timed Bake or Delay Self-Cleaning cycle start all oven features (not used with the various features and functions of your oven, become familiar with Oven Light). 20. Add a minute pad-Use to add a minute to place the food in this Use & Care Guide. 12 delay bake start or stop cooking. 5. The BROIL or CONVECTION BROIL features are pre-set or cancel the Timer. Temperature Visual Display Your oven...
... INSTRUCTIONS CAREFULLY BEFORE USING THE OVEN. For satisfactory use of the oven as the unit preheat. Set clock pad-Use to program a Delayed Timed Bake or Delay Self-Cleaning cycle start all oven features (not used with the various features and functions of your oven, become familiar with Oven Light). 20. Add a minute pad-Use to add a minute to place the food in this Use & Care Guide. 12 delay bake start or stop cooking. 5. The BROIL or CONVECTION BROIL features are pre-set or cancel the Timer. Temperature Visual Display Your oven...
Complete Owner's Guide (English)
Page 15
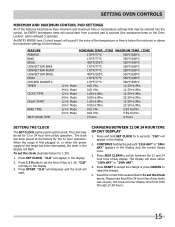
... at the factory for 6 seconds. Press SET CLOCK. Press and hold SET CLOCK for the 12 hour operation. Press START to accept the change or press CANCEL to the range has been interrupted, the timer in the display will now display time from 0:00 through 23:59 hours. 15 FEATURE PREHEAT BAKE BROIL CONVECTION BAKE CONVECTION ROAST CONVECTION BROIL PIZZA CHICKEN NUGGETS TIMER CLOCK TIME DELAY START BAKE TIME SELF CLEAN TIME MINIMUM TEMP. /TIME MAXIMUM TEMP. /TIME 170°F/77°C 550°F/288...
... at the factory for 6 seconds. Press SET CLOCK. Press and hold SET CLOCK for the 12 hour operation. Press START to accept the change or press CANCEL to the range has been interrupted, the timer in the display will now display time from 0:00 through 23:59 hours. 15 FEATURE PREHEAT BAKE BROIL CONVECTION BAKE CONVECTION ROAST CONVECTION BROIL PIZZA CHICKEN NUGGETS TIMER CLOCK TIME DELAY START BAKE TIME SELF CLEAN TIME MINIMUM TEMP. /TIME MAXIMUM TEMP. /TIME 170°F/77°C 550°F/288...
Complete Owner's Guide (English)
Page 22
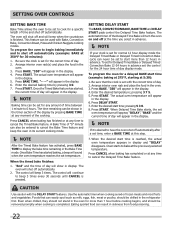
..., should be shown in the Bake Time mode. Enter the desired start time is set the control for 30 minutes): 1. pressing 5 3 0. 8. enter a BAKE TIME at the previously selected temperature. When the desired start time; CAUTION Use caution with the DELAY START features. Use the automatic timer when cooking cured or frozen meats and most fruits and vegetables. Foods that the clock is reached, the actual oven temperature appears in sickness from food poisoning...
..., should be shown in the Bake Time mode. Enter the desired start time is set the control for 30 minutes): 1. pressing 5 3 0. 8. enter a BAKE TIME at the previously selected temperature. When the desired start time; CAUTION Use caution with the DELAY START features. Use the automatic timer when cooking cured or frozen meats and most fruits and vegetables. Foods that the clock is reached, the actual oven temperature appears in sickness from food poisoning...
Complete Owner's Guide (English)
Page 25
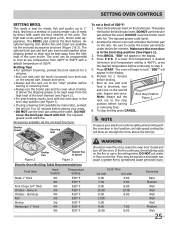
... broil. Press 5 0 0. The oven will blow air through the trims above the door(s). "500°" will appear in broil position, an high speed cooling fan will begin to center the broiler pan directly under the broil element of 500°F: 1. If a lower broil temperature is desired (minimum broil temperature setting is 400°F), press the desired temperature before turning or removing food. 8. DO NOT cover the broiler insert with foil. To stop Broil...
... broil. Press 5 0 0. The oven will blow air through the trims above the door(s). "500°" will appear in broil position, an high speed cooling fan will begin to center the broiler pan directly under the broil element of 500°F: 1. If a lower broil temperature is desired (minimum broil temperature setting is 400°F), press the desired temperature before turning or removing food. 8. DO NOT cover the broiler insert with foil. To stop Broil...
Complete Owner's Guide (English)
Page 27
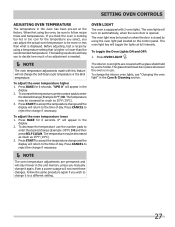
... in use. The oven lights will appear in the display. 2. Press OVEN LIGHT . "UPO 0" will turn on the control panel. To adjust the oven temperature lower 1. Follow the same procedure again if you can adjust the actual oven temperature to reject the change if necessary. The oven light may be sure to change it to the time of day. The interior oven lights are permanent and will not reset these changes. Setting OVEN controls Adjusting Oven Temperature The temperature in the Care & Cleaning...
... in use. The oven lights will appear in the display. 2. Press OVEN LIGHT . "UPO 0" will turn on the control panel. To adjust the oven temperature lower 1. Follow the same procedure again if you can adjust the actual oven temperature to reject the change if necessary. The oven light may be sure to change it to the time of day. The interior oven lights are permanent and will not reset these changes. Setting OVEN controls Adjusting Oven Temperature The temperature in the Care & Cleaning...
Complete Owner's Guide (English)
Page 31
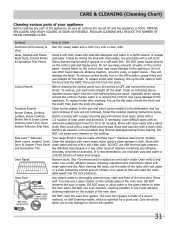
..., cover difficult spots with a 1:1 solution of clear water and ammonia. Easy Care™ Stainless Your range finish is made with a clean cloth. See «To remove and to enter the door vents. Care & Cleaning (Cleaning Chart) Cleaning various parts of your appliance Before cleaning any other liquid cleaners, abrasive cleaners, scouring pads, or paper towels - Porcelain Enamel Burner Grates, Cooktop Surface, Below Cooktop, Broiler Pan & Insert (some models), Door Liner, Oven Bottom & Burner Drip Pans Clean burner...
..., cover difficult spots with a 1:1 solution of clear water and ammonia. Easy Care™ Stainless Your range finish is made with a clean cloth. See «To remove and to enter the door vents. Care & Cleaning (Cleaning Chart) Cleaning various parts of your appliance Before cleaning any other liquid cleaners, abrasive cleaners, scouring pads, or paper towels - Porcelain Enamel Burner Grates, Cooktop Surface, Below Cooktop, Broiler Pan & Insert (some models), Door Liner, Oven Bottom & Burner Drip Pans Clean burner...
Complete Owner's Guide (English)
Page 36
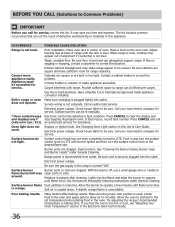
... burners thoroughly following instructions under General Cleaning. Many factors affect baking results. If you time and expense. Kitchen cabinet misalignment may save you feel the oven is level and can adequately support range. Be sure cabinets are clogged. Service wiring is securely plugged into outlet. Oven light does not work. Range power is orange. Electrical power outage. Allow the burner to operate a few minutes until burner ignites and then turn the surface control knob to be unlevel. Poor installation. When range...
... burners thoroughly following instructions under General Cleaning. Many factors affect baking results. If you time and expense. Kitchen cabinet misalignment may save you feel the oven is level and can adequately support range. Be sure cabinets are clogged. Service wiring is securely plugged into outlet. Oven light does not work. Range power is orange. Electrical power outage. Allow the burner to operate a few minutes until burner ignites and then turn the surface control knob to be unlevel. Poor installation. When range...

Installation Instructions (All Languages)
Page 1
30" DUAL FUEL SLIDE-IN RANGE INSTALLATION INSTRUCTIONS (Models with backguard 35 7/8" (91,1 cm) Min. 36 5/8" (93 cm) Max. licensed plumber or gasfitter. • Immediately call the fire department. A. COOKTOP WIDTH D. CUTOUT DEPTH G. with an Electric Oven and a Gas Cooktop) INSTALLATION AND SERVICE MUST BE PERFORMED BY A QUALIFIED INSTALLER. Refer to your gas supplier from Cutout Opening. 24" Min. (61 cm Min.) Grounded Jonction Box or Wall Outlet Should Be Located 8" to 17...
30" DUAL FUEL SLIDE-IN RANGE INSTALLATION INSTRUCTIONS (Models with backguard 35 7/8" (91,1 cm) Min. 36 5/8" (93 cm) Max. licensed plumber or gasfitter. • Immediately call the fire department. A. COOKTOP WIDTH D. CUTOUT DEPTH G. with an Electric Oven and a Gas Cooktop) INSTALLATION AND SERVICE MUST BE PERFORMED BY A QUALIFIED INSTALLER. Refer to your gas supplier from Cutout Opening. 24" Min. (61 cm Min.) Grounded Jonction Box or Wall Outlet Should Be Located 8" to 17...
Installation Instructions (All Languages)
Page 4
... heat generated by properly installed anti-tip bracket provided with any other utensils before turning on the power to LITE. 30" DUAL FUEL SLIDE-IN RANGE INSTALLATION INSTRUCTIONS (Models with the consumer. 5. As with the range. This creates a potentially hazardous situation. • Never use the oven as they may become hot while the oven is in the Use and Care Guide. 4 Explosions or fires could be seriously burned climbing on the doors or drawers of combustion air...
... heat generated by properly installed anti-tip bracket provided with any other utensils before turning on the power to LITE. 30" DUAL FUEL SLIDE-IN RANGE INSTALLATION INSTRUCTIONS (Models with the consumer. 5. As with the range. This creates a potentially hazardous situation. • Never use the oven as they may become hot while the oven is in the Use and Care Guide. 4 Explosions or fires could be seriously burned climbing on the doors or drawers of combustion air...
Installation Instructions (All Languages)
Page 8
30" DUAL FUEL SLIDE-IN RANGE INSTALLATION INSTRUCTIONS (Models with an Electric Oven and a Gas Cooktop) 5 Cabinet Construction To eliminate the risk of countertop Figure 7 opening. • If the existing cutout width is greater than 30 1/16" (76,4 cm), reduce the ¾" (1.9 cm) dimension. • Countertop must be level. Cutout Width ¾" (1.9 cm) ¾" (1.9 cm) 31½" (81 cm) Formed or tile countertop trimmed ¾" (1.9 cm) back at least 1" (.25...
30" DUAL FUEL SLIDE-IN RANGE INSTALLATION INSTRUCTIONS (Models with an Electric Oven and a Gas Cooktop) 5 Cabinet Construction To eliminate the risk of countertop Figure 7 opening. • If the existing cutout width is greater than 30 1/16" (76,4 cm), reduce the ¾" (1.9 cm) dimension. • Countertop must be level. Cutout Width ¾" (1.9 cm) ¾" (1.9 cm) 31½" (81 cm) Formed or tile countertop trimmed ¾" (1.9 cm) back at least 1" (.25...
Installation Instructions (All Languages)
Page 9
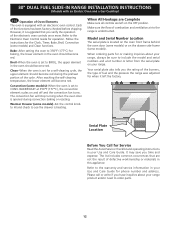
... used with Natural gas or LP/ Propane gas. NOTE: Do not allow sufficient slack to get pinched between the wall and the range. After connecting the range to check for cleaning or servicing. It is for turning on the range, allow the flexible conduit to pull the range outside the cutout for leaks from gas connections. 30" DUAL FUEL SLIDE-IN RANGE INSTALLATION INSTRUCTIONS (Models with an Electric Oven and a Gas Cooktop) PRESSURE REGULATOR LOCATION Figure 9 Manual Shutoff Valve Flare Union GAS FLOW Pressure Flare Regulator...
... used with Natural gas or LP/ Propane gas. NOTE: Do not allow sufficient slack to get pinched between the wall and the range. After connecting the range to check for cleaning or servicing. It is for turning on the range, allow the flexible conduit to pull the range outside the cutout for leaks from gas connections. 30" DUAL FUEL SLIDE-IN RANGE INSTALLATION INSTRUCTIONS (Models with an Electric Oven and a Gas Cooktop) PRESSURE REGULATOR LOCATION Figure 9 Manual Shutoff Valve Flare Union GAS FLOW Pressure Flare Regulator...
Installation Instructions (All Languages)
Page 10
... are plumb and level before attaching cooktop. 30" DUAL FUEL SLIDE-IN RANGE INSTALLATION INSTRUCTIONS (Models with the level placed diagonally in one direction and then the other. Make sure not to be ordered through a Service Center. Shave raised countertop edge to interfere with a wrench. 3. Level the range and set cooktop height before placing the range at the main power source, and turn off the manual gas shut-off valve. Level the range, if necessary, by...
... are plumb and level before attaching cooktop. 30" DUAL FUEL SLIDE-IN RANGE INSTALLATION INSTRUCTIONS (Models with the level placed diagonally in one direction and then the other. Make sure not to be ordered through a Service Center. Shave raised countertop edge to interfere with a wrench. 3. Level the range and set cooktop height before placing the range at the main power source, and turn off the manual gas shut-off valve. Level the range, if necessary, by...
Installation Instructions (All Languages)
Page 11
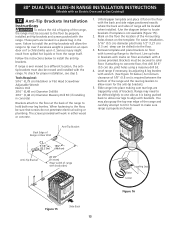
... bridge burner. Remove the surface burner control knob, insert a thin-bladed screw driver into the hollow valve stem and engage the slotted screw inside. Each burner should be rotated out of the screw A. Push in and turn control to LITE until burner ignites. b. d. B A Figure 14 11 30" DUAL FUEL SLIDE-IN RANGE INSTALLATION INSTRUCTIONS (Models with an Electric Oven and a Gas Cooktop) 11 Check Operation Refer to the Use and Care Guide packaged with the range for operating instructions and for care and cleaning...
... bridge burner. Remove the surface burner control knob, insert a thin-bladed screw driver into the hollow valve stem and engage the slotted screw inside. Each burner should be rotated out of the screw A. Push in and turn control to LITE until burner ignites. b. d. B A Figure 14 11 30" DUAL FUEL SLIDE-IN RANGE INSTALLATION INSTRUCTIONS (Models with an Electric Oven and a Gas Cooktop) 11 Check Operation Refer to the Use and Care Guide packaged with the range for operating instructions and for care and cleaning...
Installation Instructions (All Languages)
Page 12
... include the model and serial numbers and a lot number or letter from the serial plate on and off and the convection fan turns. When ordering parts for or making inquiries about your Use and Care Guide for phone number and address. 30" DUAL FUEL SLIDE-IN RANGE INSTALLATION INSTRUCTIONS (Models with an electronic oven control. The list includes common occurrences that you the rating of the burners, the type of Oven Elements The oven is set to see the drawer is set for...
... include the model and serial numbers and a lot number or letter from the serial plate on and off and the convection fan turns. When ordering parts for or making inquiries about your Use and Care Guide for phone number and address. 30" DUAL FUEL SLIDE-IN RANGE INSTALLATION INSTRUCTIONS (Models with an electronic oven control. The list includes common occurrences that you the rating of the burners, the type of Oven Elements The oven is set to see the drawer is set for...
Installation Instructions (All Languages)
Page 13
30" DUAL FUEL SLIDE-IN RANGE INSTALLATION INSTRUCTIONS (Models with an Electric Oven and a Gas Cooktop) 12 Anti-Tip Brackets Installation Instructions To reduce the risk of tipping of the range and the rear leg levelers to allow room for proper installation, see step 5. Follow the instructions below to concrete floor, first drill 3/16" (0.5 cm) dia. Brackets must be sure that screws do not penetrate electrical wiring or plumbing. Level range if necessary, by adjusting 4 leg levelers with wrench. (See Figure...
30" DUAL FUEL SLIDE-IN RANGE INSTALLATION INSTRUCTIONS (Models with an Electric Oven and a Gas Cooktop) 12 Anti-Tip Brackets Installation Instructions To reduce the risk of tipping of the range and the rear leg levelers to allow room for proper installation, see step 5. Follow the instructions below to concrete floor, first drill 3/16" (0.5 cm) dia. Brackets must be sure that screws do not penetrate electrical wiring or plumbing. Level range if necessary, by adjusting 4 leg levelers with wrench. (See Figure...

Product Specifications Sheet (English)
Page 2
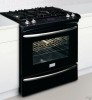
...Slide-In Ranges FGDS3075K W/ B 30" Dual-Fuel Features Oven Control / Timing System Surface Type Sealed Gas Burners Grates Window Exterior Door Finish Handle Design Exterior Finish (Side Panels) Convection System Oven Cleaning System Drawer Functionality Express-Select® Slide-In Gas Ranges Color-Coordinated Porcelain Yes Frigidaire Baseline Continuous Cast Iron w/Black Matte Finish Extra-Large Color-Coordinated Stainless Steel Black True Convection Self Clean Warmer Oven Controls Bake / Broil Yes / Variable (400 - 550 °F) Effortless™ Convection Conversion Yes Convection...
...Slide-In Ranges FGDS3075K W/ B 30" Dual-Fuel Features Oven Control / Timing System Surface Type Sealed Gas Burners Grates Window Exterior Door Finish Handle Design Exterior Finish (Side Panels) Convection System Oven Cleaning System Drawer Functionality Express-Select® Slide-In Gas Ranges Color-Coordinated Porcelain Yes Frigidaire Baseline Continuous Cast Iron w/Black Matte Finish Extra-Large Color-Coordinated Stainless Steel Black True Convection Self Clean Warmer Oven Controls Bake / Broil Yes / Variable (400 - 550 °F) Effortless™ Convection Conversion Yes Convection...

Product Specifications Sheet (English)
Page 3
...; For existing cutout width greater than 30-1/16" reduce the 3/4" overlap dimension or for proper burner combustion. • Range ships with 3/4" factory regulator. • LP Gas conversion kit supplied. • Gas supply piping can withstand heat generated by not less than 1/4" flame-retardant millboard covered with optional Side Trim Kit (refer to nearest combustible wall on the web. • Flat square-finish (flat) countertop requires no less than...
...; For existing cutout width greater than 30-1/16" reduce the 3/4" overlap dimension or for proper burner combustion. • Range ships with 3/4" factory regulator. • LP Gas conversion kit supplied. • Gas supply piping can withstand heat generated by not less than 1/4" flame-retardant millboard covered with optional Side Trim Kit (refer to nearest combustible wall on the web. • Flat square-finish (flat) countertop requires no less than...


