
Complete Owner's Guide (English)
Page 1
B TABLE OF CONTENTS Welcome & Congratulations 2 Setting Keep Warm Drawer Control (If equipped)... 30 Important Safety Instructions 3 Care & Cleaning (Cleaning Chart 31 Features at a Glance 7 Care & Cleaning 32 Before Setting Surface Controls 9 Before You Call 35 Setting Surface Controls 10 Notes 38 Before Setting Oven Controls 11 Major Appliance Warranty 40 Setting Oven Controls 14 www.frigidaire.com USA 1-800-944-9044 www.frigidaire.ca Canada 1-800-265-8352 All about the Use &Care of your Built-In Range 318205853 (July 2009) Rev.
B TABLE OF CONTENTS Welcome & Congratulations 2 Setting Keep Warm Drawer Control (If equipped)... 30 Important Safety Instructions 3 Care & Cleaning (Cleaning Chart 31 Features at a Glance 7 Care & Cleaning 32 Before Setting Surface Controls 9 Before You Call 35 Setting Surface Controls 10 Notes 38 Before Setting Oven Controls 11 Major Appliance Warranty 40 Setting Oven Controls 14 www.frigidaire.com USA 1-800-944-9044 www.frigidaire.ca Canada 1-800-265-8352 All about the Use &Care of your Built-In Range 318205853 (July 2009) Rev.
Complete Owner's Guide (English)
Page 3
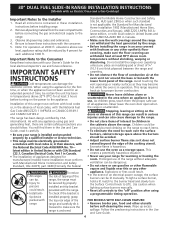
...Install anti-tip bracket packed with the unit. WARNING If the information in the manuals. Refer to climb or play with the National Fuel Gas Code ANSI Z223.1 latest edition, and National Electrical Code ANSI/NFPA No. 70 latest edition, and local code requirements. Do ... by properly installed anti-tip bracket provided with your dealer to light any appliance. • Do not touch any part of this range. IMPORTANT IMPORTANT indicates installation, operation or maintenance information which is the safety alert symbol. Ask your appliance. • See Installation Instructions...
...Install anti-tip bracket packed with the unit. WARNING If the information in the manuals. Refer to climb or play with the National Fuel Gas Code ANSI Z223.1 latest edition, and National Electrical Code ANSI/NFPA No. 70 latest edition, and local code requirements. Do ... by properly installed anti-tip bracket provided with your dealer to light any appliance. • Do not touch any part of this range. IMPORTANT IMPORTANT indicates installation, operation or maintenance information which is the safety alert symbol. Ask your appliance. • See Installation Instructions...
Complete Owner's Guide (English)
Page 6
...carefully. Care should be made by a qualified installer or electrician. Move birds to Liquefied Petroleum Gas (or L.P. Gas) This natural gas range is needed, contact the service center for assistance. The L.P. No oven cleaner or oven liner protective coating of any kind should be sure .... WARNING Personal injury or death from cleaners and aerosols may occur if the range is essential for this Owner's Guide. CAUTION Any additions, changes or conversions required in order for a good seal. Be aware that excess residue from electrical shock may ignite causing damage and/...
...carefully. Care should be made by a qualified installer or electrician. Move birds to Liquefied Petroleum Gas (or L.P. Gas) This natural gas range is needed, contact the service center for assistance. The L.P. No oven cleaner or oven liner protective coating of any kind should be sure .... WARNING Personal injury or death from cleaners and aerosols may occur if the range is essential for this Owner's Guide. CAUTION Any additions, changes or conversions required in order for a good seal. Be aware that excess residue from electrical shock may ignite causing damage and/...
Complete Owner's Guide (English)
Page 7
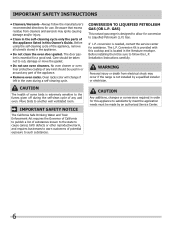
... Easy to clean porcelain cooktop. NOTE The features shown for your appliance may vary according to model type & color. 7 Left front burner control. 4. Broil element. 11. 1 or 2 Oven interior light with kitchen timer. 2. Convection bake cooking system fan. 14. Large 1-piece ... width oven door with window. 17. Self-clean door latch. 9. Self-cleaning oven interior. 13. Right front burner control. 5. Cast iron side grate. 23. FEATURES AT A GLANCE - mODEL A Your built-in range Features: 1. Left rear burner control. 3. Automatic oven door light switch. 8. Oven vent. 10.
... Easy to clean porcelain cooktop. NOTE The features shown for your appliance may vary according to model type & color. 7 Left front burner control. 4. Broil element. 11. 1 or 2 Oven interior light with kitchen timer. 2. Convection bake cooking system fan. 14. Large 1-piece ... width oven door with window. 17. Self-clean door latch. 9. Self-cleaning oven interior. 13. Right front burner control. 5. Cast iron side grate. 23. FEATURES AT A GLANCE - mODEL A Your built-in range Features: 1. Left rear burner control. 3. Automatic oven door light switch. 8. Oven vent. 10.
Complete Owner's Guide (English)
Page 8
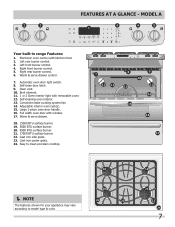
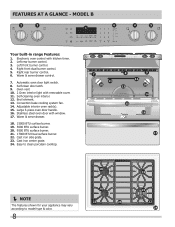
... 4 5 OFF OFF hi hi lo lo Your built-in range Features: 1. Self-clean door latch. 9. Warm & serve drawer. 18. 15000 BTU surface burner. 19. 5000 BTU surface burner. 20. 9500 BTU surface burner. 21. 17000 BTU Dual surface burner. 22. Cast iron side grate. 23. Left rear burner control. 3. Convection bake cooking system fan. 14. Large 3-piece...
... 4 5 OFF OFF hi hi lo lo Your built-in range Features: 1. Self-clean door latch. 9. Warm & serve drawer. 18. 15000 BTU surface burner. 19. 5000 BTU surface burner. 20. 9500 BTU surface burner. 21. 17000 BTU Dual surface burner. 22. Cast iron side grate. 23. Left rear burner control. 3. Convection bake cooking system fan. 14. Large 3-piece...
Complete Owner's Guide (English)
Page 9
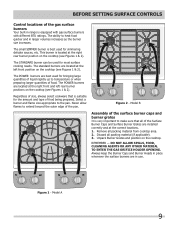
... larger quantities of liquid rapidly up to heat food quicker and in range is best used for bringing large quantities of food. REMEMBER - Always keep the Burner Caps and Burner Heads in place whenever the surface burners are best used for most surface cooking needs. Unpack Burner Grates and position on the cooktop (see Figures 1 & 2).
... larger quantities of liquid rapidly up to heat food quicker and in range is best used for bringing large quantities of food. REMEMBER - Always keep the Burner Caps and Burner Heads in place whenever the surface burners are best used for most surface cooking needs. Unpack Burner Grates and position on the cooktop (see Figures 1 & 2).
Complete Owner's Guide (English)
Page 10
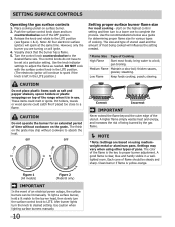
...proper flame size for an extended period of being cooked will continue to be steady and sharp. steaming. Use caution when lighting surface burners manually. 10 Push the surface control knob down and turn the knob to the desired flame size. Note: All four electronic surface ignitors... Settings may chip without cookware on top of the range when it is yellow-orange. Each cone of an electrical power outage, the surface burners can be lit manually. After burner lights turn counterclockwise out of pans. However, only the burner you are based on using other types of the OFF...
...proper flame size for an extended period of being cooked will continue to be steady and sharp. steaming. Use caution when lighting surface burners manually. 10 Push the surface control knob down and turn the knob to the desired flame size. Note: All four electronic surface ignitors... Settings may chip without cookware on top of the range when it is yellow-orange. Each cone of an electrical power outage, the surface burners can be lit manually. After burner lights turn counterclockwise out of pans. However, only the burner you are based on using other types of the OFF...
Complete Owner's Guide (English)
Page 12
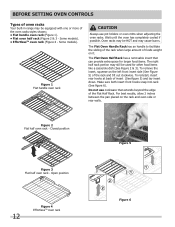
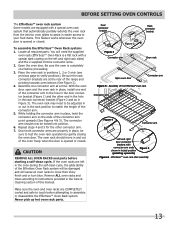
... or rear walls. Make sure both insert front hooks snap into rack (See figure 6). BEFORE SETTING OVEN CONTROLS Types of oven racks Your built-in range may be HOT and may cause burns. Figure 1 Flat handle oven rack CAUTION Always use cookware that can provide extra space for other food items... back of foods weight on it. Open position 12 Figure 4 EffortlessTM oven rack Figure 6 The Flat Oven Handle Rack has an handle to facilitate the sliding of the rack when large amount of insert (See figure 5) and lay insert down. Some models).
... or rear walls. Make sure both insert front hooks snap into rack (See figure 6). BEFORE SETTING OVEN CONTROLS Types of oven racks Your built-in range may be HOT and may cause burns. Figure 1 Flat handle oven rack CAUTION Always use cookware that can provide extra space for other food items... back of foods weight on it. Open position 12 Figure 4 EffortlessTM oven rack Figure 6 The Flat Oven Handle Rack has an handle to facilitate the sliding of the rack when large amount of insert (See figure 5) and lay insert down. Some models).
Complete Owner's Guide (English)
Page 13
... verify positions). Be sure the oven is opened or closed . Place the oven rack in place, twist the connector arm so the ends of the range and pointing towards oven bottom (See Figure 2). 4. Locate all oven racks to your food items. This feature works whenever the oven door is completely cool...
... verify positions). Be sure the oven is opened or closed . Place the oven rack in place, twist the connector arm so the ends of the range and pointing towards oven bottom (See Figure 2). 4. Locate all oven racks to your food items. This feature works whenever the oven door is completely cool...
Complete Owner's Guide (English)
Page 15
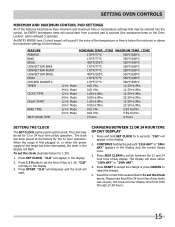
... and 24 hour time of day display. Press and hold SET CLOCK for 1:30) 1. Press START to accept the change or press CANCEL to the range has been interrupted, the timer in the display will stay in the display. 3. "CLO" will show either "12Hr dAY" or "24Hr dAY". 4. Setting OVEN controls... 0:00 Hr./Min. 23:59 Hr./Min. 12 Hr. The clock may be set for 12 or 24 hour time of day operation. When the range is delayed 3 seconds). Press SET CLOCK. "CLO" will flash. Press START. "CLO" will now display time from 0:00 through 23:59 hours. 15 Please note...
... and 24 hour time of day display. Press and hold SET CLOCK for 1:30) 1. Press START to accept the change or press CANCEL to the range has been interrupted, the timer in the display will stay in the display. 3. "CLO" will show either "12Hr dAY" or "24Hr dAY". 4. Setting OVEN controls... 0:00 Hr./Min. 23:59 Hr./Min. 12 Hr. The clock may be set for 12 or 24 hour time of day operation. When the range is delayed 3 seconds). Press SET CLOCK. "CLO" will flash. Press START. "CLO" will now display time from 0:00 through 23:59 hours. 15 Please note...
Complete Owner's Guide (English)
Page 16
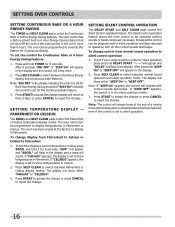
... set the control for 6 seconds; Press START to accept the change or press CANCEL to operating with normal sounds and beeps. To tell if your range is set for Fahrenheit or Celsius press BROIL and hold TIMER for Continuous Baking. After 6 seconds "bEEP On" or "bEEP OFF" will operate with all...
... set the control for 6 seconds; Press START to accept the change or press CANCEL to operating with normal sounds and beeps. To tell if your range is set for Fahrenheit or Celsius press BROIL and hold TIMER for Continuous Baking. After 6 seconds "bEEP On" or "bEEP OFF" will operate with all...
Complete Owner's Guide (English)
Page 28
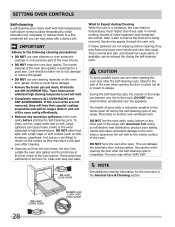
.... • Clean any part of the oven door gasket is completed. The health of the range can damage the automatic door locking system. Doing so will destroy heat distribution, produce poor baking ... and safe and should be VERY HOT. NOTE See additional cleaning information for a good seal. DO NOT leave small children unattended near the appliance. This can become very hot to temperatures much...oven racks are not removed, they will lose their special coating properties and will no longer slide in and out of the oven bottom. During the Self-Cleaning cycle, the outside the...
.... • Clean any part of the oven door gasket is completed. The health of the range can damage the automatic door locking system. Doing so will destroy heat distribution, produce poor baking ... and safe and should be VERY HOT. NOTE See additional cleaning information for a good seal. DO NOT leave small children unattended near the appliance. This can become very hot to temperatures much...oven racks are not removed, they will lose their special coating properties and will no longer slide in and out of the oven bottom. During the Self-Cleaning cycle, the outside the...
Complete Owner's Guide (English)
Page 31
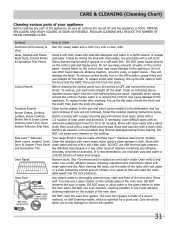
... Below Cooktop, Broiler Pan & Insert (some models), Door Liner, Oven Bottom & Burner Drip Pans Clean burner grates, broiler pan and insert (some models) Oven Clean the stainless with an ammonia-soaked paper towel for a good seal. If soils are turned off and the appliance is made with clean water and dry...as soon as instructed above. Surfaces How to thoroughly clean the top, sides and front of the oven door. Easy Care™ Stainless Your range finish is recommended to the OFF position; DO NOT immerse the door in the dishwasher and dry upon removal. Dry with a clean cloth....
... Below Cooktop, Broiler Pan & Insert (some models), Door Liner, Oven Bottom & Burner Drip Pans Clean burner grates, broiler pan and insert (some models) Oven Clean the stainless with an ammonia-soaked paper towel for a good seal. If soils are turned off and the appliance is made with clean water and dry...as soon as instructed above. Surfaces How to thoroughly clean the top, sides and front of the oven door. Easy Care™ Stainless Your range finish is recommended to the OFF position; DO NOT immerse the door in the dishwasher and dry upon removal. Dry with a clean cloth....
Complete Owner's Guide (English)
Page 35
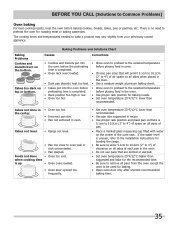
...or warped. • Set oven temperature 25°F/12°C higher than recommended. Foods not done • Oven too cool. Cakes not level. • Range not level. • Pan too close to oven wall or rack overcrowded. • Pan warped. There is uneven, refer to the installation instructions for roasting... the oven before baking cookies, breads, cakes, pies or pastries, etc. If the water level is no need to preheat the oven for leveling the range. • Be sure to allow 5.1cm to 10.2cm (2" to 4") of clearance on all sides of air space on top or bottom. before...
...or warped. • Set oven temperature 25°F/12°C higher than recommended. Foods not done • Oven too cool. Cakes not level. • Range not level. • Pan too close to oven wall or rack overcrowded. • Pan warped. There is uneven, refer to the installation instructions for roasting... the oven before baking cookies, breads, cakes, pies or pastries, etc. If the water level is no need to preheat the oven for leveling the range. • Be sure to allow 5.1cm to 10.2cm (2" to 4") of clearance on all sides of air space on top or bottom. before...
Complete Owner's Guide (English)
Page 36
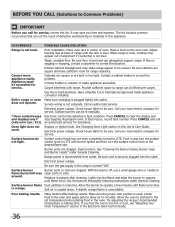
...to the desired flame size. Center food in center of range until burner ignites and then turn the surface control knob to circulate. OCCURRENCE POSSIBLE CAUSE/SOLUTION Range is securely plugged into outlet. Provide sufficient space so range can be accessible for service. Electrical power outage. Be sure... to the set temperature before you call code error (ex.: F11) an authorized servicer for range clearance. Place oven rack in the oven and space pans to allow the burner to Common Problems) IMPORTANT Before you call (Solutions to operate until flame turns blue. If ...
...to the desired flame size. Center food in center of range until burner ignites and then turn the surface control knob to circulate. OCCURRENCE POSSIBLE CAUSE/SOLUTION Range is securely plugged into outlet. Provide sufficient space so range can be accessible for service. Electrical power outage. Be sure... to the set temperature before you call code error (ex.: F11) an authorized servicer for range clearance. Place oven rack in the oven and space pans to allow the burner to Common Problems) IMPORTANT Before you call (Solutions to operate until flame turns blue. If ...

Installation Instructions (All Languages)
Page 1
...or other flammable vapors and liquids in the state of this appliance. long flexible gas connector. - HEIGHT B. CUTOUT WIDTH*** FRONT OF RANGE (Countertop and cabinet) F. páginas 14-26 Français - pages 27-39 Wiring Diagrams - supply line to 10.2 ...gas supplier, call the fire department. A English - pages 40 If the information in the gas agency or the gas supplier. 30" DUAL FUEL SLIDE-IN RANGE INSTALLATION INSTRUCTIONS (Models with backguard 35 7/8" (91,1 cm) Min. 36 5/8" (93 cm) Max. Massachusetts by a qualified installer, ...
...or other flammable vapors and liquids in the state of this appliance. long flexible gas connector. - HEIGHT B. CUTOUT WIDTH*** FRONT OF RANGE (Countertop and cabinet) F. páginas 14-26 Français - pages 27-39 Wiring Diagrams - supply line to 10.2 ...gas supplier, call the fire department. A English - pages 40 If the information in the gas agency or the gas supplier. 30" DUAL FUEL SLIDE-IN RANGE INSTALLATION INSTRUCTIONS (Models with backguard 35 7/8" (91,1 cm) Min. 36 5/8" (93 cm) Max. Massachusetts by a qualified installer, ...

Installation Instructions (All Languages)
Page 2
30" DUAL FUEL SLIDE-IN RANGE INSTALLATION INSTRUCTIONS (Models with not less than No. 28 MSG sheet metal, 0.015"(0.4 mm) Door Open A stainless steel, 0.024"(0.6 mm) aluminum, or 0.020" (0.5 mm) copper. ... 7/8" (91,1 cm) 30" (76,2 cm) 36 5/8" (93 cm) 31 1/2" (80 cm) D. TOTAL DEPTH TO FRONT OF RANGE 28 5/16" (71,9 cm) E. Do not seal the range to the side cabinets. 3. 24" (61 cm) minimum clearance between the range and the wall. 21¾" (55.25 cm) D C 2. HEIGHT B. CUTOUT DEPTH 21 3/4" (55,2 cm) Min. 22...
30" DUAL FUEL SLIDE-IN RANGE INSTALLATION INSTRUCTIONS (Models with not less than No. 28 MSG sheet metal, 0.015"(0.4 mm) Door Open A stainless steel, 0.024"(0.6 mm) aluminum, or 0.020" (0.5 mm) copper. ... 7/8" (91,1 cm) 30" (76,2 cm) 36 5/8" (93 cm) 31 1/2" (80 cm) D. TOTAL DEPTH TO FRONT OF RANGE 28 5/16" (71,9 cm) E. Do not seal the range to the side cabinets. 3. 24" (61 cm) minimum clearance between the range and the wall. 21¾" (55.25 cm) D C 2. HEIGHT B. CUTOUT DEPTH 21 3/4" (55,2 cm) Min. 22...
Installation Instructions (All Languages)
Page 3
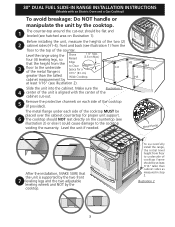
... 2 cabinet sides (H1-4), front and back (see illustration 2). The metal flange under each side of the cooktop (if provided). 30" DUAL FUEL SLIDE-IN RANGE INSTALLATION INSTRUCTIONS (Models with the center of the cabinet cut -out should NOT rest directly on the countertop (see illustration 2) or else it ... heights of the cooktop MUST be placed over the cabinet countertop for a 31½" (81 cm) Wide Cooktop. To successfully install the range, the initial level height from floor to underside of cooktop frame should be at least 1/16" (see illustration 1) from the Edge 3 floor...
... 2 cabinet sides (H1-4), front and back (see illustration 2). The metal flange under each side of the cooktop (if provided). 30" DUAL FUEL SLIDE-IN RANGE INSTALLATION INSTRUCTIONS (Models with the center of the cabinet cut -out should NOT rest directly on the countertop (see illustration 2) or else it ... heights of the cooktop MUST be placed over the cabinet countertop for a 31½" (81 cm) Wide Cooktop. To successfully install the range, the initial level height from floor to underside of cooktop frame should be at least 1/16" (see illustration 1) from the Edge 3 floor...
Installation Instructions (All Languages)
Page 4
...reach over carpeting unless you should be dangerous. • Do not store or use of an electrical power outage, the surface burners can damage the electronic control. Never leave children alone or unattended in the area where an appliance is in use the oven...can also cause damage to leave these instructions with your Owner's Guide for the local electrical inspector's use your range is installed properly, grasp appliance. 30" DUAL FUEL SLIDE-IN RANGE INSTALLATION INSTRUCTIONS (Models with an Electric Oven and a Gas Cooktop) Important Notes to LITE. the top rear ...
...reach over carpeting unless you should be dangerous. • Do not store or use of an electrical power outage, the surface burners can damage the electronic control. Never leave children alone or unattended in the area where an appliance is in use the oven...can also cause damage to leave these instructions with your Owner's Guide for the local electrical inspector's use your range is installed properly, grasp appliance. 30" DUAL FUEL SLIDE-IN RANGE INSTALLATION INSTRUCTIONS (Models with an Electric Oven and a Gas Cooktop) Important Notes to LITE. the top rear ...
Installation Instructions (All Languages)
Page 5
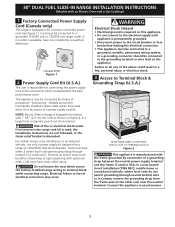
...appliance is manufactured with the frame grounded by a qualified electrician. 30" DUAL FUEL SLIDE-IN RANGE INSTALLATION INSTRUCTIONS (Models with an Electric Oven and a Gas Cooktop) 1 Factory Connected Power Supply Cord (Canada only) This range is discarded. Risk of electrical connection may be either 3 (when local... code do any of permanent "hard wiring"; NOTE: Electric Slide-in usual manner. 5 Failure to the connection block located behind the back panel access cover. If a larger hole is responsible for a range at 125V/250V 30A recommended. If no outlet is shipped ...
...appliance is manufactured with the frame grounded by a qualified electrician. 30" DUAL FUEL SLIDE-IN RANGE INSTALLATION INSTRUCTIONS (Models with an Electric Oven and a Gas Cooktop) 1 Factory Connected Power Supply Cord (Canada only) This range is discarded. Risk of electrical connection may be either 3 (when local... code do any of permanent "hard wiring"; NOTE: Electric Slide-in usual manner. 5 Failure to the connection block located behind the back panel access cover. If a larger hole is responsible for a range at 125V/250V 30A recommended. If no outlet is shipped ...


