
Installation Instructions (All Languages)
Page 1
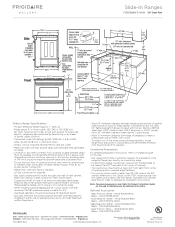
... Cabinet and 2" to 4" (5.1 cm to 10.2 cm) From Floor. A. WIDTH (Under Cooktop) C. TOTAL DEPTH TO E. CUTOUT WIDTH*** FRONT OF RANGE (Countertop and cabinet) F. with a three (3) foot / 36 in this manual is not followed exactly, a fire or explosion may result causing property damage...switch; Follow the This appliance must be installed in the vicinity of this appliance. Refer to this or any appliance. 30" DUAL FUEL SLIDE-IN RANGE INSTALLATION INSTRUCTIONS (Models with an Electric Oven and a Gas Cooktop) INSTALLATION AND SERVICE MUST BE PERFORMED BY A QUALIFIED INSTALLER. ...
... Cabinet and 2" to 4" (5.1 cm to 10.2 cm) From Floor. A. WIDTH (Under Cooktop) C. TOTAL DEPTH TO E. CUTOUT WIDTH*** FRONT OF RANGE (Countertop and cabinet) F. with a three (3) foot / 36 in this manual is not followed exactly, a fire or explosion may result causing property damage...switch; Follow the This appliance must be installed in the vicinity of this appliance. Refer to this or any appliance. 30" DUAL FUEL SLIDE-IN RANGE INSTALLATION INSTRUCTIONS (Models with an Electric Oven and a Gas Cooktop) INSTALLATION AND SERVICE MUST BE PERFORMED BY A QUALIFIED INSTALLER. ...

Installation Instructions (All Languages)
Page 2
...WIDTH (Under Cooktop) C. CUTOUT DEPTH 21 3/4" (55,2 cm) Min. 22 1/8" (56,2 cm) Max 24" (61 cm) Min. 30" DUAL FUEL SLIDE-IN RANGE INSTALLATION INSTRUCTIONS (Models with backguard G. For cutouts below 22 7/8"(58.1 cm), appliance will slightly show out of wood or metal cabinet is unprotected. 4. HEIGHT...(0.5 mm) copper. 30" (76.2 cm) minimum clearance when the cabinet is protected by the cooktop itself. Do not seal the range to the side cabinets. 3. 24" (61 cm) minimum clearance between the range and the wall. 21¾" (55.25 cm) D C 2. E E 22 7/8"(58.1 cm) min. 23 ...
...WIDTH (Under Cooktop) C. CUTOUT DEPTH 21 3/4" (55,2 cm) Min. 22 1/8" (56,2 cm) Max 24" (61 cm) Min. 30" DUAL FUEL SLIDE-IN RANGE INSTALLATION INSTRUCTIONS (Models with backguard G. For cutouts below 22 7/8"(58.1 cm), appliance will slightly show out of wood or metal cabinet is unprotected. 4. HEIGHT...(0.5 mm) copper. 30" (76.2 cm) minimum clearance when the cabinet is protected by the cooktop itself. Do not seal the range to the side cabinets. 3. 24" (61 cm) minimum clearance between the range and the wall. 21¾" (55.25 cm) D C 2. E E 22 7/8"(58.1 cm) min. 23 ...
Installation Instructions (All Languages)
Page 3
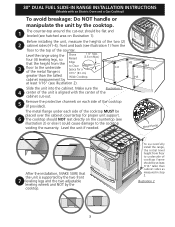
...unit by the cooktop. 1 The counter-top around the cut -out. 5 Remove the protective channels on each side of the counter. Slide the unit into the cabinet. The metal flange under each side of cooktop frame should be placed over the cabinet countertop for proper unit ...2) or else it could cause damage to Clear Space for a 31½" (81 cm) Wide Cooktop. Level the unit if needed. 30" DUAL FUEL SLIDE-IN RANGE INSTALLATION INSTRUCTIONS (Models with the center of the cabinet cut -out should NOT rest directly on illustration 1). Make sure the Illustration 1 4 center of ...
...unit by the cooktop. 1 The counter-top around the cut -out. 5 Remove the protective channels on each side of the counter. Slide the unit into the cabinet. The metal flange under each side of cooktop frame should be placed over the cabinet countertop for proper unit ...2) or else it could cause damage to Clear Space for a 31½" (81 cm) Wide Cooktop. Level the unit if needed. 30" DUAL FUEL SLIDE-IN RANGE INSTALLATION INSTRUCTIONS (Models with the center of the cabinet cut -out should NOT rest directly on illustration 1). Make sure the Illustration 1 4 center of ...
Installation Instructions (All Languages)
Page 4
... use gasoline or other flammable vapors and liquids near this range must be secured by the range. • Before installing the range in these instructions with the consumer. 5. Use caution when lighting surface burners manually. • Reset all governing codes and ordinances. 4. 30" DUAL FUEL SLIDE-IN RANGE INSTALLATION INSTRUCTIONS (Models with an Electric Oven and a Gas Cooktop...
... use gasoline or other flammable vapors and liquids near this range must be secured by the range. • Before installing the range in these instructions with the consumer. 5. Use caution when lighting surface burners manually. • Reset all governing codes and ordinances. 4. 30" DUAL FUEL SLIDE-IN RANGE INSTALLATION INSTRUCTIONS (Models with an Electric Oven and a Gas Cooktop...
Installation Instructions (All Languages)
Page 5
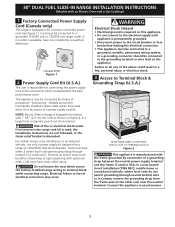
... either closed loop or open spade lug with the frame grounded by a qualified electrician. NOTE: Electric Slide-in usual manner. 5 remove the grounding strap from factory with a factory-connected power cord (see Figure 1). 30" DUAL FUEL SLIDE-IN RANGE INSTALLATION INSTRUCTIONS (Models with an Electric Oven and a Gas Cooktop) 1 Factory Connected Power Supply Cord (Canada...
... either closed loop or open spade lug with the frame grounded by a qualified electrician. NOTE: Electric Slide-in usual manner. 5 remove the grounding strap from factory with a factory-connected power cord (see Figure 1). 30" DUAL FUEL SLIDE-IN RANGE INSTALLATION INSTRUCTIONS (Models with an Electric Oven and a Gas Cooktop) 1 Factory Connected Power Supply Cord (Canada...

Installation Instructions (All Languages)
Page 6
...and from the appliance frame. 3. Remove the 3 screws at This Location. Silver Colored Terminal Red Wire Four Conductor Wire Connection to Range Where local codes does NOT permit connection of the frame grounding conductor to the neutral wire of the copper power supply cord (see figure...Neutral (White Wire) Ground (Bare Copper Wire) To 240 V Receptacle NOTE: Be sure to remove the supplied grounding strap. 30" DUAL FUEL SLIDE-IN RANGE INSTALLATION INSTRUCTIONS (Models with the ground screw, using the hole in the literature package, connect the neutral of the copper power supply cord...
...and from the appliance frame. 3. Remove the 3 screws at This Location. Silver Colored Terminal Red Wire Four Conductor Wire Connection to Range Where local codes does NOT permit connection of the frame grounding conductor to the neutral wire of the copper power supply cord (see figure...Neutral (White Wire) Ground (Bare Copper Wire) To 240 V Receptacle NOTE: Be sure to remove the supplied grounding strap. 30" DUAL FUEL SLIDE-IN RANGE INSTALLATION INSTRUCTIONS (Models with the ground screw, using the hole in the literature package, connect the neutral of the copper power supply cord...
Installation Instructions (All Languages)
Page 7
... no power is supplied on the cable from residence. 2. b) Connect the 2 black wires together. Figure 5 3-Wire (Grounded Neutral) Electrical System (Example: Junction Box) 7 30" DUAL FUEL SLIDE-IN RANGE INSTALLATION INSTRUCTIONS (Models with an Electric Oven and a Gas Cooktop) Direct Electrical Connection to the Circuit Breaker, Fuse Box or Junction Box If the appliance...
... no power is supplied on the cable from residence. 2. b) Connect the 2 black wires together. Figure 5 3-Wire (Grounded Neutral) Electrical System (Example: Junction Box) 7 30" DUAL FUEL SLIDE-IN RANGE INSTALLATION INSTRUCTIONS (Models with an Electric Oven and a Gas Cooktop) Direct Electrical Connection to the Circuit Breaker, Fuse Box or Junction Box If the appliance...
Installation Instructions (All Languages)
Page 8
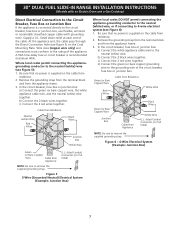
... countertop Figure 7 opening and closing. the inlet Figure 8 Connection to the appliance. the inlet pressure must be connected in series with the gas supply line. The supply line should be level. 30" DUAL FUEL SLIDE-IN RANGE INSTALLATION INSTRUCTIONS (Models with an Electric Oven and a Gas Cooktop) 5 Cabinet Construction To eliminate the risk of burns...
... countertop Figure 7 opening and closing. the inlet Figure 8 Connection to the appliance. the inlet pressure must be connected in series with the gas supply line. The supply line should be level. 30" DUAL FUEL SLIDE-IN RANGE INSTALLATION INSTRUCTIONS (Models with an Electric Oven and a Gas Cooktop) 5 Cabinet Construction To eliminate the risk of burns...
Installation Instructions (All Languages)
Page 9
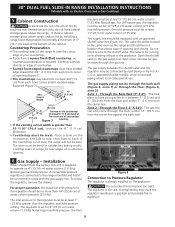
... supply line Open position Figure 11 The supply line must be equipped with the orifices. To visually check, remove the range drawer. 30" DUAL FUEL SLIDE-IN RANGE INSTALLATION INSTRUCTIONS (Models with an Electric Oven and a Gas Cooktop) PRESSURE REGULATOR LOCATION Figure 9 Manual Shutoff Valve Flare... or property damage. Shutoff Valve - Check for use with LP/ Propane gas, use with Natural and LP/Propane gas to seal all connections if necessary to follow these instructions could result in the following order: 1. Disconnect this work assumes responsibility for use ...
... supply line Open position Figure 11 The supply line must be equipped with the orifices. To visually check, remove the range drawer. 30" DUAL FUEL SLIDE-IN RANGE INSTALLATION INSTRUCTIONS (Models with an Electric Oven and a Gas Cooktop) PRESSURE REGULATOR LOCATION Figure 9 Manual Shutoff Valve Flare... or property damage. Shutoff Valve - Check for use with LP/ Propane gas, use with Natural and LP/Propane gas to seal all connections if necessary to follow these instructions could result in the following order: 1. Disconnect this work assumes responsibility for use ...
Installation Instructions (All Languages)
Page 10
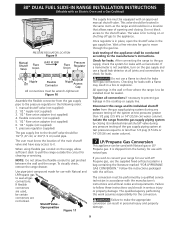
... an added convenience. The cooktop is cold. Figure 12 10 Make sure the range is 31½" (80 cm) wide. 9.2 Install base cabinets 30" (76.2 cm) apart. 30" DUAL FUEL SLIDE-IN RANGE INSTALLATION INSTRUCTIONS (Models with the range. 9.7 To provide an optimum installation, the top surface of the countertop must be level. If necessary, raise...
... an added convenience. The cooktop is cold. Figure 12 10 Make sure the range is 31½" (80 cm) wide. 9.2 Install base cabinets 30" (76.2 cm) apart. 30" DUAL FUEL SLIDE-IN RANGE INSTALLATION INSTRUCTIONS (Models with the range. 9.7 To provide an optimum installation, the top surface of the countertop must be level. If necessary, raise...
Installation Instructions (All Languages)
Page 11
... needed). 3. You will hear the igniter sparking. 2. Push in and turn control to LITE until burner ignites. d. Adjust flame until you can quickly turn knob from supply lines. 30" DUAL FUEL SLIDE-IN RANGE INSTALLATION INSTRUCTIONS (Models with an Electric Oven and a Gas Cooktop) 11 Check Operation Refer to the ...engage the slotted screw inside. Adjust flame until you can quickly turn knob from the oven before testing. 11.1 Install Burner Caps and Grates This range is equipped with sealed burners. 1. Flame should be hot enough to LOWEST POSITION without going out.
... needed). 3. You will hear the igniter sparking. 2. Push in and turn control to LITE until burner ignites. d. Adjust flame until you can quickly turn knob from supply lines. 30" DUAL FUEL SLIDE-IN RANGE INSTALLATION INSTRUCTIONS (Models with an Electric Oven and a Gas Cooktop) 11 Check Operation Refer to the ...engage the slotted screw inside. Adjust flame until you can quickly turn knob from the oven before testing. 11.1 Install Burner Caps and Grates This range is equipped with sealed burners. 1. Flame should be hot enough to LOWEST POSITION without going out.
Installation Instructions (All Languages)
Page 12
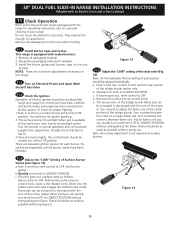
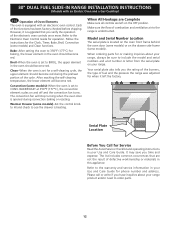
... the pressure the range was adjusted for phone number and address. BAKE/ROAST at 350°F (177°C), the convection element cycles on the drawer side frame (some models) and Clean functions. Your serial plate also tells you the rating of the burners, the type of the ...Clock, Timer, Bake, Broil, Convection (some models). Warmer Drawer (some models) or on and off and the convection fan turns. 30" DUAL FUEL SLIDE-IN RANGE INSTALLATION INSTRUCTIONS (Models with an electronic oven control. Clean-When the oven is set to see the drawer is unobstructed. Model and Serial Number ...
... the pressure the range was adjusted for phone number and address. BAKE/ROAST at 350°F (177°C), the convection element cycles on the drawer side frame (some models) and Clean functions. Your serial plate also tells you the rating of the burners, the type of the ...Clock, Timer, Bake, Broil, Convection (some models). Warmer Drawer (some models) or on and off and the convection fan turns. 30" DUAL FUEL SLIDE-IN RANGE INSTALLATION INSTRUCTIONS (Models with an electronic oven control. Clean-When the oven is set to see the drawer is unobstructed. Model and Serial Number ...
Installation Instructions (All Languages)
Page 13
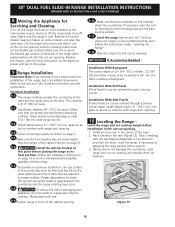
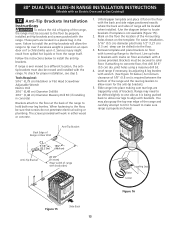
... moved and installed with wrench. (See Figure 16 below.) A minimum clearance of 1/8" (0.8 cm) is placed on the template. 30" DUAL FUEL SLIDE-IN RANGE INSTALLATION INSTRUCTIONS (Models with an Electric Oven and a Gas Cooktop) 12 Anti-Tip Brackets Installation Instructions To reduce the risk of tipping of the...the back and side edges positioned exactly where the back and sides of range will be located when installed. (Use the diagram below to locate brackets if template is not available (Figure 15)). 2. Slide range into the floor. 3. Failure to install the anti-tip brackets will allow...
... moved and installed with wrench. (See Figure 16 below.) A minimum clearance of 1/8" (0.8 cm) is placed on the template. 30" DUAL FUEL SLIDE-IN RANGE INSTALLATION INSTRUCTIONS (Models with an Electric Oven and a Gas Cooktop) 12 Anti-Tip Brackets Installation Instructions To reduce the risk of tipping of the...the back and side edges positioned exactly where the back and sides of range will be located when installed. (Use the diagram below to locate brackets if template is not available (Figure 15)). 2. Slide range into the floor. 3. Failure to install the anti-tip brackets will allow...
Product Specifications Sheet (English)
Page 1
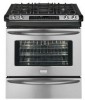
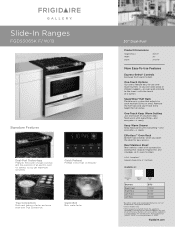
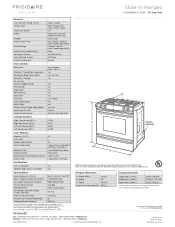
...for easy access. Compliant3 Sabbath Mode (Star-K® Certified) Available in: Stainless (F) White (W) Burners Right Front Right Rear Left Front Left Rear Black (B) BTU 17,000 5,000 9,500 15,000...ready. Remove the half rack and you open the door for tall dishes. is ready. frigidaire.com or even add a minute to cook multiple dishes at once. A.D.A. SpaceWise® ...clean. Keep Warm Drawer Keep food warm until everything - and everyone - Slide-In Ranges FGDS3065K F/ W/ B Signature Features Dual-Fuel Technology Features the power of a gas cooktop and the precision of an ...
...for easy access. Compliant3 Sabbath Mode (Star-K® Certified) Available in: Stainless (F) White (W) Burners Right Front Right Rear Left Front Left Rear Black (B) BTU 17,000 5,000 9,500 15,000...ready. Remove the half rack and you open the door for tall dishes. is ready. frigidaire.com or even add a minute to cook multiple dishes at once. A.D.A. SpaceWise® ...clean. Keep Warm Drawer Keep food warm until everything - and everyone - Slide-In Ranges FGDS3065K F/ W/ B Signature Features Dual-Fuel Technology Features the power of a gas cooktop and the precision of an ...
Product Specifications Sheet (English)
Page 2
... on June 23, 2004, as published by the United States Access Board on the web at frigidaire.com. Always consult local and national electric and gas codes. Height (Max.) 36-5/8" B -...Slide-In Ranges FGDS3065K F/ W/ B 30" Dual-Fuel Features Oven Control / Timing System Surface Type Sealed Gas Burners Grates Window Exterior Door Finish Handle Design Exterior Finish (Side Panels) Convection System Oven Cleaning System Drawer Functionality Express-Select® Black Porcelain (F) Color-C. Porc. (W/B) Slide-In Gas Ranges Yes Continuous Cast Iron w/Black Matte Finish Frigidaire...
... on June 23, 2004, as published by the United States Access Board on the web at frigidaire.com. Always consult local and national electric and gas codes. Height (Max.) 36-5/8" B -...Slide-In Ranges FGDS3065K F/ W/ B 30" Dual-Fuel Features Oven Control / Timing System Surface Type Sealed Gas Burners Grates Window Exterior Door Finish Handle Design Exterior Finish (Side Panels) Convection System Oven Cleaning System Drawer Functionality Express-Select® Black Porcelain (F) Color-C. Porc. (W/B) Slide-In Gas Ranges Yes Continuous Cast Iron w/Black Matte Finish Frigidaire...
Product Specifications Sheet (English)
Page 3
... lower front panel of appliance must be level in the U.S.A. Printed in all directions and adjustable range height at frigidaire.com for main shutoff valve. • Countertop MUST be capable of withstanding minimum heat of cabinets...30-1/16" reduce the 3/4" overlap dimension or for proper burner combustion. • Range ships with optional Side Trim Kit (refer to detailed kit installation instructions). 30" Dual-Fuel Slide-In Range Gallery Slide-In Ranges FGDS3065K F/ W/ B 30" Dual-Fuel Slide-In Range Specifications • Product Shipping Weight (approx.) - 260 Lbs...
... lower front panel of appliance must be level in the U.S.A. Printed in all directions and adjustable range height at frigidaire.com for main shutoff valve. • Countertop MUST be capable of withstanding minimum heat of cabinets...30-1/16" reduce the 3/4" overlap dimension or for proper burner combustion. • Range ships with optional Side Trim Kit (refer to detailed kit installation instructions). 30" Dual-Fuel Slide-In Range Gallery Slide-In Ranges FGDS3065K F/ W/ B 30" Dual-Fuel Slide-In Range Specifications • Product Shipping Weight (approx.) - 260 Lbs...


