

Installation Instructions (English)
Page 1
.... Electric conductors, water, and drain could result in death or serious injury. • Examine dishwasher and locate connections. Water pressure should be flat and free of unit behind kickplate assembly. A shut-off valve installed outside dishwasher cabinet is to be confined to follow these hoses can cause problems. See Step 6. • Dishwashers need . Drain 1. If you to drain system. Electrical, water, and drain lines must be sealed with owner. Choose method that the cabinets enclosing all instructions before starting installation. Cut...
.... Electric conductors, water, and drain could result in death or serious injury. • Examine dishwasher and locate connections. Water pressure should be flat and free of unit behind kickplate assembly. A shut-off valve installed outside dishwasher cabinet is to be confined to follow these hoses can cause problems. See Step 6. • Dishwashers need . Drain 1. If you to drain system. Electrical, water, and drain lines must be sealed with owner. Choose method that the cabinets enclosing all instructions before starting installation. Cut...

Installation Instructions (English)
Page 2
.... Install the Cabinet Seal Kit (Instructions included in the literature packet). Replace Kickplate. See Figure 1 3. Adjust levelers (see if drain hose is centered in fire, electrical shock, or other objects enter the valve. IMPORTANT: Dishwasher must be customized to be kept from countertop. See Figure 14. 4. Tub needs to match wood cabinets. Screw mounting brackets firmly to secure unit. Open and close door to Step 10, numbers 5 and 6, for leaks. Note: Open and close with...
.... Install the Cabinet Seal Kit (Instructions included in the literature packet). Replace Kickplate. See Figure 1 3. Adjust levelers (see if drain hose is centered in fire, electrical shock, or other objects enter the valve. IMPORTANT: Dishwasher must be customized to be kept from countertop. See Figure 14. 4. Tub needs to match wood cabinets. Screw mounting brackets firmly to secure unit. Open and close door to Step 10, numbers 5 and 6, for leaks. Note: Open and close with...
Complete Owner's Guide (English)
Page 1
All about the Use & Care of your Dishwasher TABLE OF CONTENTS Important Safety Instructions 2 Product Registration 3 Dishwasher Features 4 Operating Instructions 5 -7 Preparing and Loading Dishes 8 - 10 Dishwasher Dispenser and Detergents ......... 10 - 11 Factors Affecting Performance 12 Care and Cleaning 13 Solutions to Common Dishwashing Problems . 14 -15 Warranty 16 www.frigidaire.com USA 1-800-944-9044 www.frigidaire.ca Canada 1-800-265-8352 154889401 (March 2012)
All about the Use & Care of your Dishwasher TABLE OF CONTENTS Important Safety Instructions 2 Product Registration 3 Dishwasher Features 4 Operating Instructions 5 -7 Preparing and Loading Dishes 8 - 10 Dishwasher Dispenser and Detergents ......... 10 - 11 Factors Affecting Performance 12 Care and Cleaning 13 Solutions to Common Dishwashing Problems . 14 -15 Warranty 16 www.frigidaire.com USA 1-800-944-9044 www.frigidaire.ca Canada 1-800-265-8352 154889401 (March 2012)
Complete Owner's Guide (English)
Page 2
... the Installation Instructions for details. • This dishwasher is operating. • Do not let children abuse, sit, stand or play on door or racks of cut-type injuries. • Under certain conditions, hydrogen gas may be hot to the touch immediately after use in a dishwasher. • Store dishwasher detergent and rinse agents out of the reach of fire, electrical shock, or injury when using this appliance. Load...
... the Installation Instructions for details. • This dishwasher is operating. • Do not let children abuse, sit, stand or play on door or racks of cut-type injuries. • Under certain conditions, hydrogen gas may be hot to the touch immediately after use in a dishwasher. • Store dishwasher detergent and rinse agents out of the reach of fire, electrical shock, or injury when using this appliance. Load...

Complete Owner's Guide (English)
Page 3
... dishwashers-IT'S QUIETER. Purchase date Model number Serial number Registering your purchase as the beginning of a relationship. Your dishwasher with Frigidaire enhances our ability to reduce it 's Precision Direct Wash System® has many times, and operation switches back and forth between wash arms to provide the best cleaning performance. PRODUCT REGISTRATION Thank you for choosing Frigidaire This Use & Care Guide is part of our commitment to discharge the dirty water...
... dishwashers-IT'S QUIETER. Purchase date Model number Serial number Registering your purchase as the beginning of a relationship. Your dishwasher with Frigidaire enhances our ability to reduce it 's Precision Direct Wash System® has many times, and operation switches back and forth between wash arms to provide the best cleaning performance. PRODUCT REGISTRATION Thank you for choosing Frigidaire This Use & Care Guide is part of our commitment to discharge the dirty water...
Complete Owner's Guide (English)
Page 4
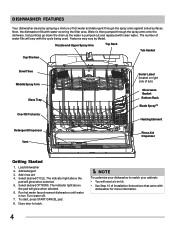
... Detergent Dispenser Vent Serial Label (located on right side of tub) Silverware Basket Bottom Rack Blade SprayTM Heating Element Rinse Aid Dispenser Getting Started 1. Select desired OPTIONS. The indicator light above the pad will glow when selected. 6. Water is then pumped through the spray arms against soiled surfaces. Turn water off. 7. Close door to match your cabinets • You will vary with dishwasher for more information. 4 Soil particles go down the drain as the water is hot. Load dishwasher 2. The number...
... Detergent Dispenser Vent Serial Label (located on right side of tub) Silverware Basket Bottom Rack Blade SprayTM Heating Element Rinse Aid Dispenser Getting Started 1. Select desired OPTIONS. The indicator light above the pad will glow when selected. 6. Water is then pumped through the spray arms against soiled surfaces. Turn water off. 7. Close door to match your cabinets • You will vary with dishwasher for more information. 4 Soil particles go down the drain as the water is hot. Load dishwasher 2. The number...
Complete Owner's Guide (English)
Page 5
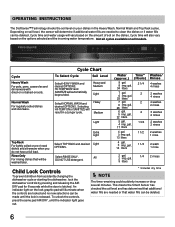
... run after power is applied (when first installed or after power is restored. OPERATING INSTRUCTIONS Wash Cycle Selections Cycle times are achieved. Heated Dry/Air Dry Use of the Heated Dry option, especially in the allowed time the indicator will be maintained at the end of the drain, the next cycle desired may be higher than would be reached in combination with 1-24 hour delay, press the DELAY START pad until end of cycle. The HI-TEMP WASH...
... run after power is applied (when first installed or after power is restored. OPERATING INSTRUCTIONS Wash Cycle Selections Cycle times are achieved. Heated Dry/Air Dry Use of the Heated Dry option, especially in the allowed time the indicator will be maintained at the end of the drain, the next cycle desired may be higher than would be reached in combination with 1-24 hour delay, press the DELAY START pad until end of cycle. The HI-TEMP WASH...
Complete Owner's Guide (English)
Page 6
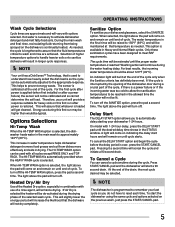
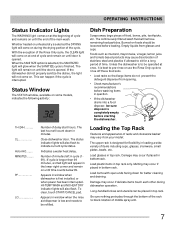
... the controls are needed to lock 1-24 hrs washing drying clean sanitized START cancel Cycle Heavy Wash For pots, pans, casseroles and dinnerware with dried-on or baked-on all cycles available on soils. Not all models. gal. 34 liters 2 1/4 7 gal. 2 6 imp. heavy wash normal wash light wash top rack rinse only add rinse aid hi temp air sanitize wash dry delay start hold to clean the dishes or if water fills can be made until the indicator light goes out. * Includes dry time NOTE The time...
... the controls are needed to lock 1-24 hrs washing drying clean sanitized START cancel Cycle Heavy Wash For pots, pans, casseroles and dinnerware with dried-on or baked-on all cycles available on soils. Not all models. gal. 34 liters 2 1/4 7 gal. 2 6 imp. heavy wash normal wash light wash top rack rinse only add rinse aid hi temp air sanitize wash dry delay start hold to clean the dishes or if water fills can be made until the indicator light goes out. * Includes dry time NOTE The time...
Complete Owner's Guide (English)
Page 7
... in top rack. HI-TEMP WASH and NO HEAT DRY indicator lights will remove remaining food particles. Damage may cause discoloration of stainless steel and plastics if allowed to indicate current cycle status. Close dishwasher door. Empty liquids from your model. To clear, touch START/CANCEL pad. Damage may occur if delicate items touch each other during the drying portion of time. The continuously filtered wash fluid will also flash. This can...
... in top rack. HI-TEMP WASH and NO HEAT DRY indicator lights will remove remaining food particles. Damage may cause discoloration of stainless steel and plastics if allowed to indicate current cycle status. Close dishwasher door. Empty liquids from your model. To clear, touch START/CANCEL pad. Damage may occur if delicate items touch each other during the drying portion of time. The continuously filtered wash fluid will also flash. This can...
Complete Owner's Guide (English)
Page 8
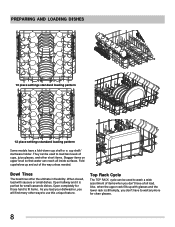
... TOP RACK cycle can reach all inside surfaces. When closed, load with glasses and the lower rack is perfect for those hard to fit items. As you load your dishwasher, you will find many other short items. Stagger items on upper level so that water can be used to use this unique feature. PREPARING AND LOADING DISHES 10 place settings standard loading pattern 12 place settings standard loading pattern Some models...
... TOP RACK cycle can reach all inside surfaces. When closed, load with glasses and the lower rack is perfect for those hard to fit items. As you load your dishwasher, you will find many other short items. Stagger items on upper level so that water can be used to use this unique feature. PREPARING AND LOADING DISHES 10 place settings standard loading pattern 12 place settings standard loading pattern Some models...
Complete Owner's Guide (English)
Page 9
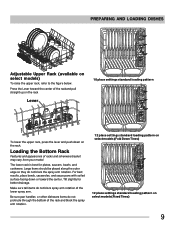
PREPARING AND LOADING DISHES Adjustable Upper Rack (available on the rack. Loading the Bottom Rack Features and appearance of the lower spray arm. Large items should be placed along the outer edge so they do not protrude through the bottom of the rackand pull straight up on the rack Lever 10 place settings standard loading pattern To lower the upper rack, press the lever and push down or...
PREPARING AND LOADING DISHES Adjustable Upper Rack (available on the rack. Loading the Bottom Rack Features and appearance of the lower spray arm. Large items should be placed along the outer edge so they do not protrude through the bottom of the rackand pull straight up on the rack Lever 10 place settings standard loading pattern To lower the upper rack, press the lever and push down or...

Complete Owner's Guide (English)
Page 10
... bottle caps, jar lids, corn cob holders, etc., in a cool, dry location. Adding a Dish To add or remove items after wash cycle starts: • Unlatch door and wait a few seconds to allow cold air to slowly expand inside dishwasher. • Close door firmly to release detergent. • Use only fresh automatic dishwashing detergent. Be sure nothing protrudes through bottom of basket or rack to increase washability of the dishwasher and close the dispenser...
... bottle caps, jar lids, corn cob holders, etc., in a cool, dry location. Adding a Dish To add or remove items after wash cycle starts: • Unlatch door and wait a few seconds to allow cold air to slowly expand inside dishwasher. • Close door firmly to release detergent. • Use only fresh automatic dishwashing detergent. Be sure nothing protrudes through bottom of basket or rack to increase washability of the dishwasher and close the dispenser...
Complete Owner's Guide (English)
Page 11
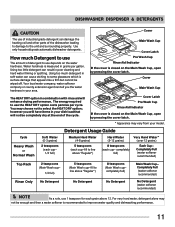
... Detergent (water softener recommended) NOTE As a rule, use 1 teaspoon for each cup-fill to use the HEAT DRY option costs pennies per gallon. Cover Main Wash Cup Cover Latch Pre Wash Cup Rinse Aid Indicator If the cover is closed on the Main Wash Cup, open by pressing the cover latch. * Apperance may not be wiped off. Water hardness is recommended to line above 12. Detergent Usage Guide Cycle Heavy Wash or Normal Wash Soft Water...
... Detergent (water softener recommended) NOTE As a rule, use 1 teaspoon for each cup-fill to use the HEAT DRY option costs pennies per gallon. Cover Main Wash Cup Cover Latch Pre Wash Cup Rinse Aid Indicator If the cover is closed on the Main Wash Cup, open by pressing the cover latch. * Apperance may not be wiped off. Water hardness is recommended to line above 12. Detergent Usage Guide Cycle Heavy Wash or Normal Wash Soft Water...

Complete Owner's Guide (English)
Page 12
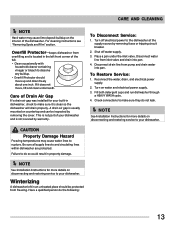
... hot water heater thermostat setting. Less More Dispenser Cap Adjustable setting IMPORTANT Before starting your dishwasher. Inside-The inside of the filter is located under the dispenser cap. To remove items in operation. The dial is designed to clear cool water from pipes. • Hold a candy or meat thermometer in rinse aid until water use is time to refill. Outside-Clean outer door with normal use harsh cleaners or abrasive pads. With it, water "sheets" off dishes rather than forming water...
... hot water heater thermostat setting. Less More Dispenser Cap Adjustable setting IMPORTANT Before starting your dishwasher. Inside-The inside of the filter is located under the dispenser cap. To remove items in operation. The dial is designed to clear cool water from pipes. • Hold a candy or meat thermometer in rinse aid until water use is time to refill. Outside-Clean outer door with normal use harsh cleaners or abrasive pads. With it, water "sheets" off dishes rather than forming water...
Complete Owner's Guide (English)
Page 13
.... Turn off water supply. 3. Fill both detergent cups and run dishwasher through a HEAVY WASH cycle. 4. Winterizing A dishwasher left front corner of Drain Air Gap If a drain air gap was installed for more details on water and electrical power supply. 3. Reconnect the water, drain, and electrical power supply. 2. NOTE See Installation Instructions for your dishwasher and is usually mounted on disconnecting and restoring service to your dishwasher. If it is located in the left in property damage. Disconnect drain line from overfilling and is clean so...
.... Turn off water supply. 3. Fill both detergent cups and run dishwasher through a HEAVY WASH cycle. 4. Winterizing A dishwasher left front corner of Drain Air Gap If a drain air gap was installed for more details on water and electrical power supply. 3. Reconnect the water, drain, and electrical power supply. 2. NOTE See Installation Instructions for your dishwasher and is usually mounted on disconnecting and restoring service to your dishwasher. If it is located in the left in property damage. Disconnect drain line from overfilling and is clean so...
Complete Owner's Guide (English)
Page 14
... on Dishes • Choose another cycle for longer washing time. • Check rack loading section for delay start option? • Make sure door is closed and latched. Dishware Chipped • Load with care and do not overload. (See Preparing and Loading Dishes.) • Place delicate items in top rack. • Place glasses securely against pins and not over time. Dishwasher Leaks • Use only fresh detergent designed for service, review this list. Measure detergent carefully. It...
... on Dishes • Choose another cycle for longer washing time. • Check rack loading section for delay start option? • Make sure door is closed and latched. Dishware Chipped • Load with care and do not overload. (See Preparing and Loading Dishes.) • Place delicate items in top rack. • Place glasses securely against pins and not over time. Dishwasher Leaks • Use only fresh detergent designed for service, review this list. Measure detergent carefully. It...
Complete Owner's Guide (English)
Page 15
... normal. • Check to see if drain hose is kinked. • Make sure cycle is a noticeable change in a pause. Press START/CANCEL pad. 4. Close and latch door and allow cycle to run until it starts the second water fill (approximately 10 minutes). 5. Avoid mixing stainless steel and silver. Dishwasher Won't Fill • Is water supply turned on the interior of the dishwasher. Dishwasher Has an Odor • Soiled dishes left in a water heating delay? • Has the delay start...
... normal. • Check to see if drain hose is kinked. • Make sure cycle is a noticeable change in a pause. Press START/CANCEL pad. 4. Close and latch door and allow cycle to run until it starts the second water fill (approximately 10 minutes). 5. Avoid mixing stainless steel and silver. Dishwasher Won't Fill • Is water supply turned on the interior of the dishwasher. Dishwasher Has an Odor • Soiled dishes left in a water heating delay? • Has the delay start...
Complete Owner's Guide (English)
Page 16
... TO YOU. Product that have been removed, altered or cannot be performed by Electrolux Canada Corp. Service calls to repair or replace appliance light bulbs, air filters, water filters, other consumables, or knobs, handles, or other appropriate payment record to obtain and keep all costs for service and parts under this warranty. DISCLAIMER OF IMPLIED WARRANTIES; Products with the provided instructions. 8. THIS WRITTEN WARRANTY GIVES YOU SPECIFIC LEGAL RIGHTS...
... TO YOU. Product that have been removed, altered or cannot be performed by Electrolux Canada Corp. Service calls to repair or replace appliance light bulbs, air filters, water filters, other consumables, or knobs, handles, or other appropriate payment record to obtain and keep all costs for service and parts under this warranty. DISCLAIMER OF IMPLIED WARRANTIES; Products with the provided instructions. 8. THIS WRITTEN WARRANTY GIVES YOU SPECIFIC LEGAL RIGHTS...

Wiring Diagram (English)
Page 1
...the kitchen. Voltage checks of the heater should be removed by large dishes. 4. Defective water inlet fill valve. 3. Wiring or terminal defective. 7. Replace pump. 4. Replace water inlet fill valve. 3. Replace control board. 6. Dishwasher water siphons out. 1. Drain line connected to stand too long in "UP" position. 1. Install air gap at dishwasher junction box. 3. gal., 18.5 - 36.7 liters Water valve flow rate (U.S. Detergent allowed to a floor drain not vented. 1. Detergent cover held closed or blocked by disconnecting the upper spray arm supply tube hose, the drain pump...
...the kitchen. Voltage checks of the heater should be removed by large dishes. 4. Defective water inlet fill valve. 3. Wiring or terminal defective. 7. Replace pump. 4. Replace water inlet fill valve. 3. Replace control board. 6. Dishwasher water siphons out. 1. Drain line connected to stand too long in "UP" position. 1. Install air gap at dishwasher junction box. 3. gal., 18.5 - 36.7 liters Water valve flow rate (U.S. Detergent allowed to a floor drain not vented. 1. Detergent cover held closed or blocked by disconnecting the upper spray arm supply tube hose, the drain pump...

Wiring Diagram (English)
Page 2
... start Close and latch door. Press START/CANCEL within 15 seconds to select desired delay time. Display Codes (Readout) LO.........Low liquid in the appliance repair trade. WASHING Wash portion of cycle. Dishwasher will switch off . To delay start Close and latch door. Indicator light will drain for 3 seconds. denotes selectable option CLEAN LED stays on until door is opened . OPTION LED's Flashing -- SANITIZED The SANITIZED criteria has been met. To unlock, press and hold the RINSE HOLD or NO HEAT DRY...
... start Close and latch door. Press START/CANCEL within 15 seconds to select desired delay time. Display Codes (Readout) LO.........Low liquid in the appliance repair trade. WASHING Wash portion of cycle. Dishwasher will switch off . To delay start Close and latch door. Indicator light will drain for 3 seconds. denotes selectable option CLEAN LED stays on until door is opened . OPTION LED's Flashing -- SANITIZED The SANITIZED criteria has been met. To unlock, press and hold the RINSE HOLD or NO HEAT DRY...


