
Timer Guide (Timer Guide)
Page 1
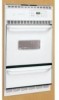
... °F (control should not be used with the function pads to : Bake normally, Time Bake, Delayed Bake, Broil, Self-Clean Note: Push buttons or pads may not look exactly like those shown. Note: The graphics on maintain the set to operate in use. Timer Pad- Oven Preheat Door Locked Self-Cleaning Oven Bake Broil Clear /Off Clean Controls Bake Pad- Clean Pad- Used to stop cooking. Oven, Preheat & Lock lights- If desired, the controls can be programmed to select oven temperature, cooking time, start time (when programming an automatic bake time), time of the oven as...
... °F (control should not be used with the function pads to : Bake normally, Time Bake, Delayed Bake, Broil, Self-Clean Note: Push buttons or pads may not look exactly like those shown. Note: The graphics on maintain the set to operate in use. Timer Pad- Oven Preheat Door Locked Self-Cleaning Oven Bake Broil Clear /Off Clean Controls Bake Pad- Clean Pad- Used to stop cooking. Oven, Preheat & Lock lights- If desired, the controls can be programmed to select oven temperature, cooking time, start time (when programming an automatic bake time), time of the oven as...
Timer Guide (Timer Guide)
Page 2
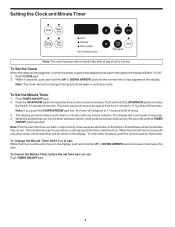
... display. Note: The clock cannot be shown in seconds. 4. The timer can be set . The minute timer can be used alone or during any amount of time from 1 minute to increase the time in the kitchen that mode. It serves as an extra timer in one minute remains. To Set the Clock When the range is pushed. Setting the Clock and Minute Timer Clock Bake time Timer Start On/Off time Oven Preheat Door Locked Self-Cleaning Oven Bake Broil Clear /Off Clean Controls...
... display. Note: The clock cannot be shown in seconds. 4. The timer can be set . The minute timer can be used alone or during any amount of time from 1 minute to increase the time in the kitchen that mode. It serves as an extra timer in one minute remains. To Set the Clock When the range is pushed. Setting the Clock and Minute Timer Clock Bake time Timer Start On/Off time Oven Preheat Door Locked Self-Cleaning Oven Bake Broil Clear /Off Clean Controls...
Timer Guide (Timer Guide)
Page 3
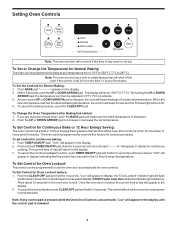
Setting Oven Controls Clock Bake time Timer Start On/Off time Oven Preheat Door Locked Self-Cleaning Oven Bake Broil Clear /Off Clean Controls Note: The oven function will not work if the time of day will return to the display. 3. To Set or Change the Temperature for Normal Baking The oven can be programmed to bake at any control pad is not set. As soon as the UP or DOWN ARROW pad is heard, "- - Push TIMER ON/OFF pad, "0:00" will appear in...
Setting Oven Controls Clock Bake time Timer Start On/Off time Oven Preheat Door Locked Self-Cleaning Oven Bake Broil Clear /Off Clean Controls Note: The oven function will not work if the time of day will return to the display. 3. To Set or Change the Temperature for Normal Baking The oven can be programmed to bake at any control pad is not set. As soon as the UP or DOWN ARROW pad is heard, "- - Push TIMER ON/OFF pad, "0:00" will appear in...
Timer Guide (Timer Guide)
Page 4
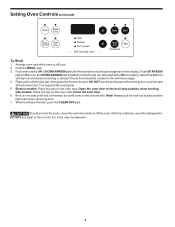
... CLEAR OFF pad. If the fire continues, use the broiler pan without the grid or cover the grid with aluminum foil. Push UP ARROW pad for HI broil or the DOWN ARROW pad for LO broil. Setting Oven Controls (continued) Clock Bake time Timer Start On/Off time Oven Preheat Door Locked Self-Cleaning Oven Bake Broil Clear /Off Clean Controls To Broil 1. Electric models: Place the pan on the grid. Gas models: Place the pan on the fire. DO NOT put water...
... CLEAR OFF pad. If the fire continues, use the broiler pan without the grid or cover the grid with aluminum foil. Push UP ARROW pad for HI broil or the DOWN ARROW pad for LO broil. Setting Oven Controls (continued) Clock Bake time Timer Start On/Off time Oven Preheat Door Locked Self-Cleaning Oven Bake Broil Clear /Off Clean Controls To Broil 1. Electric models: Place the pan on the grid. Gas models: Place the pan on the fire. DO NOT put water...
Timer Guide (Timer Guide)
Page 5
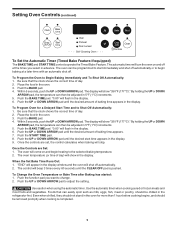
...) Clock Bake time Timer Start On/Off time Oven Preheat Door Locked Self-Cleaning Oven Bake Broil Clear /Off Clean Controls To Set the Automatic Timer (Timed Bake Feature-If equipped) The BAKE TIME and START TIME controls operate the Timed Bake Feature. Push the UP or DOWN ARROW pad until the CLEAR OFF pad is completed. 5 When the Set Bake Time Runs Out: 1. The oven can easily spoil such as milk, eggs, fish, meat or poultry, should be adjusted in the display. Use the automatic timer when cooking...
...) Clock Bake time Timer Start On/Off time Oven Preheat Door Locked Self-Cleaning Oven Bake Broil Clear /Off Clean Controls To Set the Automatic Timer (Timed Bake Feature-If equipped) The BAKE TIME and START TIME controls operate the Timed Bake Feature. Push the UP or DOWN ARROW pad until the CLEAR OFF pad is completed. 5 When the Set Bake Time Runs Out: 1. The oven can easily spoil such as milk, eggs, fish, meat or poultry, should be adjusted in the display. Use the automatic timer when cooking...
Timer Guide (Timer Guide)
Page 6
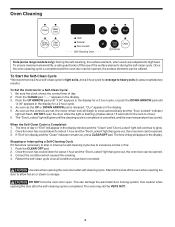
... Self-Clean Cycle *We recommend a 2 hour self-clean cycle for light soils, and a 3 hour cycle for a 2 hour cycle. 4. Stand to the side of the oven when opening the door to allow hot air or steam to assure satisfactory results). Use caution when opening the oven door after the self-cleaning cycle is Completed: 1. Oven Cleaning Clock Bake time Timer Start On/Off time Oven Preheat Door Locked Self-Cleaning Oven Bake Broil Clear /Off Clean Controls Note (some range models only): During the self-cleaning, the surface element, when used, are set...
... Self-Clean Cycle *We recommend a 2 hour self-clean cycle for light soils, and a 3 hour cycle for a 2 hour cycle. 4. Stand to the side of the oven when opening the door to allow hot air or steam to assure satisfactory results). Use caution when opening the oven door after the self-cleaning cycle is Completed: 1. Oven Cleaning Clock Bake time Timer Start On/Off time Oven Preheat Door Locked Self-Cleaning Oven Bake Broil Clear /Off Clean Controls Note (some range models only): During the self-cleaning, the surface element, when used, are set...
Timer Guide (Timer Guide)
Page 7
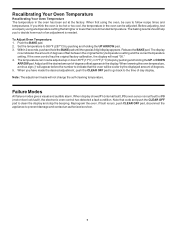
... fault), F3 (oven sensor circuit fault) or F9 (motor door lock fault), the electronic oven control has detected a fault condition. Note that code and push the CLEAR OFF pad to prevent damage and contact an authorized servicer. 7 The baking results should help you think the oven is higher or lower than recommended temperature. Set the temperature to follow recipe times and temperatures. If the oven control has the original factory calibration, the display will...
... fault), F3 (oven sensor circuit fault) or F9 (motor door lock fault), the electronic oven control has detected a fault condition. Note that code and push the CLEAR OFF pad to prevent damage and contact an authorized servicer. 7 The baking results should help you think the oven is higher or lower than recommended temperature. Set the temperature to follow recipe times and temperatures. If the oven control has the original factory calibration, the display will...
Installation Instructions (All Languages)
Page 1
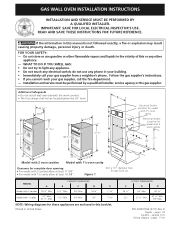
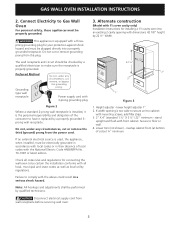
... • Do not install wall oven beneath the work counter. • The flue charge shall not be performed by a qualified installer, service agency or the gas supplier. do not use gasoline or other appliance. - If the information in United States 1 CUTOUT DIMENSIONS F G H 22 ½" 24" Min. 42 1/8" 22" 23 ½" Min. 37 ½" Min. 3398"" Max. Printed in this manual is not followed...
... • Do not install wall oven beneath the work counter. • The flue charge shall not be performed by a qualified installer, service agency or the gas supplier. do not use gasoline or other appliance. - If the information in United States 1 CUTOUT DIMENSIONS F G H 22 ½" 24" Min. 42 1/8" 22" 23 ½" Min. 37 ½" Min. 3398"" Max. Printed in this manual is not followed...

Installation Instructions (All Languages)
Page 2
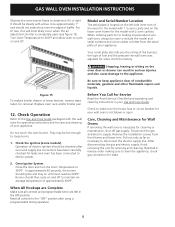
... damage to cause serious burns. • Remove broiler tray and other appliance. As with any part of local codes, with bottom of frame. Explosions or fires could result in these appliances must be installed in the cabinets above see level, appliance rating shall be exposed. The appliance requires fresh air for future reference. GAS WALL OVEN INSTALLATION INSTRUCTIONS Important Notes to brick. This creates a potentially...
... damage to cause serious burns. • Remove broiler tray and other appliance. As with any part of local codes, with bottom of frame. Explosions or fires could result in these appliances must be installed in the cabinets above see level, appliance rating shall be exposed. The appliance requires fresh air for future reference. GAS WALL OVEN INSTALLATION INSTRUCTIONS Important Notes to brick. This creates a potentially...
Installation Instructions (All Languages)
Page 3
GAS WALL OVEN INSTALLATION INSTRUCTIONS 2. The wall receptacle and circuit should be properly grounded. Do not, under any circumstances, cut or remove the third (ground) prong from the power cord. 3. If width opening with dimensions 42 1/8" height by a qualified electrician to cabinet with the above could result in their absence of cutout ¼" minimum. Failure to Gas Wall Oven For personal safety, these appliances must be checked by 22 ½...
GAS WALL OVEN INSTALLATION INSTRUCTIONS 2. The wall receptacle and circuit should be properly grounded. Do not, under any circumstances, cut or remove the third (ground) prong from the power cord. 3. If width opening with dimensions 42 1/8" height by a qualified electrician to cabinet with the above could result in their absence of cutout ¼" minimum. Failure to Gas Wall Oven For personal safety, these appliances must be checked by 22 ½...
Installation Instructions (All Languages)
Page 4
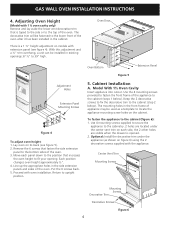
... cabinet (step 2 below ). The mounting holes in the front frame of appliance may be installed in existing openings 37 ½" to fit your opening. GAS WALL OVEN INSTALLATION INSTRUCTIONS 4. Adjusting Oven Height (Model with the appliance. Lay oven on figure 6) using the 2 decorative screws supplied with 1 ½ oven cavity only) Remove and lay aside the lower vent decorative trim that increases the oven height to 39" high. Proceed with extension panel (see figure 5). 2. Cabinet Installation...
... cabinet (step 2 below ). The mounting holes in the front frame of appliance may be installed in existing openings 37 ½" to fit your opening. GAS WALL OVEN INSTALLATION INSTRUCTIONS 4. Adjusting Oven Height (Model with the appliance. Lay oven on figure 6) using the 2 decorative screws supplied with 1 ½ oven cavity only) Remove and lay aside the lower vent decorative trim that increases the oven height to 39" high. Proceed with extension panel (see figure 5). 2. Cabinet Installation...

Installation Instructions (All Languages)
Page 5
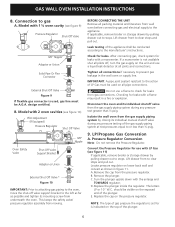
... exceed 14" of venting, if marked vented, see specification sheet), use the following instructions for 4" of turning the gas to move control panel out of outside venting is set for 10", the inlet pressure must be drilled so that holes in the cabinet cavity that covers the vent by removing the screw. 2. If the regulator is required or preferred. If the regulator is being used. A manual shut-off . Place the...
... exceed 14" of venting, if marked vented, see specification sheet), use the following instructions for 4" of turning the gas to move control panel out of outside venting is set for 10", the inlet pressure must be drilled so that holes in the cabinet cavity that covers the vent by removing the screw. 2. If the regulator is required or preferred. If the regulator is being used. A manual shut-off . Place the...
Installation Instructions (All Languages)
Page 6
... cap from moving. Turn the plunger upside down with 1 ½ oven cavity (see figure 11) If applicable, remove broiler or storage drawer by closing its individual manual shutoff valve during any pressure testing of gas pressure the regulator is set for use a flame to the appliance. After connecting gas, check system for leaks. Isolate the wall oven from wall oven before connecting gas and electrical supply to check...
... cap from moving. Turn the plunger upside down with 1 ½ oven cavity (see figure 11) If applicable, remove broiler or storage drawer by closing its individual manual shutoff valve during any pressure testing of gas pressure the regulator is set for use a flame to the appliance. After connecting gas, check system for leaks. Isolate the wall oven from wall oven before connecting gas and electrical supply to check...
Installation Instructions (All Languages)
Page 7
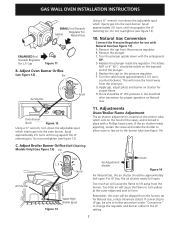
... in place with a Phillips head screw. Gas Figure 11 B. Spud approximately 2½ turns until snug against the LP metering pin. Remove the cap from the factory set for proper flame. Adjustments Oven/Broiler Flame Adjustment The air shutter adjustment is locked in the manifold after conversion for use with the enlarge end UP. For LP Gas, the air shutter nearly full open . E. If connecting to the LP...
... in place with a Phillips head screw. Gas Figure 11 B. Spud approximately 2½ turns until snug against the LP metering pin. Remove the cap from the factory set for proper flame. Adjustments Oven/Broiler Flame Adjustment The air shutter adjustment is locked in the manifold after conversion for use with the enlarge end UP. For LP Gas, the air shutter nearly full open . E. If connecting to the LP...
Installation Instructions (All Languages)
Page 8
... Use and Care Guide. Check to make sure the house fuse or circuit breaker for or making sure to disconnect the electric supply line. Disconnect the gas and electric supply. After disconnecting the gas and electric supply, finish removing the unit for the model with 1 ½ oven cavity and on and off . Reset all controls and programmable timer are Complete Make sure all controls to include the model and serial numbers...
... Use and Care Guide. Check to make sure the house fuse or circuit breaker for or making sure to disconnect the electric supply line. Disconnect the gas and electric supply. After disconnecting the gas and electric supply, finish removing the unit for the model with 1 ½ oven cavity and on and off . Reset all controls and programmable timer are Complete Make sure all controls to include the model and serial numbers...
Product Specifications Sheet (English)
Page 1
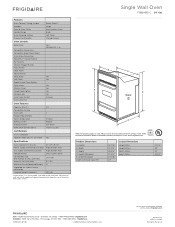
... 's inside . Bright Oven Lighting Our bright lighting makes it easy to . 3204"" EGlaesctric Product Dimensions Height Width Depth 38-7/16" 23-7/8" 25-3/8" More Easy-To-Use Features Vari-Broil™ Option Allows you extra storage space in : Stainless (C) frigidaire.com Attractive Stainless Steel Exterior Sabbath Mode (Star-K® Certified) Available in your kitchen. Delay Clean Delay Bake Oven Lock-Out Timer Function Timed Cook Option Timer Lock-Out Auto Shut-Off As an extra safety measure, the oven...
... 's inside . Bright Oven Lighting Our bright lighting makes it easy to . 3204"" EGlaesctric Product Dimensions Height Width Depth 38-7/16" 23-7/8" 25-3/8" More Easy-To-Use Features Vari-Broil™ Option Allows you extra storage space in : Stainless (C) frigidaire.com Attractive Stainless Steel Exterior Sabbath Mode (Star-K® Certified) Available in your kitchen. Delay Clean Delay Bake Oven Lock-Out Timer Function Timed Cook Option Timer Lock-Out Auto Shut-Off As an extra safety measure, the oven...
Product Specifications Sheet (English)
Page 2
...Self Clean Storage Drawer Oven Controls Bake / Broil Convection Conversion Convection Bake / Broil / Roast Quick Bake Convection PowerPlus™ / Quick Preheat My Favorite Chicken Nugget Button Pizza Button Keep Warm Add-a-Minute Delay Bake Self-Clean Rapid / Quick Clean Option Delay Clean Kitchen Timer Timed Cook Option Control Lock Auto Oven Shutoff Oven Lock-Out Yes / Variable (Hi - Width (Wrapper) Depth with ground required on separate circuit fused on the web at frigidaire.com Specifications subject to Product Installation Guide for Under-Counter Installation Shipping Weight...
...Self Clean Storage Drawer Oven Controls Bake / Broil Convection Conversion Convection Bake / Broil / Roast Quick Bake Convection PowerPlus™ / Quick Preheat My Favorite Chicken Nugget Button Pizza Button Keep Warm Add-a-Minute Delay Bake Self-Clean Rapid / Quick Clean Option Delay Clean Kitchen Timer Timed Cook Option Control Lock Auto Oven Shutoff Oven Lock-Out Yes / Variable (Hi - Width (Wrapper) Depth with ground required on separate circuit fused on the web at frigidaire.com Specifications subject to Product Installation Guide for Under-Counter Installation Shipping Weight...


