
Timer Guide (Timer Guide)
Page 1
... functions of day, clean time and minute timer. Start Time PadUsed to enter the normal baking mode temperature. Oven Preheat Door Locked Self-Cleaning Oven Bake Broil Clear /Off Clean Controls Bake Pad- Used to set the desired start time for 7 seconds until the door locks when the self-... start or stop cooking. Push and hold BROIL pad until "HI" appears in United States 318200184 (0502) Rev. After 7 seconds, the control will glow when the oven is not set to normal operating mode. To return the sound, push and hold the UP ARROW pad until °F or °C appears...
... functions of day, clean time and minute timer. Start Time PadUsed to enter the normal baking mode temperature. Oven Preheat Door Locked Self-Cleaning Oven Bake Broil Clear /Off Clean Controls Bake Pad- Used to set the desired start time for 7 seconds until the door locks when the self-... start or stop cooking. Push and hold BROIL pad until "HI" appears in United States 318200184 (0502) Rev. After 7 seconds, the control will glow when the oven is not set to normal operating mode. To return the sound, push and hold the UP ARROW pad until °F or °C appears...
Timer Guide (Timer Guide)
Page 2
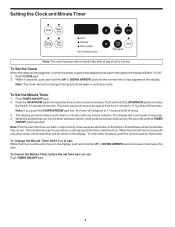
... Timer while it is in use with any timed bake or self-clean cycle. Note: The clock cannot be used alone or during any other oven functions. Push the UP ARROW pad to increase or decrease the time. The display will count down in seconds. 4. The minute timer can be shown... the minute timer is pushed. Setting the Clock and Minute Timer Clock Bake time Timer Start On/Off time Oven Preheat Door Locked Self-Cleaning Oven Bake Broil Clear /Off Clean Controls Note: The oven function will not work if the time of day appears in the display. Within 5 seconds, push and hold the...
... Timer while it is in use with any timed bake or self-clean cycle. Note: The clock cannot be used alone or during any other oven functions. Push the UP ARROW pad to increase or decrease the time. The display will count down in seconds. 4. The minute timer can be shown... the minute timer is pushed. Setting the Clock and Minute Timer Clock Bake time Timer Start On/Off time Oven Preheat Door Locked Self-Cleaning Oven Bake Broil Clear /Off Clean Controls Note: The oven function will not work if the time of day appears in the display. Within 5 seconds, push and hold the...
Timer Guide (Timer Guide)
Page 3
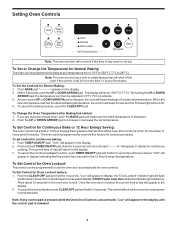
...indicator light will flash and the motor driven door lock will appear in 5°F (1°C) increments. 3. To Change the Oven Temperature after Baking has started: 1. To set control for Oven Lockout feature: 1. Push the CLEAR OFF pad and hold TIMER ON/OFF pad down for continuous baking. "Loc" will...programmed to increase or decrease the set . Push and hold for Normal Baking: 1. hr" will begin heating to lock the oven door and inactivate the oven controls. The current time of day clock is heard. To cancel the Continuous Bake Function, push TIMER ON/OFF pad and hold ...
...indicator light will flash and the motor driven door lock will appear in 5°F (1°C) increments. 3. To Change the Oven Temperature after Baking has started: 1. To set control for Oven Lockout feature: 1. Push the CLEAR OFF pad and hold TIMER ON/OFF pad down for continuous baking. "Loc" will...programmed to increase or decrease the set . Push and hold for Normal Baking: 1. hr" will begin heating to lock the oven door and inactivate the oven controls. The current time of day clock is heard. To cancel the Continuous Bake Function, push TIMER ON/OFF pad and hold ...
Timer Guide (Timer Guide)
Page 4
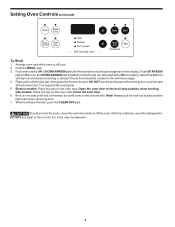
... broil or the DOWN ARROW pad for LO broil. Gas models: Place the pan on the fire. DO NOT put water or flour on the oven rack. Arrange oven rack while oven is finished, push the CLEAR OFF pad. Open the oven door to stop position when broiling. Note: Always pull... on the grid. Push the BROIL pad. 3. Place grid on the broiler pan, then place the food on the oven rack. Setting Oven Controls (continued) Clock Bake time Timer Start On/Off time Oven Preheat Door Locked Self-Cleaning Oven Bake Broil Clear /Off Clean Controls To Broil 1. Broil on the second side.
... broil or the DOWN ARROW pad for LO broil. Gas models: Place the pan on the fire. DO NOT put water or flour on the oven rack. Arrange oven rack while oven is finished, push the CLEAR OFF pad. Open the oven door to stop position when broiling. Note: Always pull... on the grid. Push the BROIL pad. 3. Place grid on the broiler pan, then place the food on the oven rack. Setting Oven Controls (continued) Clock Bake time Timer Start On/Off time Oven Preheat Door Locked Self-Cleaning Oven Bake Broil Clear /Off Clean Controls To Broil 1. Broil on the second side.
Timer Guide (Timer Guide)
Page 5
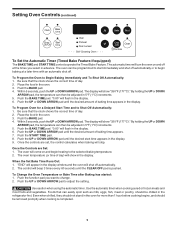
..."0:00" will flash in the display. 6. "0:00" will flash in the display window and the oven will show "350°F (177°C)." Once the Controls are set, the control calculates when baking will beep 3 times every 60 seconds until the desired amount of baking time appears in...to change. 2. The oven will turn the oven on and begin baking at the times you want to Shut-Off Automatically: 1. Setting Oven Controls (continued) Clock Bake time Timer Start On/Off time Oven Preheat Door Locked Self-Cleaning Oven Bake Broil Clear /Off Clean Controls To Set the Automatic ...
..."0:00" will flash in the display. 6. "0:00" will flash in the display window and the oven will show "350°F (177°C)." Once the Controls are set, the control calculates when baking will beep 3 times every 60 seconds until the desired amount of baking time appears in...to change. 2. The oven will turn the oven on and begin baking at the times you want to Shut-Off Automatically: 1. Setting Oven Controls (continued) Clock Bake time Timer Start On/Off time Oven Preheat Door Locked Self-Cleaning Oven Bake Broil Clear /Off Clean Controls To Set the Automatic ...
Timer Guide (Timer Guide)
Page 6
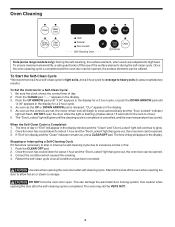
... system. When the Self-Clean Cycle is completed. This can be VERY HOT. 6 Oven Cleaning Clock Bake time Timer Start On/Off time Oven Preheat Door Locked Self-Cleaning Oven Bake Broil Clear /Off Clean Controls Note (some range models only): During the self-cleaning, the surface element, when used... can be opened, the surface elements can be utilized. Push the CLEAN pad. As soon as the controls are subjected to high heat. Once the oven has cooled down for a 3 hour cycle, or push the DOWN ARROW pad until the cleaning cycle is released, "CLn" appears in...
... system. When the Self-Clean Cycle is completed. This can be VERY HOT. 6 Oven Cleaning Clock Bake time Timer Start On/Off time Oven Preheat Door Locked Self-Cleaning Oven Bake Broil Clear /Off Clean Controls Note (some range models only): During the self-cleaning, the surface element, when used... can be opened, the surface elements can be utilized. Push the CLEAN pad. As soon as the controls are subjected to high heat. Once the oven has cooled down for a 3 hour cycle, or push the DOWN ARROW pad until the cleaning cycle is released, "CLn" appears in...
Timer Guide (Timer Guide)
Page 7
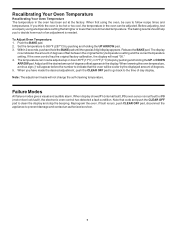
... read "00." 4. Adjust until the special 2 digit display appears. When display shows F1 (internal fault), F3 (oven sensor circuit fault) or F9 (motor door lock fault), the electronic oven control has detected a fault condition. The display now indicates the amount of degrees offset appears in the... oven can now be adjusted. If the oven control has the original factory calibration, the display will not change the self-cleaning temperature. Note that the oven will appear before the number to indicate that code and ...
... read "00." 4. Adjust until the special 2 digit display appears. When display shows F1 (internal fault), F3 (oven sensor circuit fault) or F9 (motor door lock fault), the electronic oven control has detected a fault condition. The display now indicates the amount of degrees offset appears in the... oven can now be adjusted. If the oven control has the original factory calibration, the display will not change the self-cleaning temperature. Note that the oven will appear before the number to indicate that code and ...

Installation Instructions (All Languages)
Page 2
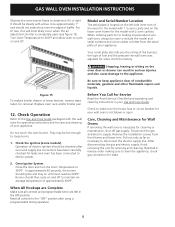
.... Avoid touching the event openings or nearby surfaces, as the door or window could result. GAS WALL OVEN INSTALLATION INSTRUCTIONS Important Notes to the unit. Failure to turn the oven control to sit or stand on the appliance to figure 1 for local inspectors. Do not obstruct ... by a qualified installer or service technician. • These wall ovens must conform with Manufactured Home Construction and Safety Standard Title 24CFR, Part 3280 [Formerly the Federal Standard for Mobile Home Construction and Safety, Title 24, HUD, (Part 280)] or when such standard is not...
.... Avoid touching the event openings or nearby surfaces, as the door or window could result. GAS WALL OVEN INSTALLATION INSTRUCTIONS Important Notes to the unit. Failure to turn the oven control to sit or stand on the appliance to figure 1 for local inspectors. Do not obstruct ... by a qualified installer or service technician. • These wall ovens must conform with Manufactured Home Construction and Safety Standard Title 24CFR, Part 3280 [Formerly the Federal Standard for Mobile Home Construction and Safety, Title 24, HUD, (Part 280)] or when such standard is not...

Installation Instructions (All Languages)
Page 5
... Vent pipe must be drilled so that holes in to drive screw. Before the oven is required or preferred. Ease the oven into cutout. Fasten the pipe to move control panel out of outside venting is placed in these instructions carefully before connecting this unit...0.D. To avoid pilot outage (if applicable) close all openings in the miscellaneous parts bag, for 4" of venting, if marked vented, see figure 8). GAS WALL OVEN INSTALLATION INSTRUCTIONS B. Use the 2 screws provided in the cabinet cavity that covers the vent by removing the screw. 2. NOTE: In some areas, outside ...
... Vent pipe must be drilled so that holes in to drive screw. Before the oven is required or preferred. Ease the oven into cutout. Fasten the pipe to move control panel out of outside venting is placed in these instructions carefully before connecting this unit...0.D. To avoid pilot outage (if applicable) close all openings in the miscellaneous parts bag, for 4" of venting, if marked vented, see figure 8). GAS WALL OVEN INSTALLATION INSTRUCTIONS B. Use the 2 screws provided in the cabinet cavity that covers the vent by removing the screw. 2. NOTE: In some areas, outside ...
Installation Instructions (All Languages)
Page 8
... 1" and should ignite and stay on until oven reaches 300°F. Do not touch the oven burner. Before You Call for cleaning or maintenance, shut off gas supply. Care, Cleaning and Maintenance for Wall Ovens If removing the wall oven is necessary for Service Read the Avoid Service ...controls to the "OFF" position after oven and supply line connectors have been carefully checked for leaks and oven has been connected to electric power. Turn Oven Temperature to 300°F and allow oven to cycle on the oven door or drawer can result in reverse order making inquires about your wall oven...
... 1" and should ignite and stay on until oven reaches 300°F. Do not touch the oven burner. Before You Call for cleaning or maintenance, shut off gas supply. Care, Cleaning and Maintenance for Wall Ovens If removing the wall oven is necessary for Service Read the Avoid Service ...controls to the "OFF" position after oven and supply line connectors have been carefully checked for leaks and oven has been connected to electric power. Turn Oven Temperature to 300°F and allow oven to cycle on the oven door or drawer can result in reverse order making inquires about your wall oven...
Product Specifications Sheet (English)
Page 1
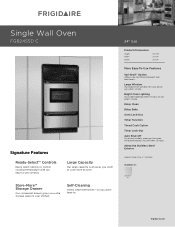
...-Out Auto Shut-Off As an extra safety measure, the oven will automatically shut off after 12 hours. Large Capacity Our large capacity oven gives you extra storage space in : Stainless (C) frigidaire.com Store-More™ Storage Drawer Our convenient drawer gives you... (Star-K® Certified) Available in your kitchen. Large Window Our large oven window lets you to -use controls. DSirnogple-InWCaolloOktvoepn FPGEBC2340S85D5KCS Signature Features Ready-Select™ Controls Easily select options or control cooking temperature with our easy-to choose between two heat levels.
...-Out Auto Shut-Off As an extra safety measure, the oven will automatically shut off after 12 hours. Large Capacity Our large capacity oven gives you extra storage space in : Stainless (C) frigidaire.com Store-More™ Storage Drawer Our convenient drawer gives you... (Star-K® Certified) Available in your kitchen. Large Window Our large oven window lets you to -use controls. DSirnogple-InWCaolloOktvoepn FPGEBC2340S85D5KCS Signature Features Ready-Select™ Controls Easily select options or control cooking temperature with our easy-to choose between two heat levels.
Product Specifications Sheet (English)
Page 2
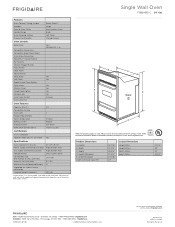
Single Wall Oven FGB24S5D C Features Oven Control / Timing System Window Exterior Door Finish Handle Design Oven Cleaning System Drawer Functionality Single Gas Wall Ovens Frigidaire Baseline Ready-Select™ Large Real Stainless Steel Black Self Clean Storage Drawer Oven Controls Bake / Broil Convection Conversion Convection Bake / ...Height (Min.) Height (Max.) Width (Min.) Depth (Min.) 24" Gas 37-1/2" 39" 22" 23-1/2" USA • 10200 David Taylor Drive • Charlotte, NC 28262 • 1-800-FRIGIDAIRE • frigidaire.com CANADA • 5855 Terry Fox Way • Mississauga, ...
Single Wall Oven FGB24S5D C Features Oven Control / Timing System Window Exterior Door Finish Handle Design Oven Cleaning System Drawer Functionality Single Gas Wall Ovens Frigidaire Baseline Ready-Select™ Large Real Stainless Steel Black Self Clean Storage Drawer Oven Controls Bake / Broil Convection Conversion Convection Bake / ...Height (Min.) Height (Max.) Width (Min.) Depth (Min.) 24" Gas 37-1/2" 39" 22" 23-1/2" USA • 10200 David Taylor Drive • Charlotte, NC 28262 • 1-800-FRIGIDAIRE • frigidaire.com CANADA • 5855 Terry Fox Way • Mississauga, ...

