
Installation Instructions (All Languages)
Page 1
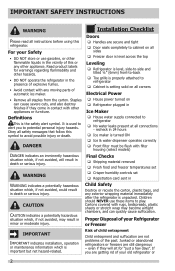
... level and able to side may damage flooring. • Do not block the toe grille on the lower front of your refrigerator? Please contact the store you for choosing Frigidaire. 8 Installation Checkoff List Doors Door seals completely to cabinet on all corners Electrical Power House power turned on...
... level and able to side may damage flooring. • Do not block the toe grille on the lower front of your refrigerator? Please contact the store you for choosing Frigidaire. 8 Installation Checkoff List Doors Door seals completely to cabinet on all corners Electrical Power House power turned on...

Complete Owner's Guide
Page 1
All about the Use &Care of your Refrigerator TABLE OF CONTENTS Important Safety Instructions 2 Storage Features 16 Features at a Glance 4 Automatic Ice & Water Dispenser 18 Installation 5 Changing the Filter 23 Door Removal Instructions 7 Normal Operating Sounds and Sights..........24 Handle Installation 9 Care and Cleaning 25 Connecting Water Supply 10 Before you Call 27 Controls 12 Major Appliance Warranty 30 www.frigidaire.com USA 1-800-944-9044 www.frigidaire.ca Canada 1-800-265-8352 808353502 (July 2013)
All about the Use &Care of your Refrigerator TABLE OF CONTENTS Important Safety Instructions 2 Storage Features 16 Features at a Glance 4 Automatic Ice & Water Dispenser 18 Installation 5 Changing the Filter 23 Door Removal Instructions 7 Normal Operating Sounds and Sights..........24 Handle Installation 9 Care and Cleaning 25 Connecting Water Supply 10 Before you Call 27 Controls 12 Major Appliance Warranty 30 www.frigidaire.com USA 1-800-944-9044 www.frigidaire.ca Canada 1-800-265-8352 808353502 (July 2013)
Complete Owner's Guide
Page 2
...not problems of automatic ice maker. • Remove all staples from the carton. Obey all safety messages that follow this refrigerator. DANGER Installation Checklist Doors Handles are still dangerous - Staples can quickly cause suffocation. CAUTION CAUTION indicates a potentially ...models) DANGER indicates an imminently hazardous situation which is unpacked. Cartons covered with other hazards. • DO NOT operate the refrigerator in death or serious injury. Final Checks Shipping material removed Fresh food and freezer temperatures set WARNING ...
...not problems of automatic ice maker. • Remove all staples from the carton. Obey all safety messages that follow this refrigerator. DANGER Installation Checklist Doors Handles are still dangerous - Staples can quickly cause suffocation. CAUTION CAUTION indicates a potentially ...models) DANGER indicates an imminently hazardous situation which is unpacked. Cartons covered with other hazards. • DO NOT operate the refrigerator in death or serious injury. Final Checks Shipping material removed Fresh food and freezer temperatures set WARNING ...

Complete Owner's Guide
Page 3
...To avoid personal injury or property damage, handle tempered glass shelves carefully. IMPORTANT Pressing and holding the On/Off button for your old refrigerator. The power cord of the appliance is damaged, it should be plugged into an electrical outlet controlled by a qualified service technician. ...Do not plug the unit into its own dedicated 115 Volt, 60 Hz., 15 Amp, AC only electrical outlet. Other refrigerants may not easily climb inside. • Have refrigerant removed by a wall switch or pull cord to "0" (Mechanical controls) will operate properly. Do not use an extension ...
...To avoid personal injury or property damage, handle tempered glass shelves carefully. IMPORTANT Pressing and holding the On/Off button for your old refrigerator. The power cord of the appliance is damaged, it should be plugged into an electrical outlet controlled by a qualified service technician. ...Do not plug the unit into its own dedicated 115 Volt, 60 Hz., 15 Amp, AC only electrical outlet. Other refrigerants may not easily climb inside. • Have refrigerant removed by a wall switch or pull cord to "0" (Mechanical controls) will operate properly. Do not use an extension ...
Complete Owner's Guide
Page 4
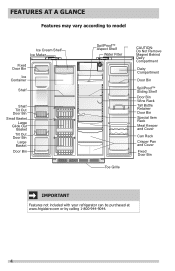
... Retainer Door Bin Special Item Rack Meat Keeper and Cover Can Rack Crisper Pan and Cover Fixed Door Bin IMPORTANT Features not included with your refrigerator can be purchased at www.frigidaire.com or by calling 1-800-944-9044. 4
... Retainer Door Bin Special Item Rack Meat Keeper and Cover Can Rack Crisper Pan and Cover Fixed Door Bin IMPORTANT Features not included with your refrigerator can be purchased at www.frigidaire.com or by calling 1-800-944-9044. 4
Complete Owner's Guide
Page 5
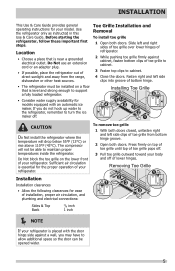
...Removal To install toe grille 1 Open both doors. Sufficient air circulation is essential for the proper operation of bottom hinge. • The refrigerator must be installed on top of toe grille until top of toe grille pops off. 3 Pull toe grille outward toward your model. ... With both doors closed, unfasten right and left side clips of toe grille from the range, dishwasher or other heat sources. Before starting the refrigerator, follow these important first steps. The compressor will drop below 55°F (13°C) or rise above 110°F (43°C). Installation...
...Removal To install toe grille 1 Open both doors. Sufficient air circulation is essential for the proper operation of bottom hinge. • The refrigerator must be installed on top of toe grille until top of toe grille pops off. 3 Pull toe grille outward toward your model. ... With both doors closed, unfasten right and left side clips of toe grille from the range, dishwasher or other heat sources. Before starting the refrigerator, follow these important first steps. The compressor will drop below 55°F (13°C) or rise above 110°F (43°C). Installation...
Complete Owner's Guide
Page 6
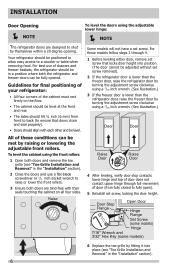
... sides. For best use a flat-blade screwdriver or 3/8 inch socket wrench to raise or lower the front rollers. 3 Ensure both the refrigerator and freezer doors can be level at the front and rear. Door Stop Flange Open Door Hinge Flange Set Screw (some models) Hinge 7/.... INSTALLATION Door Opening NOTE To level the doors using the adjustable lower hinge: NOTE The refrigerator doors are bind-free with each other and be level. Your refrigerator should be in the "Installation" section). 6 Raise Raise Door Raise Door 4 After leveling, verify door stop ...
... sides. For best use a flat-blade screwdriver or 3/8 inch socket wrench to raise or lower the front rollers. 3 Ensure both the refrigerator and freezer doors can be level at the front and rear. Door Stop Flange Open Door Hinge Flange Set Screw (some models) Hinge 7/.... INSTALLATION Door Opening NOTE To level the doors using the adjustable lower hinge: NOTE The refrigerator doors are bind-free with each other and be level. Your refrigerator should be in the "Installation" section). 6 Raise Raise Door Raise Door 4 After leveling, verify door stop ...

Complete Owner's Guide
Page 7
... each cover over the top door hinges. 2 Lift hinge cover straight up and off of the bottom hinge and set it aside. 7 To remove the refrigerator top hinge cover: 1 Remove the three screws from the top hinge. Adjustable Wrench Rear Cover Front Cover Screw Screws Top Hinge Cover Socket Wrench Set... Hinge Screws Top Hinge or 3/8" Fixed Wrench Top Hinge Cover Front Screw Top Hinge Cover Rear Screw To remove the refrigerator door: 1 Trace lightly around the door's top hinge with your appliance). 3 Remove any food from the door shelves. 4 Close the doors...
... each cover over the top door hinges. 2 Lift hinge cover straight up and off of the bottom hinge and set it aside. 7 To remove the refrigerator top hinge cover: 1 Remove the three screws from the top hinge. Adjustable Wrench Rear Cover Front Cover Screw Screws Top Hinge Cover Socket Wrench Set... Hinge Screws Top Hinge or 3/8" Fixed Wrench Top Hinge Cover Front Screw Top Hinge Cover Rear Screw To remove the refrigerator door: 1 Trace lightly around the door's top hinge with your appliance). 3 Remove any food from the door shelves. 4 Close the doors...

Complete Owner's Guide
Page 8
To Disconnect 1. Door Hinge Assembly Closer Pin Screws Hinge Adjustable Hinge To reinstall the refrigerator door, reverse the above the top hinge. Grasp both sides of fitting 2. Water Line Tubing Hinge Assembly Screws Non-Adjusting Hinge (some models) Door Top ...
To Disconnect 1. Door Hinge Assembly Closer Pin Screws Hinge Adjustable Hinge To reinstall the refrigerator door, reverse the above the top hinge. Grasp both sides of fitting 2. Water Line Tubing Hinge Assembly Screws Non-Adjusting Hinge (some models) Door Top ...

Complete Owner's Guide
Page 9
...of handle end cap. HANDLE INSTALLATION Frigidaire Professional® Freezer Upper End Cap Refrigerator Upper End Cap Freezer Lower End Cap Refrigerator Lower End Cap Frigidaire Gallery® Freezer Upper End Cap Refrigerator Upper End Cap Freezer Lower End Cap Refrigerator Lower End Cap Ensure Handle Set ...screw should be sharp (some models). IMPORTANT To ensure proper installation of the handles may be drawn tight to freezer and refrigerator doors with no gaps. The rounded end of handles, please review these handles. CAUTION Wear gloves and safety goggles and ...
...of handle end cap. HANDLE INSTALLATION Frigidaire Professional® Freezer Upper End Cap Refrigerator Upper End Cap Freezer Lower End Cap Refrigerator Lower End Cap Frigidaire Gallery® Freezer Upper End Cap Refrigerator Upper End Cap Freezer Lower End Cap Refrigerator Lower End Cap Ensure Handle Set ...screw should be sharp (some models). IMPORTANT To ensure proper installation of the handles may be drawn tight to freezer and refrigerator doors with no gaps. The rounded end of handles, please review these handles. CAUTION Wear gloves and safety goggles and ...

Complete Owner's Guide
Page 10
... a wrench; Please refer to www.frigidaire.com/store for homes without an existing valve, Frigidaire recommends its Smart Choice® water line kit 5305513409 (with water pressure between 30 and 100 psi. • A water supply line made of the refrigerator to your cold water pipe. See Figure... NOT over tighten. IMPORTANT Ensure that the softener is clear. Check with a wrench; Then add approximately 7 feet (2.1 meters), so the refrigerator can be responsible for any damage if plastic tubing is used . Turn OFF water supply at the back of ¼ inch plastic is ...
... a wrench; Please refer to www.frigidaire.com/store for homes without an existing valve, Frigidaire recommends its Smart Choice® water line kit 5305513409 (with water pressure between 30 and 100 psi. • A water supply line made of the refrigerator to your cold water pipe. See Figure... NOT over tighten. IMPORTANT Ensure that the softener is clear. Check with a wrench; Then add approximately 7 feet (2.1 meters), so the refrigerator can be responsible for any damage if plastic tubing is used . Turn OFF water supply at the back of ¼ inch plastic is ...

Complete Owner's Guide
Page 11
...a water tank. CONNECTING THE WATER SUPPLY 5 With steel clamp and screw, secure water supply line (copper tubing only) to rear panel of refrigerator as shown and arrange coils so they do not vibrate or wear against any other surface. 7 Turn ON water supply at shutoff valve and ...tighten any connections that your water dispenser works properly, this system must be completely filled with water when your refrigerator is first connected to the "I" position (rear mounted). Figure 1 11 Stainless Steel water line from household water supply (Include enough tubing...
...a water tank. CONNECTING THE WATER SUPPLY 5 With steel clamp and screw, secure water supply line (copper tubing only) to rear panel of refrigerator as shown and arrange coils so they do not vibrate or wear against any other surface. 7 Turn ON water supply at shutoff valve and ...tighten any connections that your water dispenser works properly, this system must be completely filled with water when your refrigerator is first connected to the "I" position (rear mounted). Figure 1 11 Stainless Steel water line from household water supply (Include enough tubing...

Complete Owner's Guide
Page 12
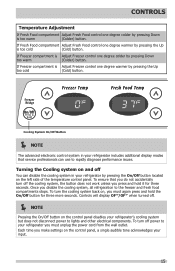
...the current accurate temperature is located at the factory. Should you desire to the display. During this cooling period, you entered. Your refrigerator comes with a two-digit temperature display are preset at the top of -the-art electronic digital control system. Each press of your... freezer and fresh food compartments. Features may vary.) 12 The display shows your refrigerator to operate with the doors closed for at least 8 to 12 hours before making additional changes. The models with a state-of ...
...the current accurate temperature is located at the factory. Should you desire to the display. During this cooling period, you entered. Your refrigerator comes with a two-digit temperature display are preset at the top of -the-art electronic digital control system. Each press of your... freezer and fresh food compartments. Features may vary.) 12 The display shows your refrigerator to operate with the doors closed for at least 8 to 12 hours before making additional changes. The models with a state-of ...
Complete Owner's Guide
Page 13
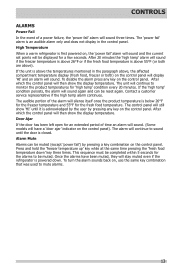
... condition persists, the alarm will sound again and can be muted. After which the control panel will be reset again. High Temperature When a warm refrigerator is first powered on, the 'power fail' alarm will sound and the current set points will then show the display temperature. Alarm Mute Alarms can.... Door Ajar If the door has been left open for the alarms to mute alarms. 13 The alarm will stay muted even if the refrigerator is an audible alarm only and does not display in the paragraph above, the affected compartment temperature display (fresh food, freezer or both are...
... condition persists, the alarm will sound again and can be muted. After which the control panel will be reset again. High Temperature When a warm refrigerator is first powered on, the 'power fail' alarm will sound and the current set points will then show the display temperature. Alarm Mute Alarms can.... Door Ajar If the door has been left open for the alarms to mute alarms. 13 The alarm will stay muted even if the refrigerator is an audible alarm only and does not display in the paragraph above, the affected compartment temperature display (fresh food, freezer or both are...

Complete Owner's Guide
Page 14
... the control system has detected a performance problem. Call your service representative, who can interpret the flashing message. To maintain temperatures, a fan circulates air in the refrigerator and freezer compartments. For good circulation, do not block cold air vents with food items. Numeric Display Warmest Factory Setting Coldest Freezer 1 6 9 Fresh Food 1 6 9 Temperature...
... the control system has detected a performance problem. Call your service representative, who can interpret the flashing message. To maintain temperatures, a fan circulates air in the refrigerator and freezer compartments. For good circulation, do not block cold air vents with food items. Numeric Display Warmest Factory Setting Coldest Freezer 1 6 9 Fresh Food 1 6 9 Temperature...
Complete Owner's Guide
Page 15
...one degree colder by pressing the Up too cold (Cold) button. To ensure that service professionals can disable the cooling system in your refrigerator's cooling system but does not disconnect power to the freezer and fresh food compartments stops. To turn the cooling system back on the... control panel, a single audible tone acknowledges your refrigerator you must unplug the power cord from the wall outlet. If Freezer compartment is Adjust Freezer control one degree warmer by pressing Down is...
...one degree colder by pressing the Up too cold (Cold) button. To ensure that service professionals can disable the cooling system in your refrigerator's cooling system but does not disconnect power to the freezer and fresh food compartments stops. To turn the cooling system back on the... control panel, a single audible tone acknowledges your refrigerator you must unplug the power cord from the wall outlet. If Freezer compartment is Adjust Freezer control one degree warmer by pressing Down is...

Complete Owner's Guide
Page 16
...room temperature before cleaning. Allow the glass shelves to stabilize to sudden temperature change. The fresh drawers, located under the bottom refrigerator shelf, are not removable from their mounting brackets. Higher Humidity Lower Humidity 2 Pull shelf out. Lower the shelf into ... Cantilever Sliding Glass Shelf Door bins and shelves are adjustable for storing fruits, vegetables, and other fresh produce. Cantilever Shelf Adjustment Refrigerator shelves are supported at rear of items including fruits, vegetables, 1 nuts, etc. Just pull the front of jars, bottles,...
...room temperature before cleaning. Allow the glass shelves to stabilize to sudden temperature change. The fresh drawers, located under the bottom refrigerator shelf, are not removable from their mounting brackets. Higher Humidity Lower Humidity 2 Pull shelf out. Lower the shelf into ... Cantilever Sliding Glass Shelf Door bins and shelves are adjustable for storing fruits, vegetables, and other fresh produce. Cantilever Shelf Adjustment Refrigerator shelves are supported at rear of items including fruits, vegetables, 1 nuts, etc. Just pull the front of jars, bottles,...
Complete Owner's Guide
Page 18
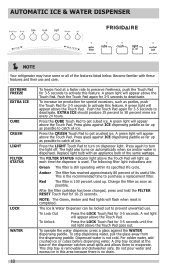
.... Dispensed water is removable and dishwasher safe. For colder water, add crushed ice or cubes before dispensing water. AUTOMATIC ICE & WATER DISPENSER NOTE Your refrigerator may have some or all ice. To increase ice production for 3-5 seconds to catch all ice. Change the filter as soon as parties, push the...
.... Dispensed water is removable and dishwasher safe. For colder water, add crushed ice or cubes before dispensing water. AUTOMATIC ICE & WATER DISPENSER NOTE Your refrigerator may have some or all ice. To increase ice production for 3-5 seconds to catch all ice. Change the filter as soon as parties, push the...

Complete Owner's Guide
Page 19
... light. A red indicator will appear above the Touch Pad. Light On Press the Light On Touch Pad to turn on o ice water NOTE Your refrigerator may have some or all of the dispenser catches small spills and allows them to evaporate. Cubed Press the Cubed Touch Pad to get crushed...
... light. A red indicator will appear above the Touch Pad. Light On Press the Light On Touch Pad to turn on o ice water NOTE Your refrigerator may have some or all of the dispenser catches small spills and allows them to evaporate. Cubed Press the Cubed Touch Pad to get crushed...
Complete Owner's Guide
Page 20
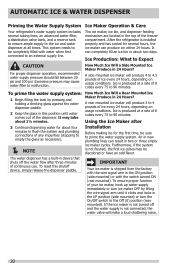
After the refrigerator is installed properly and has cooled for several tubing lines, an advanced water filter, a distribution valve bank, and a reserve tank to ensure ample supply to ... not connected, the water valve will make a loud chattering noise. 20 AUTOMATIC ICE & WATER DISPENSER Priming the Water Supply System Ice Maker Operation & Care Your refrigerator's water supply system includes several hours, the ice maker can produce ice within 24 hours. A rear mounted ice maker will produce 4 to 4.5 pounds of 8 cubes...
After the refrigerator is installed properly and has cooled for several tubing lines, an advanced water filter, a distribution valve bank, and a reserve tank to ensure ample supply to ... not connected, the water valve will make a loud chattering noise. 20 AUTOMATIC ICE & WATER DISPENSER Priming the Water Supply System Ice Maker Operation & Care Your refrigerator's water supply system includes several hours, the ice maker can produce ice within 24 hours. A rear mounted ice maker will produce 4 to 4.5 pounds of 8 cubes...


