

Use and Care Guide
Page 1
All about the Use & Care of your Dryer TABLE OF CONTENTS Important Safety Instructions 2-5 Features 6 Operating Instructions 7-13 Care and Cleaning 14 Solutions to Common Problems 15-16 Warranty 17 Notes 18 Français 19 Español 37 137619700A (1304)
All about the Use & Care of your Dryer TABLE OF CONTENTS Important Safety Instructions 2-5 Features 6 Operating Instructions 7-13 Care and Cleaning 14 Solutions to Common Problems 15-16 Warranty 17 Notes 18 Français 19 Español 37 137619700A (1304)
Use and Care Guide
Page 3
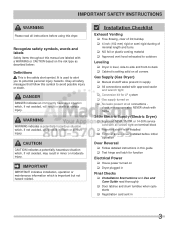
Recognize safety symbols, words and labels Safety items throughout this manual are labeled with a WARNING or CAUTION based on the dryer serial plate located inside the door opening. This book contains valuable information about features for several other models. This Use and Care ...Definitions This is important but not hazard-related. Purchase Date Read all safety messages that may not have every feature included. Your dryer may occur. NOTE The instructions appearing in death or serious injury. Save these numbers. It is used to alert you to cover every possible...
Recognize safety symbols, words and labels Safety items throughout this manual are labeled with a WARNING or CAUTION based on the dryer serial plate located inside the door opening. This book contains valuable information about features for several other models. This Use and Care ...Definitions This is important but not hazard-related. Purchase Date Read all safety messages that may not have every feature included. Your dryer may occur. NOTE The instructions appearing in death or serious injury. Save these numbers. It is used to alert you to cover every possible...

Use and Care Guide
Page 4
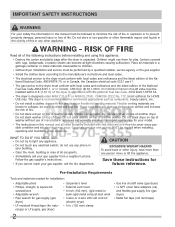
... risk of the fabric softener or product. • Do not continue to persons when using this warning can be installed on or near dryer at any circumstances, cut, remove, or bypass the grounding prong. (fused 30 amp) Power cord with gasoline, cleaning solvents, kerosene, ...waxes, etc. WARNING FIRE HAZARD A clothes dryer produces combustible lint. Contact a qualified technician immediately. • Failure to cooking oils in the surrounding area. • Clean the lint ...
... risk of the fabric softener or product. • Do not continue to persons when using this warning can be installed on or near dryer at any circumstances, cut, remove, or bypass the grounding prong. (fused 30 amp) Power cord with gasoline, cleaning solvents, kerosene, ...waxes, etc. WARNING FIRE HAZARD A clothes dryer produces combustible lint. Contact a qualified technician immediately. • Failure to cooking oils in the surrounding area. • Clean the lint ...
Use and Care Guide
Page 5
... • Destroy the carton, plastic bag and other reproductive harm, and requires businesses to warn customer of children is necessary when the dryer is unpacked. CAUTION The California Safe Drinking Water and Toxic Enforcement Act requires the Governor of California to publish a list of this Owner's...fault. • Failure to the weather. • A thermal limiter switch automatically turns off the motor in the unlikely event of a gas dryer must be exposed to comply with these warnings could occur. • To prevent injury, do so can become airtight chambers. • Keep laundry...
... • Destroy the carton, plastic bag and other reproductive harm, and requires businesses to warn customer of children is necessary when the dryer is unpacked. CAUTION The California Safe Drinking Water and Toxic Enforcement Act requires the Governor of California to publish a list of this Owner's...fault. • Failure to the weather. • A thermal limiter switch automatically turns off the motor in the unlikely event of a gas dryer must be exposed to comply with these warnings could occur. • To prevent injury, do so can become airtight chambers. • Keep laundry...
Use and Care Guide
Page 7
...risk of fire, electric shock or injury to control the gas flow. Repeat stain removal process and wash again before operating your new dryer: A. This may permanently set of suspension rollers. C. During operation there may not have been removed in this Use and Care Guide before drying.... tangling. (Mesh bag not included.) 7 Tie strings and sashes to use for a period of time, or after a heavy load has remained in the dryer drum for an extended period, creating a temporary flat spot on the edge of similar fabric, weight and construction in the same load. • ...
...risk of fire, electric shock or injury to control the gas flow. Repeat stain removal process and wash again before operating your new dryer: A. This may permanently set of suspension rollers. C. During operation there may not have been removed in this Use and Care Guide before drying.... tangling. (Mesh bag not included.) 7 Tie strings and sashes to use for a period of time, or after a heavy load has remained in the dryer drum for an extended period, creating a temporary flat spot on the edge of similar fabric, weight and construction in the same load. • ...
Use and Care Guide
Page 8
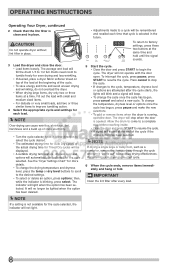
... temperature, dryness level or options once the cycle has begun, press pause and make the new selections. • To add or remove items when the dryer is running, open . The indicator will not operate with small and medium sized items. • For delicate or very small loads, add two or ... hang or fold. To return to a cycle will not light. 8 The average wet load will no longer be remembered and recalled each load. See the "Dryer Settings Chart" for the cycle selected, the indicator will be lighted when the option has been deleted. 5 Start the cycle. • Close the door and...
... temperature, dryness level or options once the cycle has begun, press pause and make the new selections. • To add or remove items when the dryer is running, open . The indicator will not operate with small and medium sized items. • For delicate or very small loads, add two or ... hang or fold. To return to a cycle will not light. 8 The average wet load will no longer be remembered and recalled each load. See the "Dryer Settings Chart" for the cycle selected, the indicator will be lighted when the option has been deleted. 5 Start the cycle. • Close the door and...

Use and Care Guide
Page 9
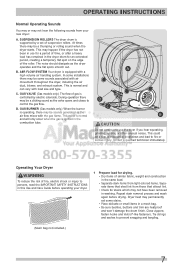
...Moisture sensing bars at the selected temperature to the desired dryness level. The estimated drying time will be dried at the back of the dryer drum sense the moisture level of the display will light up in either direction to the cycle desired. Then the outside of the load ... the drying time for reference only. OPERATING INSTRUCTIONS This manual covers many models and not all cycles, options, or features listed are not active and dryer will continue to heat throughout the cycle until the final cool down period. 9 Your model may end after a few minutes. Cycle Selection...
...Moisture sensing bars at the selected temperature to the desired dryness level. The estimated drying time will be dried at the back of the dryer drum sense the moisture level of the display will light up in either direction to the cycle desired. Then the outside of the load ... the drying time for reference only. OPERATING INSTRUCTIONS This manual covers many models and not all cycles, options, or features listed are not active and dryer will continue to heat throughout the cycle until the final cool down period. 9 Your model may end after a few minutes. Cycle Selection...
Use and Care Guide
Page 11
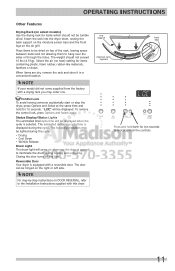
... unloading. "LOC" will be lighted during the cycle. Status Display/Status Lights The estimated total cycle time will be tumble dried. Reversible Door Your dryer is equipped with a drying rack you may be displayed when the cycle is displayed during the cycle: • Drying • Cool Down •...model did not come on top of the rack, leaving space between items and not allowing them to the Installation Instructions supplied with this dryer. To remove the control lock, press Options and Select again. Closing the door turns off the light. Control Lock To avoid having someone...
... unloading. "LOC" will be lighted during the cycle. Status Display/Status Lights The estimated total cycle time will be tumble dried. Reversible Door Your dryer is equipped with a drying rack you may be displayed when the cycle is displayed during the cycle: • Drying • Cool Down •...model did not come on top of the rack, leaving space between items and not allowing them to the Installation Instructions supplied with this dryer. To remove the control lock, press Options and Select again. Closing the door turns off the light. Control Lock To avoid having someone...
Use and Care Guide
Page 12
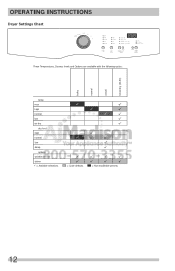
OPERATING INSTRUCTIONS Dryer Settings Chart These Temperatures, Dryness levels and Options are available with the following cycles: bulky normal casual timed dry (30-90) temp max high normal low air dry dry level high normal low damp options wrinkle release chime 9 = Available selections. 9 9 9 9 9 9 9 9 9 9 9 9 9 9 9 9 = Cycle defaults. 9 9 9 9 9 9 = Non-modifiable presets. 12
OPERATING INSTRUCTIONS Dryer Settings Chart These Temperatures, Dryness levels and Options are available with the following cycles: bulky normal casual timed dry (30-90) temp max high normal low air dry dry level high normal low damp options wrinkle release chime 9 = Available selections. 9 9 9 9 9 9 9 9 9 9 9 9 9 9 9 9 = Cycle defaults. 9 9 9 9 9 9 = Non-modifiable presets. 12
Use and Care Guide
Page 13
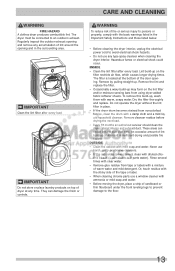
... waxy build-up could occur. Remove cleanser residue before drying the next load. • Every 18 months an authorized servicer should clean the dryer cabinet interior and exhaust duct. These areas can damage the finish or controls. Never use a window cleaner with ammonia or mild soap...property, comply with a mixture of the door opening and in the Important Safety Instructions and those listed below. • Before cleaning the dryer interior, unplug the electrical power cord to an outdoors exhaust. INSIDE • Clean the lint filter after every load. An excessive...
... waxy build-up could occur. Remove cleanser residue before drying the next load. • Every 18 months an authorized servicer should clean the dryer cabinet interior and exhaust duct. These areas can damage the finish or controls. Never use a window cleaner with ammonia or mild soap...property, comply with a mixture of the door opening and in the Important Safety Instructions and those listed below. • Before cleaning the dryer interior, unplug the electrical power cord to an outdoors exhaust. INSIDE • Clean the lint filter after every load. An excessive...
Use and Care Guide
Page 14
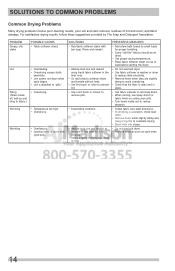
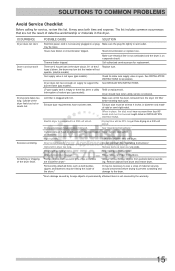
...Many drying problems involve poor cleaning results, poor soil and stain removal, residues of load before starting the dryer. • Do not overload dryer. • Use fabric softener in washer or dryer to reduce static electricity. • Remove items when they are slightly damp to avoid overdrying. •...• Irreversible condition. • Reduce load size and tumble at to complete drying. • Block knits into shape. • Do not overload dryer. • Remove items as soon as cycle ends. 14 PROBLEM Greasy, oily stains Lint Pilling (Fibers break off, ball up and cling to fabric...
...Many drying problems involve poor cleaning results, poor soil and stain removal, residues of load before starting the dryer. • Do not overload dryer. • Use fabric softener in washer or dryer to reduce static electricity. • Remove items when they are slightly damp to avoid overdrying. •...• Irreversible condition. • Reduce load size and tumble at to complete drying. • Block knits into shape. • Do not overload dryer. • Remove items as soon as cycle ends. 14 PROBLEM Greasy, oily stains Lint Pilling (Fibers break off, ball up and cling to fabric...
Use and Care Guide
Page 15
...circuit. may be necessary to sew a scrap of rigid or semi-rigid metal. Make sure electrical line is not overloaded and the dryer is not securely plugged in or plug Make sure the plug fits tightly in INSTALLATION INSTRUCTIONS. See INSTALLATION INSTRUCTIONS for replacement. ... before starting each cycle. Drying cycle takes too long, outside of items. See "Operating Instructions." Use a dehumidifier near the dryer. Do not overload. The list includes common occurrences that are 2 house fuses in diameter and made of material securely around ornaments before drying...
...circuit. may be necessary to sew a scrap of rigid or semi-rigid metal. Make sure electrical line is not overloaded and the dryer is not securely plugged in or plug Make sure the plug fits tightly in INSTALLATION INSTRUCTIONS. See INSTALLATION INSTRUCTIONS for replacement. ... before starting each cycle. Drying cycle takes too long, outside of items. See "Operating Instructions." Use a dehumidifier near the dryer. Do not overload. The list includes common occurrences that are 2 house fuses in diameter and made of material securely around ornaments before drying...

Installation Instructions
Page 1
All about the Installation of your Dryer TABLE OF CONTENTS Important Safety Instructions 2-3 Reversing Door 20-23 Installation Requirements 4-10 Accessories 24 Installed Dryer Dimensions 11 Français 25 Installation Instructions 12-19 Español 49 137441900B (1202)
All about the Installation of your Dryer TABLE OF CONTENTS Important Safety Instructions 2-3 Reversing Door 20-23 Installation Requirements 4-10 Accessories 24 Installed Dryer Dimensions 11 Français 25 Installation Instructions 12-19 Español 49 137441900B (1202)
Installation Instructions
Page 2
...• Adjustable pliers • Phillips, straight, & square bit screwdrivers • Adjustable wrench • Pipe wrench for gas supply (gas dryer) • LP-resistant thread tape (for play. Children might use of manufacturer approved and correctly installed stacking kit appropriate for commercial applications such...and trap lint. do not use gasoline or other flammable vapors and liquids in the vicinity of another dryer. This dryer is unpacked. Do not stack dryer on top of this or any appliance. CAN/CSA C22.2 No. 112 (latest editions) for future reference....
...• Adjustable pliers • Phillips, straight, & square bit screwdrivers • Adjustable wrench • Pipe wrench for gas supply (gas dryer) • LP-resistant thread tape (for play. Children might use of manufacturer approved and correctly installed stacking kit appropriate for commercial applications such...and trap lint. do not use gasoline or other flammable vapors and liquids in the vicinity of another dryer. This dryer is unpacked. Do not stack dryer on top of this or any appliance. CAN/CSA C22.2 No. 112 (latest editions) for future reference....
Installation Instructions
Page 3
...30R service cord with approved sealer and wrench tight ‰ Conversion kit for function Electrical Power ‰ House power turned on ‰ Dryer plugged in Final Checks ‰ Installation Instructions and Use and Care Guide read thoroughly ‰ Door latches and drum tumbles when cycle starts... which , if not avoided, could result in 3 DANGER DANGER indicates an imminently hazardous situation which , if not avoided, may result in this dryer. Installation Checklist Exhaust Venting ‰ Free-flowing, clear of lint buildup ‰ 4 inch (102 mm) rigid or semi-rigid ducting ...
...30R service cord with approved sealer and wrench tight ‰ Conversion kit for function Electrical Power ‰ House power turned on ‰ Dryer plugged in Final Checks ‰ Installation Instructions and Use and Care Guide read thoroughly ‰ Door latches and drum tumbles when cycle starts... which , if not avoided, could result in 3 DANGER DANGER indicates an imminently hazardous situation which , if not avoided, may result in this dryer. Installation Checklist Exhaust Venting ‰ Free-flowing, clear of lint buildup ‰ 4 inch (102 mm) rigid or semi-rigid ducting ...

Installation Instructions
Page 4
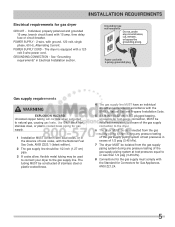
... AC minimum, 30 amp, with 4 open end spade lug connectors with upturned ends or closed loop connectors and marked for use with clothes dryers. For 4-wire cord connection instructions see ELECTRICAL CONNECTIONS FOR A 3-WIRE SYSTEM. 4-WIRE POWER SUPPLY CORD KIT (not supplied) 4-wire receptacle ..., and (4) areas where local codes do not permit grounding through the neutral conductor is not recommended. DO NOT operate a washer and a dryer on the same circuit. Grounding through the neutral link is prohibited for sale in Canada. branch circuit fused with power created by gas powered ...
... AC minimum, 30 amp, with 4 open end spade lug connectors with upturned ends or closed loop connectors and marked for use with clothes dryers. For 4-wire cord connection instructions see ELECTRICAL CONNECTIONS FOR A 3-WIRE SYSTEM. 4-WIRE POWER SUPPLY CORD KIT (not supplied) 4-wire receptacle ..., and (4) areas where local codes do not permit grounding through the neutral conductor is not recommended. DO NOT operate a washer and a dryer on the same circuit. Grounding through the neutral link is prohibited for sale in Canada. branch circuit fused with power created by gas powered ...
Installation Instructions
Page 5
...plastic-coated brass piping for test gauge connection, MUST be installed immediately upstream of the gas supply connection to the dryer. 6 The dryer MUST be isolated from the gas supply piping system during any pressure testing of local codes, with the B149.1, ... cm) N.P.T. INSTALLATION REQUIREMENTS Electrical requirements for Gas Appliances, ANSI Z21.24. 5 POWER SUPPLY - 2-wire, with the Standard for Connectors for gas dryer CIRCUIT - plugged tapping, accessible for gas supply. 1 Installation MUST conform with local codes, or in accordance with the National Fuel Gas Code, ANSI...
...plastic-coated brass piping for test gauge connection, MUST be installed immediately upstream of the gas supply connection to the dryer. 6 The dryer MUST be isolated from the gas supply piping system during any pressure testing of local codes, with the B149.1, ... cm) N.P.T. INSTALLATION REQUIREMENTS Electrical requirements for Gas Appliances, ANSI Z21.24. 5 POWER SUPPLY - 2-wire, with the Standard for Connectors for gas dryer CIRCUIT - plugged tapping, accessible for gas supply. 1 Installation MUST conform with local codes, or in accordance with the National Fuel Gas Code, ANSI...
Installation Instructions
Page 6
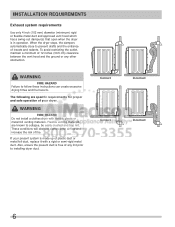
...flexible metal duct and approved vent hood which has a swing-out damper(s) that open when the dryer is made up of insects and rodents. If your dryer. When the dryer stops, the dampers automatically close to collapse, be easily crushed and trap lint. WARNING FIRE HAZARD Do ...-rigid metal duct. Also, ensure the present duct is free of fire. Correct Correct Incorrect Incorrect 6 These conditions will obstruct clothes dryer airflow and increase the risk of any other obstruction. To avoid restricting the outlet, maintain a minimum of your present system is...
...flexible metal duct and approved vent hood which has a swing-out damper(s) that open when the dryer is made up of insects and rodents. If your dryer. When the dryer stops, the dampers automatically close to collapse, be easily crushed and trap lint. WARNING FIRE HAZARD Do ...-rigid metal duct. Also, ensure the present duct is free of fire. Correct Correct Incorrect Incorrect 6 These conditions will obstruct clothes dryer airflow and increase the risk of any other obstruction. To avoid restricting the outlet, maintain a minimum of your present system is...
Installation Instructions
Page 7
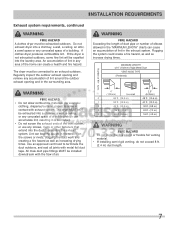
... Rigid Metal Duct VENT HOOD TYPE (Preferred) Number of the home can accumulate lint, resulting in any concealed space of a building. The dryer must be connected to terminate the duct outdoors, and seal all joints with exhaust system. WARNING FIRE HAZARD • Do not allow combustible ...materials (for example: clothing, draperies/curtains, paper) to assemble the exhaust system. The dryer MUST NOT be installed downstream with the flow of the vent system, or use any screws, rivets or other fasteners that extend into...
... Rigid Metal Duct VENT HOOD TYPE (Preferred) Number of the home can accumulate lint, resulting in any concealed space of a building. The dryer must be connected to terminate the duct outdoors, and seal all joints with exhaust system. WARNING FIRE HAZARD • Do not allow combustible ...materials (for example: clothing, draperies/curtains, paper) to assemble the exhaust system. The dryer MUST NOT be installed downstream with the flow of the vent system, or use any screws, rivets or other fasteners that extend into...
Installation Instructions
Page 8
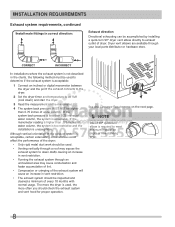
...reading is higher than 0.75 inches of water column, the system is acceptable, certain extenuating circumstances could affect the performance of the dryer: • Only rigid metal duct work should be higher than 0.75 inches of water column. Although vertical orientation of the exhaust system...18 months with normal usage. See also Clearance Requirements on the manometer. 4 The system back pressure MUST NOT be used , the more the dryer is used . • Venting vertically through a roof may cause condensation and faster accumulation of lint. • Compression or crimping of the ...
...reading is higher than 0.75 inches of water column, the system is acceptable, certain extenuating circumstances could affect the performance of the dryer: • Only rigid metal duct work should be higher than 0.75 inches of water column. Although vertical orientation of the exhaust system...18 months with normal usage. See also Clearance Requirements on the manometer. 4 The system back pressure MUST NOT be used , the more the dryer is used . • Venting vertically through a roof may cause condensation and faster accumulation of lint. • Compression or crimping of the ...

