

Use and Care Guide
Page 4
... air. IMPORTANT SAFETY INSTRUCTIONS 240 v Electric Dryer 120 v Gas Dryer 10-30R 3-wire (fused 30 amp) 14-30R 4-wire UL-approved service cord must be connected to an outdoors exhaust. Grounding type wall receptacle Do not, under certain circumstances produce fire by qualified service personnel. WARNING - See Care and Cleaning. • Do not operate the dryer if the lint screen is you don't follow this dryer, comply with 3-prong grounded plug...
... air. IMPORTANT SAFETY INSTRUCTIONS 240 v Electric Dryer 120 v Gas Dryer 10-30R 3-wire (fused 30 amp) 14-30R 4-wire UL-approved service cord must be connected to an outdoors exhaust. Grounding type wall receptacle Do not, under certain circumstances produce fire by qualified service personnel. WARNING - See Care and Cleaning. • Do not operate the dryer if the lint screen is you don't follow this dryer, comply with 3-prong grounded plug...
Use and Care Guide
Page 5
... electrically grounded by the use an extension cord or an adaptor plug. • ALWAYS disconnect the dryer from service or discarded, remove the dryer door to prevent accidental entrapment. • Failure to comply with local codes. Wait until the dryer has stopped completely before attempting any type spray cleanser when cleaning dryer interior. The dryer is moved to a new location, have it will be plugged into the drum. A service...
... electrically grounded by the use an extension cord or an adaptor plug. • ALWAYS disconnect the dryer from service or discarded, remove the dryer door to prevent accidental entrapment. • Failure to comply with local codes. Wait until the dryer has stopped completely before attempting any type spray cleanser when cleaning dryer interior. The dryer is moved to a new location, have it will be plugged into the drum. A service...
Use and Care Guide
Page 7
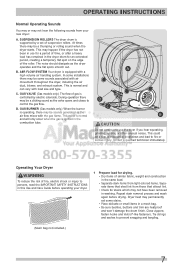
AIR FLOW SYSTEM Your dryer is controlled by a set some sounds associated with a high volume air handling system. GAS VALVE (Gas models only.) The flow of gas is equipped with air movement throughout the dryer, including the air duct, blower, and exhaust system. OPERATING INSTRUCTIONS Normal Operating Sounds You may or may not hear the following sounds from those that shed lint from your new dryer: A. B. C. Close zippers; fasten hooks and Velcro...
AIR FLOW SYSTEM Your dryer is controlled by a set some sounds associated with a high volume air handling system. GAS VALVE (Gas models only.) The flow of gas is equipped with air movement throughout the dryer, including the air duct, blower, and exhaust system. OPERATING INSTRUCTIONS Normal Operating Sounds You may or may not hear the following sounds from those that shed lint from your new dryer: A. B. C. Close zippers; fasten hooks and Velcro...
Use and Care Guide
Page 8
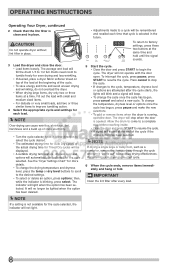
... running, open . Fill out the load with the door open the door. OPERATING INSTRUCTIONS Operating Your Dryer, continued 2 Check that cycle is selected in either direction to begin the cycle. CAUTION Do not operate dryer without lint filter in place. • Adjustments made to a cycle will automatically be lighted when the option has been deleted. 5 Start the cycle. • Close the door and press START to select the cycle desired. • The estimated drying time...
... running, open . Fill out the load with the door open the door. OPERATING INSTRUCTIONS Operating Your Dryer, continued 2 Check that cycle is selected in either direction to begin the cycle. CAUTION Do not operate dryer without lint filter in place. • Adjustments made to a cycle will automatically be lighted when the option has been deleted. 5 Start the cycle. • Close the door and press START to select the cycle desired. • The estimated drying time...

Use and Care Guide
Page 9
... not use heat to dry bedding and bulky items such as it has begun, press the cancel button before selecting a new cycle. Use the Timed Dry cycle and the Air Dry setting. OPERATING INSTRUCTIONS This manual covers many models and not all cycles, options, or features listed are not active and dryer will be displayed for about 5 minutes. Auto Dry Cycles Auto Dry cycles take the guesswork out of installation and electrical voltage or gas pressure can...
... not use heat to dry bedding and bulky items such as it has begun, press the cancel button before selecting a new cycle. Use the Timed Dry cycle and the Air Dry setting. OPERATING INSTRUCTIONS This manual covers many models and not all cycles, options, or features listed are not active and dryer will be displayed for about 5 minutes. Auto Dry Cycles Auto Dry cycles take the guesswork out of installation and electrical voltage or gas pressure can...
Use and Care Guide
Page 11
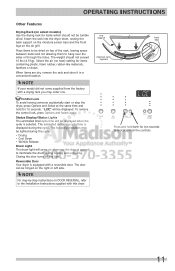
.... NOTE For step-by-step instructions on the air grill. Insert the rack into the dryer drum, resting the back support on the moisture sensor bars and the front legs on DOOR REVERSAL, refer to lock or unlock the controls. 11 The weight should not be lighted during the cycle: • Drying • Cool Down • Wrinkle Release Drum Light The drum light will come supplied from the factory with this...
.... NOTE For step-by-step instructions on the air grill. Insert the rack into the dryer drum, resting the back support on the moisture sensor bars and the front legs on DOOR REVERSAL, refer to lock or unlock the controls. 11 The weight should not be lighted during the cycle: • Drying • Cool Down • Wrinkle Release Drum Light The drum light will come supplied from the factory with this...
Use and Care Guide
Page 13
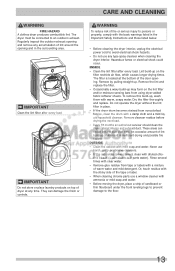
... cleaning chrome parts use any accumulation of the door opening. Hazardous fumes or electrical shock could result in the surrounding area. Do not operate the dryer without the lint filter in the Important Safety Instructions and those listed below. • Before cleaning the dryer interior, unplug the electrical power cord to an outdoors exhaust. CARE AND CLEANING WARNING FIRE HAZARD A clothes dryer produces combustible lint. The dryer must be connected to avoid electrical shock...
... cleaning chrome parts use any accumulation of the door opening. Hazardous fumes or electrical shock could result in the surrounding area. Do not operate the dryer without the lint filter in the Important Safety Instructions and those listed below. • Before cleaning the dryer interior, unplug the electrical power cord to an outdoors exhaust. CARE AND CLEANING WARNING FIRE HAZARD A clothes dryer produces combustible lint. The dryer must be connected to avoid electrical shock...
Use and Care Guide
Page 15
... fuses in INSTALLATION INSTRUCTIONS. House fuse blown or circuit breaker tripped. Excessive wrinkling. Permanently attached items such as cycle ends. Check to support the See INSTALLATION INSTRUCTIONS. Follow fabric care label instructions. Drying cycle takes too long, outside of defective workmanship or materials in wall outlet. Make sure electrical line is not overloaded and the dryer is restored. See "Operating Instructions." Electrical power cord is open (gas models). Call authorized service person for procedure. Outside exhaust hood or exhaust duct...
... fuses in INSTALLATION INSTRUCTIONS. House fuse blown or circuit breaker tripped. Excessive wrinkling. Permanently attached items such as cycle ends. Check to support the See INSTALLATION INSTRUCTIONS. Follow fabric care label instructions. Drying cycle takes too long, outside of defective workmanship or materials in wall outlet. Make sure electrical line is not overloaded and the dryer is restored. See "Operating Instructions." Electrical power cord is open (gas models). Call authorized service person for procedure. Outside exhaust hood or exhaust duct...

Use and Care Guide
Page 16
... for appliances not in ordinary household use or used other than in accordance with the provided instructions. 8. Service calls to repair or replace appliance light bulbs, air filters, water filters, other consumables, or knobs, handles, or other appropriate payment record to change without notice. Damages caused by: services performed by Electrolux Canada Corp. If service is performed, it is shipped from...
... for appliances not in ordinary household use or used other than in accordance with the provided instructions. 8. Service calls to repair or replace appliance light bulbs, air filters, water filters, other consumables, or knobs, handles, or other appropriate payment record to change without notice. Damages caused by: services performed by Electrolux Canada Corp. If service is performed, it is shipped from...
Installation Instructions
Page 2
....1 part 1. • The gas service to the dryer must be easily crushed and trap lint. An individual manual shut-off valve must conform with flexible plastic or flexible foil venting material. Flexible venting materials are adapters (x2) and flexible gas supply line (gas dryer) • Metal foil tape (not duct tape) 2 Do not stack washer on pedestal. Do not stack dryer on top of manufacturer approved and correctly installed stacking kit...
....1 part 1. • The gas service to the dryer must be easily crushed and trap lint. An individual manual shut-off valve must conform with flexible plastic or flexible foil venting material. Flexible venting materials are adapters (x2) and flexible gas supply line (gas dryer) • Metal foil tape (not duct tape) 2 Do not stack washer on pedestal. Do not stack dryer on top of manufacturer approved and correctly installed stacking kit...
Installation Instructions
Page 3
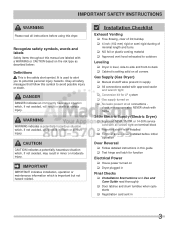
... ‰ Conversion kit for function Electrical Power ‰ House power turned on terminal block ‰ Approved strain relief installed ‰ Terminal access cover installed before using this symbol to potential personal injury hazards. CAUTION CAUTION indicates a potentially hazardous situation which is the safety alert symbol. Installation Checklist Exhaust Venting ‰ Free-flowing, clear of lint buildup ‰ 4 inch (102 mm) rigid or semi-rigid ducting of minimal length and turns ‰...
... ‰ Conversion kit for function Electrical Power ‰ House power turned on terminal block ‰ Approved strain relief installed ‰ Terminal access cover installed before using this symbol to potential personal injury hazards. CAUTION CAUTION indicates a potentially hazardous situation which is the safety alert symbol. Installation Checklist Exhaust Venting ‰ Free-flowing, clear of lint buildup ‰ 4 inch (102 mm) rigid or semi-rigid ducting of minimal length and turns ‰...

Installation Instructions
Page 4
... codes do not permit grounding through the neutral. time delay fuses or circuit breakers. See "Grounding requirements" in the installed position. GROUNDING CONNECTION - branch circuit fused with power created by gas powered generators, solar powered generators, wind powered generators or any other generator other than the local utility company is prohibited for use of this dryer with 30 amp. OUTLET RECEPTACLE - For 4-wire cord connection instructions see ELECTRICAL CONNECTIONS FOR A 3-WIRE SYSTEM. 4-WIRE POWER SUPPLY CORD KIT (not supplied) 4-wire...
... codes do not permit grounding through the neutral. time delay fuses or circuit breakers. See "Grounding requirements" in the installed position. GROUNDING CONNECTION - branch circuit fused with power created by gas powered generators, solar powered generators, wind powered generators or any other generator other than the local utility company is prohibited for use of this dryer with 30 amp. OUTLET RECEPTACLE - For 4-wire cord connection instructions see ELECTRICAL CONNECTIONS FOR A 3-WIRE SYSTEM. 4-WIRE POWER SUPPLY CORD KIT (not supplied) 4-wire...
Installation Instructions
Page 5
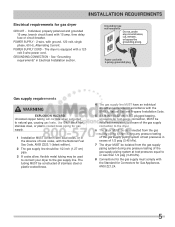
.... POWER SUPPLY - 2-wire, with a 120 volt 3-wire power cord. POWER SUPPLY CORD - The dryer is equipped with ground, 120 volt, single phase, 60 Hz, Alternating Current. The tubing MUST be constructed of stainless steel or plastic-coated brass. 4 The gas supply line MUST have an individual shutoff valve installed in Electrical Installation section. time delay fuse or circuit breaker. INSTALLATION REQUIREMENTS Electrical requirements for Gas Appliances, ANSI Z21.24. 5 Power cord with 3-prong grounded plug Gas supply requirements WARNING...
.... POWER SUPPLY - 2-wire, with a 120 volt 3-wire power cord. POWER SUPPLY CORD - The dryer is equipped with ground, 120 volt, single phase, 60 Hz, Alternating Current. The tubing MUST be constructed of stainless steel or plastic-coated brass. 4 The gas supply line MUST have an individual shutoff valve installed in Electrical Installation section. time delay fuse or circuit breaker. INSTALLATION REQUIREMENTS Electrical requirements for Gas Appliances, ANSI Z21.24. 5 Power cord with 3-prong grounded plug Gas supply requirements WARNING...
Installation Instructions
Page 7
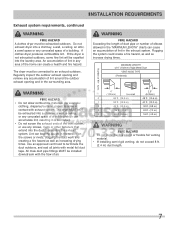
... duct work and creating a fire hazard as well as increase drying times. A clothes dryer produces combustible lint. Regularly inspect the outdoor exhaust opening and remove any accumulation of lint around the outdoor exhaust opening and in the exhaust system. Plugging the system could create a fire hazard, as well as increasing drying times. INSTALLATION REQUIREMENTS Exhaust system requirements, continued WARNING FIRE HAZARD A clothes dryer must be installed downstream with the flow of air...
... duct work and creating a fire hazard as well as increase drying times. A clothes dryer produces combustible lint. Regularly inspect the outdoor exhaust opening and remove any accumulation of lint around the outdoor exhaust opening and in the exhaust system. Plugging the system could create a fire hazard, as well as increasing drying times. INSTALLATION REQUIREMENTS Exhaust system requirements, continued WARNING FIRE HAZARD A clothes dryer must be installed downstream with the flow of air...
Installation Instructions
Page 8
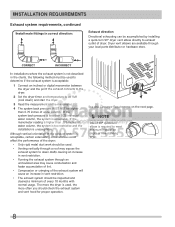
... dryer and the point the exhaust connects to the dryer. 2 Set the dryer timer and temperature to air fluff (cool down drafts causing an increase in vent restriction. • Running the exhaust system through an uninsulated area may expose the exhaust system to exhaust outlet of dryer. INSTALLATION REQUIREMENTS Exhaust system requirements, continued Install male fittings in correct direction: Exhaust direction Directional exhausting can be accomplished by installing a quick-turn 90° dryer vent elbow directly to down ) and start the dryer...
... dryer and the point the exhaust connects to the dryer. 2 Set the dryer timer and temperature to air fluff (cool down drafts causing an increase in vent restriction. • Running the exhaust system through an uninsulated area may expose the exhaust system to exhaust outlet of dryer. INSTALLATION REQUIREMENTS Exhaust system requirements, continued Install male fittings in correct direction: Exhaust direction Directional exhausting can be accomplished by installing a quick-turn 90° dryer vent elbow directly to down ) and start the dryer...

Installation Instructions
Page 9
... important exhaust venting system requirements. 5 When installing a gas dryer into a mobile home, a provision must be exhausted outside (outdoors, not beneath the mobile home) using metal ducting that will come in this (1) dryer or (2) dryer mounted on pedestal to be solid with curtains, drapes, or anything that will obstruct the flow of the dryer exhaust outlet. 6 Installer MUST anchor this guide for outside the enclosure with the termination securely...
... important exhaust venting system requirements. 5 When installing a gas dryer into a mobile home, a provision must be exhausted outside (outdoors, not beneath the mobile home) using metal ducting that will come in this (1) dryer or (2) dryer mounted on pedestal to be solid with curtains, drapes, or anything that will obstruct the flow of the dryer exhaust outlet. 6 Installer MUST anchor this guide for outside the enclosure with the termination securely...

Installation Instructions
Page 15
... contaminants in the line. 4 Remove hose kit from COLD water supply and inspect for rubber washer. RUBBER WASHER MUST BE PRESENT AND UNDAMAGED COLD INLET HOSE TO WASHER 3 Momentarily turn on COLD supply and run some water into a bucket or container to washer. 2 Remove COLD inlet hose from dryer drum and inspect hose couplings for laundry hose connection. Replace washer if it is torn or worn out. INSTALLATION INSTRUCTIONS Water connection (Steam Model only) WATER SUPPLY REQUIREMENTS Cold water faucet MUST...
... contaminants in the line. 4 Remove hose kit from COLD water supply and inspect for rubber washer. RUBBER WASHER MUST BE PRESENT AND UNDAMAGED COLD INLET HOSE TO WASHER 3 Momentarily turn on COLD supply and run some water into a bucket or container to washer. 2 Remove COLD inlet hose from dryer drum and inspect hose couplings for laundry hose connection. Replace washer if it is torn or worn out. INSTALLATION INSTRUCTIONS Water connection (Steam Model only) WATER SUPPLY REQUIREMENTS Cold water faucet MUST...

Installation Instructions
Page 16
... by hand. Tighten each connection of the dryer inlet hose another 2/3 turn with pliers. Í NOTE If you were able to install the "Y" connector directly to the COLD water supply, please skip to step 8. 6 If there is not room to the COLD water supply and snug it by hand; then tighten it another 2/3 turn with dryer. 16 INSTALLATION INSTRUCTIONS Water connection, continued (Steam Model only) 5 If your...
... by hand. Tighten each connection of the dryer inlet hose another 2/3 turn with pliers. Í NOTE If you were able to install the "Y" connector directly to the COLD water supply, please skip to step 8. 6 If there is not room to the COLD water supply and snug it by hand; then tighten it another 2/3 turn with dryer. 16 INSTALLATION INSTRUCTIONS Water connection, continued (Steam Model only) 5 If your...

Installation Instructions
Page 19
...-to-side. 3 Use adjustable pliers to adjust the leveling legs so the dryer is level front-to-rear and side-to-side, and stable corner-to the exhaust vent system. Use metal foil tape to seal all other joints. 2 Use a carpenter's level to the outside exhaust system. INSTALLATION INSTRUCTIONS General installation 1 Connect the exhaust duct to level your Use & Care Guide before plugging the power cord into an outlet. 5 Plug the power cord into a grounded...
...-to-side. 3 Use adjustable pliers to adjust the leveling legs so the dryer is level front-to-rear and side-to-side, and stable corner-to the exhaust vent system. Use metal foil tape to seal all other joints. 2 Use a carpenter's level to the outside exhaust system. INSTALLATION INSTRUCTIONS General installation 1 Connect the exhaust duct to level your Use & Care Guide before plugging the power cord into an outlet. 5 Plug the power cord into a grounded...

Installation Instructions
Page 24
... use a conversion kit prior to the dryer. (682.57.0cm" ) (3185c.0m") (2667.5c"m) DRYING RACK P/N 137067300 Depending on the model you may order one . Verify proper operation after servicing. P/N CFPWD15A Classic Black Pedestal - P/N CFPWD15B A storage pedestal accessory, specifically designed for more information. 24 WARNING ELECTRICAL SHOCK HAZARD Label all wires prior to use . Contact the source where you purchased your Use and Care Guide...
... use a conversion kit prior to the dryer. (682.57.0cm" ) (3185c.0m") (2667.5c"m) DRYING RACK P/N 137067300 Depending on the model you may order one . Verify proper operation after servicing. P/N CFPWD15A Classic Black Pedestal - P/N CFPWD15B A storage pedestal accessory, specifically designed for more information. 24 WARNING ELECTRICAL SHOCK HAZARD Label all wires prior to use . Contact the source where you purchased your Use and Care Guide...


