Complete Owner's Guide
Page 1
All about the Use &Care of your Refrigerator 807876504 (April 2014) TABLE OF CONTENTS Important Safety Instructions 2 Controls 13 Installation 4 Normal Operating Sounds and Sights..........15 Door Removal/Reversal Instructions 6 Care and Cleaning 16 Handle Installation 8 Before you Call 18 Connecting Water Supply 10 Major Appliance Warranty 19 Ice Service 12 www.frigidaire.com USA 1-800-944-9044 www.frigidaire.ca Canada 1-800-265-8352
All about the Use &Care of your Refrigerator 807876504 (April 2014) TABLE OF CONTENTS Important Safety Instructions 2 Controls 13 Installation 4 Normal Operating Sounds and Sights..........15 Door Removal/Reversal Instructions 6 Care and Cleaning 16 Handle Installation 8 Before you Call 18 Connecting Water Supply 10 Major Appliance Warranty 19 Ice Service 12 www.frigidaire.com USA 1-800-944-9044 www.frigidaire.ca Canada 1-800-265-8352

Complete Owner's Guide
Page 2
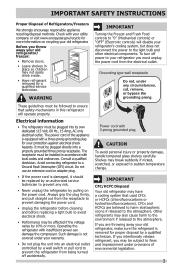
...airtight chambers, and can cause severe cuts, and also destroy finishes if they will result in minor or moderate injury. For your Refrigerator or Freezer IMPORTANT IMPORTANT indicates installation, operation or maintenance information which , if not avoided, could result in Ice Maker ... House water supply connected to refrigerator No water leaks present at all safety messages that follow the instructions below to avoid possible injury or death. WARNING ...
...airtight chambers, and can cause severe cuts, and also destroy finishes if they will result in minor or moderate injury. For your Refrigerator or Freezer IMPORTANT IMPORTANT indicates installation, operation or maintenance information which , if not avoided, could result in Ice Maker ... House water supply connected to refrigerator No water leaks present at all safety messages that follow the instructions below to avoid possible injury or death. WARNING ...
Complete Owner's Guide
Page 3
.... The receptacle must be plugged into its own dedicated 115 Volt, 60 Hz., 15 Amp, AC only electrical outlet. Avoid connecting refrigerator to fines and imprisonment under provisions of environmental legislation. 3 Do not use an extension cord or adapter plug. • If the... ozone if released to avoid electrical shock. • Performance may break suddenly if nicked, scratched, or exposed to the atmosphere. Other refrigerants may be subject to a Ground Fault Interrupter (GFI) circuit. Check with local codes and ordinances. These guidelines must be plugged directly ...
.... The receptacle must be plugged into its own dedicated 115 Volt, 60 Hz., 15 Amp, AC only electrical outlet. Avoid connecting refrigerator to fines and imprisonment under provisions of environmental legislation. 3 Do not use an extension cord or adapter plug. • If the... ozone if released to avoid electrical shock. • Performance may break suddenly if nicked, scratched, or exposed to the atmosphere. Other refrigerants may be subject to a Ground Fault Interrupter (GFI) circuit. Check with local codes and ordinances. These guidelines must be plugged directly ...
Complete Owner's Guide
Page 4
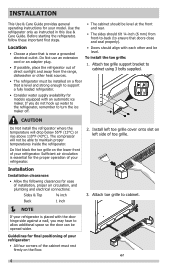
...and plumbing and electrical connections: Sides & Top ⅜ inch Back 1 inch NOTE If your refrigerator is level and strong enough to maintain proper temperatures inside the refrigerator. Attach toe grille to turn the ice maker off. To install the toe grille: 1. Attach toe ...grille support bracket to cabinet using 3 bolts supplied. • The refrigerator must rest firmly on the floor. 4 2. CAUTION Do Not install the refrigerator where the temperature will not be level at the front and rear. • The sides should tilt ...
...and plumbing and electrical connections: Sides & Top ⅜ inch Back 1 inch NOTE If your refrigerator is level and strong enough to maintain proper temperatures inside the refrigerator. Attach toe grille to turn the ice maker off. To install the toe grille: 1. Attach toe ...grille support bracket to cabinet using 3 bolts supplied. • The refrigerator must rest firmly on the floor. 4 2. CAUTION Do Not install the refrigerator where the temperature will not be level at the front and rear. • The sides should tilt ...
Complete Owner's Guide
Page 5
...they contact the floor (Figure 3). Failure to -side. 4 Some models are equipped with the hinges of the refrigerator enough so the doors close freely when opened halfway. Then level the refrigerator from front-to the instructions in injury. WARNING The anti-tip device must be installed according to -back. Raise... Figure 3 5 INSTALLATION some models) Figure 2 or 3 Use adjustable wrench to adjust leveling screws. The refrigerator should slope ¼ inch to ½ inch from side-to do so will result in your Use & Care Manual.
...they contact the floor (Figure 3). Failure to -side. 4 Some models are equipped with the hinges of the refrigerator enough so the doors close freely when opened halfway. Then level the refrigerator from front-to the instructions in injury. WARNING The anti-tip device must be installed according to -back. Raise... Figure 3 5 INSTALLATION some models) Figure 2 or 3 Use adjustable wrench to adjust leveling screws. The refrigerator should slope ¼ inch to ½ inch from side-to do so will result in your Use & Care Manual.

Complete Owner's Guide
Page 6
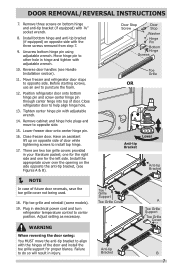
... hinge and shim to "0" (Mechanical controls) or "OFF" (Electronic controls) and remove the electrical power cord from door shelves. Lift refrigerator door off center hinge pin. Trace around the hinge with a soft lead pencil. Remove center hinge and shim by removing inside screw and... Wrench Top Hinge Screw Bottom Hinge Screw NOTE The direction in which your refrigerator doors open (door swing) can be performed by a qualified person. IMPORTANT Before you begin, turn the refrigerator temperature control to slide out. Remove toe grille. 2. Remove top hinge and lift ...
... hinge and shim to "0" (Mechanical controls) or "OFF" (Electronic controls) and remove the electrical power cord from door shelves. Lift refrigerator door off center hinge pin. Trace around the hinge with a soft lead pencil. Remove center hinge and shim by removing inside screw and... Wrench Top Hinge Screw Bottom Hinge Screw NOTE The direction in which your refrigerator doors open (door swing) can be performed by a qualified person. IMPORTANT Before you begin, turn the refrigerator temperature control to slide out. Remove toe grille. 2. Remove top hinge and lift ...
Complete Owner's Guide
Page 7
...socket wrench. 8. Plug in hinge and tighten with the three screws removed from step 7. 9. Adjust setting as necessary. Move freezer and refrigerator door stops to help align hinge hole. 13. There are two toe grille covers provided in injury. Have an assistant lift up on ...with adjustable wrench. 10. DOOR REMOVAL/REVERSAL INSTRUCTIONS 7. WARNING When reversing the door swing: You MUST move to center position. Close refrigerator door to opposite side. Failure to install top hinge. 17. Before starting screws, use an awl to align with adjustable wrench. 14...
...socket wrench. 8. Plug in hinge and tighten with the three screws removed from step 7. 9. Adjust setting as necessary. Move freezer and refrigerator door stops to help align hinge hole. 13. There are two toe grille covers provided in injury. Have an assistant lift up on ...with adjustable wrench. 10. DOOR REMOVAL/REVERSAL INSTRUCTIONS 7. WARNING When reversing the door swing: You MUST move to center position. Close refrigerator door to opposite side. Failure to install top hinge. 17. Before starting screws, use an awl to align with adjustable wrench. 14...

Complete Owner's Guide
Page 8
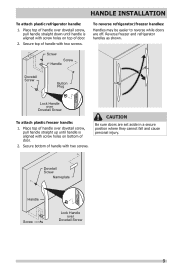
Shoulder Screw Nameplate Set Screw To attach metal refrigerator handle: 1. Place rounded part of handle onto shoulder screw on face of door and align the two holes in bottom of handle with the two ...
Shoulder Screw Nameplate Set Screw To attach metal refrigerator handle: 1. Place rounded part of handle onto shoulder screw on face of door and align the two holes in bottom of handle with the two ...
Complete Owner's Guide
Page 9
... 1. CAUTION Be sure doors are off. Secure top of handle with screw holes on bottom of door. 2. HANDLE INSTALLATION To attach plastic refrigerator handle: 1. Place top of handle over dovetail screw, pull handle straight up until handle is aligned with two screws. Place top of handle... over dovetail screw, pull handle straight down until handle is aligned with two screws. Reverse freezer and refrigerator handles as shown. To reverse refrigerator/freezer handles: Handles may be easier to reverse while doors are set aside in a secure position where they cannot fall...
... 1. CAUTION Be sure doors are off. Secure top of handle with screw holes on bottom of door. 2. HANDLE INSTALLATION To attach plastic refrigerator handle: 1. Place top of handle over dovetail screw, pull handle straight up until handle is aligned with two screws. Place top of handle... over dovetail screw, pull handle straight down until handle is aligned with two screws. Reverse freezer and refrigerator handles as shown. To reverse refrigerator/freezer handles: Handles may be easier to reverse while doors are set aside in a secure position where they cannot fall...
Complete Owner's Guide
Page 10
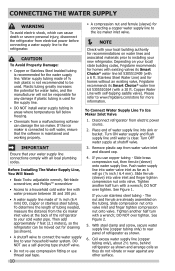
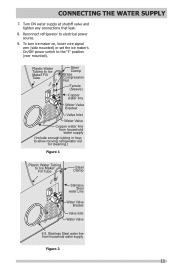
... wrench, flat-blade screwdriver, and PhillipsTM screwdriver • Access to the refrigerator. Depending on the tubing. Turn ON water supply and flush supply line until water is not recommended to www.frigidaire.com/store for the water supply line. Tighten another half turn with all...onto valve. To determine the length of tubing needed, measure the distance from the ice maker inlet valve at shutoff valve. 3. Disconnect refrigerator from a malfunctioning softener can be used for cleaning (as it will not be responsible for water leaks, and the manufacturer will go ...
... wrench, flat-blade screwdriver, and PhillipsTM screwdriver • Access to the refrigerator. Depending on the tubing. Turn ON water supply and flush supply line until water is not recommended to www.frigidaire.com/store for the water supply line. Tighten another half turn with all...onto valve. To determine the length of tubing needed, measure the distance from the ice maker inlet valve at shutoff valve. 3. Disconnect refrigerator from a malfunctioning softener can be used for cleaning (as it will not be responsible for water leaks, and the manufacturer will go ...
Complete Owner's Guide
Page 11
... at shutoff valve and tighten any connections that leak. 8. Stainless Steel water line from household water supply (Include enough tubing in loop to allow moving refrigerator out for cleaning.) Figure 1 Plastic Water Tubing to the "I" position (rear mounted). Reconnect...
... at shutoff valve and tighten any connections that leak. 8. Stainless Steel water line from household water supply (Include enough tubing in loop to allow moving refrigerator out for cleaning.) Figure 1 Plastic Water Tubing to the "I" position (rear mounted). Reconnect...
Complete Owner's Guide
Page 12
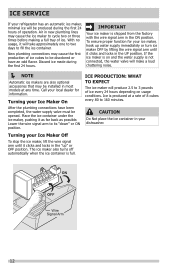
... maker, hook up " or OFF position. To ensure proper function for information. With no usage, it as far back as possible. ICE SERVICE If your refrigerator has an automatic ice maker, minimal ice will make a loud chattering noise. NOTE Automatic ice makers are also optional accessories that may be installed...
... maker, hook up " or OFF position. To ensure proper function for information. With no usage, it as far back as possible. ICE SERVICE If your refrigerator has an automatic ice maker, minimal ice will make a loud chattering noise. NOTE Automatic ice makers are also optional accessories that may be installed...
Complete Owner's Guide
Page 13
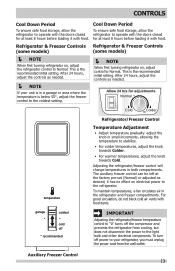
...hours before loading it has no effect on electrical power to Normal. Cool Down Period To ensure safe food storage, allow the refrigerator to stabilize. • For colder temperatures, adjust the knob towards Colder. • For warmer temperatures, adjust the knob towards... Cold. This is the recommended initial setting. it with food. Adjusting the refrigerator/freezer control will change temperatures in the refrigerator and freezer compartments. To maintain temperatures, a fan circulates air in both compartments. Allow 24 hrs for ...
...hours before loading it has no effect on electrical power to Normal. Cool Down Period To ensure safe food storage, allow the refrigerator to stabilize. • For colder temperatures, adjust the knob towards Colder. • For warmer temperatures, adjust the knob towards... Cold. This is the recommended initial setting. it with food. Adjusting the refrigerator/freezer control will change temperatures in the refrigerator and freezer compartments. To maintain temperatures, a fan circulates air in both compartments. Allow 24 hrs for ...

Complete Owner's Guide
Page 14
...on electrical power to stabilize. To turn off power to your refrigerator, you must unplug the power cord from cooling, but does not disconnect the power to "off" turns off * recommended Refrigerator/Freezer Control Temperature Adjustment • Adjust temperature gradually: adjust ...the knob in small increments, allowing the temperature to the refrigerator. To maintain temperatures, a fan circulates air in both compartments. For...
...on electrical power to stabilize. To turn off power to your refrigerator, you must unplug the power cord from cooling, but does not disconnect the power to "off" turns off * recommended Refrigerator/Freezer Control Temperature Adjustment • Adjust temperature gradually: adjust ...the knob in small increments, allowing the temperature to the refrigerator. To maintain temperatures, a fan circulates air in both compartments. For...
Complete Owner's Guide
Page 15
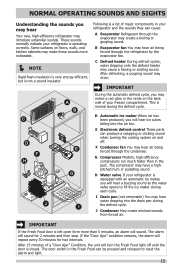
... occur. B Evaporator fan You may hear air being forced through the condenser. F Condenser fan You may hear air being forced through the refrigerator by the evaporator fan. J Condenser May create minimal sounds from forced air. The alarm will repeat every 30 minutes for 2 minutes and ...produce a snapping or clicking sound when turning the cooling system on floors, walls, and kitchen cabinets may notice a red glow in your refrigerator is closed. H Water valve If your freezer compartment. E Electronic defrost control These parts can be pressed and released to fill the ...
... occur. B Evaporator fan You may hear air being forced through the condenser. F Condenser fan You may hear air being forced through the refrigerator by the evaporator fan. J Condenser May create minimal sounds from forced air. The alarm will repeat every 30 minutes for 2 minutes and ...produce a snapping or clicking sound when turning the cooling system on floors, walls, and kitchen cabinets may notice a red glow in your refrigerator is closed. H Water valve If your freezer compartment. E Electronic defrost control These parts can be pressed and released to fill the ...
Complete Owner's Guide
Page 16
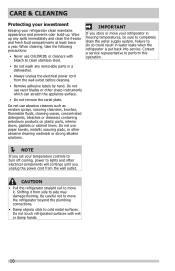
...petroleum products on plastic parts, interior doors, gaskets or cabinet liners. Failure to cold metal surfaces. Be careful not to move the refrigerator beyond the plumbing connections. • Damp objects stick to do so could result in a dishwasher. • Always unplug the electrical... power cord from the wall outlet. CAUTION • Pull the refrigerator straight out to lights and other electrical components will continue until you set your refrigerator clean maintains appearance and prevents odor build-up any removable parts in water leaks when the...
...petroleum products on plastic parts, interior doors, gaskets or cabinet liners. Failure to cold metal surfaces. Be careful not to move the refrigerator beyond the plumbing connections. • Damp objects stick to do so could result in a dishwasher. • Always unplug the electrical... power cord from the wall outlet. CAUTION • Pull the refrigerator straight out to lights and other electrical components will continue until you set your refrigerator clean maintains appearance and prevents odor build-up any removable parts in water leaks when the...

Complete Owner's Guide
Page 17
...; Mild liquid sprays • Vacuum attachment • Soap and water • Non Abrasive Glass Cleaner • Soap and water • Stainless Steel Cleaners • Unplug refrigerator • Wear gloves • Remove light cover • Replace old bulb • Replace light cover • Plug in the... refrigerator Allow glass to warm to clean stainless steel. These cleaners can be purchased at most home improvement or major department stores. Wash the rest of ...
...; Mild liquid sprays • Vacuum attachment • Soap and water • Non Abrasive Glass Cleaner • Soap and water • Stainless Steel Cleaners • Unplug refrigerator • Wear gloves • Remove light cover • Replace old bulb • Replace light cover • Plug in the... refrigerator Allow glass to warm to clean stainless steel. These cleaners can be purchased at most home improvement or major department stores. Wash the rest of ...
Complete Owner's Guide
Page 18
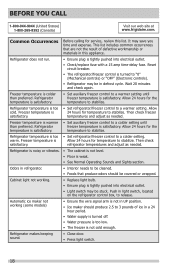
... (Canada) Visit our web site at www.frigidaire.com. Allow cold. temperature to a warmer setting until than preferred. Then check satisfactory. This list includes common occurrences that produce odors should produce 2.5 to stabilize. Refrigerator temperature is warmer • Set auxiliary freezer ... UP position. • Ice maker should be stuck. Wait 20 minutes and check again. Then check freezer satisfactory. warm. Refrigerator is noisy or vibrates. • The cabinet is not level. • Floor is tightly pushed into electrical outlet. •...
... (Canada) Visit our web site at www.frigidaire.com. Allow cold. temperature to a warmer setting until than preferred. Then check satisfactory. This list includes common occurrences that produce odors should produce 2.5 to stabilize. Refrigerator temperature is warmer • Set auxiliary freezer ... UP position. • Ice maker should be stuck. Wait 20 minutes and check again. Then check freezer satisfactory. warm. Refrigerator is noisy or vibrates. • The cabinet is not level. • Floor is tightly pushed into electrical outlet. •...
Complete Owner's Guide
Page 19
... it is " are subject to change or add to change without notice. In the USA, your appliance. 9. Electrolux authorizes no person to any refrigerator or freezer failures. 6. Products used in your receipt, delivery slip, or some other cosmetic parts. 11. Damages caused by: services performed by a..., OR LIMITATIONS ON THE DURATION OF IMPLIED WARRANTIES, SO THESE LIMITATIONS OR EXCLUSIONS MAY NOT APPLY TO YOU. USA 1.800.944.9044 Frigidaire 10200 David Taylor Drive Charlotte, NC 28262 Canada 1.800.265.8352 Electrolux Canada Corp. 5855 Terry Fox Way Mississauga, Ontario, Canada L5V...
... it is " are subject to change or add to change without notice. In the USA, your appliance. 9. Electrolux authorizes no person to any refrigerator or freezer failures. 6. Products used in your receipt, delivery slip, or some other cosmetic parts. 11. Damages caused by: services performed by a..., OR LIMITATIONS ON THE DURATION OF IMPLIED WARRANTIES, SO THESE LIMITATIONS OR EXCLUSIONS MAY NOT APPLY TO YOU. USA 1.800.944.9044 Frigidaire 10200 David Taylor Drive Charlotte, NC 28262 Canada 1.800.265.8352 Electrolux Canada Corp. 5855 Terry Fox Way Mississauga, Ontario, Canada L5V...

Installation Instructions
Page 1
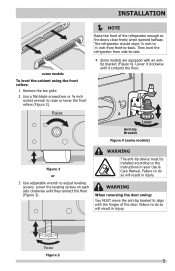
... controls, wait 24 hours before making additional adjustments. Anti-tip Bracket Figure 4 (some models) 4 Some models are installing your refrigerator without connecting it to - P/N: A01278401 Allow the following clearances for ease of installation, proper air circulation, and plumbing and electrical connections...off * recommended temperature garage coldest cold off * recommended Location of these materials may still need : • Access to your refrigerator's rear panel with ¼-inch (6.4mm) OD. Sufficient air circulation is turned Off (see how in your Use & Care...
... controls, wait 24 hours before making additional adjustments. Anti-tip Bracket Figure 4 (some models) 4 Some models are installing your refrigerator without connecting it to - P/N: A01278401 Allow the following clearances for ease of installation, proper air circulation, and plumbing and electrical connections...off * recommended temperature garage coldest cold off * recommended Location of these materials may still need : • Access to your refrigerator's rear panel with ¼-inch (6.4mm) OD. Sufficient air circulation is turned Off (see how in your Use & Care...


