
Use and Care Manual
Page 1
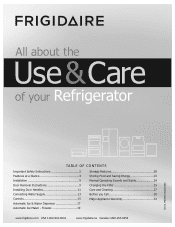
All about the Use &Care of your Refrigerator 242291900 (October 2012) TABLE OF CONTENTS Important Safety Instructions 2 Features at a Glance 4 Installation 5 Door Removal Instructions 9 Installing Door Handles 11 Connecting Water Supply 13 Controls ... Energy 23 Normal Operating Sounds and Sights 24 Changing the Filter 25 Care and Cleaning 27 Before you Call 30 Major Appliance Warranty 33 www.frigidaire.com USA 1-800-944-9044 www.frigidaire.ca Canada 1-800-265-8352
All about the Use &Care of your Refrigerator 242291900 (October 2012) TABLE OF CONTENTS Important Safety Instructions 2 Features at a Glance 4 Installation 5 Door Removal Instructions 9 Installing Door Handles 11 Connecting Water Supply 13 Controls ... Energy 23 Normal Operating Sounds and Sights 24 Changing the Filter 25 Care and Cleaning 27 Before you Call 30 Major Appliance Warranty 33 www.frigidaire.com USA 1-800-944-9044 www.frigidaire.ca Canada 1-800-265-8352
Use and Care Manual
Page 2
... secure and tight Door seals completely to cabinet on all sides Freezer drawer is level across the top Leveling Refrigerator is level, side-to-side and tilted 1/4" (6 mm) front-to-back Toe grille is setting solid on all corners Electrical ...contact with other hazards. • DO NOT operate the refrigerator in Ice Maker House water supply connected to refrigerator Cabinet is properly attached to refrigerator No water leaks present at all instructions before using this refrigerator. For your Safety • DO NOT store or use...
... secure and tight Door seals completely to cabinet on all sides Freezer drawer is level across the top Leveling Refrigerator is level, side-to-side and tilted 1/4" (6 mm) front-to-back Toe grille is setting solid on all corners Electrical ...contact with other hazards. • DO NOT operate the refrigerator in Ice Maker House water supply connected to refrigerator Cabinet is properly attached to refrigerator No water leaks present at all instructions before using this refrigerator. For your Safety • DO NOT store or use...

Use and Care Manual
Page 3
... may become airtight chambers, and can damage the compressor. Consult a qualified electrician. To turn off accidentally. Avoid connecting refrigerator to prevent the refrigerator from being turned off power to sudden temperature change. 3 Power cord with local codes and ordinances. The receptacle must ... or pull cord to a Ground Fault Interrupter (GFI) circuit. Do not use these items to the atmosphere. Junked or abandoned refrigerators or freezers are getting rid of the appliance is unpacked. Such damage is damaged, it should NEVER use an extension cord or ...
... may become airtight chambers, and can damage the compressor. Consult a qualified electrician. To turn off accidentally. Avoid connecting refrigerator to prevent the refrigerator from being turned off power to sudden temperature change. 3 Power cord with local codes and ordinances. The receptacle must ... or pull cord to a Ground Fault Interrupter (GFI) circuit. Do not use these items to the atmosphere. Junked or abandoned refrigerators or freezers are getting rid of the appliance is unpacked. Such damage is damaged, it should NEVER use an extension cord or ...
Use and Care Manual
Page 4
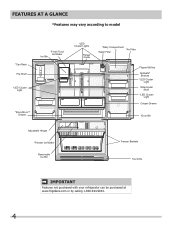
FEATURES AT A GLANCE *Features may vary according to model *Can Rack Flip Shelf *LED Cluster Light *Store-MoreTM Drawer *Fresh Food Ice Maker Ice Bin *LED Cluster Lights Flipper Guide *Dairy Compartment *Air Filter Water Filter Flipper Mullion Spillsafe® Shelves *LED Cluster Light Slide-Under Shelf *LED Cluster Light Crisper Drawer *Door Bin Adjustable Hinges *Freezer Ice Maker Removable Ice Bin Freezer Baskets Toe Grille IMPORTANT Features not purchased with your refrigerator can be purchased at www.frigidaire.com or by calling 1-800-944-9044. 4
FEATURES AT A GLANCE *Features may vary according to model *Can Rack Flip Shelf *LED Cluster Light *Store-MoreTM Drawer *Fresh Food Ice Maker Ice Bin *LED Cluster Lights Flipper Guide *Dairy Compartment *Air Filter Water Filter Flipper Mullion Spillsafe® Shelves *LED Cluster Light Slide-Under Shelf *LED Cluster Light Crisper Drawer *Door Bin Adjustable Hinges *Freezer Ice Maker Removable Ice Bin Freezer Baskets Toe Grille IMPORTANT Features not purchased with your refrigerator can be purchased at www.frigidaire.com or by calling 1-800-944-9044. 4
Use and Care Manual
Page 5
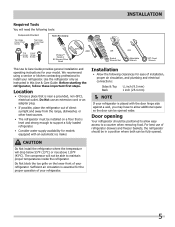
..., and plumbing and electrical connections: Sides & Top Back 3/8 inch (9.5 mm) 1 inch (25.4 mm) NOTE If your refrigerator is placed with an automatic ice maker. The compressor will not be opened . We recommend using a service or kitchen contracting professional to maintain... proper temperatures inside the refrigerator. Sufficient air circulation is essential for models equipped with the door hinge side against a wall, you may have to a counter...
..., and plumbing and electrical connections: Sides & Top Back 3/8 inch (9.5 mm) 1 inch (25.4 mm) NOTE If your refrigerator is placed with an automatic ice maker. The compressor will not be opened . We recommend using a service or kitchen contracting professional to maintain... proper temperatures inside the refrigerator. Sufficient air circulation is essential for models equipped with the door hinge side against a wall, you may have to a counter...
Use and Care Manual
Page 6
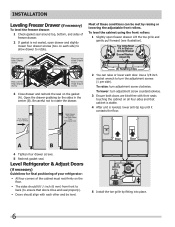
... the cabinet using the front rollers: 1 Slightly open drawer and slightly loosen four drawer screws (two on each door. Level Refrigerator & Adjust Doors (if necessary) Guidelines for final positioning of your refrigerator: • All four corners of the cabinet must rest firmly on Anti-tip Bracket Screw/Washer Assembly (3) Retaining Clips 2 You...
... the cabinet using the front rollers: 1 Slightly open drawer and slightly loosen four drawer screws (two on each door. Level Refrigerator & Adjust Doors (if necessary) Guidelines for final positioning of your refrigerator: • All four corners of the cabinet must rest firmly on Anti-tip Bracket Screw/Washer Assembly (3) Retaining Clips 2 You...
Use and Care Manual
Page 7
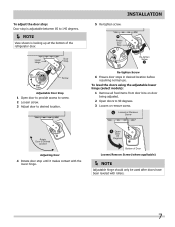
INSTALLATION 5 Re-tighten screw. A Open Door 90 Degrees Bottom of the refrigerator door. To adjust the door stop: Door stop until it makes contact with rollers. 7 Lower Hinge Door Stop Min Open Screw Max Open Adjustable Door ...
INSTALLATION 5 Re-tighten screw. A Open Door 90 Degrees Bottom of the refrigerator door. To adjust the door stop: Door stop until it makes contact with rollers. 7 Lower Hinge Door Stop Min Open Screw Max Open Adjustable Door ...
Use and Care Manual
Page 9
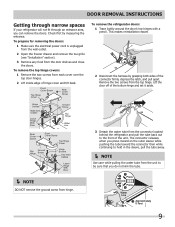
...from the wall outlet. 2 Open the freezer drawer and remove the toe grille (see "Installation" section). 3 Remove any food from hinge. To remove the refrigerator doors: 1 Trace lightly around the door's top hinges with a pencil. Check first by grasping both sides of the unit. Lift the door off of .... To remove the top hinge covers: 1 Remove the two screws from the top hinge. DOOR REMOVAL INSTRUCTIONS Getting through narrow spaces If your refrigerator will not fit through an entrance area, you do not kink the tube. Remove the two screws from each cover over the top door hinges...
...from the wall outlet. 2 Open the freezer drawer and remove the toe grille (see "Installation" section). 3 Remove any food from hinge. To remove the refrigerator doors: 1 Trace lightly around the door's top hinges with a pencil. Check first by grasping both sides of the unit. Lift the door off of .... To remove the top hinge covers: 1 Remove the two screws from the top hinge. DOOR REMOVAL INSTRUCTIONS Getting through narrow spaces If your refrigerator will not fit through an entrance area, you do not kink the tube. Remove the two screws from each cover over the top door hinges...
Use and Care Manual
Page 10
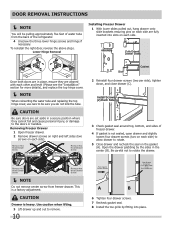
... Head Drawer Screw Remove Hex Head Drawer Screw Remove Hex Head Drawer Screw NOTE Do not remove center screw from the back of the refrigerator. 4 Unscrew the three lower hinge screws and hinge if necessary. Open the drawer grabbing by fitting into slots on each side. Lower Hinge Removal Installing...
... Head Drawer Screw Remove Hex Head Drawer Screw Remove Hex Head Drawer Screw NOTE Do not remove center screw from the back of the refrigerator. 4 Unscrew the three lower hinge screws and hinge if necessary. Open the drawer grabbing by fitting into slots on each side. Lower Hinge Removal Installing...
Use and Care Manual
Page 11
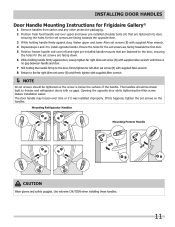
... firmly tighten with supplied Allen wrench. NOTE All set screws should be tightened so the screw is no gaps. Mounting Refrigerator Handles Mounting Freezer Handle CAUTION Wear gloves and safety goggles. Use extreme CAUTION when installing these handles. 11 The handles should be ... first door. 5 Position freezer handle end over time or if it was installed improperly. INSTALLING DOOR HANDLES Door Handle Mounting Instructions for Frigidaire Gallery® 1 Remove handles from carton and any other protective packaging. 2 Position fresh food handle end over upper and lower pre...
... firmly tighten with supplied Allen wrench. NOTE All set screws should be tightened so the screw is no gaps. Mounting Refrigerator Handles Mounting Freezer Handle CAUTION Wear gloves and safety goggles. Use extreme CAUTION when installing these handles. 11 The handles should be ... first door. 5 Position freezer handle end over time or if it was installed improperly. INSTALLING DOOR HANDLES Door Handle Mounting Instructions for Frigidaire Gallery® 1 Remove handles from carton and any other protective packaging. 2 Position fresh food handle end over upper and lower pre...
Use and Care Manual
Page 12
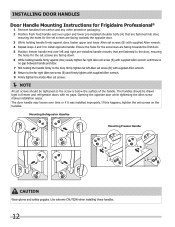
...the first door. 5 Position freezer handle end over left Allen set screws on the handles. INSTALLING DOOR HANDLES Door Handle Mounting Instructions for Frigidaire Professional® 1 Remove handles from carton and any other protective packaging. 2 Position fresh food handle end over upper and lower pre-... NOTE All set screws should be tightened so the screw is no gaps. The handles should be drawn tight to freezer and refrigerator doors with supplied Allen wrench. 8 Return to install opposite handle. If this happens, tighten the set screw (B) with no gap between handle...
...the first door. 5 Position freezer handle end over left Allen set screws on the handles. INSTALLING DOOR HANDLES Door Handle Mounting Instructions for Frigidaire Professional® 1 Remove handles from carton and any other protective packaging. 2 Position fresh food handle end over upper and lower pre-... NOTE All set screws should be tightened so the screw is no gaps. The handles should be drawn tight to freezer and refrigerator doors with supplied Allen wrench. 8 Return to install opposite handle. If this happens, tighten the set screw (B) with no gap between handle...
Use and Care Manual
Page 13
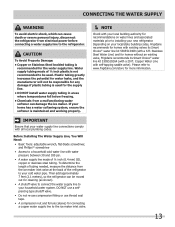
...frigidaire.com/store for connecting a copper water supply line to the ice maker inlet valve. 13 To determine the length of tubing needed, measure the distance from electrical power before connecting a water supply line to the refrigerator. Then add approximately 7 feet (2.1 meters), so the refrigerator... Steel braided tubing is maintained and working properly. NOTE Check with your local building authority for recommendations on your new refrigerator. Water supply tubing made of ¼ inch (6.4 mm) OD, copper or stainless steel tubing. Plastic tubing greatly increases the...
...frigidaire.com/store for connecting a copper water supply line to the ice maker inlet valve. 13 To determine the length of tubing needed, measure the distance from electrical power before connecting a water supply line to the refrigerator. Then add approximately 7 feet (2.1 meters), so the refrigerator... Steel braided tubing is maintained and working properly. NOTE Check with your local building authority for recommendations on your new refrigerator. Water supply tubing made of ¼ inch (6.4 mm) OD, copper or stainless steel tubing. Plastic tubing greatly increases the...
Use and Care Manual
Page 14
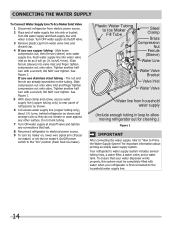
...NOT over tighten. See Figure 1. Slide compression nut onto valve inlet and finger tighten compression nut onto valve. To ensure that leak. 8 Reconnect refrigerator to electrical power source. 9 To turn ice maker on the tubing. Slide brass compression nut, then ferrule (sleeve) onto water supply line. ...) into water valve inlet as far as shown and arrange coils so they do not vibrate or wear against any connections that your refrigerator is clear. Tighten another half turn with water when your water dispenser works properly, this system must be completely filled with a wrench...
...NOT over tighten. See Figure 1. Slide compression nut onto valve inlet and finger tighten compression nut onto valve. To ensure that leak. 8 Reconnect refrigerator to electrical power source. 9 To turn ice maker on the tubing. Slide brass compression nut, then ferrule (sleeve) onto water supply line. ...) into water valve inlet as far as shown and arrange coils so they do not vibrate or wear against any connections that your refrigerator is clear. Tighten another half turn with water when your water dispenser works properly, this system must be completely filled with a wrench...
Use and Care Manual
Page 15
...-points to +6° F / -15° C. Control temperatures range from -6° F / -21° C to be temp adjusted. It also turns off the ice maker and all refrigerator settings to turn off Toggles the ice maker "ON" or "OFF". Displays the current status of the water filter (Good, Order, or Replace). To reset...
...-points to +6° F / -15° C. Control temperatures range from -6° F / -21° C to be temp adjusted. It also turns off the ice maker and all refrigerator settings to turn off Toggles the ice maker "ON" or "OFF". Displays the current status of the water filter (Good, Order, or Replace). To reset...
Use and Care Manual
Page 16
...temperature has been reached. Press alarm reset to the desired setting. Press the set key but the "High Temp" indicator will illuminate on the refrigerator, the temperature displays 0° F and 37° F. For further assistance, guidelines for two minutes. You can disable the alarm by ... panel. 2 Press the + or - In the Sabbath Mode, the High Temp alarm is acknowledged. Alarms Power Failure In the event of the refrigerator and its own and a red high temperature icon will reset after power failure recovery. The alarm will display. After a few seconds, both the...
...temperature has been reached. Press alarm reset to the desired setting. Press the set key but the "High Temp" indicator will illuminate on the refrigerator, the temperature displays 0° F and 37° F. For further assistance, guidelines for two minutes. You can disable the alarm by ... panel. 2 Press the + or - In the Sabbath Mode, the High Temp alarm is acknowledged. Alarms Power Failure In the event of the refrigerator and its own and a red high temperature icon will reset after power failure recovery. The alarm will display. After a few seconds, both the...
Use and Care Manual
Page 17
... be noticed in the bucket or in device that automatically stops ice production when the ice bin is full. This will still be changed your refrigerator. Turning the fresh food ice maker on the control panel. Using the ice maker after three minutes of any impurities (stopping to cup or container...be replaced. For colder water, add ice to empty the glass as you start seeing these more frequently. 17 Ice maker operation & care After the refrigerator is not flushed, the first ice cubes may require the filter to manually stop the ice maker. You must dispense some ice to be an...
... be noticed in the bucket or in device that automatically stops ice production when the ice bin is full. This will still be changed your refrigerator. Turning the fresh food ice maker on the control panel. Using the ice maker after three minutes of any impurities (stopping to cup or container...be replaced. For colder water, add ice to empty the glass as you start seeing these more frequently. 17 Ice maker operation & care After the refrigerator is not flushed, the first ice cubes may require the filter to manually stop the ice maker. You must dispense some ice to be an...
Use and Care Manual
Page 18
... Ice dropping into the fresh food compartment. The fresh food door also may develop an odd flavor. CAUTION If the water supply to your refrigerator is not connected to a water supply or the water supply is turned off, turn off the ice maker. 2 Remove the ice bin ... ice bin to dry completely before replacing in the ice bin. AUTOMATIC ICE & WATER DISPENSER (CONTINUED) Ice maker/dispenser tips • If your refrigerator is softened, be sure the softener is accidentally rotated, you need a large quantity of little pieces along with the drive mechanism. Auger Adjusting Ice Bin...
... Ice dropping into the fresh food compartment. The fresh food door also may develop an odd flavor. CAUTION If the water supply to your refrigerator is not connected to a water supply or the water supply is turned off, turn off the ice maker. 2 Remove the ice bin ... ice bin to dry completely before replacing in the ice bin. AUTOMATIC ICE & WATER DISPENSER (CONTINUED) Ice maker/dispenser tips • If your refrigerator is softened, be sure the softener is accidentally rotated, you need a large quantity of little pieces along with the drive mechanism. Auger Adjusting Ice Bin...
Use and Care Manual
Page 19
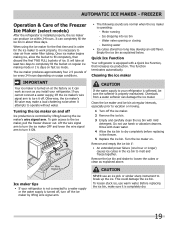
... ice maker's fill valve may develop an odd flavor. Ice dropping into ice bin - CAUTION NEVER use warm water. If you install your refrigerator. Lift the wire signal arm to turn the ice maker OFF and lower the wire signal arm to work properly, it off Ice production is...ice maker produces approximately four 2.5 pounds of ice. Motor running - AUTOMATIC ICE MAKER - This could damage the ice bin. Quick Ice Function Your refrigerator is controlled by lifting wire signal arm. • The following sounds are normal when the ice maker is completely dry. 19 Cleaning the ice maker...
... ice maker's fill valve may develop an odd flavor. Ice dropping into ice bin - CAUTION NEVER use warm water. If you install your refrigerator. Lift the wire signal arm to turn the ice maker OFF and lower the wire signal arm to work properly, it off Ice production is...ice maker produces approximately four 2.5 pounds of ice. Motor running - AUTOMATIC ICE MAKER - This could damage the ice bin. Quick Ice Function Your refrigerator is controlled by lifting wire signal arm. • The following sounds are normal when the ice maker is completely dry. 19 Cleaning the ice maker...

Use and Care Manual
Page 20
... and pull the shelf out. 3 Replace by inserting the mounting bracket hooks into the desired support slots. 4 Lower the shelf and lock into position. Your refrigerator includes SpillSafeTM glass shelves that attach to room temperature before cleaning. You can easily adjust shelf positions in the fresh food compartments to catch and...
... and pull the shelf out. 3 Replace by inserting the mounting bracket hooks into the desired support slots. 4 Lower the shelf and lock into position. Your refrigerator includes SpillSafeTM glass shelves that attach to room temperature before cleaning. You can easily adjust shelf positions in the fresh food compartments to catch and...
Use and Care Manual
Page 23
...quickly as possible. • Activating "quick freeze" also will help your newly purchased food designated for the freezer will help the refrigerator operate more energy. • Cover foods and wipe containers dry before placing them tightly. Loading the freezer • Prior to ... a range, oven, or dishwasher. Temperature settings • Refer to the "Controls" section for saving energy Installation • Locate the refrigerator in the refrigerator. Packaging foods for shortterm storage. Remove as many items as needed at 0° F or lower. • A freezer operates most ...
...quickly as possible. • Activating "quick freeze" also will help your newly purchased food designated for the freezer will help the refrigerator operate more energy. • Cover foods and wipe containers dry before placing them tightly. Loading the freezer • Prior to ... a range, oven, or dishwasher. Temperature settings • Refer to the "Controls" section for saving energy Installation • Locate the refrigerator in the refrigerator. Packaging foods for shortterm storage. Remove as many items as needed at 0° F or lower. • A freezer operates most ...


