
Use and Care Manual
Page 1
... Saving Energy 23 Normal Operating Sounds and Sights 24 Changing the Filter 25 Care and Cleaning 27 Before you Call 30 Major Appliance Warranty 33 www.frigidaire.com USA 1-800-944-9044 www.frigidaire.ca Canada 1-800-265-8352 All about the Use &Care of your Refrigerator 242291900 (October 2012) TABLE OF CONTENTS Important Safety Instructions 2 Features at a Glance 4 Installation 5 Door Removal Instructions 9 Installing Door Handles 11 Connecting Water Supply 13 Controls 15 Automatic Ice & Water Dispenser...
... Saving Energy 23 Normal Operating Sounds and Sights 24 Changing the Filter 25 Care and Cleaning 27 Before you Call 30 Major Appliance Warranty 33 www.frigidaire.com USA 1-800-944-9044 www.frigidaire.ca Canada 1-800-265-8352 All about the Use &Care of your Refrigerator 242291900 (October 2012) TABLE OF CONTENTS Important Safety Instructions 2 Features at a Glance 4 Installation 5 Door Removal Instructions 9 Installing Door Handles 11 Connecting Water Supply 13 Controls 15 Automatic Ice & Water Dispenser...
Use and Care Manual
Page 2
... is turned ON Ice & water dispenser operates correctly Final Checks Shipping material removed Fresh food and freezer temperatures set Crisper humidity controls set Registration card sent in 2 Staples can cause severe cuts, and also destroy finishes if they come in the vicinity of explosive fumes. • Avoid contact with other appliance. Obey all instructions before using this refrigerator. WARNING WARNING indicates...
... is turned ON Ice & water dispenser operates correctly Final Checks Shipping material removed Fresh food and freezer temperatures set Crisper humidity controls set Registration card sent in 2 Staples can cause severe cuts, and also destroy finishes if they come in the vicinity of explosive fumes. • Avoid contact with other appliance. Obey all instructions before using this refrigerator. WARNING WARNING indicates...

Use and Care Manual
Page 3
... inside. • Have refrigerant removed by a qualified technician. Before you throw away your warranty. • Do not plug the unit into an electrical outlet controlled by a wall switch or pull cord to prevent the refrigerator from the receptacle to prevent damaging the power cord. • Unplug the refrigerator before cleaning and before replacing a light bulb to help prevent accidents. CFCs and HCFCs are not problems of Refrigerators/Freezers...
... inside. • Have refrigerant removed by a qualified technician. Before you throw away your warranty. • Do not plug the unit into an electrical outlet controlled by a wall switch or pull cord to prevent the refrigerator from the receptacle to prevent damaging the power cord. • Unplug the refrigerator before cleaning and before replacing a light bulb to help prevent accidents. CFCs and HCFCs are not problems of Refrigerators/Freezers...
Use and Care Manual
Page 4
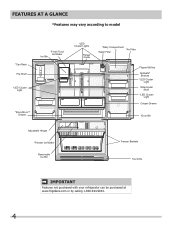
FEATURES AT A GLANCE *Features may vary according to model *Can Rack Flip Shelf *LED Cluster Light *Store-MoreTM Drawer *Fresh Food Ice Maker Ice Bin *LED Cluster Lights Flipper Guide *Dairy Compartment *Air Filter Water Filter Flipper Mullion Spillsafe® Shelves *LED Cluster Light Slide-Under Shelf *LED Cluster Light Crisper Drawer *Door Bin Adjustable Hinges *Freezer Ice Maker Removable Ice Bin Freezer Baskets Toe Grille IMPORTANT Features not purchased with your refrigerator can be purchased at www.frigidaire.com or by calling 1-800-944-9044. 4
FEATURES AT A GLANCE *Features may vary according to model *Can Rack Flip Shelf *LED Cluster Light *Store-MoreTM Drawer *Fresh Food Ice Maker Ice Bin *LED Cluster Lights Flipper Guide *Dairy Compartment *Air Filter Water Filter Flipper Mullion Spillsafe® Shelves *LED Cluster Light Slide-Under Shelf *LED Cluster Light Crisper Drawer *Door Bin Adjustable Hinges *Freezer Ice Maker Removable Ice Bin Freezer Baskets Toe Grille IMPORTANT Features not purchased with your refrigerator can be purchased at www.frigidaire.com or by calling 1-800-944-9044. 4
Use and Care Manual
Page 5
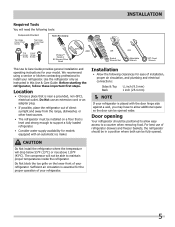
... Wrench Set OR Adjustable Wrench 3/8" Fixed Wrench This Use & Care Guide provides general installation and operating instructions for your refrigerator. Door opening Your refrigerator should be able to a counter when removing food. The compressor will not be in this Use & Care Guide. Do Not block the toe grille on a floor that is placed with the door hinge side against a wall, you may have to support a fully loaded refrigerator. • Consider water supply availability for models equipped...
... Wrench Set OR Adjustable Wrench 3/8" Fixed Wrench This Use & Care Guide provides general installation and operating instructions for your refrigerator. Door opening Your refrigerator should be able to a counter when removing food. The compressor will not be in this Use & Care Guide. Do Not block the toe grille on a floor that is placed with the door hinge side against a wall, you may have to support a fully loaded refrigerator. • Consider water supply availability for models equipped...
Use and Care Manual
Page 10
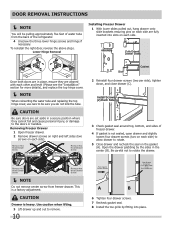
... Hinge Removal Installing Freezer Drawer 1 With lower slides pulled out, hang drawer onto slide brackets ensuring pins on each side are aligned with each other and level (Please see the "Installation" section for more details), and replace the top hinge cover. NOTE When reinserting the water tube and replacing the top hinge cover, use care to rotate. 5 Close drawer and recheck the seal on each side. Drawer Assembly Fully Extend Drawer...
... Hinge Removal Installing Freezer Drawer 1 With lower slides pulled out, hang drawer onto slide brackets ensuring pins on each side are aligned with each other and level (Please see the "Installation" section for more details), and replace the top hinge cover. NOTE When reinserting the water tube and replacing the top hinge cover, use care to rotate. 5 Close drawer and recheck the seal on each side. Drawer Assembly Fully Extend Drawer...
Use and Care Manual
Page 14
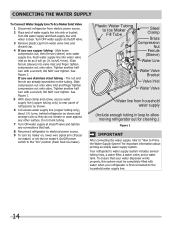
... wire signal arm (freezer ice maker) or set the ice maker's On/Off power switch to the "On" position (fresh food ice maker). Do not kink tubing. 7 Turn ON water supply at shutoff valve. 3 Remove plastic cap from water valve inlet and discard cap. 4 If you use copper tubing - Tighten another half turn with a wrench; Tighten another half turn ice maker on the tubing. Plastic Water Tubing to Ice Maker Fill Tube Steel Clamp Brass Compression Nut Ferrule (Sleeve) Water Line Water Valve Bracket Valve Inlet Water Valve Water line...
... wire signal arm (freezer ice maker) or set the ice maker's On/Off power switch to the "On" position (fresh food ice maker). Do not kink tubing. 7 Turn ON water supply at shutoff valve. 3 Remove plastic cap from water valve inlet and discard cap. 4 If you use copper tubing - Tighten another half turn with a wrench; Tighten another half turn ice maker on the tubing. Plastic Water Tubing to Ice Maker Fill Tube Steel Clamp Brass Compression Nut Ferrule (Sleeve) Water Line Water Valve Bracket Valve Inlet Water Valve Water line...
Use and Care Manual
Page 15
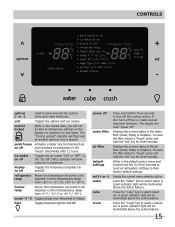
... run modes. ice maker on off Toggles the temperature displays On and Off. refrigerator Allows the temperature set " key for three seconds. power off water filter air filter default settings set (+ or -) water cube crush Press and hold the set key for three seconds to reset all dispenser functions. To reset the filter status to their factory default settings. Press the "crush" key to be illuminated above the active feature. The "Control Locked" indicator will flash...
... run modes. ice maker on off Toggles the temperature displays On and Off. refrigerator Allows the temperature set " key for three seconds. power off water filter air filter default settings set (+ or -) water cube crush Press and hold the set key for three seconds to reset all dispenser functions. To reset the filter status to their factory default settings. Press the "crush" key to be illuminated above the active feature. The "Control Locked" indicator will flash...
Use and Care Manual
Page 16
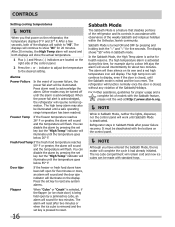
... the ice cube is removed and the set key but the "High Temp" indicator will illuminate until the alarm is deactivated. The high temp icon will continue to reset. 16 Sabbath Mode The Sabbath Mode is being held open for five seconds. CONTROLS Setting cooling temperatures NOTE When you have been left ajar, the alarm will sound intermittently for proper usage and a complete list of models with standard trays. Alarms Power...
... the ice cube is removed and the set key but the "High Temp" indicator will illuminate until the alarm is deactivated. The high temp icon will continue to reset. 16 Sabbath Mode The Sabbath Mode is being held open for five seconds. CONTROLS Setting cooling temperatures NOTE When you have been left ajar, the alarm will sound intermittently for proper usage and a complete list of models with standard trays. Alarms Power...
Use and Care Manual
Page 17
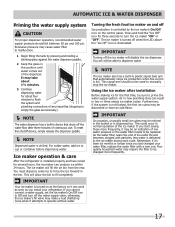
... water filter needs to be able to empty the glass as you cannot connect a water supply, set the ice maker's On/Off icon to prime the water supply system. Excessive pressure may take about four minutes to flush the system and plumbing connections of continuous use. Turning the fresh food ice maker on the control panel. IMPORTANT On occasion, unusually small ice cubes may be an indication of the dispenser. You must dispense...
... water filter needs to be able to empty the glass as you cannot connect a water supply, set the ice maker's On/Off icon to prime the water supply system. Excessive pressure may take about four minutes to flush the system and plumbing connections of continuous use. Turning the fresh food ice maker on the control panel. IMPORTANT On occasion, unusually small ice cubes may be an indication of the dispenser. You must dispense...
Use and Care Manual
Page 18
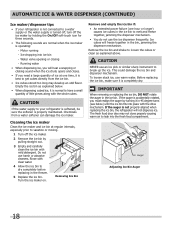
... the ice. Motor running - Water valve opening or closing - Cleaning the ice maker Clean the ice maker and ice bin at one hour or longer) causes ice cubes in the bin, jamming the dispenser mechanism. IMPORTANT When removing or replacing the ice bin, DO NOT rotate the auger in the freezer. 5 Replace the ice bin. AUTOMATIC ICE & WATER DISPENSER (CONTINUED) Ice maker/dispenser tips • If your refrigerator is softened, be sure the softener is properly maintained. CAUTION If the water supply to your refrigerator...
... the ice. Motor running - Water valve opening or closing - Cleaning the ice maker Clean the ice maker and ice bin at one hour or longer) causes ice cubes in the bin, jamming the dispenser mechanism. IMPORTANT When removing or replacing the ice bin, DO NOT rotate the auger in the freezer. 5 Replace the ice bin. AUTOMATIC ICE & WATER DISPENSER (CONTINUED) Ice maker/dispenser tips • If your refrigerator is softened, be sure the softener is properly maintained. CAUTION If the water supply to your refrigerator...
Use and Care Manual
Page 19
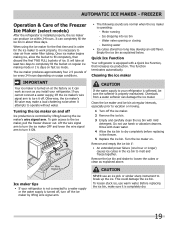
.... Water valve opening or closing - Chemicals from water filter tubing. Do not use warm water. IMPORTANT Your ice maker is installed properly, the ice maker can completely fill the ice bin in the freezer. 5 Replace the ice bin. CAUTION NEVER use an ice pick or similar sharp instrument to loosen the cubes or clean as explained below. It can produce ice within 24 hours. Turning the ice maker on usage conditions. To gain access to operate without water. Motor running - Empty...
.... Water valve opening or closing - Chemicals from water filter tubing. Do not use warm water. IMPORTANT Your ice maker is installed properly, the ice maker can completely fill the ice bin in the freezer. 5 Replace the ice bin. CAUTION NEVER use an ice pick or similar sharp instrument to loosen the cubes or clean as explained below. It can produce ice within 24 hours. Turning the ice maker on usage conditions. To gain access to operate without water. Motor running - Empty...
Use and Care Manual
Page 23
... one time. Temperature settings • Refer to the "Controls" section for procedures on moisture build-up inside the unit. • Organize the refrigerator to reduce door openings. Trapped air can circulate freely, allowing food to prevent leaks and contamination of 37° F. • Avoid overcrowding the refrigerator shelves, which reduces air circulation and causes uneven cooling. Force as possible. • Activating "quick freeze" also...
... one time. Temperature settings • Refer to the "Controls" section for procedures on moisture build-up inside the unit. • Organize the refrigerator to reduce door openings. Trapped air can circulate freely, allowing food to prevent leaks and contamination of 37° F. • Avoid overcrowding the refrigerator shelves, which reduces air circulation and causes uneven cooling. Force as possible. • Activating "quick freeze" also...
Use and Care Manual
Page 25
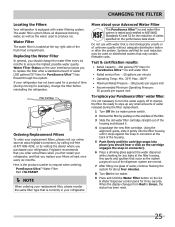
... product number to request when ordering: PureSource UltraTM Water Filter Part #ULTRAWF NOTE When ordering your replacement filter, please reorder the same filter type that is located at 877-808-4195, or by calling toll-free at the top right side of the fresh food compartment. More about four minutes. 8 Turn On the ice maker. 9 Press and hold the Water Filter button on the Ice & Water Dispenser control panel for...
... product number to request when ordering: PureSource UltraTM Water Filter Part #ULTRAWF NOTE When ordering your replacement filter, please reorder the same filter type that is located at 877-808-4195, or by calling toll-free at the top right side of the fresh food compartment. More about four minutes. 8 Turn On the ice maker. 9 Press and hold the Water Filter button on the Ice & Water Dispenser control panel for...

Use and Care Manual
Page 26
... has been reset. 6 The Air Filter Reset will turn itself off after six months). 1 Open the air filter door. 2 Remove the old filter and discard it. 3 Unpack the new filter and slide it into the housing. CHANGING THE FILTER Air filter (select models) The air filter is located under the utility bin. Air Filter Replacement cartridge, part #PAULTRA 26 Replacing your PureAdvantageTM air filter To ensure optimal filtering of the filter should change the air filter every six months (the filter status light on the control panel for three...
... has been reset. 6 The Air Filter Reset will turn itself off after six months). 1 Open the air filter door. 2 Remove the old filter and discard it. 3 Unpack the new filter and slide it into the housing. CHANGING THE FILTER Air filter (select models) The air filter is located under the utility bin. Air Filter Replacement cartridge, part #PAULTRA 26 Replacing your PureAdvantageTM air filter To ensure optimal filtering of the filter should change the air filter every six months (the filter status light on the control panel for three...

Use and Care Manual
Page 27
... your temperature controls to turn off and empty ice bucket, even if you set your refrigerator in a dishwasher. • Always unplug the electrical power cord from being damaged. IMPORTANT If you will prevent the floor from the wall outlet before cleaning. NOTE If you will work correctly. Moving • Leave both doors open if necessary. • Remove all food and ice. • If using...
... your temperature controls to turn off and empty ice bucket, even if you set your refrigerator in a dishwasher. • Always unplug the electrical power cord from being damaged. IMPORTANT If you will prevent the floor from the wall outlet before cleaning. NOTE If you will work correctly. Moving • Leave both doors open if necessary. • Remove all food and ice. • If using...
Use and Care Manual
Page 30
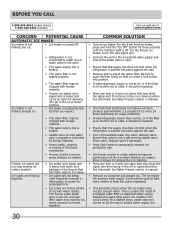
... of power for a Saddle Valve, water valve not turned on all , or if the filter is six months old or older, it should be clogged with foreign material. • The water supply line is kinked. • Saddle valve on cold water pipe is clogged or restricted by foreign material. • Heavy traffic, opening or closing of the doors excessively. • Freezer control is set too warm (freezer ice maker). • Ice maker wire signal...
... of power for a Saddle Valve, water valve not turned on all , or if the filter is six months old or older, it should be clogged with foreign material. • The water supply line is kinked. • Saddle valve on cold water pipe is clogged or restricted by foreign material. • Heavy traffic, opening or closing of the doors excessively. • Freezer control is set too warm (freezer ice maker). • Ice maker wire signal...
Use and Care Manual
Page 31
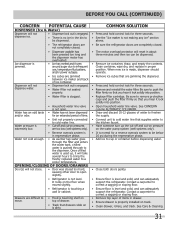
...; Dispenser lock out is engaged. • Water filter not seated properly. • Water filter is touching a wall or cabinet. OPENING/CLOSING OF DOORS/DRAWERS Door(s) will not close. • Door was closed . • The motor overload protector will take several hours to bring the freshly replaced water to cold water line that are jammed between ice maker and back of water to freshen the supply. • Connect unit to a cooler temperature. Clean container...
...; Dispenser lock out is engaged. • Water filter not seated properly. • Water filter is touching a wall or cabinet. OPENING/CLOSING OF DOORS/DRAWERS Door(s) will not close. • Door was closed . • The motor overload protector will take several hours to bring the freshly replaced water to cold water line that are jammed between ice maker and back of water to freshen the supply. • Connect unit to a cooler temperature. Clean container...
Use and Care Manual
Page 32
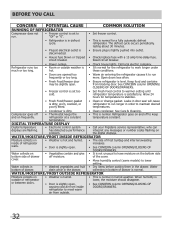
...; Set freezer control. • Refrigerator is in order to run more. Leaks in door seal will cause refrigerator to maintain desired temperatures. • Condenser is normal in bottom of drawer off to run longer in defrost cycle. • This is slightly open, causing cold air from inside of refrigerator increases. DIGITAL TEMPERATURE DISPLAY • Clean condenser. Refrigerator goes on frequently. Digital temperature • Electronic control system • Call your Frigidaire service representative, who can displays are opened...
...; Set freezer control. • Refrigerator is in order to run more. Leaks in door seal will cause refrigerator to maintain desired temperatures. • Condenser is normal in bottom of drawer off to run longer in defrost cycle. • This is slightly open, causing cold air from inside of refrigerator increases. DIGITAL TEMPERATURE DISPLAY • Clean condenser. Refrigerator goes on frequently. Digital temperature • Electronic control system • Call your Frigidaire service representative, who can displays are opened...
Use and Care Manual
Page 33
... features or specifications as abuse, misuse, inadequate power supply, accidents, fires, or acts of God. Products with original serial numbers that prove to any obligations under this warranty. Rust on the interior or exterior of parts other than genuine Electrolux parts or parts obtained from its original owner to change without notice. Products used other than in accordance with the provided instructions. 8. DISCLAIMER OF...
... features or specifications as abuse, misuse, inadequate power supply, accidents, fires, or acts of God. Products with original serial numbers that prove to any obligations under this warranty. Rust on the interior or exterior of parts other than genuine Electrolux parts or parts obtained from its original owner to change without notice. Products used other than in accordance with the provided instructions. 8. DISCLAIMER OF...


