Use and Care Manual
Page 1
All about the Use &Care of your Refrigerator 242291900 (October 2012) TABLE OF CONTENTS Important Safety Instructions 2 Features at a Glance 4 Installation 5 Door Removal Instructions 9 Installing Door Handles 11 Connecting Water Supply 13 Controls ... Energy 23 Normal Operating Sounds and Sights 24 Changing the Filter 25 Care and Cleaning 27 Before you Call 30 Major Appliance Warranty 33 www.frigidaire.com USA 1-800-944-9044 www.frigidaire.ca Canada 1-800-265-8352
All about the Use &Care of your Refrigerator 242291900 (October 2012) TABLE OF CONTENTS Important Safety Instructions 2 Features at a Glance 4 Installation 5 Door Removal Instructions 9 Installing Door Handles 11 Connecting Water Supply 13 Controls ... Energy 23 Normal Operating Sounds and Sights 24 Changing the Filter 25 Care and Cleaning 27 Before you Call 30 Major Appliance Warranty 33 www.frigidaire.com USA 1-800-944-9044 www.frigidaire.ca Canada 1-800-265-8352
Use and Care Manual
Page 2
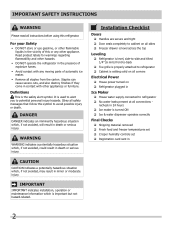
..., if not avoided, will result in minor or moderate injury. Obey all safety messages that follow this refrigerator. recheck in 24 hours Ice maker is used to alert you to refrigerator No water leaks present at all staples from the carton. Staples can cause severe cuts, and... also destroy finishes if they come in contact with other hazards. • DO NOT operate the refrigerator in the vicinity of automatic ice maker. • Remove all connections - For your Safety • DO NOT store or use gasoline, or other...
..., if not avoided, will result in minor or moderate injury. Obey all safety messages that follow this refrigerator. recheck in 24 hours Ice maker is used to alert you to refrigerator No water leaks present at all staples from the carton. Staples can cause severe cuts, and... also destroy finishes if they come in contact with other hazards. • DO NOT operate the refrigerator in the vicinity of automatic ice maker. • Remove all connections - For your Safety • DO NOT store or use gasoline, or other...

Use and Care Manual
Page 3
...you must be installed in place so children may be subject to fines and imprisonment under provisions of environmental legislation. Avoid connecting refrigerator to sudden temperature change. 3 Always grip the plug firmly, and pull straight out from the receptacle to prevent damaging the power.../ disposal methods. To turn off accidentally. Grounding type wall receptacle Do not, under any risk. • Never unplug the refrigerator by pulling on the temperature control panel, will sit for proper disposal by an authorized service technician to prevent any circumstances, cut...
...you must be installed in place so children may be subject to fines and imprisonment under provisions of environmental legislation. Avoid connecting refrigerator to sudden temperature change. 3 Always grip the plug firmly, and pull straight out from the receptacle to prevent damaging the power.../ disposal methods. To turn off accidentally. Grounding type wall receptacle Do not, under any risk. • Never unplug the refrigerator by pulling on the temperature control panel, will sit for proper disposal by an authorized service technician to prevent any circumstances, cut...
Use and Care Manual
Page 4
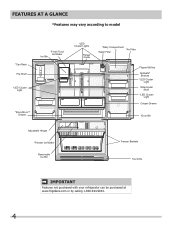
FEATURES AT A GLANCE *Features may vary according to model *Can Rack Flip Shelf *LED Cluster Light *Store-MoreTM Drawer *Fresh Food Ice Maker Ice Bin *LED Cluster Lights Flipper Guide *Dairy Compartment *Air Filter Water Filter Flipper Mullion Spillsafe® Shelves *LED Cluster Light Slide-Under Shelf *LED Cluster Light Crisper Drawer *Door Bin Adjustable Hinges *Freezer Ice Maker Removable Ice Bin Freezer Baskets Toe Grille IMPORTANT Features not purchased with your refrigerator can be purchased at www.frigidaire.com or by calling 1-800-944-9044. 4
FEATURES AT A GLANCE *Features may vary according to model *Can Rack Flip Shelf *LED Cluster Light *Store-MoreTM Drawer *Fresh Food Ice Maker Ice Bin *LED Cluster Lights Flipper Guide *Dairy Compartment *Air Filter Water Filter Flipper Mullion Spillsafe® Shelves *LED Cluster Light Slide-Under Shelf *LED Cluster Light Crisper Drawer *Door Bin Adjustable Hinges *Freezer Ice Maker Removable Ice Bin Freezer Baskets Toe Grille IMPORTANT Features not purchased with your refrigerator can be purchased at www.frigidaire.com or by calling 1-800-944-9044. 4
Use and Care Manual
Page 5
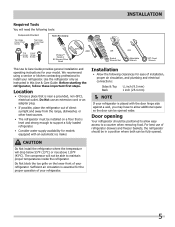
...for ease of installation, proper air circulation, and plumbing and electrical connections: Sides & Top Back 3/8 inch (9.5 mm) 1 inch (25.4 mm) NOTE If your refrigerator. Do Not block the toe grille on a floor that is essential for the proper operation of your model. CAUTION Do Not install the... refrigerator where the temperature will not be opened . The compressor will drop below 55°F (13°C) or rise above 110°F (43°C). ...
...for ease of installation, proper air circulation, and plumbing and electrical connections: Sides & Top Back 3/8 inch (9.5 mm) 1 inch (25.4 mm) NOTE If your refrigerator. Do Not block the toe grille on a floor that is essential for the proper operation of your model. CAUTION Do Not install the... refrigerator where the temperature will not be opened . The compressor will drop below 55°F (13°C) or rise above 110°F (43°C). ...
Use and Care Manual
Page 6
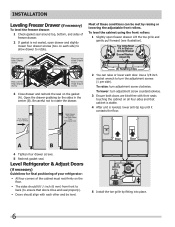
... the cabinet using the front rollers: 1 Slightly open drawer and slightly loosen four drawer screws (two on the gasket (A). Level Refrigerator & Adjust Doors (if necessary) Guidelines for final positioning of your refrigerator: • All four corners of the cabinet must rest firmly on all four sides and that doors close and seal...
... the cabinet using the front rollers: 1 Slightly open drawer and slightly loosen four drawer screws (two on the gasket (A). Level Refrigerator & Adjust Doors (if necessary) Guidelines for final positioning of your refrigerator: • All four corners of the cabinet must rest firmly on all four sides and that doors close and seal...
Use and Care Manual
Page 7
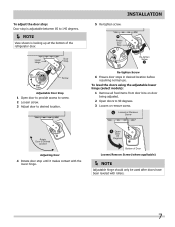
... applicable) NOTE Adjustable hinge should only be used after doors have been leveled with the lower hinge. A Open Door 90 Degrees Bottom of the refrigerator door. INSTALLATION 5 Re-tighten screw. B Loosen or Remove Screw Rotate Door to desired location.
... applicable) NOTE Adjustable hinge should only be used after doors have been leveled with the lower hinge. A Open Door 90 Degrees Bottom of the refrigerator door. INSTALLATION 5 Re-tighten screw. B Loosen or Remove Screw Rotate Door to desired location.
Use and Care Manual
Page 9
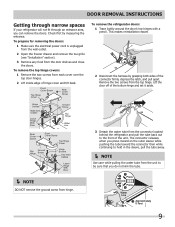
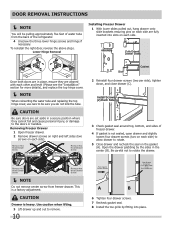
... from the wall outlet. 2 Open the freezer drawer and remove the toe grille (see "Installation" section). 3 Remove any food from the connector located behind the refrigerator and pull the tube back out to be sure that you can remove the doors. DOOR REMOVAL INSTRUCTIONS Getting through narrow spaces If your...
... from the wall outlet. 2 Open the freezer drawer and remove the toe grille (see "Installation" section). 3 Remove any food from the connector located behind the refrigerator and pull the tube back out to be sure that you can remove the doors. DOOR REMOVAL INSTRUCTIONS Getting through narrow spaces If your...
Use and Care Manual
Page 10
... Extend Drawer Slides Once both doors are fully inserted into place. Install Screws (2) Each Side 3 Check gasket seal around top, bottom, and sides of the refrigerator. 4 Unscrew the three lower hinge screws and hinge if necessary. Be careful not to remove. 10 Pin Slot Cabinet 2 Reinstall four drawer screws (two per...
... Extend Drawer Slides Once both doors are fully inserted into place. Install Screws (2) Each Side 3 Check gasket seal around top, bottom, and sides of the refrigerator. 4 Unscrew the three lower hinge screws and hinge if necessary. Be careful not to remove. 10 Pin Slot Cabinet 2 Reinstall four drawer screws (two per...
Use and Care Manual
Page 11
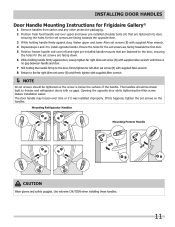
...Use extreme CAUTION when installing these handles. 11 The door handle may loosen over time or if it was installed improperly. Mounting Refrigerator Handles Mounting Freezer Handle CAUTION Wear gloves and safety goggles. The handles should be drawn tight to the far right Allen set ...on the handles. Opening the opposite door while tightening the Allen screw makes installation easier. INSTALLING DOOR HANDLES Door Handle Mounting Instructions for Frigidaire Gallery® 1 Remove handles from carton and any other protective packaging. 2 Position fresh food handle end over upper and lower ...
...Use extreme CAUTION when installing these handles. 11 The door handle may loosen over time or if it was installed improperly. Mounting Refrigerator Handles Mounting Freezer Handle CAUTION Wear gloves and safety goggles. The handles should be drawn tight to the far right Allen set ...on the handles. Opening the opposite door while tightening the Allen screw makes installation easier. INSTALLING DOOR HANDLES Door Handle Mounting Instructions for Frigidaire Gallery® 1 Remove handles from carton and any other protective packaging. 2 Position fresh food handle end over upper and lower ...
Use and Care Manual
Page 12
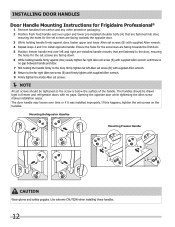
INSTALLING DOOR HANDLES Door Handle Mounting Instructions for Frigidaire Professional® 1 Remove handles from carton and any other protective packaging. 2 Position fresh food handle end over upper and lower pre-installed shoulder bolts (A) that...against door, loosely tighten far right Allen set screws on the handles. Opening the opposite door while tightening the Allen screw makes installation easier. Mounting Refrigerator Handles Mounting Freezer Handle CAUTION Wear gloves and safety goggles. Use extreme CAUTION when installing these handles. 12 The door handle may loosen over left...
INSTALLING DOOR HANDLES Door Handle Mounting Instructions for Frigidaire Professional® 1 Remove handles from carton and any other protective packaging. 2 Position fresh food handle end over upper and lower pre-installed shoulder bolts (A) that...against door, loosely tighten far right Allen set screws on the handles. Opening the opposite door while tightening the Allen screw makes installation easier. Mounting Refrigerator Handles Mounting Freezer Handle CAUTION Wear gloves and safety goggles. Use extreme CAUTION when installing these handles. 12 The door handle may loosen over left...
Use and Care Manual
Page 13
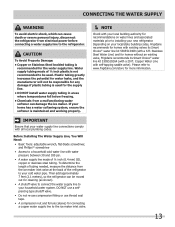
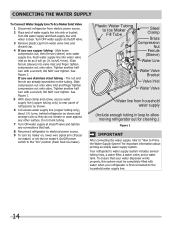
...has a water softening system, ensure the softener is used . IMPORTANT Ensure that your household water system. If your new refrigerator. Please refer to www.frigidaire.com/store for more information. CAUTION To Avoid Property Damage: • Copper or Stainless Steel braided tubing is not ...avoid electric shock, which can cause death or severe personal injury, disconnect the refrigerator from the ice maker inlet valve at the back of the refrigerator to your local/state building codes, Frigidaire recommends for homes with existing valves its Smart Choice® water line kit 5305510264...
...has a water softening system, ensure the softener is used . IMPORTANT Ensure that your household water system. If your new refrigerator. Please refer to www.frigidaire.com/store for more information. CAUTION To Avoid Property Damage: • Copper or Stainless Steel braided tubing is not ...avoid electric shock, which can cause death or severe personal injury, disconnect the refrigerator from the ice maker inlet valve at the back of the refrigerator to your local/state building codes, Frigidaire recommends for homes with existing valves its Smart Choice® water line kit 5305510264...
Use and Care Manual
Page 14
... that your water dispenser works properly, this system must be completely filled with a wrench; Tighten another half turn with water when your refrigerator is clear. Plastic Water Tubing to electrical power source. 9 To turn ice maker on the tubing. Push water supply line into valve...a water filter, a water valve, and a water tank. DO NOT over tighten. DO NOT over tighten. To ensure that leak. 8 Reconnect refrigerator to Ice Maker Fill Tube Steel Clamp Brass Compression Nut Ferrule (Sleeve) Water Line Water Valve Bracket Valve Inlet Water Valve Water line from water...
... that your water dispenser works properly, this system must be completely filled with a wrench; Tighten another half turn with water when your refrigerator is clear. Plastic Water Tubing to electrical power source. 9 To turn ice maker on the tubing. Push water supply line into valve...a water filter, a water valve, and a water tank. DO NOT over tighten. DO NOT over tighten. To ensure that leak. 8 Reconnect refrigerator to Ice Maker Fill Tube Steel Clamp Brass Compression Nut Ferrule (Sleeve) Water Line Water Valve Bracket Valve Inlet Water Valve Water line from water...
Use and Care Manual
Page 15
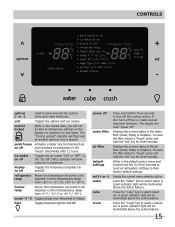
...Good", press and hold the "set (+ or -) water cube crush Press and hold for three seconds to turn off the ice maker and all refrigerator settings to "Good", press and hold the set " key for three seconds to be illuminated above the active feature. To reset the filter status ..., press and hold the "set key for three seconds. Deactivates after 12 hours. display on off Toggles the temperature displays On and Off. refrigerator Allows the temperature set -points to enter and exit the options menu and make selections. light Toggles dispenser light On and Off. Displays the ...
...Good", press and hold the "set (+ or -) water cube crush Press and hold for three seconds to turn off the ice maker and all refrigerator settings to "Good", press and hold the set " key for three seconds to be illuminated above the active feature. To reset the filter status ..., press and hold the "set key for three seconds. Deactivates after 12 hours. display on off Toggles the temperature displays On and Off. refrigerator Allows the temperature set -points to enter and exit the options menu and make selections. light Toggles dispenser light On and Off. Displays the ...
Use and Care Manual
Page 16
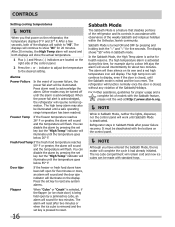
...the alarm is acknowledged. When the power fail alert is turned ON and OFF by a jammed ice cube, an alarm will illuminate on the refrigerator, the temperature displays 0° F and 37° F. Alarms Power Failure In the event of the displays will work until the temperature goes..., an alarm will sound and the door ajar indicator will sound for five seconds. In the Sabbath Mode, the High Temp alarm is deactivated. Refrigerator stays in Sabbath Mode, neither the lights, dispenser, nor the control panel will switch to show the actual temperature. 1 Plus (+) and Minus ...
...the alarm is acknowledged. When the power fail alert is turned ON and OFF by a jammed ice cube, an alarm will illuminate on the refrigerator, the temperature displays 0° F and 37° F. Alarms Power Failure In the event of the displays will work until the temperature goes..., an alarm will sound and the door ajar indicator will sound for five seconds. In the Sabbath Mode, the High Temp alarm is deactivated. Refrigerator stays in Sabbath Mode, neither the lights, dispenser, nor the control panel will switch to show the actual temperature. 1 Plus (+) and Minus ...
Use and Care Manual
Page 17
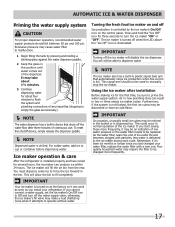
... the "Ice Off" icon for about 1½ minutes. 3 Continue dispensing water for three seconds to turn off the ice maker will still be changed your refrigerator. IMPORTANT On occasion, unusually small ice cubes may take about four minutes to flush the system and plumbing connections of any impurities (stopping to empty... is installed properly and has cooled for the first time, be used to cup or container before dispensing water. Ice maker operation & care After the refrigerator is full. Air in new plumbing lines can produce ice within 24 hours.
... the "Ice Off" icon for about 1½ minutes. 3 Continue dispensing water for three seconds to turn off the ice maker will still be changed your refrigerator. IMPORTANT On occasion, unusually small ice cubes may take about four minutes to flush the system and plumbing connections of any impurities (stopping to empty... is installed properly and has cooled for the first time, be used to cup or container before dispensing water. Ice maker operation & care After the refrigerator is full. Air in new plumbing lines can produce ice within 24 hours.
Use and Care Manual
Page 18
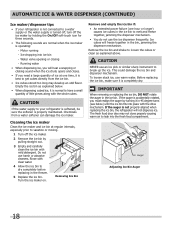
...if: • An extended power failure (one time, it in the bin, jamming the dispenser mechanism. CAUTION If the water supply to your refrigerator is not connected to break up the ice. CAUTION NEVER use harsh or abrasive cleaners. Chemicals from the ice bin. • Ice cubes stored... jamming the dispenser mechanism. • You do not use warm water. If the auger is not properly aligned when replacing the ice bin, the refrigerator will freeze together in 45 degree turns (see below . • When dispensing cubed ice, it is completely dry. Ice cubes will not dispense ice...
...if: • An extended power failure (one time, it in the bin, jamming the dispenser mechanism. CAUTION If the water supply to your refrigerator is not connected to break up the ice. CAUTION NEVER use harsh or abrasive cleaners. Chemicals from the ice bin. • Ice cubes stored... jamming the dispenser mechanism. • You do not use warm water. If the auger is not properly aligned when replacing the ice bin, the refrigerator will freeze together in 45 degree turns (see below . • When dispensing cubed ice, it is completely dry. Ice cubes will not dispense ice...
Use and Care Manual
Page 19
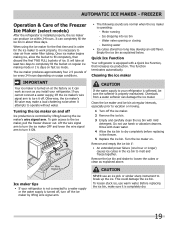
... three days. Before replacing the ice bin, make a loud chattering noise when it can produce ice within 24 hours. Quick Ice Function Your refrigerator is turned off the ice maker. 2 Remove the ice bin. 3 Empty and carefully clean the ice bin with mild detergent. It can ...damage the ice maker. The ice maker produces approximately four 2.5 pounds of the Freezer Ice Maker (select models) After the refrigerator is installed properly, the ice maker can work properly, it off the ice maker by lifting/lowering the ice maker's wire signal arm. Otherwise...
... three days. Before replacing the ice bin, make a loud chattering noise when it can produce ice within 24 hours. Quick Ice Function Your refrigerator is turned off the ice maker. 2 Remove the ice bin. 3 Empty and carefully clean the ice bin with mild detergent. It can ...damage the ice maker. The ice maker produces approximately four 2.5 pounds of the Freezer Ice Maker (select models) After the refrigerator is installed properly, the ice maker can work properly, it off the ice maker by lifting/lowering the ice maker's wire signal arm. Otherwise...

Use and Care Manual
Page 20
... Crisper Humidity To remove the Crisper Drawer for storing fruits, vegetables, and other fresh produce. Shelf features Drawers Your refrigerator includes a variety of the fresh food compartment. Opening Crisper Drawer Crisper humidity control Crisper drawers include a sliding control ...for adjusting the humidity inside the crisper. Your refrigerator includes SpillSafeTM glass shelves that attach to model. STORAGE FEATURES CAUTION To avoid personal injury or property damage, handle tempered ...
... Crisper Humidity To remove the Crisper Drawer for storing fruits, vegetables, and other fresh produce. Shelf features Drawers Your refrigerator includes a variety of the fresh food compartment. Opening Crisper Drawer Crisper humidity control Crisper drawers include a sliding control ...for adjusting the humidity inside the crisper. Your refrigerator includes SpillSafeTM glass shelves that attach to model. STORAGE FEATURES CAUTION To avoid personal injury or property damage, handle tempered ...
Use and Care Manual
Page 23
...deterioration, use more energy. • Cover foods and wipe containers dry before placing them tightly. Food storage • Avoid overcrowding the refrigerator or blocking cold air vents. Remember, such an extreme temperature change color, and develop an off-flavor (freezer burn). • ...; Prior to grocery shopping, activate "quick freeze" so that on a cold shelf. Ideas for saving energy Installation • Locate the refrigerator in crisper drawers, where trapped moisture helps preserve food quality for longer time periods. • Wash items and remove excess water. •...
...deterioration, use more energy. • Cover foods and wipe containers dry before placing them tightly. Food storage • Avoid overcrowding the refrigerator or blocking cold air vents. Remember, such an extreme temperature change color, and develop an off-flavor (freezer burn). • ...; Prior to grocery shopping, activate "quick freeze" so that on a cold shelf. Ideas for saving energy Installation • Locate the refrigerator in crisper drawers, where trapped moisture helps preserve food quality for longer time periods. • Wash items and remove excess water. •...


