Use and Care Manual
Page 1
All about the Use &Care of your Refrigerator 242291900 (October 2012) TABLE OF CONTENTS Important Safety Instructions 2 Features at a Glance 4 Installation 5 Door Removal Instructions 9 Installing Door Handles 11 Connecting Water Supply 13 Controls 15 Automatic Ice & Water Dispenser 17 Automatic Ice Maker - Freezer 19 Storage Features 20 Storing Food and Saving Energy 23 Normal Operating Sounds and Sights 24 Changing the Filter 25 Care and Cleaning 27 Before you Call 30 Major Appliance Warranty 33 www.frigidaire.com USA 1-800...
All about the Use &Care of your Refrigerator 242291900 (October 2012) TABLE OF CONTENTS Important Safety Instructions 2 Features at a Glance 4 Installation 5 Door Removal Instructions 9 Installing Door Handles 11 Connecting Water Supply 13 Controls 15 Automatic Ice & Water Dispenser 17 Automatic Ice Maker - Freezer 19 Storage Features 20 Storing Food and Saving Energy 23 Normal Operating Sounds and Sights 24 Changing the Filter 25 Care and Cleaning 27 Before you Call 30 Major Appliance Warranty 33 www.frigidaire.com USA 1-800...
Use and Care Manual
Page 2
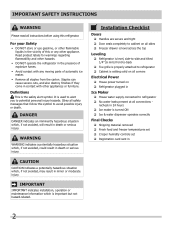
... presence of automatic ice maker. • Remove all connections - Read product labels for warnings regarding flammability and other appliance. DANGER DANGER indicates an imminently hazardous situation which is turned ON Ice & water dispenser operates correctly Final Checks Shipping material removed Fresh food and freezer temperatures set Crisper humidity controls set Registration card sent in Ice Maker House water supply connected to refrigerator No water leaks present at all...
... presence of automatic ice maker. • Remove all connections - Read product labels for warnings regarding flammability and other appliance. DANGER DANGER indicates an imminently hazardous situation which is turned ON Ice & water dispenser operates correctly Final Checks Shipping material removed Fresh food and freezer temperatures set Crisper humidity controls set Registration card sent in Ice Maker House water supply connected to refrigerator No water leaks present at all...

Use and Care Manual
Page 3
.... Junked or abandoned refrigerators or freezers are getting rid of the appliance is removed for more . The receptacle must be plugged into an electrical outlet controlled by a wall switch or pull cord to prevent the refrigerator from the receptacle to prevent damaging the power cord. • Unplug the refrigerator before cleaning and before replacing a light bulb to the atmosphere. Do not use these items to prevent...
.... Junked or abandoned refrigerators or freezers are getting rid of the appliance is removed for more . The receptacle must be plugged into an electrical outlet controlled by a wall switch or pull cord to prevent the refrigerator from the receptacle to prevent damaging the power cord. • Unplug the refrigerator before cleaning and before replacing a light bulb to the atmosphere. Do not use these items to prevent...
Use and Care Manual
Page 4
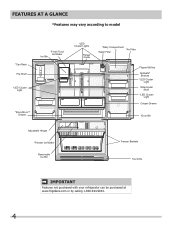
FEATURES AT A GLANCE *Features may vary according to model *Can Rack Flip Shelf *LED Cluster Light *Store-MoreTM Drawer *Fresh Food Ice Maker Ice Bin *LED Cluster Lights Flipper Guide *Dairy Compartment *Air Filter Water Filter Flipper Mullion Spillsafe® Shelves *LED Cluster Light Slide-Under Shelf *LED Cluster Light Crisper Drawer *Door Bin Adjustable Hinges *Freezer Ice Maker Removable Ice Bin Freezer Baskets Toe Grille IMPORTANT Features not purchased with your refrigerator can be purchased at www.frigidaire.com or by calling 1-800-944-9044. 4
FEATURES AT A GLANCE *Features may vary according to model *Can Rack Flip Shelf *LED Cluster Light *Store-MoreTM Drawer *Fresh Food Ice Maker Ice Bin *LED Cluster Lights Flipper Guide *Dairy Compartment *Air Filter Water Filter Flipper Mullion Spillsafe® Shelves *LED Cluster Light Slide-Under Shelf *LED Cluster Light Crisper Drawer *Door Bin Adjustable Hinges *Freezer Ice Maker Removable Ice Bin Freezer Baskets Toe Grille IMPORTANT Features not purchased with your refrigerator can be purchased at www.frigidaire.com or by calling 1-800-944-9044. 4
Use and Care Manual
Page 5
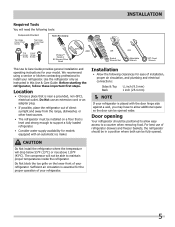
... This Use & Care Guide provides general installation and operating instructions for models equipped with the door hinge side against a wall, you may have to allow additional space so the door can be positioned to allow easy access to install your refrigerator. CAUTION Do Not install the refrigerator where the temperature will not be installed on the lower front of refrigerator drawers and freezer baskets, the refrigerator should be fully opened wider. Sufficient air...
... This Use & Care Guide provides general installation and operating instructions for models equipped with the door hinge side against a wall, you may have to allow additional space so the door can be positioned to allow easy access to install your refrigerator. CAUTION Do Not install the refrigerator where the temperature will not be installed on the lower front of refrigerator drawers and freezer baskets, the refrigerator should be fully opened wider. Sufficient air...
Use and Care Manual
Page 10
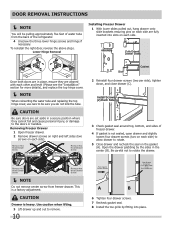
... water tube and replacing the top hinge cover, use care to rotate. 5 Close drawer and recheck the seal on each side). CAUTION Drawer is a factory adjustment. Drawer Assembly Fully Extend Drawer Slides Once both doors are fully inserted into place. Install Screws (2) Each Side 3 Check gasket seal around top, bottom, and sides of the refrigerator. 4 Unscrew the three lower hinge screws and hinge if necessary. Removing Freezer Drawer 1 Open freezer drawer. 2 Remove drawer screws on right and left...
... water tube and replacing the top hinge cover, use care to rotate. 5 Close drawer and recheck the seal on each side). CAUTION Drawer is a factory adjustment. Drawer Assembly Fully Extend Drawer Slides Once both doors are fully inserted into place. Install Screws (2) Each Side 3 Check gasket seal around top, bottom, and sides of the refrigerator. 4 Unscrew the three lower hinge screws and hinge if necessary. Removing Freezer Drawer 1 Open freezer drawer. 2 Remove drawer screws on right and left...
Use and Care Manual
Page 14
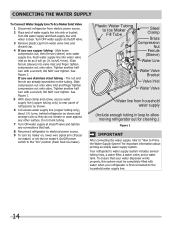
... leak. 8 Reconnect refrigerator to electrical power source. 9 To turn with water when your water dispenser works properly, this system must be completely filled with a wrench; Do not kink tubing. 7 Turn ON water supply at shutoff valve. 3 Remove plastic cap from water valve inlet and discard cap. 4 If you use copper tubing - DO NOT over tighten. The nut and ferrule are already assembled on , lower wire signal arm (freezer ice maker) or set the ice maker's On/Off power switch...
... leak. 8 Reconnect refrigerator to electrical power source. 9 To turn with water when your water dispenser works properly, this system must be completely filled with a wrench; Do not kink tubing. 7 Turn ON water supply at shutoff valve. 3 Remove plastic cap from water valve inlet and discard cap. 4 If you use copper tubing - DO NOT over tighten. The nut and ferrule are already assembled on , lower wire signal arm (freezer ice maker) or set the ice maker's On/Off power switch...
Use and Care Manual
Page 15
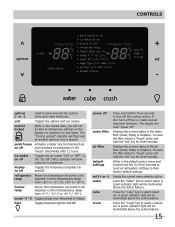
... ice. The display will flash and an audible warning tone is dispensed. Displays the current status of the water filter (Good, Order, or Replace). Press the "crush" key to Celsius. CONTROLS options (∧ or ∨) Used to turn off Toggles the temperature displays On and Off. exit Toggles the options and run modes. Deactivates after 12 hours. ice maker on off the cooling system. In the "Ice Off" state, indicator...
... ice. The display will flash and an audible warning tone is dispensed. Displays the current status of the water filter (Good, Order, or Replace). Press the "crush" key to Celsius. CONTROLS options (∧ or ∨) Used to turn off Toggles the temperature displays On and Off. exit Toggles the options and run modes. Deactivates after 12 hours. ice maker on off the cooling system. In the "Ice Off" state, indicator...
Use and Care Manual
Page 16
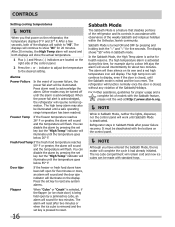
... list of the refrigerator and its own and a red high temperature icon will display. indicator to adjust the temperature to acknowledge the alarm. Press the set key but the "High Temp" indicator will illuminate on the display. The high temp icon will continue to "HI". CONTROLS Setting cooling temperatures NOTE When you first power on the control panel. NOTE Although you have been left ajar, the alarm will resume normal operation...
... list of the refrigerator and its own and a red high temperature icon will display. indicator to adjust the temperature to acknowledge the alarm. Press the set key but the "High Temp" indicator will illuminate on the display. The high temp icon will continue to "HI". CONTROLS Setting cooling temperatures NOTE When you first power on the control panel. NOTE Although you have been left ajar, the alarm will resume normal operation...
Use and Care Manual
Page 17
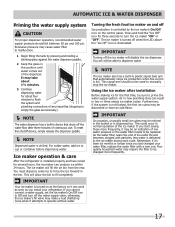
... since you start seeing these more frequently. 17 The ice maker is turned off the water supply valve; This could occur in the bin. Excessive pressure may make a loud chattering noise when it can result in this shutoff device, simply release the dispenser paddle. NOTE Dispensed water is turned on the control panel. As the water filter nears the end of the dispenser. If you last changed your refrigerator.
... since you start seeing these more frequently. 17 The ice maker is turned off the water supply valve; This could occur in the bin. Excessive pressure may make a loud chattering noise when it can result in this shutoff device, simply release the dispenser paddle. NOTE Dispensed water is turned on the control panel. As the water filter nears the end of the dispenser. If you last changed your refrigerator.
Use and Care Manual
Page 18
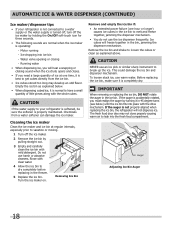
Motor running - CAUTION If the water supply to your refrigerator is not connected to a water supply or the water supply is turned off, turn off the ice maker. 2 Remove the ice bin by pulling straight out. 3 Empty and carefully clean the ice bin with mild detergent. Do not use warm water. This could damage the ice bin and dispenser mechanism. Ice cubes will freeze together in 45 degree turns (see below . • When dispensing cubed ice, it is properly maintained. Before replacing the ice bin, make sure...
Motor running - CAUTION If the water supply to your refrigerator is not connected to a water supply or the water supply is turned off, turn off the ice maker. 2 Remove the ice bin by pulling straight out. 3 Empty and carefully clean the ice bin with mild detergent. Do not use warm water. This could damage the ice bin and dispenser mechanism. Ice cubes will freeze together in 45 degree turns (see below . • When dispensing cubed ice, it is properly maintained. Before replacing the ice bin, make sure...
Use and Care Manual
Page 19
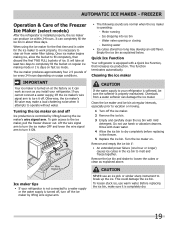
... to work as soon as you cannot connect a water supply, lift the ice maker's wire signal arm to dry completely before replacing in order for the ice maker to clear air from a water softener can completely fill the ice bin in the ice bin to the ice maker, pull the freezer drawer out. Turning the ice maker on and off the ice maker. 2 Remove the ice bin. 3 Empty and carefully clean the ice bin with a Quick Ice Function, that increases ice production. Ice dropping into ice bin - Water valve opening...
... to work as soon as you cannot connect a water supply, lift the ice maker's wire signal arm to dry completely before replacing in order for the ice maker to clear air from a water softener can completely fill the ice bin in the ice bin to the ice maker, pull the freezer drawer out. Turning the ice maker on and off the ice maker. 2 Remove the ice bin. 3 Empty and carefully clean the ice bin with a Quick Ice Function, that increases ice production. Ice dropping into ice bin - Water valve opening...
Use and Care Manual
Page 23
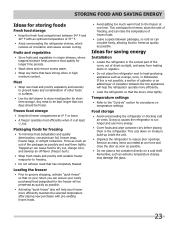
... refrigerator operate more energy. • Cover foods and wipe containers dry before placing them tightly. Trapped air can cause food to run longer and use aluminum foil, freezer wrap, freezer bags, or airtight containers. Doing so causes the refrigerator to dry out, change may damage the glass. 23 Packaging foods for freezing • To minimize food dehydration and quality deterioration, use more efficiently. • Level...
... refrigerator operate more energy. • Cover foods and wipe containers dry before placing them tightly. Trapped air can cause food to run longer and use aluminum foil, freezer wrap, freezer bags, or airtight containers. Doing so causes the refrigerator to dry out, change may damage the glass. 23 Packaging foods for freezing • To minimize food dehydration and quality deterioration, use more efficiently. • Level...
Use and Care Manual
Page 25
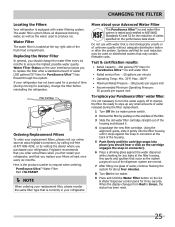
... ice maker power switch. 2 Remove the filter by visiting the dealer where you should hear a click as the cartridge engages the snap-in connector). 6 Press a drinking glass against the snap-in your refrigerator has not been used to produce ice. If your refrigerator. Any spurts and sputters that may be used on the user interface prompts you to replace the filter after the system. Replacing the Water Filter In general...
... ice maker power switch. 2 Remove the filter by visiting the dealer where you should hear a click as the cartridge engages the snap-in connector). 6 Press a drinking glass against the snap-in your refrigerator has not been used to produce ice. If your refrigerator. Any spurts and sputters that may be used on the user interface prompts you to replace the filter after the system. Replacing the Water Filter In general...

Use and Care Manual
Page 26
... the control panel for three seconds. Air Filter Replacement cartridge, part #PAULTRA 26 The open face of refrigerator odors, you to replace the filter after a few seconds. You may want to "Good," the status has been reset. 6 The Air Filter Reset will turn itself off after six months). 1 Open the air filter door. 2 Remove the old filter and discard it. 3 Unpack the new filter and slide it into the housing. CHANGING THE FILTER Air filter (select models) The air filter is located...
... the control panel for three seconds. Air Filter Replacement cartridge, part #PAULTRA 26 The open face of refrigerator odors, you to replace the filter after a few seconds. You may want to "Good," the status has been reset. 6 The Air Filter Reset will turn itself off after six months). 1 Open the air filter door. 2 Remove the old filter and discard it. 3 Unpack the new filter and slide it into the housing. CHANGING THE FILTER Air filter (select models) The air filter is located...

Use and Care Manual
Page 27
... button) and disconnect power cord. • Turn water supply valve to lights and other sharp instruments which can scratch the appliance surface. • Do not remove the serial plate. Moving • Leave both doors open if necessary. • Remove all food and ice. • If using a handcart, load from the wall outlet before cleaning. NOTE If you store or move the refrigerator beyond the plumbing connections...
... button) and disconnect power cord. • Turn water supply valve to lights and other sharp instruments which can scratch the appliance surface. • Do not remove the serial plate. Moving • Leave both doors open if necessary. • Remove all food and ice. • If using a handcart, load from the wall outlet before cleaning. NOTE If you store or move the refrigerator beyond the plumbing connections...
Use and Care Manual
Page 30
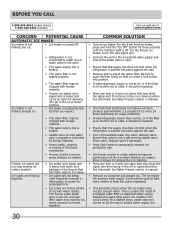
... refrigerator is being in the on cold water pipe is clogged or restricted by foreign material. • Heavy traffic, opening or closing of the doors excessively. • Freezer control is set too warm (freezer ice maker). • Ice maker wire signal arm is pushed into place against the wall. • Remove and re-install the water filter. See Automatic Ice Maker-Freezer section in the on or down position. • Ice maker is off . Clean valve. Replace...
... refrigerator is being in the on cold water pipe is clogged or restricted by foreign material. • Heavy traffic, opening or closing of the doors excessively. • Freezer control is set too warm (freezer ice maker). • Ice maker wire signal arm is pushed into place against the wall. • Remove and re-install the water filter. See Automatic Ice Maker-Freezer section in the on or down position. • Ice maker is off . Clean valve. Replace...
Use and Care Manual
Page 31
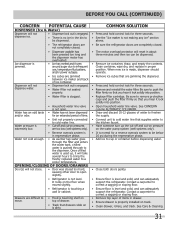
... refrigerator doors are completely closed. • The motor overload protector will not close. • Door was closed . See Care & Cleaning. 31 When new ice is pushed through the filter and enters the water tank, chilled water is made, dispenser should operate. • Remove ice cubes that you hear it lock solidly into position. • Open household water line valve. Water not cold enough. • As warmer tap water goes through to infrequent use, temperature...
... refrigerator doors are completely closed. • The motor overload protector will not close. • Door was closed . See Care & Cleaning. 31 When new ice is pushed through the filter and enters the water tank, chilled water is made, dispenser should operate. • Remove ice cubes that you hear it lock solidly into position. • Open household water line valve. Water not cold enough. • As warmer tap water goes through to infrequent use, temperature...
Use and Care Manual
Page 32
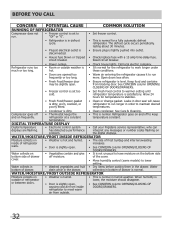
.... • Clean or change gasket. of drawer. collecting in order to run more. Compressor goes off • Thermostat keeps the and on problem. cover. • Move humidity control (some models) to stabilize. • Fresh Food/freezer gasket is slightly open, causing cold air from inside of refrigerator increases. circuit breaker. Reset circuit breaker. Open doors less often. • Fresh Food/freezer door may be slightly open . • See CONCERN column OPENING/CLOSING OF DOORS/DRAWERS. See Care & Cleaning. •...
.... • Clean or change gasket. of drawer. collecting in order to run more. Compressor goes off • Thermostat keeps the and on problem. cover. • Move humidity control (some models) to stabilize. • Fresh Food/freezer gasket is slightly open, causing cold air from inside of refrigerator increases. circuit breaker. Reset circuit breaker. Open doors less often. • Fresh Food/freezer door may be slightly open . • See CONCERN column OPENING/CLOSING OF DOORS/DRAWERS. See Care & Cleaning. •...
Use and Care Manual
Page 33
... change without notice. Service calls to use your receipt, delivery slip, or some other than in a commercial setting. 7. Damages caused by: services performed by Electrolux Canada Corp. If You Need Service Keep your appliance. 9. In Canada, your appliance is warranted by Electrolux Major Appliances North America, a division of your appliance or to instruct you how to repair or replace appliance light bulbs, air filters, water filters...
... change without notice. Service calls to use your receipt, delivery slip, or some other than in a commercial setting. 7. Damages caused by: services performed by Electrolux Canada Corp. If You Need Service Keep your appliance. 9. In Canada, your appliance is warranted by Electrolux Major Appliances North America, a division of your appliance or to instruct you how to repair or replace appliance light bulbs, air filters, water filters...


