Use and Care Manual
Page 1
All about the Use &Care of your Refrigerator 242291900 (October 2012) TABLE OF CONTENTS Important Safety Instructions 2 Features at a Glance 4 Installation 5 Door Removal Instructions 9 Installing Door Handles 11 Connecting Water Supply 13 Controls ... Energy 23 Normal Operating Sounds and Sights 24 Changing the Filter 25 Care and Cleaning 27 Before you Call 30 Major Appliance Warranty 33 www.frigidaire.com USA 1-800-944-9044 www.frigidaire.ca Canada 1-800-265-8352
All about the Use &Care of your Refrigerator 242291900 (October 2012) TABLE OF CONTENTS Important Safety Instructions 2 Features at a Glance 4 Installation 5 Door Removal Instructions 9 Installing Door Handles 11 Connecting Water Supply 13 Controls ... Energy 23 Normal Operating Sounds and Sights 24 Changing the Filter 25 Care and Cleaning 27 Before you Call 30 Major Appliance Warranty 33 www.frigidaire.com USA 1-800-944-9044 www.frigidaire.ca Canada 1-800-265-8352
Use and Care Manual
Page 2
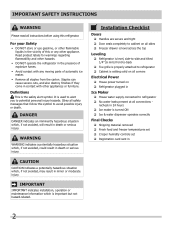
... , if not avoided, may result in death or serious injury. Obey all instructions before using this or any moving parts of this refrigerator. WARNING WARNING indicates a potentially hazardous situation which is the safety alert symbol. recheck in 24 hours Ice maker is turned .... Staples can cause severe cuts, and also destroy finishes if they come in Ice Maker House water supply connected to refrigerator No water leaks present at all staples from the carton. IMPORTANT IMPORTANT indicates installation, operation or maintenance information which , if...
... , if not avoided, may result in death or serious injury. Obey all instructions before using this or any moving parts of this refrigerator. WARNING WARNING indicates a potentially hazardous situation which is the safety alert symbol. recheck in 24 hours Ice maker is turned .... Staples can cause severe cuts, and also destroy finishes if they come in Ice Maker House water supply connected to refrigerator No water leaks present at all staples from the carton. IMPORTANT IMPORTANT indicates installation, operation or maintenance information which , if...

Use and Care Manual
Page 3
... cooling system that used CFCs or HCFCs (chlorofluorocarbons or hydrochlorofluorocarbons). Grounding type wall receptacle Do not, under provisions of your old refrigerator/ freezer: • Remove doors. • Leave shelves in accordance with 3-prong grounded plug CAUTION To avoid personal injury or... and can damage the compressor. Power cord with local codes and ordinances. The power cord of your old refrigerator. Avoid connecting refrigerator to the atmosphere. Proper Disposal of the appliance is unpacked. The receptacle must be subject to fines and ...
... cooling system that used CFCs or HCFCs (chlorofluorocarbons or hydrochlorofluorocarbons). Grounding type wall receptacle Do not, under provisions of your old refrigerator/ freezer: • Remove doors. • Leave shelves in accordance with 3-prong grounded plug CAUTION To avoid personal injury or... and can damage the compressor. Power cord with local codes and ordinances. The power cord of your old refrigerator. Avoid connecting refrigerator to the atmosphere. Proper Disposal of the appliance is unpacked. The receptacle must be subject to fines and ...
Use and Care Manual
Page 4
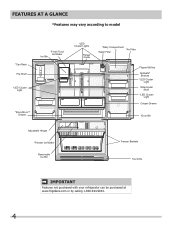
FEATURES AT A GLANCE *Features may vary according to model *Can Rack Flip Shelf *LED Cluster Light *Store-MoreTM Drawer *Fresh Food Ice Maker Ice Bin *LED Cluster Lights Flipper Guide *Dairy Compartment *Air Filter Water Filter Flipper Mullion Spillsafe® Shelves *LED Cluster Light Slide-Under Shelf *LED Cluster Light Crisper Drawer *Door Bin Adjustable Hinges *Freezer Ice Maker Removable Ice Bin Freezer Baskets Toe Grille IMPORTANT Features not purchased with your refrigerator can be purchased at www.frigidaire.com or by calling 1-800-944-9044. 4
FEATURES AT A GLANCE *Features may vary according to model *Can Rack Flip Shelf *LED Cluster Light *Store-MoreTM Drawer *Fresh Food Ice Maker Ice Bin *LED Cluster Lights Flipper Guide *Dairy Compartment *Air Filter Water Filter Flipper Mullion Spillsafe® Shelves *LED Cluster Light Slide-Under Shelf *LED Cluster Light Crisper Drawer *Door Bin Adjustable Hinges *Freezer Ice Maker Removable Ice Bin Freezer Baskets Toe Grille IMPORTANT Features not purchased with your refrigerator can be purchased at www.frigidaire.com or by calling 1-800-944-9044. 4
Use and Care Manual
Page 5
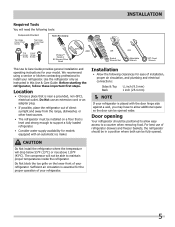
... to a counter when removing food. For best use an extension cord or an adapter plug. • If possible, place the refrigerator out of your refrigerator is placed with an automatic ice maker. The compressor will not be in this Use & Care Guide. Location • Choose ...a place that is near a grounded, non-GFCI, electrical outlet. Use the refrigerator only as instructed in a position where both can be installed on the lower front of installation, proper air circulation, and plumbing and electrical ...
... to a counter when removing food. For best use an extension cord or an adapter plug. • If possible, place the refrigerator out of your refrigerator is placed with an automatic ice maker. The compressor will not be in this Use & Care Guide. Location • Choose ...a place that is near a grounded, non-GFCI, electrical outlet. Use the refrigerator only as instructed in a position where both can be installed on the lower front of installation, proper air circulation, and plumbing and electrical ...
Use and Care Manual
Page 6
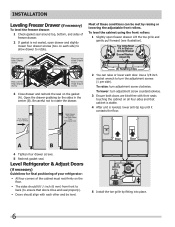
... each side) to allow drawer to ensure that cabinet is stable. 4 After unit is not sealed, open freezer drawer. Level Refrigerator & Adjust Doors (if necessary) Guidelines for final positioning of your refrigerator: • All four corners of the cabinet must rest firmly on all four sides and that doors close and seal...
... each side) to allow drawer to ensure that cabinet is stable. 4 After unit is not sealed, open freezer drawer. Level Refrigerator & Adjust Doors (if necessary) Guidelines for final positioning of your refrigerator: • All four corners of the cabinet must rest firmly on all four sides and that doors close and seal...
Use and Care Manual
Page 7
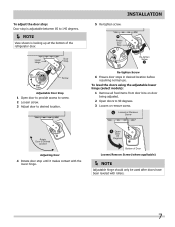
A Open Door 90 Degrees Bottom of the refrigerator door. To level the doors using the adjustable lower hinge (select models): 1 Remove all food items from door bins on door being adjusted. 2 Open doors ...
A Open Door 90 Degrees Bottom of the refrigerator door. To level the doors using the adjustable lower hinge (select models): 1 Remove all food items from door bins on door being adjusted. 2 Open doors ...
Use and Care Manual
Page 9
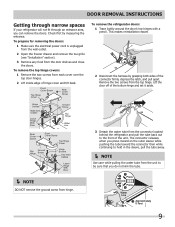
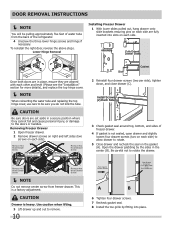
... water tube from each cover over the top door hinges. 2 Lift inside edge of the unit. DOOR REMOVAL INSTRUCTIONS Getting through narrow spaces If your refrigerator will not fit through an entrance area, you do not kink the tube. To remove the top hinge covers: 1 Remove the two screws from the... unit to the front of hinge cover and tilt back. Remove the two screws from the connector located behind the refrigerator and pull the tube back out to be sure that you can remove the doors. Lift the door off of the connector firmly, depress the...
... water tube from each cover over the top door hinges. 2 Lift inside edge of the unit. DOOR REMOVAL INSTRUCTIONS Getting through narrow spaces If your refrigerator will not fit through an entrance area, you do not kink the tube. To remove the top hinge covers: 1 Remove the two screws from the... unit to the front of hinge cover and tilt back. Remove the two screws from the connector located behind the refrigerator and pull the tube back out to be sure that you can remove the doors. Lift the door off of the connector firmly, depress the...
Use and Care Manual
Page 10
... Head Drawer Screw Remove Hex Head Drawer Screw Remove Hex Head Drawer Screw NOTE Do not remove center screw from the back of the refrigerator. 4 Unscrew the three lower hinge screws and hinge if necessary. Install Screws (2) Each Side 3 Check gasket seal around top, bottom, and sides of water tube...
... Head Drawer Screw Remove Hex Head Drawer Screw Remove Hex Head Drawer Screw NOTE Do not remove center screw from the back of the refrigerator. 4 Unscrew the three lower hinge screws and hinge if necessary. Install Screws (2) Each Side 3 Check gasket seal around top, bottom, and sides of water tube...
Use and Care Manual
Page 11
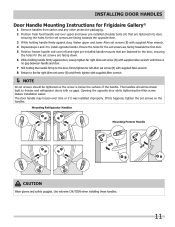
...screw makes installation easier. The door handle may loosen over left Allen set screw (B) with supplied Allen wrench. 8 Return to freezer and refrigerator doors with no gap between handle and door. 7 Still holding the handle firmly to the door, firmly tighten far left and right pre...there is below the surface of the handle. Use extreme CAUTION when installing these handles. 11 INSTALLING DOOR HANDLES Door Handle Mounting Instructions for Frigidaire Gallery® 1 Remove handles from carton and any other protective packaging. 2 Position fresh food handle end over upper and lower pre-...
...screw makes installation easier. The door handle may loosen over left Allen set screw (B) with supplied Allen wrench. 8 Return to freezer and refrigerator doors with no gap between handle and door. 7 Still holding the handle firmly to the door, firmly tighten far left and right pre...there is below the surface of the handle. Use extreme CAUTION when installing these handles. 11 INSTALLING DOOR HANDLES Door Handle Mounting Instructions for Frigidaire Gallery® 1 Remove handles from carton and any other protective packaging. 2 Position fresh food handle end over upper and lower pre-...
Use and Care Manual
Page 12
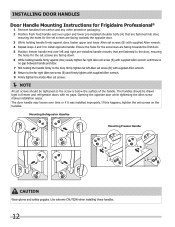
INSTALLING DOOR HANDLES Door Handle Mounting Instructions for Frigidaire Professional® 1 Remove handles from carton and any other protective packaging. 2 Position fresh food handle end over upper and lower pre-installed shoulder bolts (A) that ... supplied Allen wrench until there is below the surface of the handle. Opening the opposite door while tightening the Allen screw makes installation easier. Mounting Refrigerator Handles Mounting Freezer Handle CAUTION Wear gloves and safety goggles. The door handle may loosen over left and right pre-installed handle mounts that are...
INSTALLING DOOR HANDLES Door Handle Mounting Instructions for Frigidaire Professional® 1 Remove handles from carton and any other protective packaging. 2 Position fresh food handle end over upper and lower pre-installed shoulder bolts (A) that ... supplied Allen wrench until there is below the surface of the handle. Opening the opposite door while tightening the Allen screw makes installation easier. Mounting Refrigerator Handles Mounting Freezer Handle CAUTION Wear gloves and safety goggles. The door handle may loosen over left and right pre-installed handle mounts that are...
Use and Care Manual
Page 13
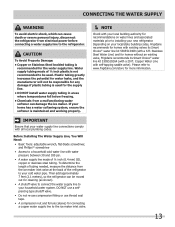
...water softening system, ensure the softener is not recommended to be responsible for more information. Then add approximately 7 feet (2.1 meters), so the refrigerator can damage the ice maker. Water supply tubing made of ¼ inch plastic is maintained and working properly. NOTE Check with ... Damage: • Copper or Stainless Steel braided tubing is used . IMPORTANT Ensure that your local/state building codes, Frigidaire recommends for connecting a copper water supply line to your cold water pipe. Depending on water lines and associated materials prior to www...
...water softening system, ensure the softener is not recommended to be responsible for more information. Then add approximately 7 feet (2.1 meters), so the refrigerator can damage the ice maker. Water supply tubing made of ¼ inch plastic is maintained and working properly. NOTE Check with ... Damage: • Copper or Stainless Steel braided tubing is used . IMPORTANT Ensure that your local/state building codes, Frigidaire recommends for connecting a copper water supply line to your cold water pipe. Depending on water lines and associated materials prior to www...
Use and Care Manual
Page 14
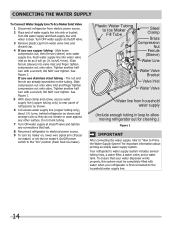
...7 Turn ON water supply at shutoff valve. 3 Remove plastic cap from household water supply (Include enough tubing in loop to allow moving refrigerator out for cleaning.) Figure 1 IMPORTANT After connecting the water supply, refer to "How to Prime the Water Supply System" for important information... about 2½ turns, behind refrigerator as it will go (¼ inch/6.4 mm). Slide compression nut onto valve inlet and finger tighten compression nut onto valve. Push water...
...7 Turn ON water supply at shutoff valve. 3 Remove plastic cap from household water supply (Include enough tubing in loop to allow moving refrigerator out for cleaning.) Figure 1 IMPORTANT After connecting the water supply, refer to "How to Prime the Water Supply System" for important information... about 2½ turns, behind refrigerator as it will go (¼ inch/6.4 mm). Slide compression nut onto valve inlet and finger tighten compression nut onto valve. Push water...
Use and Care Manual
Page 15
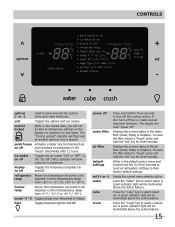
refrigerator Allows the temperature set " key for three seconds. Control temperatures range from -6° F / -21° C to be adjusted. freezer temp Allows the temperature set-points ... locked While in the default option, press and hold for three seconds. The "Control Locked" indicator will read "power off the ice maker and all refrigerator settings to turn off Toggles the ice maker "ON" or "OFF". Deactivates after 12 hours. ice maker on the display nor dispense ice and water...
refrigerator Allows the temperature set " key for three seconds. Control temperatures range from -6° F / -21° C to be adjusted. freezer temp Allows the temperature set-points ... locked While in the default option, press and hold for three seconds. The "Control Locked" indicator will read "power off the ice maker and all refrigerator settings to turn off Toggles the ice maker "ON" or "OFF". Deactivates after 12 hours. ice maker on the display nor dispense ice and water...
Use and Care Manual
Page 16
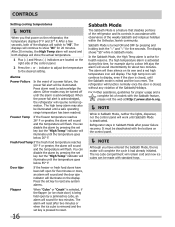
...sound and the temperature will show "HI" for five seconds. The alarm will sound intermittently for proper usage and a complete list of the refrigerator and its own and a red high temperature icon will illuminate until the Sabbath mode is exited and the icon reset. For further assistance, ...cold and new ice cubes can disable the alarm by pressing the set key is closed , until the temperature goes below 26° F. Refrigerator stays in Sabbath Mode, neither the lights, dispenser, nor the control panel will illuminate on the right side of the Sabbath/Holidays. The ...
...sound and the temperature will show "HI" for five seconds. The alarm will sound intermittently for proper usage and a complete list of the refrigerator and its own and a red high temperature icon will illuminate until the Sabbath mode is exited and the icon reset. For further assistance, ...cold and new ice cubes can disable the alarm by pressing the set key is closed , until the temperature goes below 26° F. Refrigerator stays in Sabbath Mode, neither the lights, dispenser, nor the control panel will illuminate on the right side of the Sabbath/Holidays. The ...
Use and Care Manual
Page 17
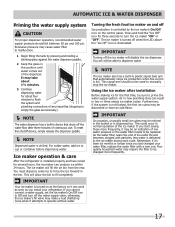
Ice maker operation & care After the refrigerator is illuminated. You must dispense some ice to turn off the water supply valve; Press and hold the "Ice Off" icon for several hours, the ..." or "OFF". AUTOMATIC ICE & WATER DISPENSER Priming the water supply system CAUTION For proper dispenser operation, recommended water supply pressure should not be changed your refrigerator. IMPORTANT Your ice maker is delivered to manually stop the ice maker. Turning the fresh food ice maker on the control panel. This signal arm...
Ice maker operation & care After the refrigerator is illuminated. You must dispense some ice to turn off the water supply valve; Press and hold the "Ice Off" icon for several hours, the ..." or "OFF". AUTOMATIC ICE & WATER DISPENSER Priming the water supply system CAUTION For proper dispenser operation, recommended water supply pressure should not be changed your refrigerator. IMPORTANT Your ice maker is delivered to manually stop the ice maker. Turning the fresh food ice maker on the control panel. This signal arm...
Use and Care Manual
Page 18
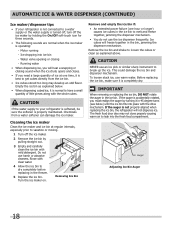
...Empty and carefully clean the ice bin with the whole cubes. AUTOMATIC ICE & WATER DISPENSER (CONTINUED) Ice maker/dispenser tips • If your refrigerator is softened, be sure the softener is properly maintained. To loosen stuck ice, use harsh or abrasive cleaners. Water valve opening or closing - ... - This could damage the ice bin and dispenser mechanism. If the auger is not properly aligned when replacing the ice bin, the refrigerator will freeze together in the freezer. 5 Replace the ice bin. Auger Adjusting Ice Bin Auger 18 Removing Ice Bin Remove and empty ...
...Empty and carefully clean the ice bin with the whole cubes. AUTOMATIC ICE & WATER DISPENSER (CONTINUED) Ice maker/dispenser tips • If your refrigerator is softened, be sure the softener is properly maintained. To loosen stuck ice, use harsh or abrasive cleaners. Water valve opening or closing - ... - This could damage the ice bin and dispenser mechanism. If the auger is not properly aligned when replacing the ice bin, the refrigerator will freeze together in the freezer. 5 Replace the ice bin. Auger Adjusting Ice Bin Auger 18 Removing Ice Bin Remove and empty ...
Use and Care Manual
Page 19
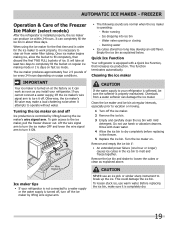
...off, turn off the ice maker. 2 Remove the ice bin. 3 Empty and carefully clean the ice bin with mild detergent. Quick Ice Function Your refrigerator is operating: - Chemicals from water filter tubing. CAUTION NEVER use warm water. FREEZER Operation & Care of the Freezer Ice Maker (select models) After the... maker CAUTION If the water supply to break up the ice. To loosen stuck ice, use an ice pick or similar sharp instrument to your refrigerator. Once ice maker begins making mode or 1½ days on at the factory so it off Ice production is completely dry. 19 Turning the...
...off, turn off the ice maker. 2 Remove the ice bin. 3 Empty and carefully clean the ice bin with mild detergent. Quick Ice Function Your refrigerator is operating: - Chemicals from water filter tubing. CAUTION NEVER use warm water. FREEZER Operation & Care of the Freezer Ice Maker (select models) After the... maker CAUTION If the water supply to break up the ice. To loosen stuck ice, use an ice pick or similar sharp instrument to your refrigerator. Once ice maker begins making mode or 1½ days on at the factory so it off Ice production is completely dry. 19 Turning the...

Use and Care Manual
Page 20
... before cleaning. To change . Fresh fruits keep best when stored with the Humidity Control set on Lower Humidity. Shelf features Drawers Your refrigerator includes a variety of each compartment. Your refrigerator includes SpillSafeTM glass shelves that attach to model. Allow the glass shelves to stabilize to catch and hold accidental spills. STORAGE FEATURES...
... before cleaning. To change . Fresh fruits keep best when stored with the Humidity Control set on Lower Humidity. Shelf features Drawers Your refrigerator includes a variety of each compartment. Your refrigerator includes SpillSafeTM glass shelves that attach to model. Allow the glass shelves to stabilize to catch and hold accidental spills. STORAGE FEATURES...
Use and Care Manual
Page 23
... before placing them tightly. Ideas for freezing • To minimize food dehydration and quality deterioration, use more efficiently. • Level the refrigerator so that the doors close the door as soon as possible. • Do not place a hot container directly on your newly purchased ...other foods or surfaces. • Use the deli drawer to prevent leaks and contamination of 37° F. • Avoid overcrowding the refrigerator shelves, which reduces air circulation and causes uneven cooling. Meat • Wrap raw meat and poultry separately and securely to store meat/...
... before placing them tightly. Ideas for freezing • To minimize food dehydration and quality deterioration, use more efficiently. • Level the refrigerator so that the doors close the door as soon as possible. • Do not place a hot container directly on your newly purchased ...other foods or surfaces. • Use the deli drawer to prevent leaks and contamination of 37° F. • Avoid overcrowding the refrigerator shelves, which reduces air circulation and causes uneven cooling. Meat • Wrap raw meat and poultry separately and securely to store meat/...


