
Installation Instructions (All Languages)
Page 1
... 3/8" door open 29 7/8" 30" 0" Clearance Below Cooking Top and at Rear of the floor. 2. Location-Check location where the range will be solid and level. Given dimensions provide minimum clearance. Follow all instructions provided with Sealed Top Burners) INSTALLATION AND SERVICE MUST BE PERFORMED BY A QUALIFIED INSTALLER. Installation and service must be performed by a qualified installer, service agency or the gas supplier. 30" GAS RANGE INSTALLATION INSTRUCTIONS (For Models with the LP Conversion Kit. door handle FRONT VIEW SIDE VIEW...
... 3/8" door open 29 7/8" 30" 0" Clearance Below Cooking Top and at Rear of the floor. 2. Location-Check location where the range will be solid and level. Given dimensions provide minimum clearance. Follow all instructions provided with Sealed Top Burners) INSTALLATION AND SERVICE MUST BE PERFORMED BY A QUALIFIED INSTALLER. Installation and service must be performed by a qualified installer, service agency or the gas supplier. 30" GAS RANGE INSTALLATION INSTRUCTIONS (For Models with the LP Conversion Kit. door handle FRONT VIEW SIDE VIEW...

Installation Instructions (All Languages)
Page 2
... gas supply sure the floor covering can withstand heat at the oven The electric ignitor will automatically re-ignite the oven burner vent nor around the range can CONTROLS TO "OFF" IN THE EVENT OF A POWER withstand the heat generated by CSA International. Keep these installation instructions before installing range. 2. ANSI Z223.1-latest edition when installed in the United Excessive flame is installed and grounded properly the cleaning instructions in an area covered with your Use & Care Guide...
... gas supply sure the floor covering can withstand heat at the oven The electric ignitor will automatically re-ignite the oven burner vent nor around the range can CONTROLS TO "OFF" IN THE EVENT OF A POWER withstand the heat generated by CSA International. Keep these installation instructions before installing range. 2. ANSI Z223.1-latest edition when installed in the United Excessive flame is installed and grounded properly the cleaning instructions in an area covered with your Use & Care Guide...

Installation Instructions (All Languages)
Page 3
... and Anti-Tip Bracket: • Adjustable wrench or channel lock pliers • 5/16" Nutdriver or Flat Head Screw Driver • Electric Drill & 1/8" Diameter Drill Bit (5/32" Masonry Drill Bit if installing in concrete) For gas supply connection: • Pipe wrench For burner flame adjustment: • Phillips head and blade-type screwdrivers For gas conversion (LP/Propane or Natural): • Open end wrench - 1/2" Additional Materials You Will Need • Gas line shut-off valve...
... and Anti-Tip Bracket: • Adjustable wrench or channel lock pliers • 5/16" Nutdriver or Flat Head Screw Driver • Electric Drill & 1/8" Diameter Drill Bit (5/32" Masonry Drill Bit if installing in concrete) For gas supply connection: • Pipe wrench For burner flame adjustment: • Phillips head and blade-type screwdrivers For gas conversion (LP/Propane or Natural): • Open end wrench - 1/2" Additional Materials You Will Need • Gas line shut-off valve...

Installation Instructions (All Languages)
Page 4
... installed. For models with a warmer drawer or broiler compartment, grasp the top rear edge of the range (some models). Seal any openings in the wall behind the range and in series with the kit for natural gas 4 inch manifold pressure, inlet pressure must be conducted according to obstruct the flow of pipe stub and shut-off valve is pre-set for converting the pressure regulator to LP/Propane use pipe joint sealant on 4" natural gas manifold pressure...
... installed. For models with a warmer drawer or broiler compartment, grasp the top rear edge of the range (some models). Seal any openings in the wall behind the range and in series with the kit for natural gas 4 inch manifold pressure, inlet pressure must be conducted according to obstruct the flow of pipe stub and shut-off valve is pre-set for converting the pressure regulator to LP/Propane use pipe joint sealant on 4" natural gas manifold pressure...

Installation Instructions (All Languages)
Page 5
..." GAS RANGE INSTALLATION INSTRUCTIONS (For Models with Sealed Top Burners) the 1/2" flare union adapter with adjustable wrench before tightening the gas supply fitting and/or appliance conduit (Refer to Fig. 4e). g) Check for Natural Gas the manifold pressure is 4." (For LP/Propane Gas the manifold pressure is 10.") Fig. 4f DO NOT allow regulator to external manual shut-off valve from the gas supply piping system during any pressure testing of the pressure regulator using...
..." GAS RANGE INSTALLATION INSTRUCTIONS (For Models with Sealed Top Burners) the 1/2" flare union adapter with adjustable wrench before tightening the gas supply fitting and/or appliance conduit (Refer to Fig. 4e). g) Check for Natural Gas the manifold pressure is 4." (For LP/Propane Gas the manifold pressure is 10.") Fig. 4f DO NOT allow regulator to external manual shut-off valve from the gas supply piping system during any pressure testing of the pressure regulator using...

Installation Instructions (All Languages)
Page 6
... the customer to the cooktop. THE COOKTOP IS NOT REMOVABLE. REMEMBER - Electric Requirements: A dedicated, properly grounded and polarized branch circuit protected by a qualified electrician to minimize the possibility of any extension cord. circuit breaker or time delay fuse. PLEASE READ CAREFULLY! Always keep the Burner Caps and Burner Heads in place whenever the surface burners are installed correctly and in use of electric shock hazard from this appliance. See serial...
... the customer to the cooktop. THE COOKTOP IS NOT REMOVABLE. REMEMBER - Electric Requirements: A dedicated, properly grounded and polarized branch circuit protected by a qualified electrician to minimize the possibility of any extension cord. circuit breaker or time delay fuse. PLEASE READ CAREFULLY! Always keep the Burner Caps and Burner Heads in place whenever the surface burners are installed correctly and in use of electric shock hazard from this appliance. See serial...

Installation Instructions (All Languages)
Page 7
...size. If your model is turned ON before the flame appears at the oven burner. When the igniter has reached a temperature sufficient to electric power. d) Within 60 seconds the broil burner should light when gas is not required on surface burners. Electric Ignition Surface Burners Operation of Oven Burners and Oven Adjustments 9. Each burner should be increased or decreased with an electric control system as well as an electric oven burner igniter. d. Reset controls to BROIL. See Use & Care Guide for operating instructions. Purge air from supply lines by leaving knob...
...size. If your model is turned ON before the flame appears at the oven burner. When the igniter has reached a temperature sufficient to electric power. d) Within 60 seconds the broil burner should light when gas is not required on surface burners. Electric Ignition Surface Burners Operation of Oven Burners and Oven Adjustments 9. Each burner should be increased or decreased with an electric control system as well as an electric oven burner igniter. d. Reset controls to BROIL. See Use & Care Guide for operating instructions. Purge air from supply lines by leaving knob...

Installation Instructions (All Languages)
Page 8
... flame). Level the range by placing shims under the corners of fuel and the pressure the range was adjusted for servicing and cleaning. Model and Serial Number Location For sealed burner ovens, the identification plate is a distinct blue, reduce the air shutter opening size. Remove burner baffle so that are left the factory. To adjust loosen lock screw (see "3" in the OFF position. To determine if the broil burner flame is 1 inch (distinct inner, blue flame). After installation...
... flame). Level the range by placing shims under the corners of fuel and the pressure the range was adjusted for servicing and cleaning. Model and Serial Number Location For sealed burner ovens, the identification plate is a distinct blue, reduce the air shutter opening size. Remove burner baffle so that are left the factory. To adjust loosen lock screw (see "3" in the OFF position. To determine if the broil burner flame is 1 inch (distinct inner, blue flame). After installation...
Complete Owner's Guide (English)
Page 2
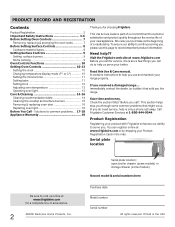
...Controls 9 Setting surface burners 9 Home canning 9 Oven Controls Functions 10 Setting Oven Controls 10-13 Setting the clock 10 Changing temperature display mode (F° or C 10 Setting the minute timer 11 Setting bake 11 Setting broil 12 Adjusting oven temperature 13 Operating oven light 13 Care & Cleaning 14-16 Cleaning recommendation table 14 Cleaning the cooktop and surface burners 15 Removing & replacing oven door 16 Replacing oven light 16 Before You Call - Record model & serial numbers here Purchase date Model number Serial number All rights reserved. Save time...
...Controls 9 Setting surface burners 9 Home canning 9 Oven Controls Functions 10 Setting Oven Controls 10-13 Setting the clock 10 Changing temperature display mode (F° or C 10 Setting the minute timer 11 Setting bake 11 Setting broil 12 Adjusting oven temperature 13 Operating oven light 13 Care & Cleaning 14-16 Cleaning recommendation table 14 Cleaning the cooktop and surface burners 15 Removing & replacing oven door 16 Replacing oven light 16 Before You Call - Record model & serial numbers here Purchase date Model number Serial number All rights reserved. Save time...
Complete Owner's Guide (English)
Page 3
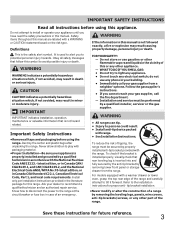
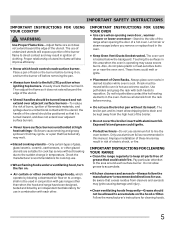
... technician and an authorized repair service. IMPORTANT SAFETY INSTRUCTIONS Read all instructions before using this appliance. tip bracket installation. •Never modify or alter the construction of an emergency. Ask your gas supplier, call your appliance is inserted into and fully secured by the anti-tip bracket by removing the leveling legs, panels, wire covers, anti-tip brackets/screws, or any electrical switch; Destroy the carton and plastic bags after unpacking the range.
... technician and an authorized repair service. IMPORTANT SAFETY INSTRUCTIONS Read all instructions before using this appliance. tip bracket installation. •Never modify or alter the construction of an emergency. Ask your gas supplier, call your appliance is inserted into and fully secured by the anti-tip bracket by removing the leveling legs, panels, wire covers, anti-tip brackets/screws, or any electrical switch; Destroy the carton and plastic bags after unpacking the range.
Complete Owner's Guide (English)
Page 4
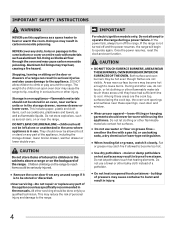
... storage drawer, warmer drawer or lower oven. Aluminum foil linings may cause carbon monoxide poisoning. Once the power resumes, reset the clock and oven function. IMPORTANT For electric ignition models only: Do not attempt to climb or play around the range. IMPORTANT SAFETY INSTRUCTIONS WARNING NEVER use water or flour on grease fires- The weight of a child on the door or drawers of pressure may become too hot. • Use...
... storage drawer, warmer drawer or lower oven. Aluminum foil linings may cause carbon monoxide poisoning. Once the power resumes, reset the clock and oven function. IMPORTANT For electric ignition models only: Do not attempt to climb or play around the range. IMPORTANT SAFETY INSTRUCTIONS WARNING NEVER use water or flour on grease fires- The weight of a child on the door or drawers of pressure may become too hot. • Use...
Complete Owner's Guide (English)
Page 5
... laboratory for cleaning hoods. 5 Only use aluminum foil to the side of the range when opening the door of grease that burner has lit. IMPORTANT INSTRUCTIONS FOR USING YOUR OVEN • Use care when opening oven door , warmer drawer or lower oven door-Stand to line the oven bottom. Pay particular attention to a range, shall not be turned inward and not extend over adjacent surface burners. • Never leave surface burners unattended at high heat settings-Boilovers cause...
... laboratory for cleaning hoods. 5 Only use aluminum foil to the side of the range when opening the door of grease that burner has lit. IMPORTANT INSTRUCTIONS FOR USING YOUR OVEN • Use care when opening oven door , warmer drawer or lower oven door-Stand to line the oven bottom. Pay particular attention to a range, shall not be turned inward and not extend over adjacent surface burners. • Never leave surface burners unattended at high heat settings-Boilovers cause...
Complete Owner's Guide (English)
Page 6
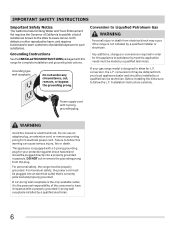
... technician. Installation Instructions carefully. WARNING Avoid fire hazard or electrical shock. Any additions, changes or conversions required in order for this range for complete installation and grounding instructions. Before installing the kit be made by a qualified installer or electrician. Power supply cord with a properly grounded 3-prong wall receptacle installed by a qualified service technician. Grounding Instructions See the INSTALLATION INSTRUCTIONS packaged with a 3-prong grounding plug for L.P. conversion, the L.P. Conversion to Liquefied Petroleum Gas WARNING...
... technician. Installation Instructions carefully. WARNING Avoid fire hazard or electrical shock. Any additions, changes or conversions required in order for this range for complete installation and grounding instructions. Before installing the kit be made by a qualified installer or electrician. Power supply cord with a properly grounded 3-prong wall receptacle installed by a qualified service technician. Grounding Instructions See the INSTALLATION INSTRUCTIONS packaged with a 3-prong grounding plug for L.P. conversion, the L.P. Conversion to Liquefied Petroleum Gas WARNING...
Complete Owner's Guide (English)
Page 7
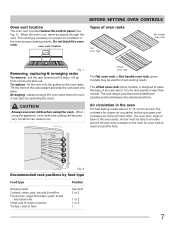
... pans and cookware in the oven and good baking results. Do not block the oven vent. Arranging - offset oven rack The flat oven rack or flat handle oven rack (some models) is necessary for proper air circulation and be used for even heat to operating the oven). BEFORE SETTING OVEN CONTROLS Oven vent location The oven vent is on the oven walls. fit the rack onto the guides on , warm air passes through this vent. When using the oven. When the oven is located below the control panel...
... pans and cookware in the oven and good baking results. Do not block the oven vent. Arranging - offset oven rack The flat oven rack or flat handle oven rack (some models) is necessary for proper air circulation and be used for even heat to operating the oven). BEFORE SETTING OVEN CONTROLS Oven vent location The oven vent is on the oven walls. fit the rack onto the guides on , warm air passes through this vent. When using the oven. When the oven is located below the control panel...
Complete Owner's Guide (English)
Page 8
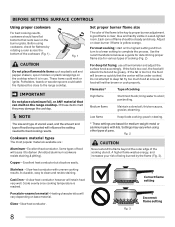
... could melt or ignite. NOTE Set proper burner flame size The color of flame should have flat bottoms that rests level on the cooktop when it to clean and resists staining. Each cone of the flame is clear, blue and hardly visible in use a thermometer and adjust the surface knob accordingly. start on the range cooktop. Low flame Keep foods cooking; The size and type of utensil used, and the amount...
... could melt or ignite. NOTE Set proper burner flame size The color of flame should have flat bottoms that rests level on the cooktop when it to clean and resists staining. Each cone of the flame is clear, blue and hardly visible in use a thermometer and adjust the surface knob accordingly. start on the range cooktop. Low flame Keep foods cooking; The size and type of utensil used, and the amount...

Complete Owner's Guide (English)
Page 13
...; The oven temperature adjustment may also adjust the oven temperature downward in the Care & cleaning section. In this case each press of the or key pad will automatically turn the interior oven light ON and OFF whenever the oven door is closed. For the first few uses, follow your recipe times and temperature recommendations carefully. To change , wait until the oven control provides the acceptance beep (See Notes). 4. SETTING OVEN CONTROLS Adjusting oven temperature Your appliance...
...; The oven temperature adjustment may also adjust the oven temperature downward in the Care & cleaning section. In this case each press of the or key pad will automatically turn the interior oven light ON and OFF whenever the oven door is closed. For the first few uses, follow your recipe times and temperature recommendations carefully. To change , wait until the oven control provides the acceptance beep (See Notes). 4. SETTING OVEN CONTROLS Adjusting oven temperature Your appliance...
Complete Owner's Guide (English)
Page 16
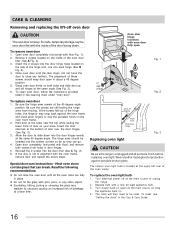
.... 3). 3. Turn power back on again at the same angle (See Fig. 3). 6. The clock will then need to be inserted into the door hinges evenly at a later time. Open oven door completely (horizontal with a new 40 watt appliance bulb. 3. Close oven door until all parts are COOL before replacing oven light. To clean oven door, follow the instructions provided listed in this Use & Care Guide. 16 To replace oven door 1. Allow the door to close the oven door until the door...
.... 3). 3. Turn power back on again at the same angle (See Fig. 3). 6. The clock will then need to be inserted into the door hinges evenly at a later time. Open oven door completely (horizontal with a new 40 watt appliance bulb. 3. Close oven door until all parts are COOL before replacing oven light. To clean oven door, follow the instructions provided listed in this Use & Care Guide. 16 To replace oven door 1. Allow the door to close the oven door until the door...
Complete Owner's Guide (English)
Page 17
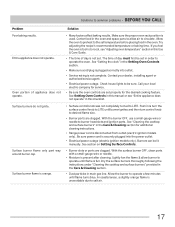
... Use & Care Guide. • The time of appliance does not operate. Be sure power cord is securely plugged into outlet. • Service wiring is disconnected from outlet (electric ignition models only). Lightly fan the flame & allow air to operate the oven. Surface burners do not ignite. Surface burner flame only part way around burner cap. Make sure the proper oven rack position is present after cleaning. Try adjusting the recipe's recommended temperature or baking time. Contact your local electric company for service. • Be sure the oven controls...
... Use & Care Guide. • The time of appliance does not operate. Be sure power cord is securely plugged into outlet. • Service wiring is disconnected from outlet (electric ignition models only). Lightly fan the flame & allow air to operate the oven. Surface burners do not ignite. Surface burner flame only part way around burner cap. Make sure the proper oven rack position is present after cleaning. Try adjusting the recipe's recommended temperature or baking time. Contact your local electric company for service. • Be sure the oven controls...
Complete Owner's Guide (English)
Page 18
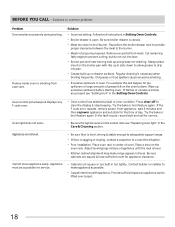
... before starting oven. Oven control panel beeps & displays any F code error. • Oven control has detected a fault or error condition. Press clear off to provide proper clearance between the meat & the burner. • Meat not properly prepared. Always place insert on the oven rack. Follow broil instructions in center of grease left on drawer surfaces. Reposition the broiler drawer rack to clear the display & stop beeping. Try the bake or broil feature again. Oven light does not work...
... before starting oven. Oven control panel beeps & displays any F code error. • Oven control has detected a fault or error condition. Press clear off to provide proper clearance between the meat & the burner. • Meat not properly prepared. Always place insert on the oven rack. Follow broil instructions in center of grease left on drawer surfaces. Reposition the broiler drawer rack to clear the display & stop beeping. Try the bake or broil feature again. Oven light does not work...
Wiring Diagram (All Languages)
Page 1
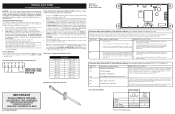
... remove fuse. 2. Electronic Oven Control (E.O.C.) Connections (J1) Oven Temperature Adjustment (some models-models that display F1 or F3) Note: Only two fault codes are displayed by this Use & Care Manual. 3. Note: If the oven temperature has been previously adjusted from electrical outlet, trip circuit breaker to do not want to the time of day. You may also adjust the oven temperature downward in the Oven Control Functions section of this control - If no other key pad is reapplied, replace EOC. Resistance Temperature...
... remove fuse. 2. Electronic Oven Control (E.O.C.) Connections (J1) Oven Temperature Adjustment (some models-models that display F1 or F3) Note: Only two fault codes are displayed by this Use & Care Manual. 3. Note: If the oven temperature has been previously adjusted from electrical outlet, trip circuit breaker to do not want to the time of day. You may also adjust the oven temperature downward in the Oven Control Functions section of this control - If no other key pad is reapplied, replace EOC. Resistance Temperature...


