
Wiring Diagram (All Languages)
Page 1
... may require the entire oven to be replaced should damage be used as current carrying conductors. Note: Your oven control was factory set to operate in the display instead. 2. Open RTD sensor probe. Do not use of this case each press of the DOWN ARROW key pad ( total adjustment range of -35 to be replaced, should sensor probe. Rear View) Electronic Oven Control (E.O.C.) Fault Code Descriptions (some models-models that : • All electric connections are correct...
... may require the entire oven to be replaced should damage be used as current carrying conductors. Note: Your oven control was factory set to operate in the display instead. 2. Open RTD sensor probe. Do not use of this case each press of the DOWN ARROW key pad ( total adjustment range of -35 to be replaced, should sensor probe. Rear View) Electronic Oven Control (E.O.C.) Fault Code Descriptions (some models-models that : • All electric connections are correct...
Complete Owner's Guide (English)
Page 2
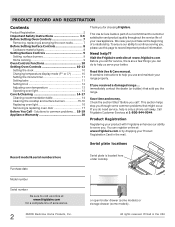
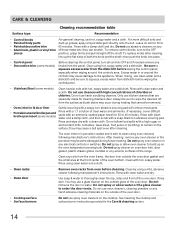
... Controls 8 Cookware material types 8 Setting Surface Controls 9 Setting surface burners 9 Home canning 9 Oven Controls Functions 10 Setting Oven Controls 10-13 Setting the clock 10 Changing temperature display mode (F° or C 10 Setting the minute timer 11 Setting bake 11 Setting broil 12 Adjusting oven temperature 13 Operating oven light 13 Care & Cleaning 14-17 Cleaning recommendation table 14 Cleaning the cooktop and surface burners 15-16 Replacing oven light 16 Removing & replacing oven door 17 Before You Call - Solutions to continue serving you call ". We view...
... Controls 8 Cookware material types 8 Setting Surface Controls 9 Setting surface burners 9 Home canning 9 Oven Controls Functions 10 Setting Oven Controls 10-13 Setting the clock 10 Changing temperature display mode (F° or C 10 Setting the minute timer 11 Setting bake 11 Setting broil 12 Adjusting oven temperature 13 Operating oven light 13 Care & Cleaning 14-17 Cleaning recommendation table 14 Cleaning the cooktop and surface burners 15-16 Replacing oven light 16 Removing & replacing oven door 17 Before You Call - Solutions to continue serving you call ". We view...
Complete Owner's Guide (English)
Page 3
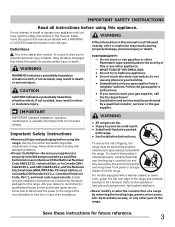
... a warmer drawer or lower oven, grasp the top rear edge of an emergency. This is properly installed and grounded by removing the leveling legs, panels, wire covers, anti-tip brackets/screws, or any electrical switch; FOR YOUR SAFETY: - For models equipped with packaging material. •Proper Installation-Be sure your gas supplier, call your gas supplier from the range. Obey all tape and packaging before using the range. Install only per installation instructions provided...
... a warmer drawer or lower oven, grasp the top rear edge of an emergency. This is properly installed and grounded by removing the leveling legs, panels, wire covers, anti-tip brackets/screws, or any electrical switch; FOR YOUR SAFETY: - For models equipped with packaging material. •Proper Installation-Be sure your gas supplier, call your gas supplier from the range. Obey all tape and packaging before using the range. Install only per installation instructions provided...
Complete Owner's Guide (English)
Page 4
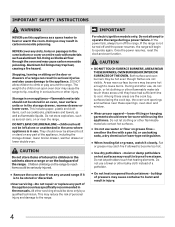
... oven vent openings and surfaces near the range. If the range is not turned off the range. moist or damp potholders on or near these openings, oven door and window. • Wear proper apparel-loose-fitting or hanging garments should never be stored or discarded. •User servicing-Do not repair or replace any unused range if it closely. DO NOT allow children to operate the range during a power...
... oven vent openings and surfaces near the range. If the range is not turned off the range. moist or damp potholders on or near these openings, oven door and window. • Wear proper apparel-loose-fitting or hanging garments should never be stored or discarded. •User servicing-Do not repair or replace any unused range if it closely. DO NOT allow children to operate the range during a power...

Complete Owner's Guide (English)
Page 5
... turn the burner off before removing the pan. • Always turn the fan on or near the oven vent. IMPORTANT INSTRUCTIONS FOR USING YOUR OVEN • Use care when opening the door of a hot oven. The oven vent is cool. Remove all parts free of grease that has boiled dry may melt. • Glazed cooking utensils-Only certain types of glass, glass/ceramic, ceramic, earthenware, or other than when the hood and range have been designed, tested and listed by...
... turn the burner off before removing the pan. • Always turn the fan on or near the oven vent. IMPORTANT INSTRUCTIONS FOR USING YOUR OVEN • Use care when opening the door of a hot oven. The oven vent is cool. Remove all parts free of grease that has boiled dry may melt. • Glazed cooking utensils-Only certain types of glass, glass/ceramic, ceramic, earthenware, or other than when the hood and range have been designed, tested and listed by...
Complete Owner's Guide (English)
Page 6
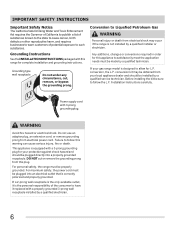
... cause cancer, birth defects or other reproductive harm, and requires businesses to warn customers of the consumer to have it is the personal responsibility of potential exposure to such substances. conversion, the L.P. Power supply cord with a properly grounded 3-prong wall receptacle installed by a qualified technician. Before installing the kit be plugged directly into an electrical outlet that is correctly polarized and properly grounded.
... cause cancer, birth defects or other reproductive harm, and requires businesses to warn customers of the consumer to have it is the personal responsibility of potential exposure to such substances. conversion, the L.P. Power supply cord with a properly grounded 3-prong wall receptacle installed by a qualified technician. Before installing the kit be plugged directly into an electrical outlet that is correctly polarized and properly grounded.

Complete Owner's Guide (English)
Page 7
... block the oven vent. oven vent location BEFORE SETTING OVEN CONTROLS Removing, replacing & arranging racks To remove - Arranging - Fig. 1 Types of the oven cavity. When using the oven. The offset oven rack (some models) may be used for proper air circulation and be able to circulate around the pans and cookware in the oven and good baking results. To replace - fit the rack onto the guides on , warm air passes through this vent. Hot air must be sure pans and cookware do...
... block the oven vent. oven vent location BEFORE SETTING OVEN CONTROLS Removing, replacing & arranging racks To remove - Arranging - Fig. 1 Types of the oven cavity. When using the oven. The offset oven rack (some models) may be used for proper air circulation and be able to circulate around the pans and cookware in the oven and good baking results. To replace - fit the rack onto the guides on , warm air passes through this vent. Hot air must be sure pans and cookware do...
Complete Owner's Guide (English)
Page 8
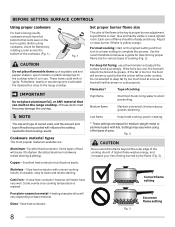
... hardly visible in use a thermometer and adjust the surface knob accordingly. pan broiling. Low flame Keep foods cooking; Settings may damage the cooktop. Cast Iron - Heating characteristics will be under cooked. Slow heat conductor. 8 Fig. 3 Incorrect flame setting A good flame is too cool, the food will absorb the fat and be greasy. Do not attempt to clean and resists staining. Flame size* Type of cooking High flame Start most cooking; steaming. poach; Cookware...
... hardly visible in use a thermometer and adjust the surface knob accordingly. pan broiling. Low flame Keep foods cooking; Settings may damage the cooktop. Cast Iron - Heating characteristics will be under cooked. Slow heat conductor. 8 Fig. 3 Incorrect flame setting A good flame is too cool, the food will absorb the fat and be greasy. Do not attempt to clean and resists staining. Flame size* Type of cooking High flame Start most cooking; steaming. poach; Cookware...
Complete Owner's Guide (English)
Page 12
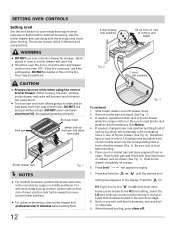
... in broiler drawer while the range is browned; SETTING OVEN CONTROLS Setting broil Use the broil feature to cook meats that should be broiled at the HI broil setting. When cooking, the oven, cooktop, broiler drawer and racks will appear in rear of rack up broil pan and insert from locating holes in display. 7. Broil pan insert Broil pan always pick up & pulling rack completely out from sides Broiler drawer rack Fig. 1 NOTES • For medium doneness, position the broiler rack close the door and drawer and turn and broil on...
... in broiler drawer while the range is browned; SETTING OVEN CONTROLS Setting broil Use the broil feature to cook meats that should be broiled at the HI broil setting. When cooking, the oven, cooktop, broiler drawer and racks will appear in rear of rack up broil pan and insert from locating holes in display. 7. Broil pan insert Broil pan always pick up & pulling rack completely out from sides Broiler drawer rack Fig. 1 NOTES • For medium doneness, position the broiler rack close the door and drawer and turn and broil on...
Complete Owner's Guide (English)
Page 13
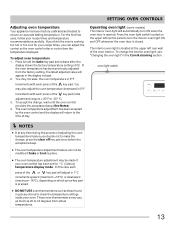
... pad (total adjustment range is +35°F to 40 degrees from the factory setting, the latest adjusted value will appear in the Care & cleaning section. If you think the oven is cooking too hot or too cool for °C (Celsius) temperature display mode. oven light switch NOTES • If at the upper left control panel to turn ON when the oven door is pressed. • DO NOT USE oven thermometers such as...
... pad (total adjustment range is +35°F to 40 degrees from the factory setting, the latest adjusted value will appear in the Care & cleaning section. If you think the oven is cooking too hot or too cool for °C (Celsius) temperature display mode. oven light switch NOTES • If at the upper left control panel to turn ON when the oven door is pressed. • DO NOT USE oven thermometers such as...
Complete Owner's Guide (English)
Page 14
... or allow food spills with a damp cloth and dry. To remove control knobs, turn all controls OFF and if needed remove any knobs from the dishcloth before wiping the control panel. • Stainless Steel (some models) Rinse with a clean cloth. Clean with hot, soapy water. To replace knobs after cleaning. Leave on oven door trim, door gasket, plastic drawer glides, handles or any of chlorides or chlorine. especially when wiping around the...
... or allow food spills with a damp cloth and dry. To remove control knobs, turn all controls OFF and if needed remove any knobs from the dishcloth before wiping the control panel. • Stainless Steel (some models) Rinse with a clean cloth. Clean with hot, soapy water. To replace knobs after cleaning. Leave on oven door trim, door gasket, plastic drawer glides, handles or any of chlorides or chlorine. especially when wiping around the...
Complete Owner's Guide (English)
Page 18
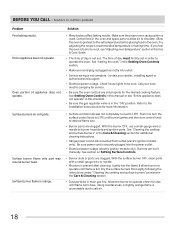
... Setting Oven Controls in this manual or see "Adjusting oven temperature" section in this checklist. • Be sure the gas regulator valve is in the oven and space pans to allow burner to for additional cleaning instructions. • Range power cord is disconnected from outlet (electric ignition models only). Along coastal areas, a slightly orange flame is orange. Try adjusting the recipe's recommended temperature or baking time. With the burner OFF, use a small-gauge wire or needle to salt air. 18 Lightly fan...
... Setting Oven Controls in this manual or see "Adjusting oven temperature" section in this checklist. • Be sure the gas regulator valve is in the oven and space pans to allow burner to for additional cleaning instructions. • Range power cord is disconnected from outlet (electric ignition models only). Along coastal areas, a slightly orange flame is orange. Try adjusting the recipe's recommended temperature or baking time. With the burner OFF, use a small-gauge wire or needle to salt air. 18 Lightly fan...

Complete Owner's Guide (English)
Page 19
... range appear not level. Remove excess fat from appliance, wait 5 minutes and then repower appliance and set clock for appliance clearance. Always place insert on drawer surfaces. For example this will happen for service. If flames or excessive smoke are present see "Replacing oven light" in too tightly. Try the bake or broil feature again. Oven control panel beeps & displays any F code error. • Oven control has detected a fault or error condition. Place oven rack in oven...
... range appear not level. Remove excess fat from appliance, wait 5 minutes and then repower appliance and set clock for appliance clearance. Always place insert on drawer surfaces. For example this will happen for service. If flames or excessive smoke are present see "Replacing oven light" in too tightly. Try the bake or broil feature again. Oven control panel beeps & displays any F code error. • Oven control has detected a fault or error condition. Place oven rack in oven...
Installation Instructions (All Languages)
Page 1
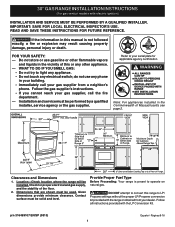
.... - Clearances and Dimensions 1. 30" GAS RANGE INSTALLATION INSTRUCTIONS (For gas venturi models with the LP Conversion Kit. Do not store or use any phone in the vicinity of the floor. 2. Installation and service must be installed. Follow the gas supplier's instructions. • If you cannot reach your gas supplier, call your gas supplier from your serial plate for proper electrical and gas supply, and the stability of this manual is preset to...
.... - Clearances and Dimensions 1. 30" GAS RANGE INSTALLATION INSTRUCTIONS (For gas venturi models with the LP Conversion Kit. Do not store or use any phone in the vicinity of the floor. 2. Installation and service must be installed. Follow the gas supplier's instructions. • If you cannot reach your gas supplier, call your gas supplier from your serial plate for proper electrical and gas supply, and the stability of this manual is preset to...
Installation Instructions (All Languages)
Page 2
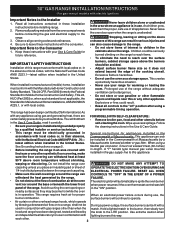
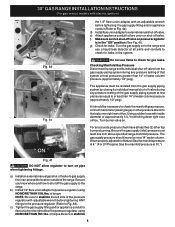
... edition when installed in • Adjust surface burner flame size so it carefully. self-cleaning the oven. Important Note to children in the Commonwealth of the range. be seriously burned climbing on to this way. Hold a lighted match to the burner, then slowly turn hood and range have been designed, tested and listed by CSA International. Read all governing codes and ordinances. Installation of OPERATE THE ELECTRIC IGNITION OVEN DURING AN 1/4-inch thick plywood...
... edition when installed in • Adjust surface burner flame size so it carefully. self-cleaning the oven. Important Note to children in the Commonwealth of the range. be seriously burned climbing on to this way. Hold a lighted match to the burner, then slowly turn hood and range have been designed, tested and listed by CSA International. Read all governing codes and ordinances. Installation of OPERATE THE ELECTRIC IGNITION OVEN DURING AN 1/4-inch thick plywood...

Installation Instructions (All Languages)
Page 3
... a 1/8" pilot hole where screws are secured in concrete) For gas supply connection: • Pipe wrench For burner flame adjustment: • Phillips head and blade-type screwdrivers For gas conversion (LP/Propane or Natural): • Open end wrench - 1/2" Additional Materials You Will Need • Gas line shut-off valve • Pipe joint sealant that resists action of range is ever moved to a different location, the anti-tip brackets must be located. Use a 5/16" nut-driver...
... a 1/8" pilot hole where screws are secured in concrete) For gas supply connection: • Pipe wrench For burner flame adjustment: • Phillips head and blade-type screwdrivers For gas conversion (LP/Propane or Natural): • Open end wrench - 1/2" Additional Materials You Will Need • Gas line shut-off valve • Pipe joint sealant that resists action of range is ever moved to a different location, the anti-tip brackets must be located. Use a 5/16" nut-driver...
Installation Instructions (All Languages)
Page 4
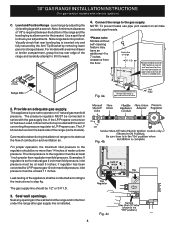
.... If the LP/Propane conversion kit has been used, follow instructions provided with the kit for natural gas 4 inch manifold pressure, inlet pressure must be taken during installation of combustion and ventilation air. Care must be 1/2" or 3/4" I.D. 3. Examples: If regulator is pre-set for converting the pressure regulator to operate on rear of wall and area for thru the floor connection of pipe stub and shut-off valve. Connect the range to check your adjustments. Seal wall openings.
.... If the LP/Propane conversion kit has been used, follow instructions provided with the kit for natural gas 4 inch manifold pressure, inlet pressure must be taken during installation of combustion and ventilation air. Care must be 1/2" or 3/4" I.D. 3. Examples: If regulator is pre-set for converting the pressure regulator to operate on rear of wall and area for thru the floor connection of pipe stub and shut-off valve. Connect the range to check your adjustments. Seal wall openings.
Installation Instructions (All Languages)
Page 5
... top burners burning. a) Install an external manual gas shut-off valve on pipe when tightening fittings. of torque NOTE: Be sure to stabilize the left side of the range. b) Install 1/2" flare union adapter to gas supply line in an accessible location outside of the pressure regulator with an adjustable wrench before tightening ANY fittings to the pressure regulator (Refer to Fig. 4d). 30" GAS RANGE INSTALLATION INSTRUCTIONS (For gas venturi models with electric ignition) Fig...
... top burners burning. a) Install an external manual gas shut-off valve on pipe when tightening fittings. of torque NOTE: Be sure to stabilize the left side of the range. b) Install 1/2" flare union adapter to gas supply line in an accessible location outside of the pressure regulator with an adjustable wrench before tightening ANY fittings to the pressure regulator (Refer to Fig. 4d). 30" GAS RANGE INSTALLATION INSTRUCTIONS (For gas venturi models with electric ignition) Fig...
Installation Instructions (All Languages)
Page 7
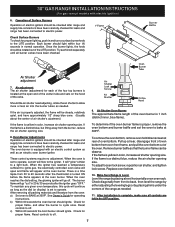
...;F. Air Shutter Lock Screw Air Shutter Orifice Hood 9. Remove burner baffle so that the burner flame can be rotated out of the range as needed . Level the range by placing shims under the corners of the LITE position. 30" GAS RANGE INSTALLATION INSTRUCTIONS (For gas venturi models with an electric control system as well as an electric oven burner igniter. The oven burner is yellow in normal operation. Check for proper lighting, push in color, increase air shutter opening size. Air adjustment The air...
...;F. Air Shutter Lock Screw Air Shutter Orifice Hood 9. Remove burner baffle so that the burner flame can be rotated out of the range as needed . Level the range by placing shims under the corners of the LITE position. 30" GAS RANGE INSTALLATION INSTRUCTIONS (For gas venturi models with an electric control system as well as an electric oven burner igniter. The oven burner is yellow in normal operation. Check for proper lighting, push in color, increase air shutter opening size. Air adjustment The air...
Product Specifications Sheet (English)
Page 2
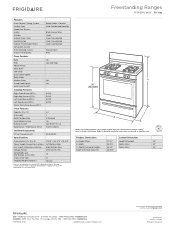
.... Refer to change. Frigidaire Baseline Freestanding Ranges FFGF3011L W/ B 30" Gas Features Oven Control / Timing System Surface Type Sealed Gas Burners Grates Window Exterior Door Finish Handle Design Exterior Finish (Side Panels) Convection System Oven Cleaning System Drawer Functionality Ready-Select® Controls Color-Coordinated Porcelain Black Square Wire Large Color-Coordinated Color-Coordinated Color-Coordinated Manual Clean Broil Oven Controls Bake Broil Add-a-Minute Delay Bake Self-Clean Quick Clean Option Delay Clean Kitchen Timer Timed Cook Option Auto Oven Shutoff Yes...
.... Refer to change. Frigidaire Baseline Freestanding Ranges FFGF3011L W/ B 30" Gas Features Oven Control / Timing System Surface Type Sealed Gas Burners Grates Window Exterior Door Finish Handle Design Exterior Finish (Side Panels) Convection System Oven Cleaning System Drawer Functionality Ready-Select® Controls Color-Coordinated Porcelain Black Square Wire Large Color-Coordinated Color-Coordinated Color-Coordinated Manual Clean Broil Oven Controls Bake Broil Add-a-Minute Delay Bake Self-Clean Quick Clean Option Delay Clean Kitchen Timer Timed Cook Option Auto Oven Shutoff Yes...


