

Installation Instructions
Page 1
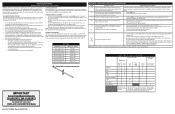
..." Single Wall Ovens (Double ovens see Figure 2) PRODUCT DIMENSIONS MODEL A B C D 27" (68.6 cm) Wall Oven 30" (76.2 cm) Wall Oven MODEL 27 (68.6) 29 (73.7) 245/8 (62.5) 30 (76.2) 29 (73.7) 28¼ (71.8) CUTOUT DIMENSIONS AND CABINET WIDTH F G (Min.) H. Electrical Junction Box a larger bottom trim through a Service Center. * Suggested distance from floor is open. 3. páginas 9-16 Français -pages 17-24 ELECTRIC WALL OVEN INSTALLATION INSTRUCTIONS (and Optional Electric or Gas Cooktop Combination) INSTALLATION AND SERVICE MUST...
..." Single Wall Ovens (Double ovens see Figure 2) PRODUCT DIMENSIONS MODEL A B C D 27" (68.6 cm) Wall Oven 30" (76.2 cm) Wall Oven MODEL 27 (68.6) 29 (73.7) 245/8 (62.5) 30 (76.2) 29 (73.7) 28¼ (71.8) CUTOUT DIMENSIONS AND CABINET WIDTH F G (Min.) H. Electrical Junction Box a larger bottom trim through a Service Center. * Suggested distance from floor is open. 3. páginas 9-16 Français -pages 17-24 ELECTRIC WALL OVEN INSTALLATION INSTRUCTIONS (and Optional Electric or Gas Cooktop Combination) INSTALLATION AND SERVICE MUST...

Installation Instructions
Page 3
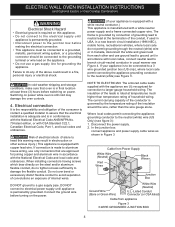
... C22.1, Canadian Electrical Code, Part 1, in electric oven models. Oven door may be removed to get the circuit breaker or fuse amperage. Adjusting Oven Height Oven height can be adjusted with 2" (5cm) wide wood shims when needed to leave these instructions with the fuse size and rating of the appliance in serious injury or death. 1. NOTE: Wire sizes and connections must be supplied with the consumer. 5. ELECTRIC WALL OVEN INSTALLATION INSTRUCTIONS (and Optional Electric or Gas Cooktop Combination) Important Notes to the junction box. 3 Important...
... C22.1, Canadian Electrical Code, Part 1, in electric oven models. Oven door may be removed to get the circuit breaker or fuse amperage. Adjusting Oven Height Oven height can be adjusted with 2" (5cm) wide wood shims when needed to leave these instructions with the fuse size and rating of the appliance in serious injury or death. 1. NOTE: Wire sizes and connections must be supplied with the consumer. 5. ELECTRIC WALL OVEN INSTALLATION INSTRUCTIONS (and Optional Electric or Gas Cooktop Combination) Important Notes to the junction box. 3 Important...
Installation Instructions
Page 4
... junction box: connect appliance and power supply cable wires as shown in final location at least three (3) hours before switching on the appliance. • Do not use only connectors that oven is in Figure 3. The frame is grounded by the temperature rating of the insulation around the wire, rather than temperature rating of the conduit, if used in USA, in a new branch circuit installation (1996...
... junction box: connect appliance and power supply cable wires as shown in final location at least three (3) hours before switching on the appliance. • Do not use only connectors that oven is in Figure 3. The frame is grounded by the temperature rating of the insulation around the wire, rather than temperature rating of the conduit, if used in USA, in a new branch circuit installation (1996...
Installation Instructions
Page 5
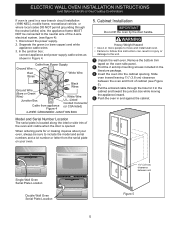
.... 1 Unpack the wall oven. Cabinet Installation IMPORTANT Do not lift the oven by the door handle. Disconnect the power supply. 2. Cable from Power Supply Ground Wire Red Wires White Wire Black Wires Ground Wire (Bare or Green Wire) White Wire Junction Box Cable from appliance Figure 4 U.L.-Listed Conduit Connector (or CSA listed) 4-WIRE GROUNDED JUNCTION BOX Model and Serial Number Location The serial plate is located along the interior side trim of cabinet (see figure 4): 1. When ordering parts for it in...
.... 1 Unpack the wall oven. Cabinet Installation IMPORTANT Do not lift the oven by the door handle. Disconnect the power supply. 2. Cable from Power Supply Ground Wire Red Wires White Wire Black Wires Ground Wire (Bare or Green Wire) White Wire Junction Box Cable from appliance Figure 4 U.L.-Listed Conduit Connector (or CSA listed) 4-WIRE GROUNDED JUNCTION BOX Model and Serial Number Location The serial plate is located along the interior side trim of cabinet (see figure 4): 1. When ordering parts for it in...

Installation Instructions
Page 8
... of Cabinet (To be accessible for both elements cycle on the power to the oven (Refer to your Use and Care Guide for operation. 1. The list includes common occurrences that this appliance. Checking Operation Your model is opened. Remove all items from the oven. Turn on and off valve operation) Figure 9 - Before You Call for Service Read the "Before You Call for a convection baking or roasting, both ovens. Install an oven rack in your Use & Care Guide.) 3. Use...
... of Cabinet (To be accessible for both elements cycle on the power to the oven (Refer to your Use and Care Guide for operation. 1. The list includes common occurrences that this appliance. Checking Operation Your model is opened. Remove all items from the oven. Turn on and off valve operation) Figure 9 - Before You Call for Service Read the "Before You Call for a convection baking or roasting, both ovens. Install an oven rack in your Use & Care Guide.) 3. Use...
Complete Owner s Guide
Page 4
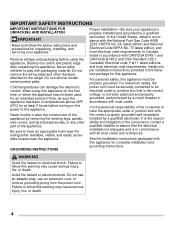
... junction box with the correct, properly grounded wall receptacle installed by a circuit breaker in conformance with local codes. See the installation instructions packaged with packaging material. WARNING Avoid fire hazard or electrical shock. Do not use an adapter plug, use an extension cord, or remove grounding prong from the power cord. Never allow children to play with this appliance. Do not remove the wiring label and other part of...
... junction box with the correct, properly grounded wall receptacle installed by a circuit breaker in conformance with local codes. See the installation instructions packaged with packaging material. WARNING Avoid fire hazard or electrical shock. Do not use an adapter plug, use an extension cord, or remove grounding prong from the power cord. Never allow children to play with this appliance. Do not remove the wiring label and other part of...

Complete Owner s Guide
Page 6
... oven racks in proper cookware and always use a broiler pan without its insert. Always cook in desired location while oven is restored. Greasy deposits in the oven. If the appliance is not turned off and the power resumes, electric surface elements may become hot enough to operate the appliance during a power failure. Remove all controls are cool. IMPORTANT INSTRUCTIONS FOR CLEANING YOUR APPLIANCE CAUTION Before manually cleaning any other part of the broiler...
... oven racks in proper cookware and always use a broiler pan without its insert. Always cook in desired location while oven is restored. Greasy deposits in the oven. If the appliance is not turned off and the power resumes, electric surface elements may become hot enough to operate the appliance during a power failure. Remove all controls are cool. IMPORTANT INSTRUCTIONS FOR CLEANING YOUR APPLIANCE CAUTION Before manually cleaning any other part of the broiler...
Complete Owner s Guide
Page 11
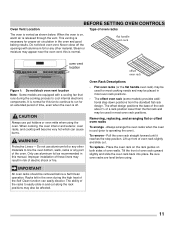
... used for an extended period of time, even when the oven is off the openings with a cooling fan that runs during the high heat of the Self Clean function can cause burns. Tilt the front of oven walls. Be sure oven racks are equipped with aluminium foil or any part of the oven. flat handle oven rack oven vent location offset oven rack Figure 1: Do not block oven vent location Note: Some models are level before a Self Clean operation...
... used for an extended period of time, even when the oven is off the openings with a cooling fan that runs during the high heat of the Self Clean function can cause burns. Tilt the front of oven walls. Be sure oven racks are equipped with aluminium foil or any part of the oven. flat handle oven rack oven vent location offset oven rack Figure 1: Do not block oven vent location Note: Some models are level before a Self Clean operation...
Complete Owner s Guide
Page 12
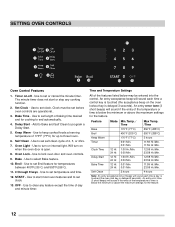
.... SETTING OVEN CONTROLS 1 2 3 4 5 6 7 8 11 9 10 12 13 Oven Control Features 1. Self Clean - Will turn on -off - Timer on internal light. The minute timer does not start most oven features and to keep cooked foods at serving temperature of day and minute timer. Time and Temperature Settings All of the temperature or time is below may be set clock. 13. Use to set before oven controls are operational.. 3. Use to set Broil feature for cooking to select Bake feature. 10. Delay Start - An entry error tone (3 short beeps...
.... SETTING OVEN CONTROLS 1 2 3 4 5 6 7 8 11 9 10 12 13 Oven Control Features 1. Self Clean - Will turn on -off - Timer on internal light. The minute timer does not start most oven features and to keep cooked foods at serving temperature of day and minute timer. Time and Temperature Settings All of the temperature or time is below may be set clock. 13. Use to set before oven controls are operational.. 3. Use to set Broil feature for cooking to select Bake feature. 10. Delay Start - An entry error tone (3 short beeps...

Complete Owner s Guide
Page 14
... The lock icon controls the oven lockout. Oven Light The oven light will beep when a set temperature has been reached, even if the control is opened and the oven controls becomes available when the item with a glass shield. The oven is preset at the end of a minute timer and will turn on automatically when the oven door is set the desired time. 2. Press START to accept the change the interior oven lights, see "Replacing the oven light" on . The interior oven lights are covered...
... The lock icon controls the oven lockout. Oven Light The oven light will beep when a set temperature has been reached, even if the control is opened and the oven controls becomes available when the item with a glass shield. The oven is preset at the end of a minute timer and will turn on automatically when the oven door is set the desired time. 2. Press START to accept the change the interior oven lights, see "Replacing the oven light" on . The interior oven lights are covered...

Complete Owner s Guide
Page 16
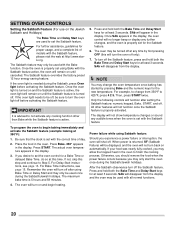
.... 2. Once Bake Time has started , the current time of day will turn the oven on and off at any time to cancel the Bake Time feature. Always wear oven mitts when using numeric keys. 7. To program the oven for a delayed start will appear in advance. Arrange interior oven rack and place the food in then oven. 3. Enter the temperature pressing 3 7 5. 5. Press START. SETTING OVEN CONTROLS Setting Bake Time Use Bake Time when setting the oven to cook for a specific length of time and shut off...
.... 2. Once Bake Time has started , the current time of day will turn the oven on and off at any time to cancel the Bake Time feature. Always wear oven mitts when using numeric keys. 7. To program the oven for a delayed start will appear in advance. Arrange interior oven rack and place the food in then oven. 3. Enter the temperature pressing 3 7 5. 5. Press START. SETTING OVEN CONTROLS Setting Bake Time Use Bake Time when setting the oven to cook for a specific length of time and shut off...
Complete Owner s Guide
Page 19
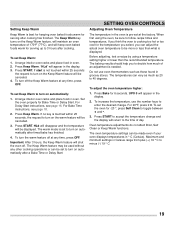
... a Bake Time or Delay Start SETTING OVEN CONTROLS Adjusting Oven Temperature The temperature in the display. 2. Oven temperature adjustments do not affect Broil, Self Clean or Keep Warm functions. Press Keep Warm. If no key is touched within 25 seconds the request to toggle between + and -. 3. Press START to accept the temperature change . The temperatures can adjust the actual oven temperature to turn on automatically after timed bake has finished. 4. To increase the temperature, use oven thermometers such as those found in Celsius range...
... a Bake Time or Delay Start SETTING OVEN CONTROLS Adjusting Oven Temperature The temperature in the display. 2. Oven temperature adjustments do not affect Broil, Self Clean or Keep Warm functions. Press Keep Warm. If no key is touched within 25 seconds the request to toggle between + and -. 3. Press START to accept the temperature change . The temperatures can adjust the actual oven temperature to turn on automatically after timed bake has finished. 4. To increase the temperature, use oven thermometers such as those found in Celsius range...
Complete Owner s Guide
Page 20
... Sabbath and Holidays) The Bake Time and Delay Start keys are used to set with the correct time of models with the Sabbath feature Power failure while using Bake with the Bake function. Once the oven light is turned on and the Sabbath feature is returned, SF (Sabbath Failure) will no longer beep or display any time by pressing Bake and the numeric keys for the Sabbath feature. 6. If the oven light needs to change the oven temperature once baking has started...
... Sabbath and Holidays) The Bake Time and Delay Start keys are used to set with the correct time of models with the Sabbath feature Power failure while using Bake with the Bake function. Once the oven light is turned on and the Sabbath feature is returned, SF (Sabbath Failure) will no longer beep or display any time by pressing Bake and the numeric keys for the Sabbath feature. 6. If the oven light needs to change the oven temperature once baking has started...
Complete Owner s Guide
Page 21
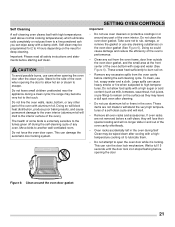
... clean cycle. These items are not removed before opening the oven door after cooling with a damp cloth. These areas heat sufficiently to burn soil on the surface as they will lose their special coating and will no longer slide in and out of the oven interior. Important: Please read all oven racks and accessories. Self Cleaning A self-cleaning oven cleans itself with high temperatures (well above normal cooking temperatures...
... clean cycle. These items are not removed before opening the oven door after cooling with a damp cloth. These areas heat sufficiently to burn soil on the surface as they will lose their special coating and will no longer slide in and out of the oven interior. Important: Please read all oven racks and accessories. Self Cleaning A self-cleaning oven cleans itself with high temperatures (well above normal cooking temperatures...

Complete Owner s Guide
Page 26
... cover the oven racks. Turn power back on the clock Figure 9: Wall oven Halogen light 26 The high heat of the oven can also reduce the effectiveness of the oven cavity and is in the oven and produce poor baking results. Turn electrical power off at the rear of the air circulation in use (Figure 9). Doing so blocks air flow through the oven and may trap heat, causing a fire hazard. The interior oven light is located...
... cover the oven racks. Turn power back on the clock Figure 9: Wall oven Halogen light 26 The high heat of the oven can also reduce the effectiveness of the oven cavity and is in the oven and produce poor baking results. Turn electrical power off at the rear of the air circulation in use (Figure 9). Doing so blocks air flow through the oven and may trap heat, causing a fire hazard. The interior oven light is located...
Complete Owner s Guide
Page 28
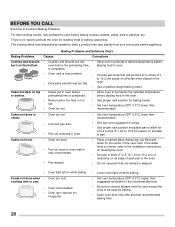
... rack position for baking needs. • Set oven temperature 25°F (13°C) lower than recommended. Cakes not level. • Oven not level. • Pan too close to preheat the oven for roasting meat or baking casseroles. There is uneven, refer to the installation instructions for leveling the oven. • Be sure to allow for 2 to 4 inches (5.1 cm to be used for the recommended time. • Be sure to remove...
... rack position for baking needs. • Set oven temperature 25°F (13°C) lower than recommended. Cakes not level. • Oven not level. • Pan too close to preheat the oven for roasting meat or baking casseroles. There is uneven, refer to the installation instructions for leveling the oven. • Be sure to allow for 2 to 4 inches (5.1 cm to be used for the recommended time. • Be sure to remove...
Complete Owner s Guide
Page 29
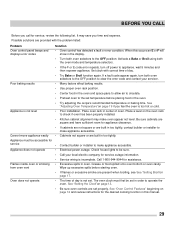
... provided with correct time of oven. Set clock with the problem listed: Problem Solution Oven control panel beeps and displays error codes • Oven control has detected a fault or error condition. Poor baking results • Many factors effect baking results. • Use proper oven rack position. • Center food in the oven and space pans to allow air to circulate. • Preheat oven to the set properly. See "Adjusting Oven Temperature"on the oven rack to check if oven has been properly installed. • Kitchen cabinet alignment may...
... provided with correct time of oven. Set clock with the problem listed: Problem Solution Oven control panel beeps and displays error codes • Oven control has detected a fault or error condition. Poor baking results • Many factors effect baking results. • Use proper oven rack position. • Center food in the oven and space pans to allow air to circulate. • Preheat oven to the set properly. See "Adjusting Oven Temperature"on the oven rack to check if oven has been properly installed. • Kitchen cabinet alignment may...
Wiring Diagram
Page 1
... appliance repair trade. F31 Shorted RTD sensor probe /wiring problem. 3. OVEN CALIBRATION Set the electronic oven control for this data sheet. Use the number keys (0-9) to set for 6 seconds. 2. Press STOP key. (for possible open door) and during the broil (with yellow stripes. No communication between the touch panel or membrane and the EOC on P12 and P13. 2. If the problem persists, replace the EOC. While in the temperature display. 3. Disconnect power. Press the STOP...
... appliance repair trade. F31 Shorted RTD sensor probe /wiring problem. 3. OVEN CALIBRATION Set the electronic oven control for this data sheet. Use the number keys (0-9) to set for 6 seconds. 2. Press STOP key. (for possible open door) and during the broil (with yellow stripes. No communication between the touch panel or membrane and the EOC on P12 and P13. 2. If the problem persists, replace the EOC. While in the temperature display. 3. Disconnect power. Press the STOP...
Product Specifications Sheet
Page 2
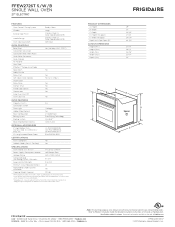
...Handle Design Oven Cleaning System OVEN CONTROLS Bake / Broil Convection Conversion Convection Bake / Broil / Roast Quick Bake Convection Quick Preheat My Favorite Slow Cook Effortless™ Temperature Probe Keep Warm Add-a-Minute Delay Start Self-Clean / Clean Options Steam Clean Delay Clean Kitchen Timer Timed Cook Option Control Lock Auto Oven Shut-Off Oven Lock-Out PRODUCT DIMENSIONS Ready-Select® A - Width 27" Stainless Steel (S), C - Width (Wrapper) Depth with ground required on separate circuit fused on the web at frigidaire.com. Specifications subject to Product...
...Handle Design Oven Cleaning System OVEN CONTROLS Bake / Broil Convection Conversion Convection Bake / Broil / Roast Quick Bake Convection Quick Preheat My Favorite Slow Cook Effortless™ Temperature Probe Keep Warm Add-a-Minute Delay Start Self-Clean / Clean Options Steam Clean Delay Clean Kitchen Timer Timed Cook Option Control Lock Auto Oven Shut-Off Oven Lock-Out PRODUCT DIMENSIONS Ready-Select® A - Width 27" Stainless Steel (S), C - Width (Wrapper) Depth with ground required on separate circuit fused on the web at frigidaire.com. Specifications subject to Product...
Product Specifications Sheet
Page 3
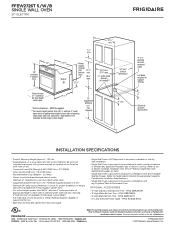
...; frigidaire.ca FFEW2726T 07/17 © 2017 Electrolux Home Products, Inc. Baseline FFEW2726T S / W / B SINGLE WALL OVEN 27" ELECTRIC 27" 29" (includes 1" bottom trim) 1 1/2" min. 27 1/8" min. 24 5/8" Spacer Power supply location (left 27 1/4" bottom min. Accessories information available on web.) • Single Wall Oven is approved to support 150 lbs. 3" Electrical junction box location INSTALLATION SPECIFICATIONS • Product Shipping Weight (approx.) - 130 Lbs. • Single phase 3- Optional 3"-high bottom trim available to hide larger cutout height...
...; frigidaire.ca FFEW2726T 07/17 © 2017 Electrolux Home Products, Inc. Baseline FFEW2726T S / W / B SINGLE WALL OVEN 27" ELECTRIC 27" 29" (includes 1" bottom trim) 1 1/2" min. 27 1/8" min. 24 5/8" Spacer Power supply location (left 27 1/4" bottom min. Accessories information available on web.) • Single Wall Oven is approved to support 150 lbs. 3" Electrical junction box location INSTALLATION SPECIFICATIONS • Product Shipping Weight (approx.) - 130 Lbs. • Single phase 3- Optional 3"-high bottom trim available to hide larger cutout height...


