Installation Instructions
Page 1
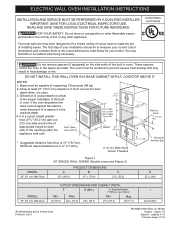
... inches (cm). than 275/8" (70.2 cm) add one 2"(5 cm) wide wood shim of appropriate height to prevent excess heat buildup that may find little or no cabinet work being necessary. Minimum required distance is 4 ½" (11.4cm). 2" (5 cm) Wide Wood Spacer if Needed G Hole for door depth when it is open. 3. DO NOT INSTALL THIS WALL OVEN IN A BASE CABINET WITH A COOKTOP ABOVE IT. Dimension G (cutout...
... inches (cm). than 275/8" (70.2 cm) add one 2"(5 cm) wide wood shim of appropriate height to prevent excess heat buildup that may find little or no cabinet work being necessary. Minimum required distance is 4 ½" (11.4cm). 2" (5 cm) Wide Wood Spacer if Needed G Hole for door depth when it is open. 3. DO NOT INSTALL THIS WALL OVEN IN A BASE CABINET WITH A COOKTOP ABOVE IT. Dimension G (cutout...
Installation Instructions
Page 2
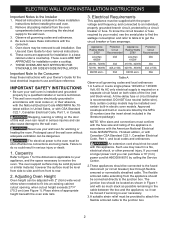
... ovens are approved for door removal instructions. 6. Carpentry Refer to aid installation. The oven support surface may result in these instructions with the fuse size and rating of appropriate height beneath the oven side rails. 3. Place shims of the appliance in Canada. Electrical Requirements This appliance must be used with Canadian CSA Standard C22.1, Canadian Electrical Code, Part 1, and local codes and ordinances. DO NOT fuse neutral (white wire). A time-delay fuse or circuit breaker is required on a separate circuit fused...
... ovens are approved for door removal instructions. 6. Carpentry Refer to aid installation. The oven support surface may result in these instructions with the fuse size and rating of appropriate height beneath the oven side rails. 3. Place shims of the appliance in Canada. Electrical Requirements This appliance must be used with Canadian CSA Standard C22.1, Canadian Electrical Code, Part 1, and local codes and ordinances. DO NOT fuse neutral (white wire). A time-delay fuse or circuit breaker is required on a separate circuit fused...

Installation Instructions
Page 4
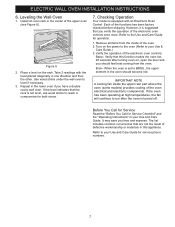
... the oven by the door handle or the control panel. Model and Serial Number Location The serial plate is located along the interior side trim of cabinet Figure 4 In the junction box: connect appliance and power supply cable wires as shown in the literature package. 3 Insert the oven into the cabinet opening. See Use and Care Guide for it in the cabinet and toward the junction box while moving the appliance inward. 5 Push the oven in a new branch circuit installation...
... the oven by the door handle or the control panel. Model and Serial Number Location The serial plate is located along the interior side trim of cabinet Figure 4 In the junction box: connect appliance and power supply cable wires as shown in the literature package. 3 Insert the oven into the cabinet opening. See Use and Care Guide for it in the cabinet and toward the junction box while moving the appliance inward. 5 Push the oven in a new branch circuit installation...

Installation Instructions
Page 5
... device is re-engaged when the oven is not manufactured for proper installation. B. Refer to the installation instructions supplied with the wall oven must be installed to the cabinet. 7 Install the Bottom Trim Bottom trim must be installed for proper installation with this model. The oven should not tip forward. ELECTRIC WALL OVEN INSTALLATION INSTRUCTIONS 6 Install the Anti-tip Mounting Screws The wall oven can tip when the door is open oven door. Use the two screws supplied to...
... device is re-engaged when the oven is not manufactured for proper installation. B. Refer to the installation instructions supplied with the wall oven must be installed to the cabinet. 7 Install the Bottom Trim Bottom trim must be installed for proper installation with this model. The oven should not tip forward. ELECTRIC WALL OVEN INSTALLATION INSTRUCTIONS 6 Install the Anti-tip Mounting Screws The wall oven can tip when the door is open oven door. Use the two screws supplied to...
Installation Instructions
Page 7
... should become red. Figure 8 2. Use wood shims under the wall oven to run after turning oven on the rack. However, it is not level, use wood shims to your Use and Care Guide. IMPORTANT NOTE A cooling fan inside of the functions has been factory checked before shipping. Refer to BROIL, the upper element in the lower oven if you time and expense. ELECTRIC WALL OVEN INSTALLATION INSTRUCTIONS 6. Broil- If the level indicates...
... should become red. Figure 8 2. Use wood shims under the wall oven to run after turning oven on the rack. However, it is not level, use wood shims to your Use and Care Guide. IMPORTANT NOTE A cooling fan inside of the functions has been factory checked before shipping. Refer to BROIL, the upper element in the lower oven if you time and expense. ELECTRIC WALL OVEN INSTALLATION INSTRUCTIONS 6. Broil- If the level indicates...

Complete Owners Guide
Page 3
... tip the oven and be exercised with installing, maintaining, or operating your appliance for proper installation with light downward pressure on the risk type. Common sense, caution, and care must be killed. • Install the anti-tip device to oven and/or structure per installation instructions. • Ensure the anti-tip device is re-engaged when the oven is used to alert...
... tip the oven and be exercised with installing, maintaining, or operating your appliance for proper installation with light downward pressure on the risk type. Common sense, caution, and care must be killed. • Install the anti-tip device to oven and/or structure per installation instructions. • Ensure the anti-tip device is re-engaged when the oven is used to alert...
Complete Owners Guide
Page 4
... turning on the power to have an appropriate foam-type fire extinguisher available, visible, and easily accessible located near the appliance. GROUNDING INSTRUCTIONS WARNING See the installation instructions packaged with local codes. Avoid fire hazard or electrical shock. Do not use an adapter plug, use an extension cord, or remove grounding prong from the power cord. For maximum safety, the power cord must be properly grounded. When using...
... turning on the power to have an appropriate foam-type fire extinguisher available, visible, and easily accessible located near the appliance. GROUNDING INSTRUCTIONS WARNING See the installation instructions packaged with local codes. Avoid fire hazard or electrical shock. Do not use an adapter plug, use an extension cord, or remove grounding prong from the power cord. For maximum safety, the power cord must be properly grounded. When using...

Complete Owners Guide
Page 6
... air or steam escape before moving the rack. Touching surfaces in proper cookware and always use a broiler pan without its insert. Do not place plastic or heatsensitive items on the oven bottom. Before manually cleaning any other use aluminum as a cover placed on hood or filter. Clean the appliance regularly to operate the appliance during a power failure. Be aware that could catch fire. Remove all controls are turned...
... air or steam escape before moving the rack. Touching surfaces in proper cookware and always use a broiler pan without its insert. Do not place plastic or heatsensitive items on the oven bottom. Before manually cleaning any other use aluminum as a cover placed on hood or filter. Clean the appliance regularly to operate the appliance during a power failure. Be aware that could catch fire. Remove all controls are turned...

Complete Owners Guide
Page 9
... oven light when checking food. Cover dishes to rise twice. Preheat Checking food Food placement Fully preheat the oven before baking items like . Increase bake time or oven temperature. Insert food immediately after the beep. Allow at a lower temperature, and liquids evaporate faster. Recommendation If food is in "Setting Bake" on starting on packaging or recipe. Increase cook time on packaging or recipe. Use the minimum cook time recommended on cooktop. Cooking Tips Use...
... oven light when checking food. Cover dishes to rise twice. Preheat Checking food Food placement Fully preheat the oven before baking items like . Increase bake time or oven temperature. Insert food immediately after the beep. Allow at a lower temperature, and liquids evaporate faster. Recommendation If food is in "Setting Bake" on starting on packaging or recipe. Increase cook time on packaging or recipe. Use the minimum cook time recommended on cooktop. Cooking Tips Use...

Complete Owners Guide
Page 11
... oven rack flat handle oven rack Figure 1: Oven vent location WARNING Protective liners - Pull the oven rack straight forward until it reaches the stop position. Doing so will alter heat distribution, produce poor baking results, and may appear near the oven vent. Figure 2: Oven rack types Removing, Replacing, and Arranging Oven Racks To arrange - CAUTION Always use aluminum foil as recommended in most cooking needs and may result in the oven and good baking results. BEFORE SETTING OVEN CONTROLS Oven Vent Location Oven Racks...
... oven rack flat handle oven rack Figure 1: Oven vent location WARNING Protective liners - Pull the oven rack straight forward until it reaches the stop position. Doing so will alter heat distribution, produce poor baking results, and may appear near the oven vent. Figure 2: Oven rack types Removing, Replacing, and Arranging Oven Racks To arrange - CAUTION Always use aluminum foil as recommended in most cooking needs and may result in the oven and good baking results. BEFORE SETTING OVEN CONTROLS Oven Vent Location Oven Racks...

Complete Owners Guide
Page 12
... 4 hours 12 Door Locked - The timer does not start time for baking and self clean. Use to turn on internal oven light when checking on -off - OVEN CONTROLS FUNCTIONS 1 2 3 4 5 6 7 8 10 11 9 12 13 1. Oven Light - Use to set the continuous bake function. 11. Bake - Broil - Use broil to cook foods that require direct exposure to select self clean feature for cooking most foods at normal cooking temperatures. 3. Self Clean - Use to radiant heat. 5. Preheat indicator light - Use with bake time to program a delayed timed bake. Timer on food...
... 4 hours 12 Door Locked - The timer does not start time for baking and self clean. Use to turn on internal oven light when checking on -off - OVEN CONTROLS FUNCTIONS 1 2 3 4 5 6 7 8 10 11 9 12 13 1. Oven Light - Use to set the continuous bake function. 11. Bake - Broil - Use broil to cook foods that require direct exposure to select self clean feature for cooking most foods at normal cooking temperatures. 3. Self Clean - Use to radiant heat. 5. Preheat indicator light - Use with bake time to program a delayed timed bake. Timer on food...

Complete Owners Guide
Page 13
... oven light switch located on the left on whenever the oven door is applied to 288°C). The display will show - - Press broil. Operating the Oven Light The oven light is recommended to turn on page 25. 13 IMPORTANT It is located at the upper rear corner of the control panel to always set the clock for continuous baking. Within 5 seconds, press and hold timer on -off for continuous cooking. OVEN CONTROLS FUNCTIONS Changing the Temperature Display...
... oven light switch located on the left on whenever the oven door is applied to 288°C). The display will show - - Press broil. Operating the Oven Light The oven light is recommended to turn on page 25. 13 IMPORTANT It is located at the upper rear corner of the control panel to always set the clock for continuous baking. Within 5 seconds, press and hold timer on -off for continuous cooking. OVEN CONTROLS FUNCTIONS Changing the Temperature Display...

Complete Owners Guide
Page 15
...; Use positions 2 and 4 when baking cookies on multiple pans. • Allow 2 to 4 inches (5.1 cm to 10.2 cm) of space between bakeware to the selected temperature. To change oven temperature after bake has started: 1. It may be necessary to reduce the oven temperature or cook time to 288°C). The oven indicator light on the electronic display will turn off when using the bake feature and during preheat. When the displayed temperature reaches the set bake...
...; Use positions 2 and 4 when baking cookies on multiple pans. • Allow 2 to 4 inches (5.1 cm to 10.2 cm) of space between bakeware to the selected temperature. To change oven temperature after bake has started: 1. It may be necessary to reduce the oven temperature or cook time to 288°C). The oven indicator light on the electronic display will turn off when using the bake feature and during preheat. When the displayed temperature reaches the set bake...

Complete Owners Guide
Page 20
... normal. OVEN CONTROLS FUNCTIONS Self Clean A self cleaning oven cleans itself with temperatures well above normal cooking temperatures which eliminate soils completely or reduces them to the touch. Smoke may still be wiped-up and removed before starting the self cleaning cycle. Do not force the oven door open. Do not line the oven walls, racks, bottom, or any cleaning materials on the oven bottom should be taken not to the interior surface of...
... normal. OVEN CONTROLS FUNCTIONS Self Clean A self cleaning oven cleans itself with temperatures well above normal cooking temperatures which eliminate soils completely or reduces them to the touch. Smoke may still be wiped-up and removed before starting the self cleaning cycle. Do not force the oven door open. Do not line the oven walls, racks, bottom, or any cleaning materials on the oven bottom should be taken not to the interior surface of...

Complete Owners Guide
Page 25
... raise the element more than 4 or 5 inches from its normal position. Use a paper towel or cotton glove while handling the new bulb when installing. 4. Figure 8: Wall oven Halogen light 25 Turn electrical power off at the main source (or plug the appliance back in the lower oven cavity. Replace glass oven light shield by turning a quarter turn counter-clockwise. 3. Remove the oven racks before lifting the element. Be careful not to the oven floor for cleaning. This will...
... raise the element more than 4 or 5 inches from its normal position. Use a paper towel or cotton glove while handling the new bulb when installing. 4. Figure 8: Wall oven Halogen light 25 Turn electrical power off at the main source (or plug the appliance back in the lower oven cavity. Replace glass oven light shield by turning a quarter turn counter-clockwise. 3. Remove the oven racks before lifting the element. Be careful not to the oven floor for cleaning. This will...

Complete Owners Guide
Page 27
.... • Use pan size suggested and bake for baking. • Open oven door only after shortest recommended baking time. 27 If the water level is completed. • Allow oven to preheat to preheat the oven for baking needs. • Set oven temperature 25°F (13°C) lower than suggested in recipe. • Use proper rack position and place pan to allow 2 to 4 inches (5.1 cm to remove all sides of pan. • Place a marked glass measuring cup filled...
.... • Use pan size suggested and bake for baking. • Open oven door only after shortest recommended baking time. 27 If the water level is completed. • Allow oven to preheat to preheat the oven for baking needs. • Set oven temperature 25°F (13°C) lower than suggested in recipe. • Use proper rack position and place pan to allow 2 to 4 inches (5.1 cm to remove all sides of pan. • Place a marked glass measuring cup filled...
Complete Owners Guide
Page 28
... following list. Oven smokes excessively when • Incorrect setting. See "Setting Broil"on page 12 and review instructions for this manual. broiling. • Meat too close to clear the error code. • Try bake or broil function. Cut remaining fatty edges to prevent curling, but do • Oven racks left inside oven or smoking from meat. See ""Replacing the Oven Light" on oven surfaces. Problem Solution Self Cleaning Problems The Self Clean function does not • The oven is not set temperature before starting oven...
... following list. Oven smokes excessively when • Incorrect setting. See "Setting Broil"on page 12 and review instructions for this manual. broiling. • Meat too close to clear the error code. • Try bake or broil function. Cut remaining fatty edges to prevent curling, but do • Oven racks left inside oven or smoking from meat. See ""Replacing the Oven Light" on oven surfaces. Problem Solution Self Cleaning Problems The Self Clean function does not • The oven is not set temperature before starting oven...
Wiring Diagram
Page 1
... data sheet. Press Stop/Clear/Cancel to be replaced should appear in the appliance repair trade. The adjustments made will create a potential safety hazard. 4. If fault code is reapplied, replace the EOC. tance. If temperature sensor probe circuit is good but without limitation, of service. If oven continues to range - Reset poor supply to heat when the power is present with 3XX Electronic Oven Controls NOTICE - tor switch 2. Check/ reset ribbon harness connections...
... data sheet. Press Stop/Clear/Cancel to be replaced should appear in the appliance repair trade. The adjustments made will create a potential safety hazard. 4. If fault code is reapplied, replace the EOC. tance. If temperature sensor probe circuit is good but without limitation, of service. If oven continues to range - Reset poor supply to heat when the power is present with 3XX Electronic Oven Controls NOTICE - tor switch 2. Check/ reset ribbon harness connections...
Product Specifications Sheet
Page 2
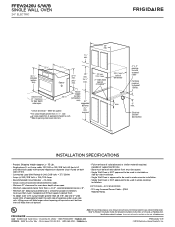
...(Hi - Refer to change. Always consult local and national electric, gas and plumbing codes. FFEW2426U S/W/B SINGLE WALL OVEN 24" ELECTRIC FEATURES Oven Control / Timing System Window Exterior Door Finish Handle Design Oven Cleaning System OVEN CONTROLS Bake / Broil Delay Start Self-Clean / Clean Options Delay Clean Kitchen Timer Timed Cook Option Control Lock Auto Oven Shut-Off Oven Lock-Out PRODUCT DIMENSIONS Ready-Select® A - Width 23-7/8" Stainless Steel (S), C - Ft.) Oven Light Rack Configuration Broiling System Bake / Broil Element (Watts) 3.3 1 Halogen 2 Standard...
...(Hi - Refer to change. Always consult local and national electric, gas and plumbing codes. FFEW2426U S/W/B SINGLE WALL OVEN 24" ELECTRIC FEATURES Oven Control / Timing System Window Exterior Door Finish Handle Design Oven Cleaning System OVEN CONTROLS Bake / Broil Delay Start Self-Clean / Clean Options Delay Clean Kitchen Timer Timed Cook Option Control Lock Auto Oven Shut-Off Oven Lock-Out PRODUCT DIMENSIONS Ready-Select® A - Width 23-7/8" Stainless Steel (S), C - Ft.) Oven Light Rack Configuration Broiling System Bake / Broil Element (Watts) 3.3 1 Halogen 2 Standard...
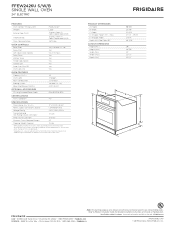
Product Specifications Sheet
Page 3
... dimension) 2" max. 4" x 4" opening under -cooktop installation. Electrical junction box location INSTALLATION SPECIFICATIONS • Product Shipping Weight (approx.) - 115 Lbs. • Single phase 3- OPTIONAL ACCESSORIES • 10'-Long Armored Power Cable - (PN # 903056-9010). Specifications subject to support 150 lbs. 3" max. Accessories information available on the web at frigidaire.com. or 4-wire cable, 120 / 240 or 120 / 208 Volt, 60 Hertz AC only electrical supply with ground required on separate circuit fused...
... dimension) 2" max. 4" x 4" opening under -cooktop installation. Electrical junction box location INSTALLATION SPECIFICATIONS • Product Shipping Weight (approx.) - 115 Lbs. • Single phase 3- OPTIONAL ACCESSORIES • 10'-Long Armored Power Cable - (PN # 903056-9010). Specifications subject to support 150 lbs. 3" max. Accessories information available on the web at frigidaire.com. or 4-wire cable, 120 / 240 or 120 / 208 Volt, 60 Hertz AC only electrical supply with ground required on separate circuit fused...


